Category: WordPress

  • Introducing: CleanTalk Pixel

    Introducing: CleanTalk Pixel

    Our mission is to protect your website from spam. In order to do so we need to firstly identificate visitor’s IP address. But detecting IP address sometimes may go wrong because it may be substituted by some bots. So we decided to exclude the probability of false triggering and here comes the CleanTalk Pixel that improves your website spam protection.

    What is CleanTalk Pixel and how does it improve your site spam protection

    It is an «invisible» 1×1px image that Anti-Spam plugin integrates to your WordPress website. And when someone visits your website the Pixel is triggered and reports this visit and some other data including true IP address.

    This Pixel is not located on some server but is created in HTML every time you load your website page. This exactly helps our system to get the most true IP address and not be confused by CDN or plugins caching site requests. And that’s exactly how CleanTalk Pixel improves your website spam protection.

    How to connect Pixel to your website

    Step 1: Go to Plugins Installed Plugins.

    Then go to Settings link next to CleanTalk Anti-Spam plugin.

    Step 2: Click on «Advanced settings» button at the bottom of the screen. More setting will appear.

    Then find Add a CleanTalk Pixel… field in Data Processing section.

    Step 3: Choose, how exactly Pixel will act:

    • Via direct output – insert Pixel code into HTML from the backend.
    • Via Javascript – insert Pixel code into HTML from the frontend.
    • Auto – insert Pixel code into HTML from the backend if pixel detects a caching plugin (Recommended).
    • Off – Pixel if disabled.

    After that just press the Save Changes button.

    Done! It really is that simple.

    If you have any questions, add a comment and we will be happy to help you.
    Create your Cleantalk account – Register now

    You can see a complete list of CleanTalk Anti-Spam plugin features here.

    WordPress spam protection

  • How to protect your Caldera forms using CleanTalk Anti-Spam plugin

    How to protect your Caldera forms using CleanTalk Anti-Spam plugin

    After you created your contact form using Caldera Forms you actually may get spam. CleanTalk Anti-Spam plugin protects your Caldera contact forms from spam.

    Once CleanTalk Anti-Spam plugin is installed it starts to protect all of the existing forms on your WordPress website. It may not only be Caldera contact forms but many others.

    How to install CleanTalk Anti-Spam plugin

    To install the Anti-Spam plugin, go to your WordPress admin panel → Plugins → Add New.

    Then enter «СleanTalk» in the search box and click the Install button for «Spam protection, Anti-Spam, FireWall by CleanTalk».

    After installing the plugin, click the «Activate»‎ button.

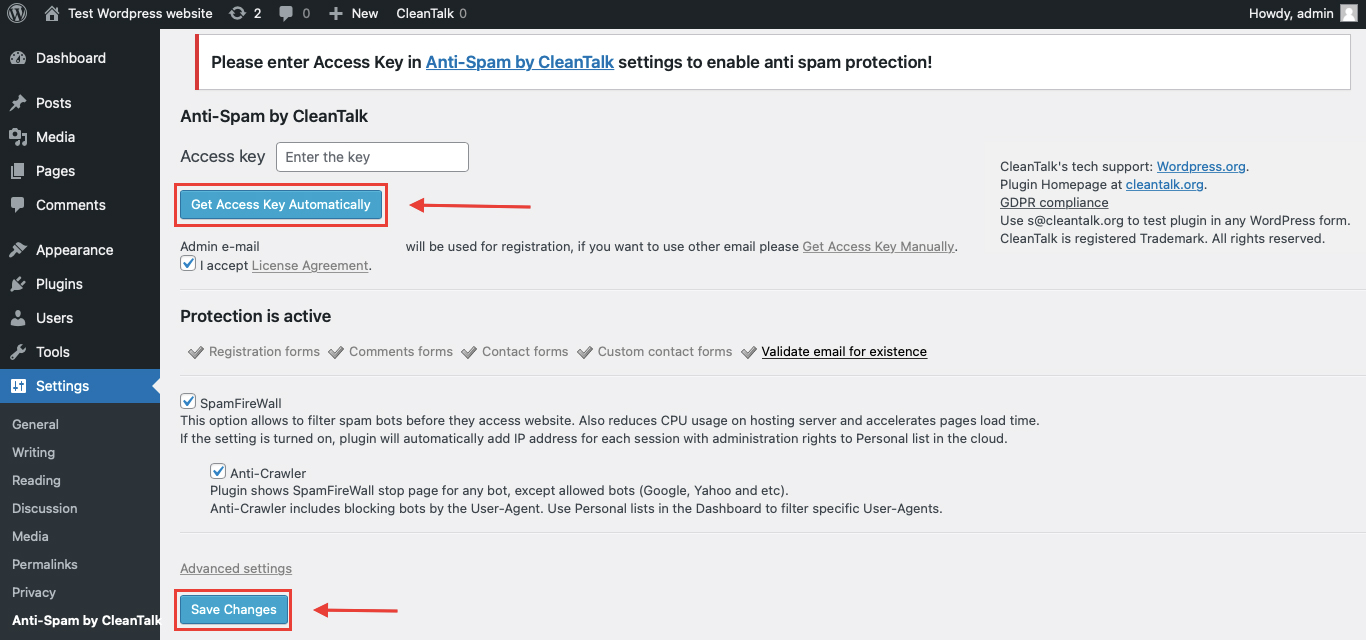
    After it is done go to the plugin settings, click the «Get Access Key Automatically»‎ button. Then just click the «Save Settings»‎ button.

    That’s it! From now your WordPress website and Caldera forms are protected from spam.

    You can always use our detailed installation instructions.

    Download CleanTalk Anti-Spam plugin | Download Contact Form by Caldera Forms 

    How to check that CleanTalk already protects your Caldera contact forms from spam

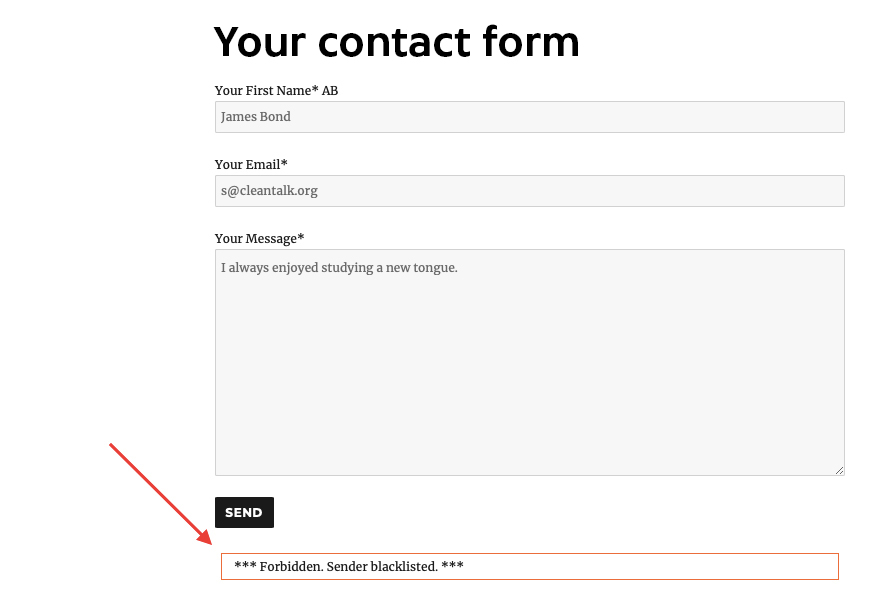
    You can test the work of Anti-Spam protection for your Caldera contact form by using a test email s @ cleantalk.org (without spaces). First, open the form in an Incognito browser tab. Fill in all the required form fields and send a form. After submitting the form, you will see a block message about the block on the form submission.

    If you have any questions, add a comment and we will be happy to help you.

    Create your Cleantalk account – Register now and enjoy while CleanTalk Anti-Spam plugin protects your Caldera contact forms from spam.

    Update

    The protection works only for website visitors, not for website admins. Be sure to test the form protection using Incognito mode.

    Additional features

    • CleanTalk protects all forms at once: comments, registrations, feedbacks, contacts, reviews.
    • Installation takes about 1-2 minutes.
    • Smart 100% protection against spambots.
    • Always online – 24/7 technical support.
    • Logs, personal lists, country filters, stop-words and many another.

    A complete list of CleanTalk Anti-Spam plugin features can be viewed here. https://cleantalk.org/help/introduction 
    WordPress spam protection

  • How to hide Website URL Field From WordPress Comment Form

    How to hide Website URL Field From WordPress Comment Form

    How many useful website URL’s did you get through comments on your website lately? Not too many, we believe. But it really is a good way for spammers to send spam websites using this form. This «Website URL» field is frequently used by spammers to place spam links in it. CleanTalk helps you protect your WordPress website comments by hiding this field off.

    So we improved CleanTalk’s integration to Comments and from now you can just remove «Website URL» field from all of the comment forms on your website. This feature is disabled by default, but it will take less than a minute to enable it using your WordPress dashboard. This option does not completely remove the field but hides it on the page.

    At the moment this feature works only with default WordPress Comments. So if your comments form is made with another plugin it will not be able to hide it’s «Website» field for now. If you use another comments plugin and still need to remove «Website URL» field – just let us know in the comments below.

    How to hide «Website» field to protect your WordPress site comments

    Step 1: Go to Plugins Installed Plugins.

    Then go to Settings link next to CleanTalk Anti-Spam plugin.

    Step 2: Click on «Advanced settings» button at the bottom of the screen. More setting will appear.

    Then find Hide the «Website» field in Comments and Messanges section.

    Step 3: Just switch it to «On» and press the «Save changes» button.

    Done! It really is that simple.

    Now just go to your WordPress site page and see the difference while CleanTalk helps you completely protecting your WordPress website comments

    If you have any questions, add a comment and we will be happy to help you.
    Create your Cleantalk account – Register now

    Additional features

    • CleanTalk protects not only comments, but also registrations, feedbacks, contacts and reviews.
    • Installation takes about 1-2 minutes.
    • Smart 100% protection against spambots.
    • Always online – 24/7 technical support & free mobile app.
    • Logs, personal lists, country filters, stop-words and many another.

    A complete list of CleanTalk Anti-Spam plugin features can be viewed here. https://cleantalk.org/help/introduction 
    WordPress spam protection

  • Contact Form 7 Spam Protection for WordPress

    Contact Form 7 Spam Protection for WordPress

    Once you created your contact form using Contact Form 7 you actually may get spam and still need a Contact Form 7 Spam Protection for WordPress.

    Once CleanTalk Anti-Spam plugin is installed it starts to protect all of the existing forms on your WordPress website. It may not only be Contact Form 7 contact forms but many others.

    How to install Contact Form 7 Spam Protection for WordPress

    To install the Anti-Spam plugin, go to your WordPress admin panel → Plugins → Add New.

    Adding CleanTalk Anti-Spam plugin to your WordPress website

    Then enter «СleanTalk» in the search box and click the Install button for «Spam protection, Anti-Spam, FireWall by CleanTalk».

    Searching for CleanTalk Anti-Spam plugin in WordPress

    After installing the plugin, click the «Activate»‎ button.

    Installing and activating CleanTalk Anti-Spam plugin to protect your Contact Form 7 forms from spam

    After it is done go to the plugin settings and click the «Get Access Key Automatically»‎ button. Then just click the «Save Settings»‎ button.

    Configuring CleanTalk Anti-Spam plugin to protect your Contact Form 7 forms from spam

    That’s it! From now your WordPress website and Contact Form 7 form are protected from spam.

    Download CleanTalk Anti-Spam plugin | Download Contact Form by Contact Form 7 

    How to test your Contact Form 7(CF7) spam protection

    You can check if CleanTalk Anti-Spam properly protects your Contact Form 7 from spam by using a test email s @ cleantalk.org (without spaces). First, open the form in an Incognito browser tab. Fill in all the required form fields and send a form. After submitting the form, you will see a block message about the block on the form submission.

    Testing your Contact Form 7 spam protection

    If you have any questions, add a comment and we will be happy to help you.

    Create your Cleantalk account – Register now and enjoy while CleanTalk protects your Contact Form 7 form from spam

    Update

    The protection works only for website visitors, not for website admins. Be sure to test the form protection using Incognito mode.

    Update 2

    Here are pros and cons of reCAPTCHA for Contact form 7.

    Additional features

    • CleanTalk protects all forms at once: comments, registrations, feedbacks, contacts, reviews.
    • Installation takes about 1-2 minutes.
    • Smart 100% protection against spambots.
    • Always online – 24/7 technical support.
    • Logs, personal lists, country filters, stop-words and many another.

    Protect your website effortlessly—enhance your Contact Form 7 spam protection with CleanTalk today and keep your forms spam-free!

  • CleanTalk updated the 2FA (two-factor authentication) option

    CleanTalk updated the 2FA (two-factor authentication) option

    Two-factor authentication is still one of the most effective methods of protecting your account. One of the most common ways to hack WordPress sites is to brute force passwords.
    CleanTalk Security plugin for WordPress already has two-factor authentication by sending an authorization code to the email account.
    We have now expanded the two-factor authentication options and added the Google Authenticator option.
    Now you can choose the most convenient 2FA option for you.
    You can learn more about how to set up two-factor authentication in WordPress here https://cleantalk.org/help/two-factor-auth
    You can further strengthen the protection of accounts and change the URL address of the authorization page. You can read more here https://blog.cleantalk.org/how-to-change-wp-login-url/.


    If you have any questions, we will be happy to help you.
    You can leave a comment below or create a private ticket here.

  • Spam Protection for Woocommerce forms without captcha

    Spam Protection for Woocommerce forms without captcha

    CleanTalk Anti-Spam has native spam protection for Woocommerce. Any web form on the website is subject to spam attacks and you can install CleanTalk Anti-Spam to protect all existing forms on the WordPress site at once and you do not need to integrate protection for each form separately.

    CleanTalk anti-spam processes more than 35,000 orders daily. Below is a list of the top10 countries from which order spam comes in for 1 day.

    Country | Number of spam |

    • | GB | 1460 |
    • | US | 642 |
    • | LT | 635 |
    • | PH | 436 |
    • | CA | 272 |
    • | RU | 218 |
    • | DE | 127 |
    • | NL | 91 |
    • | FR | 82 |
    • | PK | 61 |

    CleanTalk provides a powerful tool for spam, profanity, email validation, personal IPs/Emails lists and more.
    You can read more about all CleanTalk features here https://cleantalk.org/help/introduction.

    Whether you use Woocommerce on your WordPress site, you can use the CleanTalk Anti-Spam to protect any other web forms on WordPress.

    How to install CleanTalk Anti-Spam on WordPress

    To install the anti-spam plugin, go to your WordPress admin panel -> Plugins -> Add New
    enter cleantalk in the search box and click the Install button for “Spam protection, AntiSpam, FireWall by CleanTalk”.
    After installing the plugin, click the “Activate” button and go to the plugin settings and click the “Get Access Key Automatically” button and click the “Save Settings” button.

    Your WordPress site and Woocommerce are now protected from spam.
    Or use our installation instructions.
    https://cleantalk.org/help/install-wordpress

    You can find the options for managing spam protection for Woocommerce in the plugin settings WP Dashboard -> Settings -> Anti-Spam by CleanTalk -> Advanced Settings -> WooCommerce

    WooCommerce checkout form – spam protection for Woocommerce checkout form.

    Spam test for registration during checkout – this option protects against spam registrations that occur during Woocommerce checkout.

    How to test spam protection

    You can test the work of anti-spam protection for any web form by using a test email s @ cleantalk.org (without spaces). First, open the form in an Incognito browser tab. Fill in all the required form fields and send a form. After submitting the form, you will see a block message about the block on the form submission.

    If you have any questions, add a comment and we will be happy to help you.

    Update

    The protection works only for website visitors, not for website admins. Be sure to test the form protection using Incognito mode.

  • Country Blocking. How to block access to your site from certain countries.

    If you are the owner of a web site, then by default it is available for the entire planet. Many websites are simply not relevant to people in other countries. Thus, you should not expect significant traffic from them for granted.

    If you notice that there are requests to your site from a particular country for which your content is insignificant or you just want to deny access to your website from one or more countries, you can easily use the CleanTalk services.

    Most of the visits to the site are various bots, brute-force attempts, vulnerability scanners and content, products and prices, why not block access to my site from China if it is targeted at users from the USA? Sometimes the danger is greater than the occasional visitor from Pakistan, Iran or Côte d’Ivoire.

    3 types of blocking by country

    CleanTalk provides 3 different types of blocking users by country:

    • Anti-Spam
    • SpamFireWall
    • Security FireWall(Only WordPress)

    Anti-Spam

    Blocking by country using Anti-Spam service allows you to block only comments/registrations and any POST requests on the site from users from certain countries. The site will be available for visitors and they can view it, but will not be able to leave a comment. It will be useful to block spam sent manually and some types of online threats (SQL injections) from these IP addresses. How to use Black/White lists for Anti-Spam service.

    SpamFireWall

    Blocking traffic by country using Spam FireWall allows you to partially block access to the site for the IP addresses of specific countries. All visitors from the blocked country will be given a special page, while ordinary users will be able to go through it and be able to view the site, comment and register, but bots will not be able to go through this page. This option is useful because it can significantly reduce the load on the site, since all POST/GET requests will be blocked and the site will not execute scripts for these requests, the blocking page almost does not consume any server resources. It can be used to block brute force attacks, vulnerability scanners, various bots, as well as to temporarily block traffic in some types of DoS attacks, when attackers send thousands of HTTP requests to the site, reduce the likelihood of hacking the site. How to use the Spam FireWall BlackList.

    If you need to block comments and registrations for this country too, then use country blocking for Anti-Spam service.

    WordPress Security FireWall

    WordPress Security FireWall – tightly blocks access to the site for blocked countries. At the same time, all requests to the site will be blocked and visitors from these countries will not be able to go to the site pages. A blocking page will be displayed to visitors. This type of blocking will be useful to prevent all types of attacks on the web site via HTTP / HTTPS. How to use WordPress Security FireWall.

    For all types of blocks requests are logged and available in the Dashboard for further analysis. All types of blocking allow to reduce the load on the site/server and block attacks on the site.

    For most websites, we recommend blocking only problematic countries that have a large number of spam, brute force attacks, generate a large number of 404 errors on the website, or pose other security threats to your website. We also recommend that you review your block lists regularly.

    For search bots Google, Bing, Yahoo, Baidu, MSN, Yandex and etc. we have made exceptions and they will not be blocked. Also, if you enter the IP address or network in the white list, this entry will have priority and requests will be skipped.

    In addition to blocking by country, each type can use your personal lists to block individual IP addresses or IP networks.

    How to identify the countries with the most spam activity on your site?

    It is enough to go to the CleanTalk dashboard and to see the block with the spam attack map and Top Spam Requests statistics.

    You can also view general statistics on spam attacks https://cleantalk.org/spam-stats

    You can see data on website visitors by country in Google Analytics statistics.

    We will be happy to answer your questions. Leave a comment below or create a private ticket.

    Thank you!

  • Two-Factor Authentication for WordPress

    CleanTalk has launched Two-Factor Authentication for WordPress admin accounts that will improve your website security and make it safer, if not impossible, for hackers to breach your WordPress account.


    Two-Factor Authentication works via e-mail. It makes the Two-Factor Authentication more reliable. The reason is that if an intruder knows your password they also need to know your e-mail address that is being used to get an authorization code and the password to your e-mail.

    This method almost eliminates the possibility for strangers to get access to your account.


    It requires a bit of your time but Two-Factor Authentication immediately gives a much higher level of protection.


    With your first authorization, the CleanTalk Security plugin remembers your browser and you won’t have to input your authorization code every time anymore. However, if you started to use a new device or a new browser then you are required to input your authorization code. The plugin will remember your browser for 30 days.


    To activate Two-Factor Authentication go to the settings of the CleanTalk Security plugin and enable the option  “General Settings” -> “Miscellaneous” -> “Two-Factor Authentication”. The letter with your authorization code will be sent to your e-mail that you put into the general settings of your WordPress website.


    You will be notified by e-mail each time the Two-Factor Authentication was successfully passed.


    By spending a few minutes to set up Two-Factor Authentication you save your time and other resources by not having to deal with the consequences of the hacked website.


    If you have any questions, we will be happy to help you.
    You can leave a comment below or create a private ticket here.

  • Real-Time Email Address Existence Validation

    Real-Time Email Address Existence Validation

    Today we launched a new and important parameter to evaluate spambots. According to our statistics, almost 30% of all spam requests are made with fake email addresses, i.e. such addresses do not exist.

    Previously, we could only check the existence of emails after the fact and use these data in the future; now we have started checking emails in real-time.

    This new feature of CleanTalk grants the ability to check email addresses for existence in real-time.

    Non-existing email addresses also entail several other problems for website owners:
    • You can never contact them by email,
    • The client will never receive any notifications from you (account activation letter, password recovery, email distribution, notifications, etc.),
    • If you use email marketing for your clients, then a large number of nonexistent emails in the mailing list may result in your IP address being added to various blacklists of email servers.

    The anti-spam service will block all requests with not real email addresses.
    You can control such requests in the anti-spam dashboard, non-existent emails will have the “Fake email” status.

    Checking emails for existence is available for all anti-spam plugins and is included in the standard package.

    Update 05/23/2022

    Encrypted SMTP support has been added,

    Spam filtering service improved

    You can leave a comment below or create a private ticket here.
    We will be happy to answer your questions.
    How to install CleanTalk Anti-Spam on your website.
    Create an account or log in.
    Thank you!

  • CleanTalk Anti-Spam with White Label mode

    Warning! The instruction is out-of-date. The current guide can be found here.

    We have developed the White label mode to make usage of the service for hosting more comfortable and it virtually eliminates the interaction between CleanTalk and hosting clients. This option is available only for WordPress MultiSite.

    It also allows changing logos, links to your own. Your clients don’t need to get an access key, and the anti-spam logs and statistics will be available in the plugin settings, in the admin panel.

    How to enable White label Mode
    You have to edit wp-config.php in WordPress and add this code:
    define(‘APBCT_WHITELABLE’, true);
    define(‘APBCT_HOSTER_API_KEY’, ‘YOUR_HOSTER_API_KEY’);

    Where YOUR_HOSTER_API_KEY is a key from your CleanTalk’s hoster panel.

    So, you can change other details of the plugin in your CleanTalk Dashboard.

    Learn more, how to configure your own hosting service.

    Let us know if you have any questions and we will be happy to help you.
    Leave a comment below or Create a private ticket.

    Thank you!