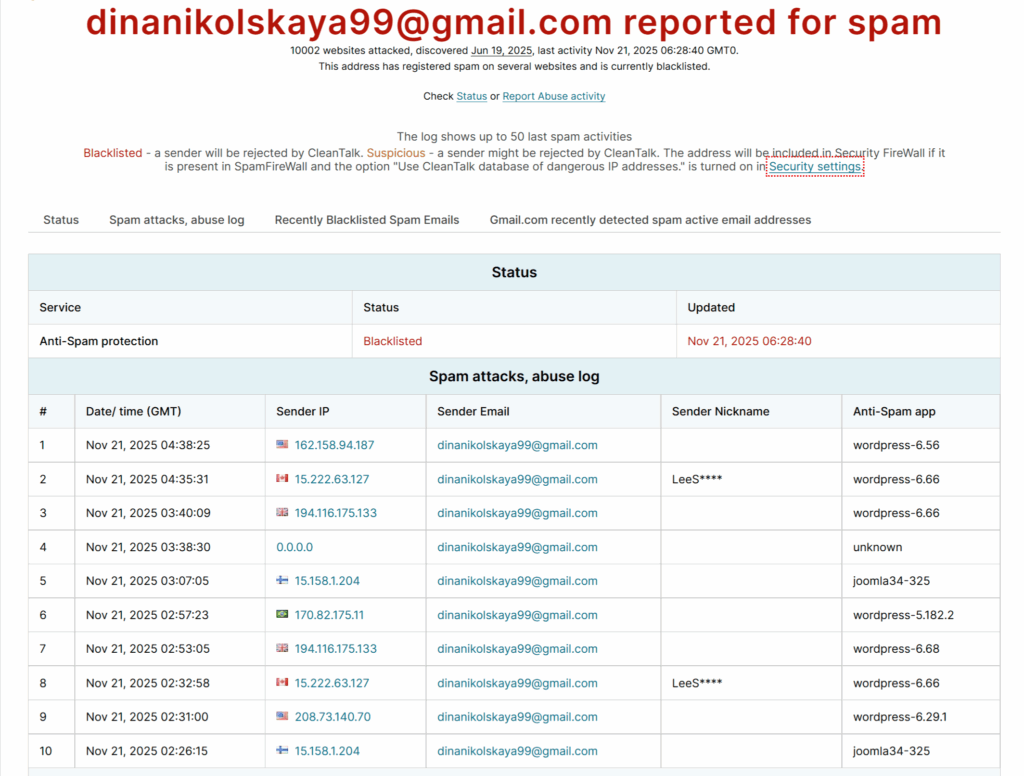
The email address dinanikolskaya99@gmail.com has been reported for sending spam and launching automated malicious requests on thousands of websites.
According to CleanTalk BlackLists, this address has:
Attacked over 10,002 websites
Generated approximately 17,304 spam requests in the last 24 hours
The bot uses many different IP addresses from all over the world.
First detected on June 19, 2025
Last activity recorded: Nov 21, 2025 06:28:40 GMT0.
The bot is currently blacklisted in CleanTalk Anti-Spam databases.
What Does This Spam Bot Do?
This spam bot employs a multilingual approach, sending seemingly innocent pricing inquiry messages in various languages to bypass basic spam filters. The messages appear legitimate at first glance, making them particularly insidious for website owners who might mistake them for genuine customer inquiries.
The bot sends variations of pricing inquiries in multiple languages:
Danish: “Hej, jeg ønskede at kende din pris.”
Indonesian: “Hai, saya ingin tahu harga Anda.”
Latin: “Hi, ego volo scire vestri pretium.”
Albanian: “Hi, kam dashur të di çmimin tuaj”
English: “Hi, I wanted to know your price.”
Spanish: “Hola, quería saber tu precio..”
Zulu: “Sawubona, bengifuna ukwazi intengo yakho.”
All these messages translate roughly to: “Hi, I wanted to know your price.”
The bot repeats this pattern on contact and comments forms.
Here is a snapshot from CleanTalk’s logs:
“17304 requests in 24 hours detected from multiple IP addresses. All actions associated with spam form submissions and bot-like behavior.”
dinanikolskaya99@gmail.com spam report Nov 21, 2025 06:28:40 GMT0
How to Block Spam from zekisuquc419@gmail.com
If you’re seeing traffic or spam submissions from this email, here’s how to stop it:
1. Use CleanTalk Anti-Spam Plugin Install the CleanTalk Anti-Spam plugin for your CMS (WordPress, Joomla, Drupal, etc.). It automatically filters requests by checking emails, IPs, and behavior against the global CleanTalk Spam Database.
This email is already blacklisted and will be blocked automatically by the plugin.
2. Manually Block the Email (if needed) If you want to block it manually in addition to using CleanTalk:
Add zekisuquc419@gmail.com to your site’s block list.
Block common IPs that were used in attacks (CleanTalk logs show many from Russian ranges).
Monitor your server logs for repetitive POST requests.
zekisuquc419@gmail.com is a known spammer attacking thousands of sites daily. By installing proper anti-spam protection like CleanTalk and staying vigilant, you can block these threats before they reach your visitors.
If you’re already using CleanTalk, rest assured — this spammer is on the blacklist and will be filtered automatically.
CleanTalk Research Team has identified a severe information disclosure vulnerability in the popular WordPress plugin WP Reset (400,000+ active installations). The issue allows unauthenticated attackers to obtain license keys and sensitive site metadata directly from a publicly accessible log file created by the plugin.
This vulnerability has been assigned CVE-2025-10645 and independently confirmed by Wordfence.
Potential Consequences
1. License Abuse
License Theft: Using stolen keys on other websites
Resale: Illegally selling valid license keys
Financial Losses: Losses to plugin developers from illegal use
2. Targeted Attacks
Infrastructure Reconnaissance: Collecting software version information to find other vulnerabilities
Phishing: Using website information for targeted phishing attacks
Social Engineering: Using data for convincing attacks
3. Privacy Breach
Corporate Data Leak: Exposing organization names and internal URLs
Compliance Issues: Violation of GDPR/CCPA when personal data is leaked
Reputational Risks: Damage to reputation when a leak is discovered
4. Attack Escalation
Exploit Chains: Using nonces and metadata for other attacks
Credential Stuffing: Using obtained information to attack other services
RCE Chains: Combining with other vulnerabilities for remote execution Code
Affected Versions
Confirmed to be vulnerable: WP Reset version 2.05 and earlier Fixed in: version 2.06 (released September 18, 2025)
CVE-2025-10645 poses a serious privacy threat to hundreds of thousands of WordPress sites using WP Reset. While the vulnerability does not allow direct code execution, the leak of license keys and metadata creates significant security risks and can lead to financial losses. This incident highlights the critical importance of secure logging practices:
Never write secrets in plaintext
Store logs outside the web root
Disable verbose logging in production
Audit and purge logs regularly
Developers should treat logging with the same seriousness as password handling—any sensitive information must be protected at all stages of the application lifecycle.
The CleanTalk research team discovered a critical vulnerability in the popular WordPress plugin “Anti-Malware Security and Brute-Force Firewall” (GOTMLS), installed on over 100,000 websites. CVE-2025-11705 allows attackers with minimal privileges (Subscriber level) to read arbitrary files on the server, including the critical wp-config.php file, which contains database credentials and secret keys.
This issue was independently confirmed by multiple parties, including Wordfence, and assigned CVE-2025-11705.
Problem Description The vulnerability is a classic authorization breach chain involving token leakage and cross-context reuse. The main issue is that the GOTMLS_View_Quarantine AJAX endpoint displays the quarantine list to any authorized user without checking access rights or validating nonce tokens.
Summary of the Vulnerability
The plugin exposes an internal AJAX endpoint, GOTMLS_View_Quarantine, to any authenticated user, without performing any capability checks or verifying a security nonce.
When this endpoint renders the quarantine interface, it embeds a valid GOTMLS_mt token into HTML links.
Because other privileged AJAX handlers — such as:
GOTMLS_scan
GOTMLS_empty_trash
— rely only on the leaked token and do not enforce current_user_can(…), a low-privileged user (e.g., Subscriber) can:
✔ Reuse the leaked token ✔ Trigger GOTMLS_scan ✔ Supply an arbitrary file path ✔ Receive the contents of that file
This includes highly sensitive files like:
wp-config.php
credential-containing logs
backup files
environment configuration
Additionally, the same token works with GOTMLS_empty_trash, allowing the attacker to delete quarantine records, effectively tampering with detection artifacts.
Affected versions The vulnerability has been confirmed in version 4.23.81 and earlier of the Anti-Malware Security and Brute-Force Firewall plugin.
The developers have already released a plugin update that addresses this issue. Users should update to the latest version.
We’re happy to share another story from one of our valued clients — Maker Of Jacket.
At CleanTalk, we always appreciate hearing how our service helps real businesses operate more smoothly. Feedback like this motivates our team to continue improving our anti-spam technologies and deliver reliable, invisible protection for websites of all sizes.
About Maker Of Jacket: Since 2017, Maker Of Jacket has specialized in handcrafted, customizable, high-quality jackets and leather apparel. From biker to varsity styles, every piece is crafted with premium materials and trusted by over 6,000 happy customers worldwide. Our products are made-to-order, and we serve customers globally, ensuring a smooth and secure shopping experience.
“How we use CleanTalk:
We use CleanTalk Anti-Spam to protect our website forms, including customer inquiries, order forms, and reviews, from spam bots. Since implementing CleanTalk, we’ve experienced a significant reduction in spam submissions, allowing our team to focus on genuine customer interactions and maintain a safe, efficient online environment.
We’d like to thank Maker Of Jacket for trusting CleanTalk to protect their website and for sharing their experience with our community.”
Best Custom Jackets Handcrafted Unique Stylish Designs Maker of Jacket
From time to time, website owners report a sudden increase in spam activity and try to link it to plugin settings, hosting, or license status. However, these assumptions often overlook how dynamic spam behavior truly is. To illustrate this, I conducted a small study analyzing spam distribution over time using data from several of our WordPress sites.
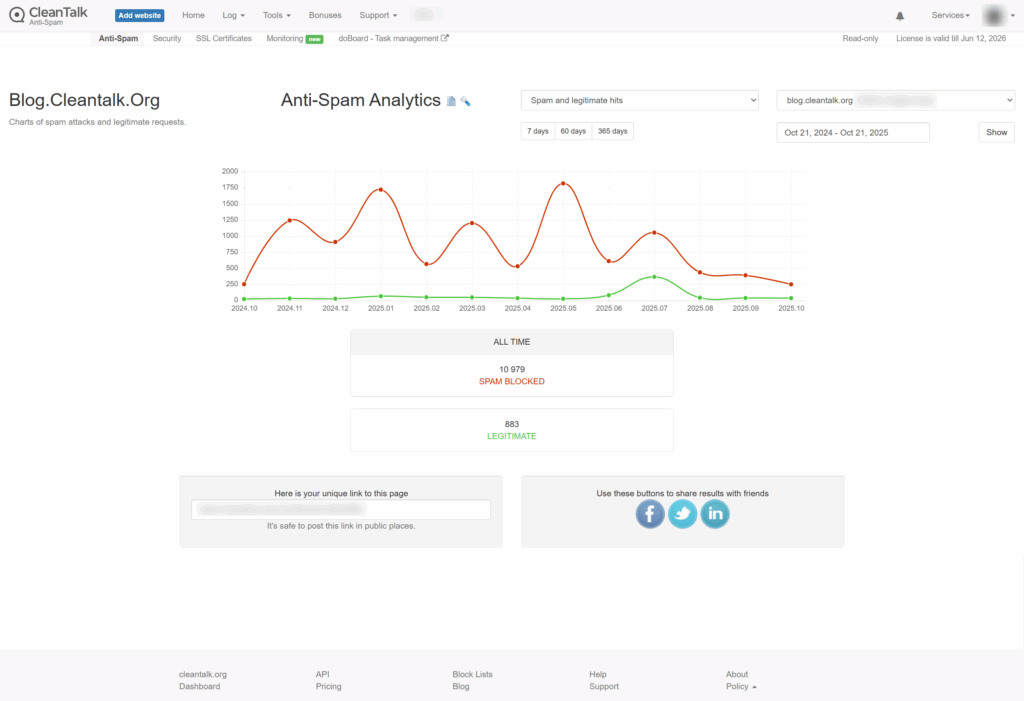
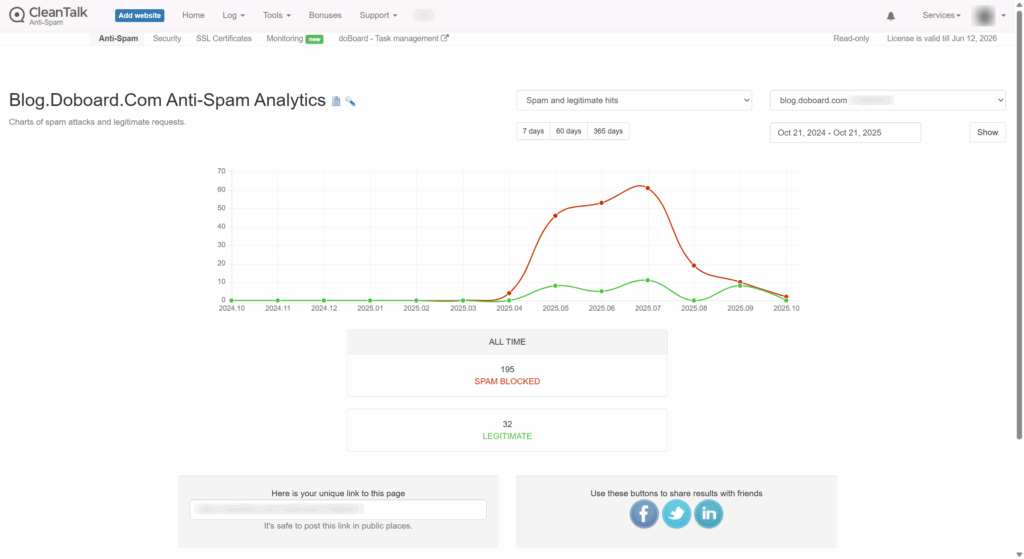
First, I’ll look at data for three of our WordPress sites, which host our themed blogs. The statistics are for the year.
The screenshot shows the statistics for the year. As you can see from the graph, the number of spam attacks isn’t linear, but fluctuates from month to month. Only since August has there been any stability, and the number of spam attacks has been more or less consistent.
The graph shows an increase in spam attacks at the beginning of the year, followed by a decline to almost zero. However, in May, there is a peak in spam attacks, followed by a sharp decline. Subsequently, there is a slight increase in spam attacks.
The blog was launched recently, and from the very beginning, it was clear that the number of spam attacks was high, but after some time, there was a decrease.
All time 195 spam blocked 10 21 2025 11 29 AM
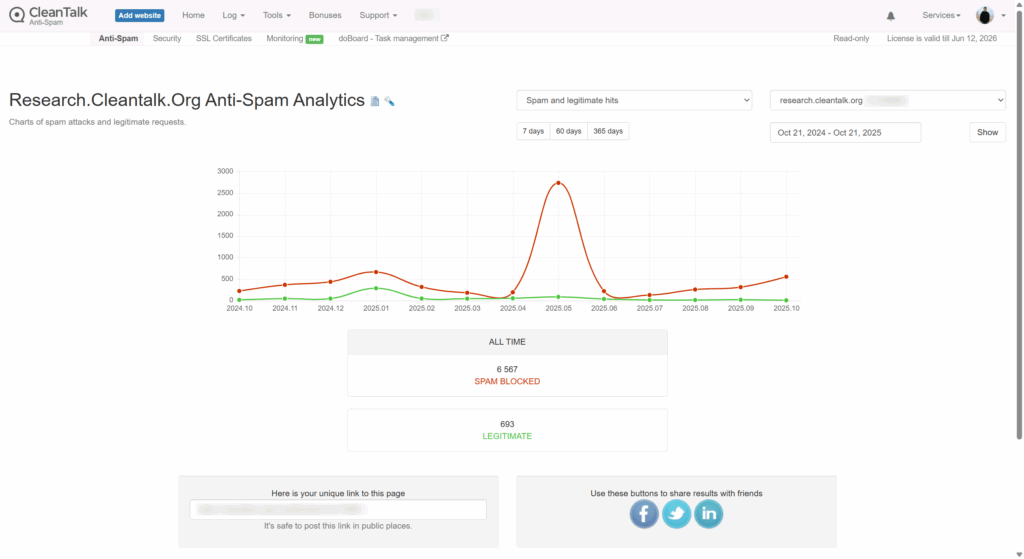
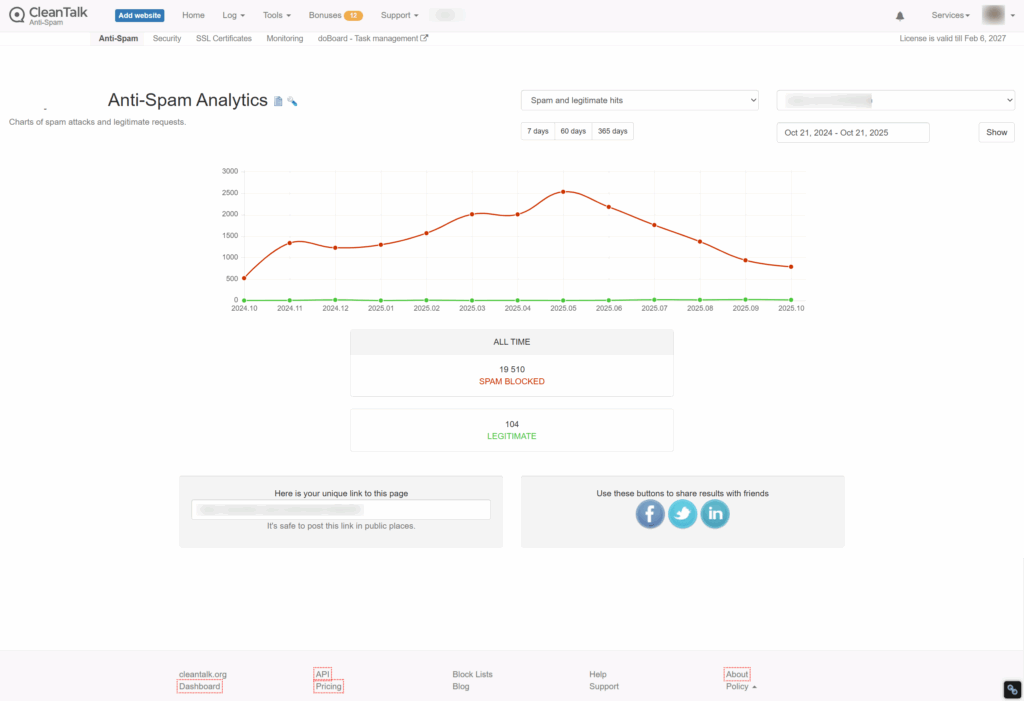
4. Personal WordPress Test Site
The following graph shows statistics for my personal WordPress site, which I use for testing. The graph shows a steady increase, peaking in May and then declining.
All time 19 510 spam blocked 10 21 2025 11 19 AM
What Does This Tell Us?
Based on this data, I can draw the following conclusions: the number of spam attacks does not show any trend, other than a possible seasonal factor.
The number of spam attacks may not be linear from month to month or even from day to day. At some points, there may be more, at others, fewer. A low-traffic site like my test site can receive a much higher number of spam attacks than a site with more traffic, a larger number of articles, and a higher search engine ranking.
What I did next?
Now let’s talk about how a user can evaluate the difference between the amount of spam a client sees while using an anti-spam service and when the license expires.
First, as you can see on our new site, the number of spam attacks increases as it gets added to spam lists.
Second, when a client installs the CleanTalk Anti-Spam plugin, we have the SpamFireWall option. This option blocks spammers before they reach the site.
CleanTalk Anti Spam Dashboard 10 21 2025 11 20 AM
As you can see from this table, we currently receive 12-14 spam attacks per day. These requests can be found, for example, in the spam folder on their site. On average, there were 57 spam attacks per week, and SpamFireWall (SFW) blocked another 350.
Then, I disabled SFW, and the number of spam attacks reaching the website form immediately increased to 120 on average. So, we see that when using SFW, 50% of spam attacks reach the website and forms, and the remaining spam attacks were stopped by SFW and simply didn’t reach the website.
Therefore, when assessing the amount of spam, we must also take into account the portion of SFW traffic that simply didn’t reach the website forms. You can track statistics for your sites in the Trends section of the ClanTalk Dashboard.
To summarize
The number of spam attacks is not constant and can be higher or lower. Also, when using SFW, you only see a portion of the spam reaching the forms on your website. Having or not having a CleanTalk license doesn’t affect the number of spam attacks.
The CleanTalk Research team has identified a critical vulnerability in the popular WP Statistics plugin (versions up to and including 14.15.3), which is installed on over 600,000 WordPress websites. The vulnerability allows unauthenticated attackers to perform Stored Cross-Site Scripting (XSS), leading to administrative session hijacking, admin panel compromise, and potential code execution on the underlying server OS.
This Unauthenticated Stored XSS vulnerability operates through the HTTP User-Agent header. Attackers can execute arbitrary JavaScript in the WordPress admin panel, enabling them to steal session tokens and nonces, escalate privileges, create administrator accounts, and potentially expand access to the operating system if additional attack vectors are available. Most critically, no authentication is required—a single HTTP request is sufficient, making mass automated exploitation trivial.
The WP Statistics development team has released a security update addressing this vulnerability. Website administrators are strongly urged to update WP Statistics to the latest version immediately.
The CleanTalk Research team specializes in identifying and responsibly disclosing vulnerabilities in popular WordPress plugins and themes. We continue to actively audit plugins and publish technical reports on newly discovered vulnerabilities.
CleanTalk Security Plugin automatically scans your plugins for known vulnerabilities. The plugin monitors the versions of all your installed plugins and themes and immediately alerts you if a vulnerability is detected in one. As soon as a problem is detected (like with WP Statistics), you receive a notification.
We love sharing feedback from our users — and today’s story comes from Robin from WP Guru.
CleanTalk has been a lifesaver for my client’s website on countless occasions. As someone managing SEO-driven lead generation sites and WooCommerce stores, having a reliable solution to combat spam has been an essential part of the development process.
CleanTalk has not only helped me block spam comments and leads, but it has also been instrumental in preventing bots from creating fake orders. This has saved both me and my clients a significant amount of time and hassle.
We’d like to thank Robin and WP Guru for trusting CleanTalk to protect their projects and sharing their experience with the community.
WordPress Developer Sydney WP Guru 10 09 2025 05 01 PM
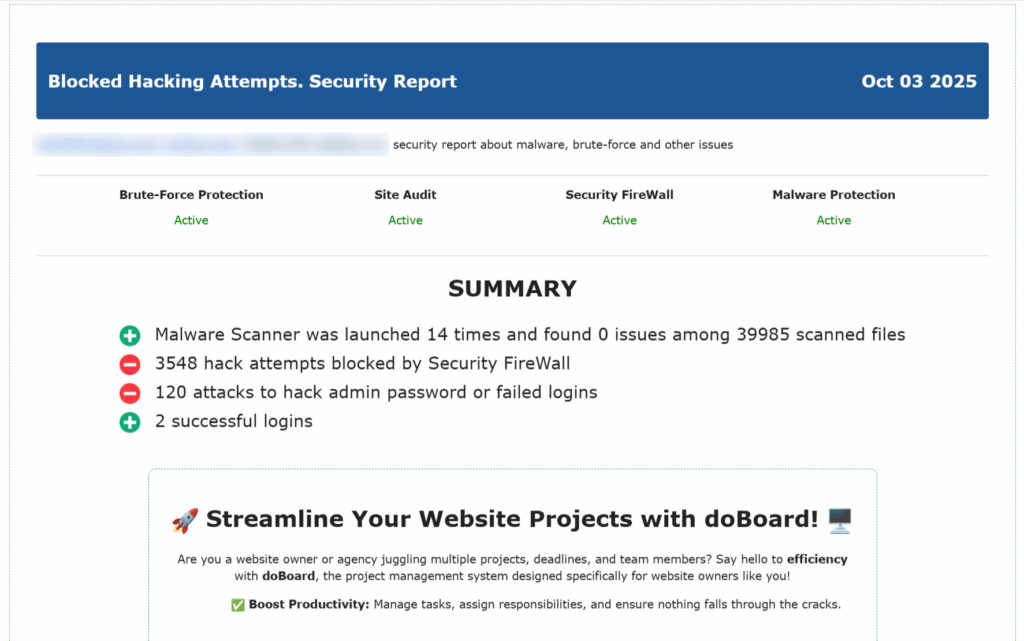
On October 2, a technical error caused our system to send duplicate copies of the Security Report email to some users of our Security Service for Websites.
In a few cases, the same report was sent multiple times.
3668 Security Issues Have Been Blocked
We identified and fixed the issue within a few hours, but unfortunately, the duplicate emails had already been delivered.
We sincerely apologize for this inconvenience and appreciate your understanding.
Our team has implemented additional safeguards to ensure this does not happen again.
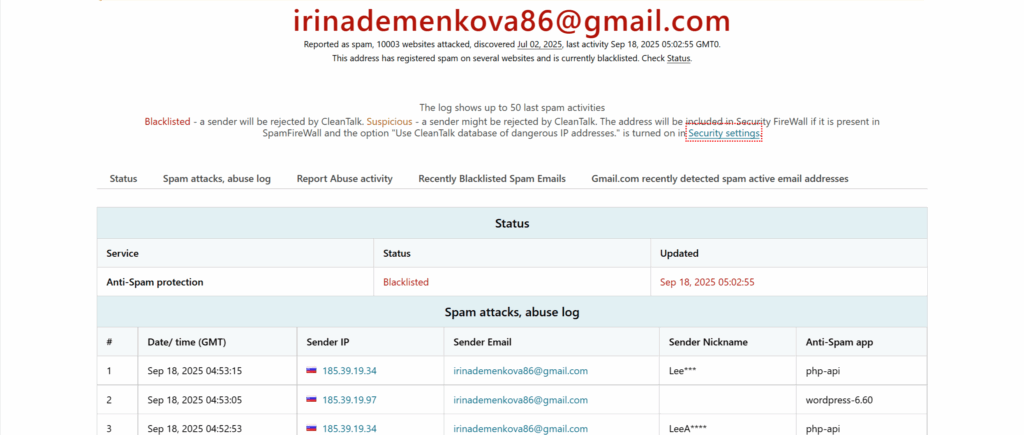
The email address irinademenkova86@gmail.com has been reported for sending spam and launching automated malicious requests on thousands of websites.
According to CleanTalk BlackLists, this address has:
Attacked over 10,000 websites
Generated approximately 6,420 spam requests every day
Used multiple IP addresses from Russia
First detected on July 2, 2025
Last activity recorded: September 18, 2025
This bot attempts to exploit website forms — both contact forms and comment sections, using automated messages that appear to inquire about pricing but are actually spam attempts.
Common Spam Messages Used: The bot sends messages in multiple languages, pretending to ask for pricing information:
“Hi, roeddwn i eisiau gwybod eich pris.” (Welsh — I wanted to know your price)
“Hi, მინდოდა ვიცოდე თქვენი ფასი.” (Georgian — I wanted to know your price)
“Ola, quería saber o seu prezo.” (Galician — I wanted to know your price)
“Hi, i write about price for reseller”
These phrases are repeated across multiple websites, and the messages appear to be legitimate business inquiries, but they are part of an automated spam campaign targeting contact forms on thousands of websites.
Here is a snapshot from CleanTalk’s logs: “535 requests per hour detected from multiple Russian IP addresses. All actions associated with spam form submissions and bot-like behavior using fake pricing inquiry messages.”
irinademenkova86 gmail com Email spam report 09 18 2025 10 14 AM
How to Block Spam from irinademenkova86@attacker
If you’re seeing traffic or spam submissions from this email, here’s how to stop it:
Use CleanTalk Anti-Spam Plugin Install the CleanTalk Anti-Spam plugin for your CMS (WordPress, Joomla, Drupal, etc.). It automatically filters requests by checking emails, IPs, and behavior against the global CleanTalk Spam Database. This email is already blacklisted and will be blocked automatically by the plugin.
2. Use CleanTalk BlockLists or Manually Block Spam Sources
Add irinademenkova86@gmail.com to your site’s manual blocklist.
Block IP addresses commonly used in attacks (CleanTalk logs show many from Russian IP ranges).
Use the CleanTalk IP/Email BlockLists Database, which includes up-to-date records of known spam email addresses and IPs. This database is updated hourly and you can integrate into your website or server for spam filtering.
irinademenkova86@gmail.com is a known spammer attacking thousands of sites daily with fake pricing inquiries. By installing proper anti-spam protection like CleanTalk and staying vigilant, you can block these threats before they reach your contact forms or comment sections.
If you’re already using CleanTalk, rest assured — this spammer is on the blacklist and will be filtered automatically.
We are happy to share feedback from one of our clients — Thomas, the owner of climatechangedispatch.com
Great support, even better spam killer
I was using Akismet for WordPress for years until I found Cleantalk. I got an email from Automaticc, which owns Akismet and Jetpack, stating that because I had some ads on my site, I had to pay a ridiculous amount of money. They gave me 30 days. I switched to Cleantalk as it was cheaper, and the difference was amazing. Not only did it catch spam, but the personal blacklists are a timesaver. No more hits or misses from imprecise wording in the Discussion settings. And the support is absolutely superb. The few times I’ve needed them, they were prompt and fantastic. The firewall and bot-crawler features are also a timesaver. Did you know that auto-bots crawl your site and slow it down? I’m talking spammy bots looking for email addies. This plugin stops them. And also prevents spam after spam from getting through via rate limiting. Try it out, and I swear you will rarely, if ever, have to get rid of spam manually. It’s that good!
We thank Thomas for his detailed feedback and trust in CleanTalk. It’s always a pleasure to hear that our service helps clients protect their websites and save time.