If you use KulaHub as your CRM and marketing platform, you may eventually face spam through website enquiries, contact forms, sign-up forms, or other lead capture points.
Fake submissions can pollute your CRM, waste your sales team’s time, reduce the quality of your email marketing lists, and make it harder to understand which marketing activities are actually bringing real prospects.
This guide explains how to set up KulaHub spam protection using:
- the Anti-Spam plugin by CleanTalk with direct form integration for KulaHub;
- additional tools like Google reCAPTCHA, hCaptcha, Cloudflare Turnstile, honeypot protection, Akismet, and basic moderation.
CleanTalk has added spam protection for the KulaHub marketing and CRM platform using direct form integration. So, if you use KulaHub to collect website enquiries, it makes sense to protect these forms before spam reaches your CRM.
Because KulaHub is used to capture enquiries, track where prospects came from, and manage sales and marketing communication, spam protection is important from the beginning.

KulaHub and website enquiry forms
KulaHub is a CRM and marketing platform that helps businesses capture website enquiries, understand where prospects came from, track sales and marketing activity, and communicate with customers through email campaigns.
On a business website, KulaHub can be connected to different types of lead capture points, such as:
- contact forms;
- website enquiry forms;
- newsletter sign-up forms;
- quote request forms;
- landing page forms;
- customer request forms;
- marketing campaign forms.
These forms are useful because they help collect real enquiries and move prospects into your sales or marketing workflow. But the same forms can also attract spam.
Spambots may submit fake names, disposable email addresses, suspicious links, irrelevant messages, or automated requests. If these submissions are not filtered, they can enter your CRM, trigger unnecessary notifications, distort reports, and create extra manual work.
That is why it is important to set up reliable KulaHub spam protection before spam reaches your CRM and marketing system.
As the official KulaHub website shows, KulaHub helps businesses capture website enquiries, track which activity is driving them, and create email campaigns. CleanTalk provides spam protection for KulaHub forms using direct form integration.
KulaHub Homepage
Anti-Spam plugin by CleanTalk for WordPress
The next tool we are going to use is the Anti-Spam plugin by CleanTalk.
Here’s a short overview:
- CleanTalk is a cloud-based spam protection service for websites.
- It blocks spam without forcing real visitors to solve CAPTCHA challenges.
- It can protect different types of website forms and submissions.
- It checks submissions using spam detection signals such as email address, IP address, and sender activity.
- It helps block automated bots and suspicious form submissions.
- It works quietly in the background.
- It allows you to review spam checks in the CleanTalk Cloud Dashboard.
- It gives you tools for personal allow/block lists, country filters, stop words, and SpamFireWall.
According to WordPress.org, Anti-Spam by CleanTalk for WordPress has over 200,000 active installations, with 3,168 reviews and an average rating of 4.7.
Plugin Homepage at cleantalk.org | Latest release at GitHub.com | Website cleantalk.org
Install the CleanTalk Anti-Spam plugin
Show Instructions
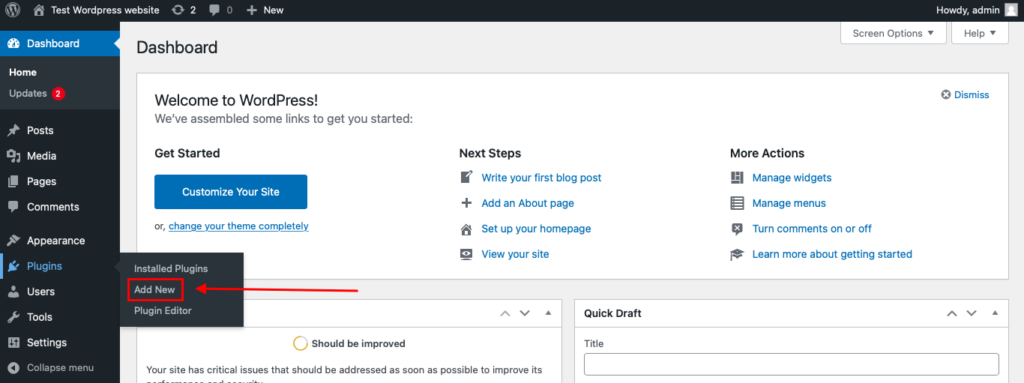
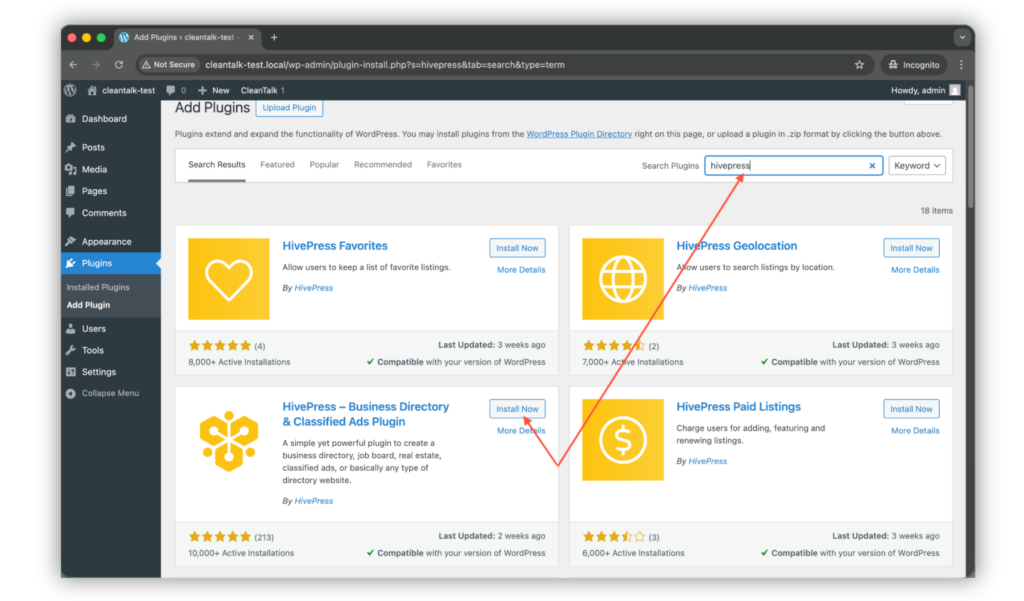
To install the Anti-Spam plugin, go to your WordPress admin panel → Plugins → Add New.

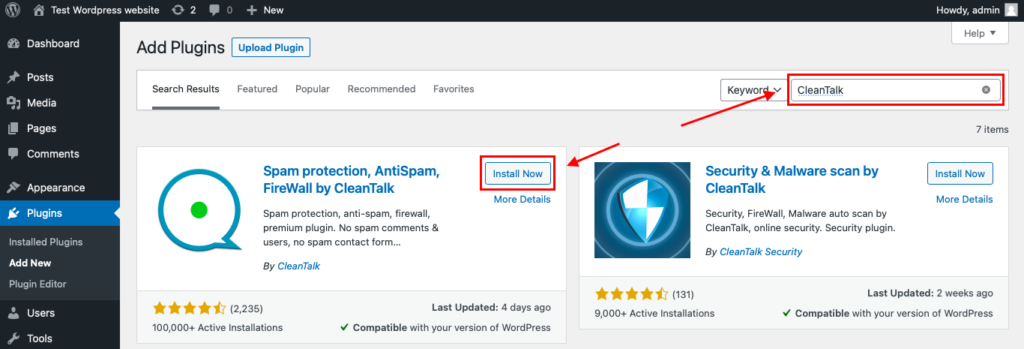
Then enter «СleanTalk» in the search box and click the Install button for «Spam protection, Anti-Spam, FireWall by CleanTalk».

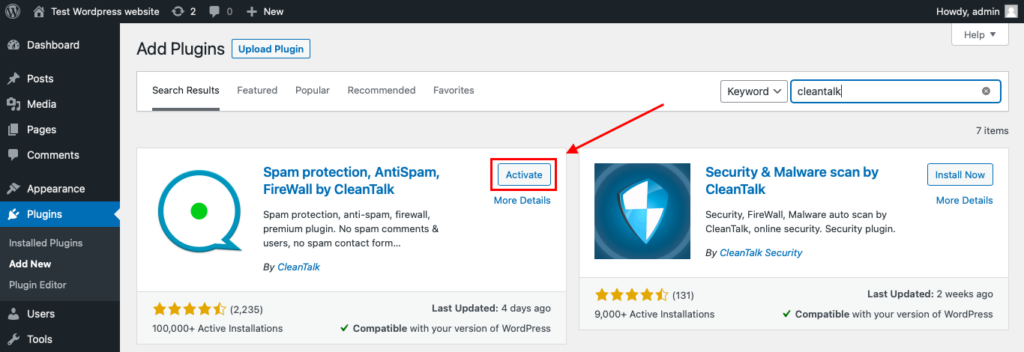
After installing the plugin, click the «Activate» button.

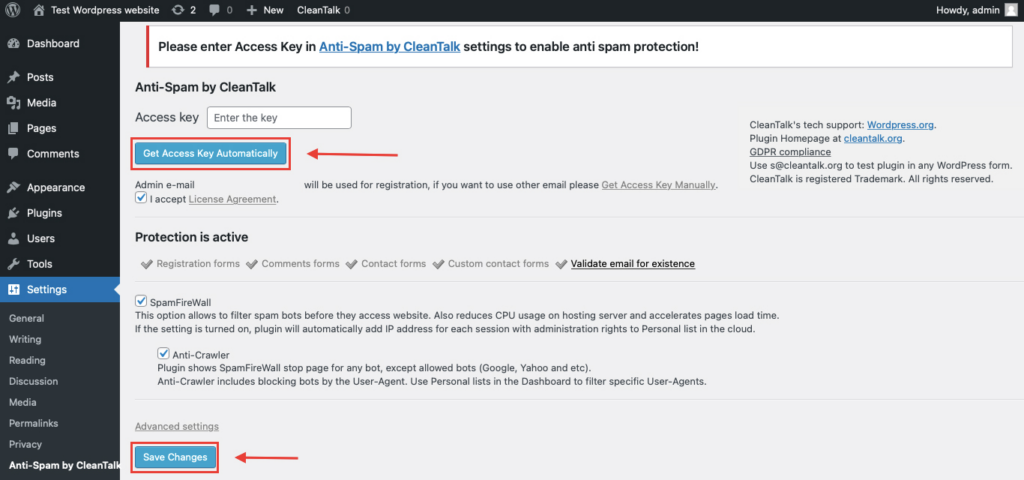
After it is done go to the plugin settings and click the «Get Access Key Automatically» button. Then just click the «Save Settings» button.

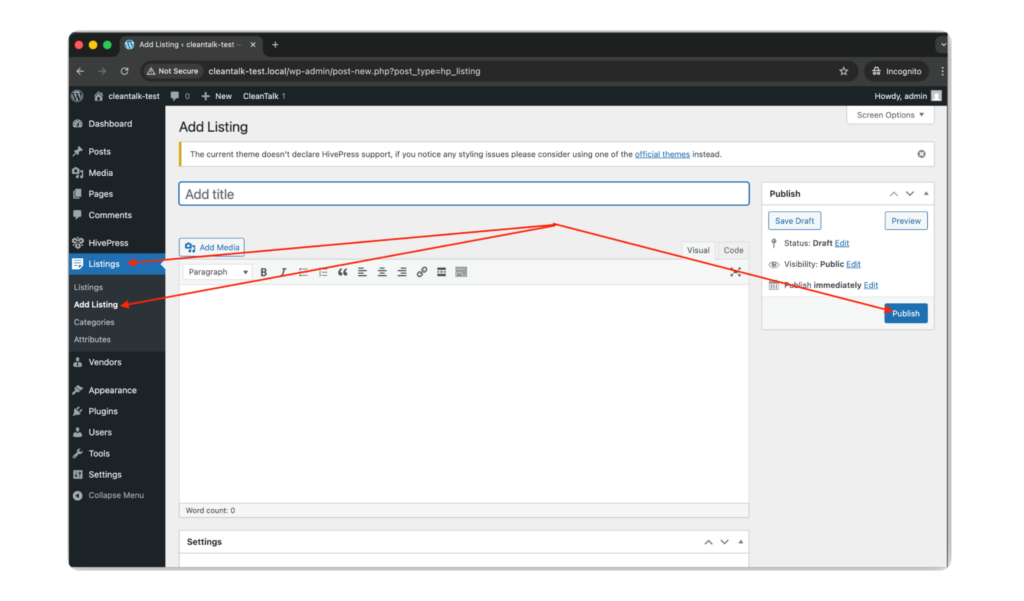
That’s it! From now you know how to completely protect your HivePress from spam.
For KulaHub specifically, the current CleanTalk article states that CleanTalk added spam protection for the KulaHub marketing and CRM platform using direct form integration.This means CleanTalk can be used as the main anti-spam layer for KulaHub forms, helping stop spam before it reaches your enquiry and CRM workflow.
Check if spam protection works with KulaHub
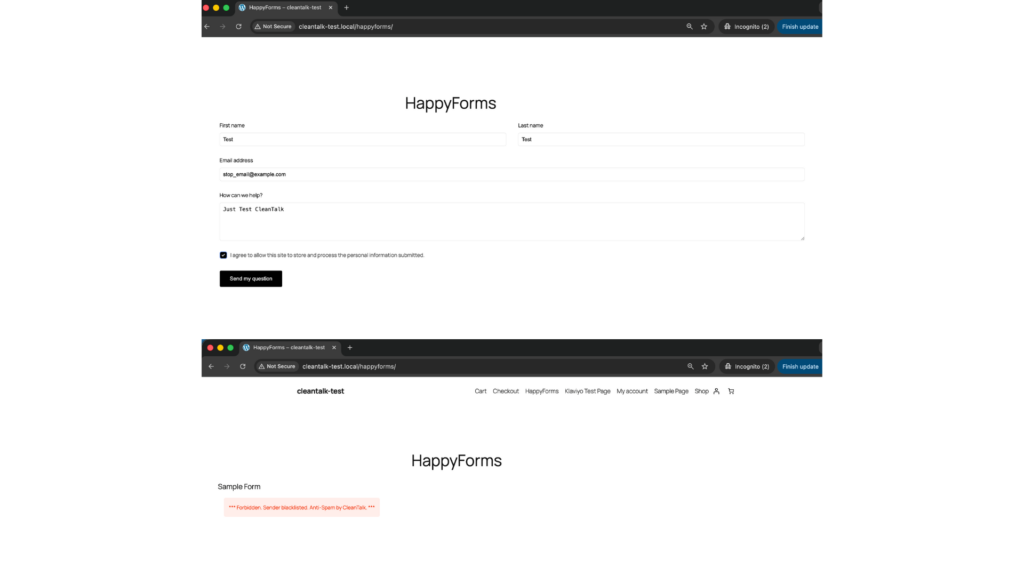
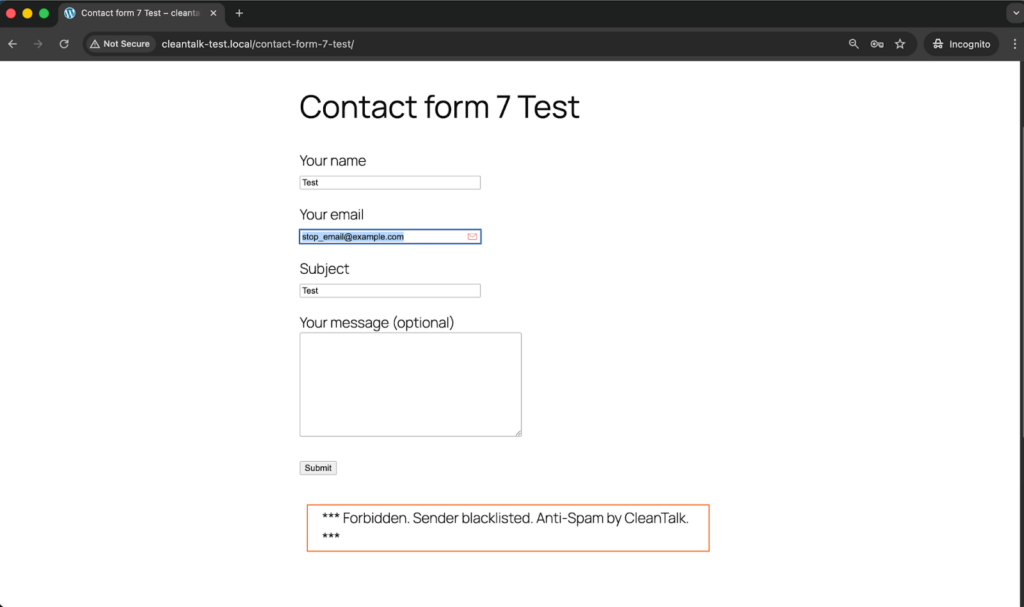
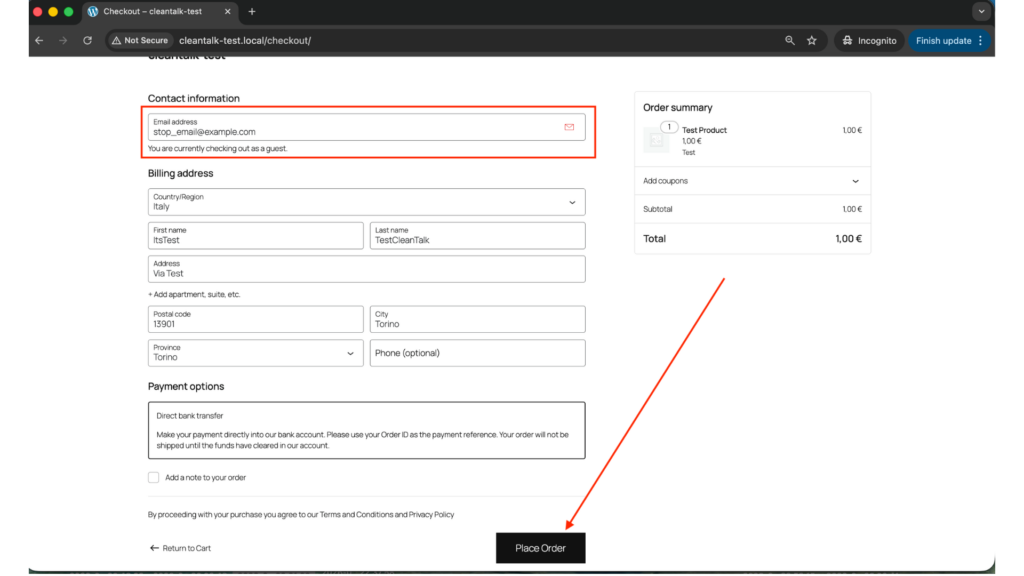
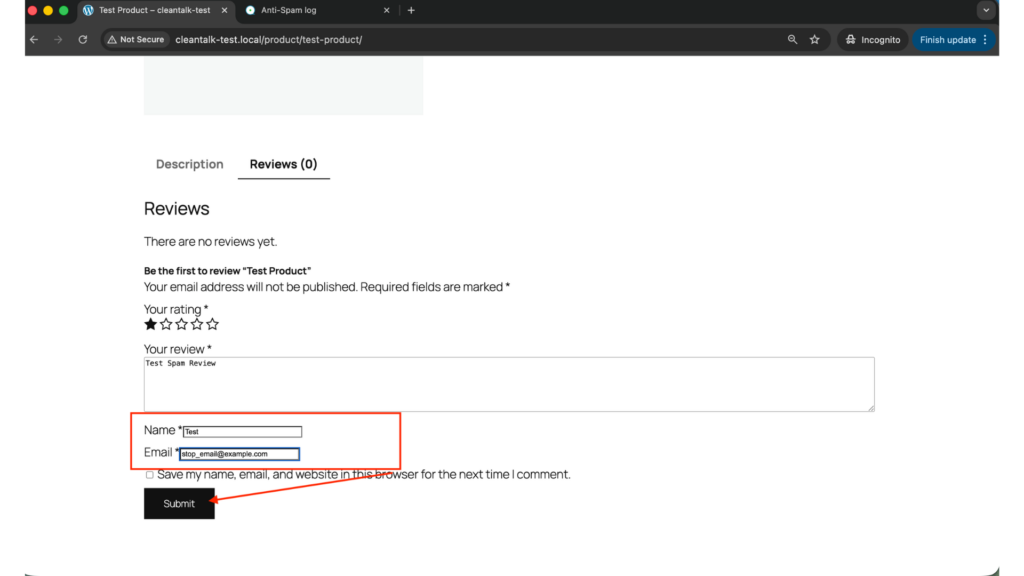
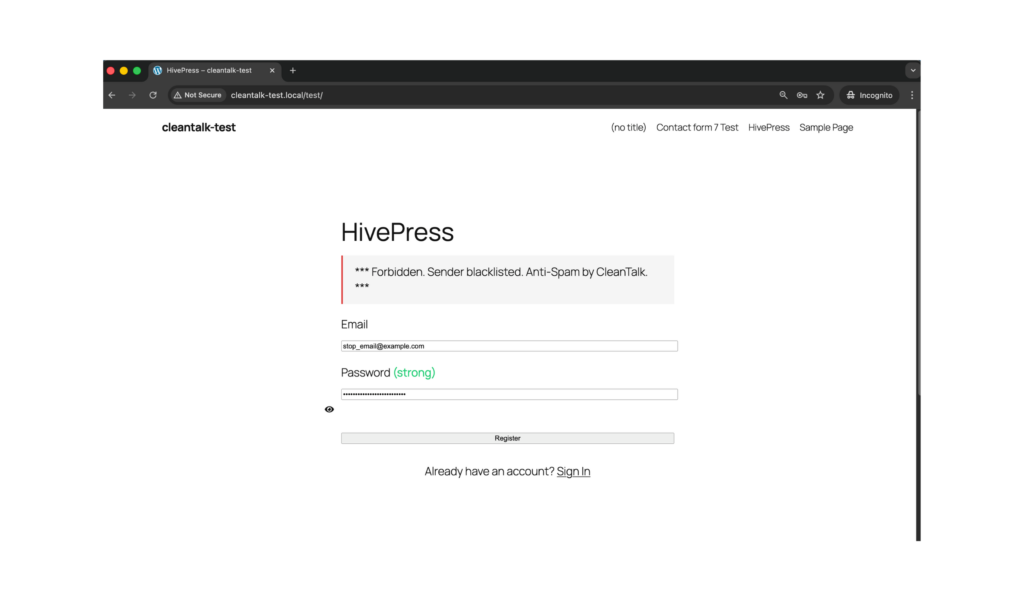
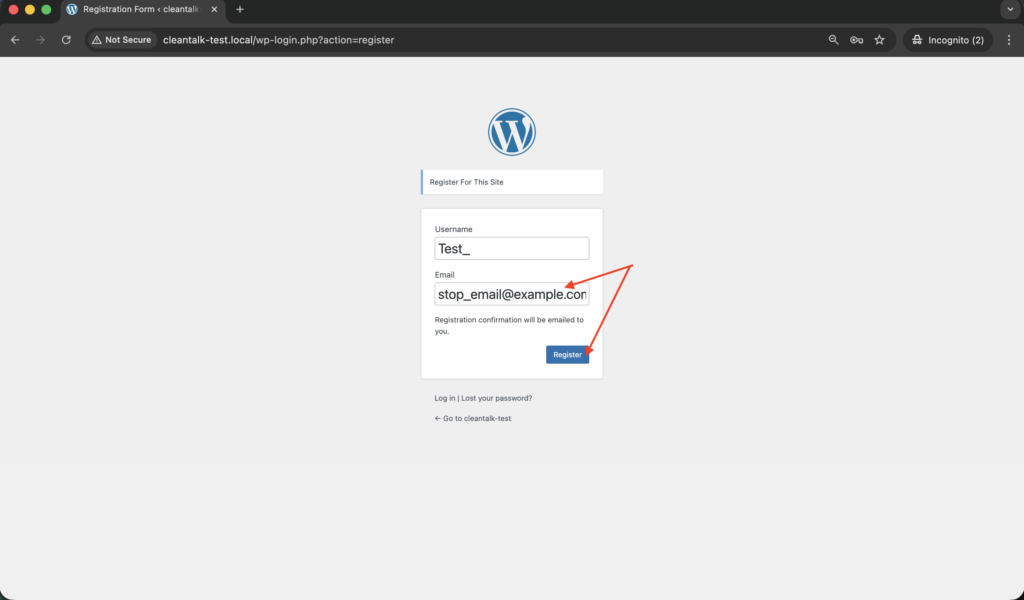
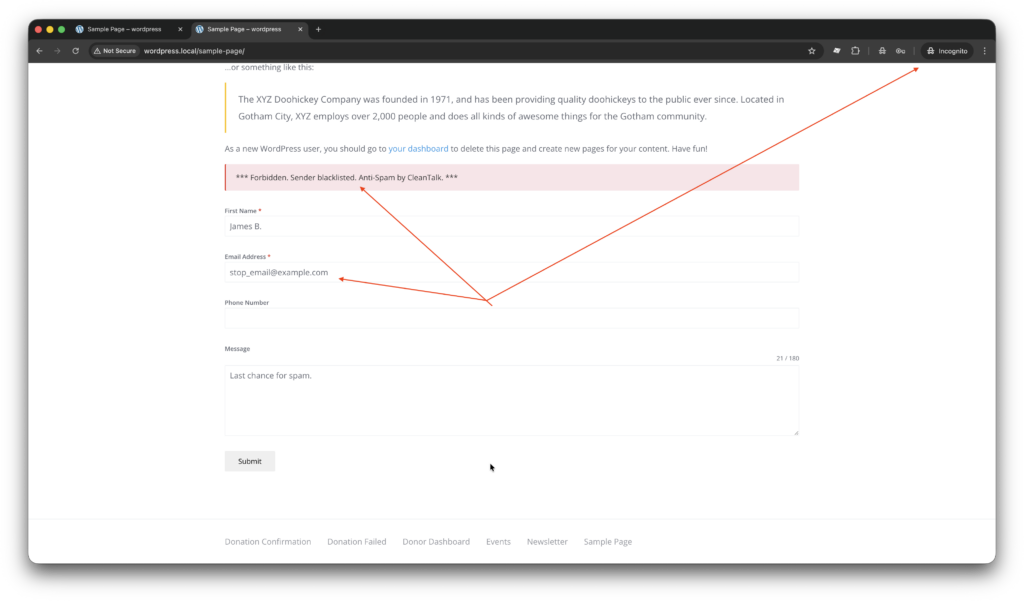
The best way to test spam protection is to use the CleanTalk test email:
stop_email@example.com
Follow these steps:
- Open the page with your KulaHub form in an Incognito browser tab.
- Fill in the form fields.
- Use stop_email@example.com as the sender email.
- Submit the form.
- Check whether the submission is blocked.
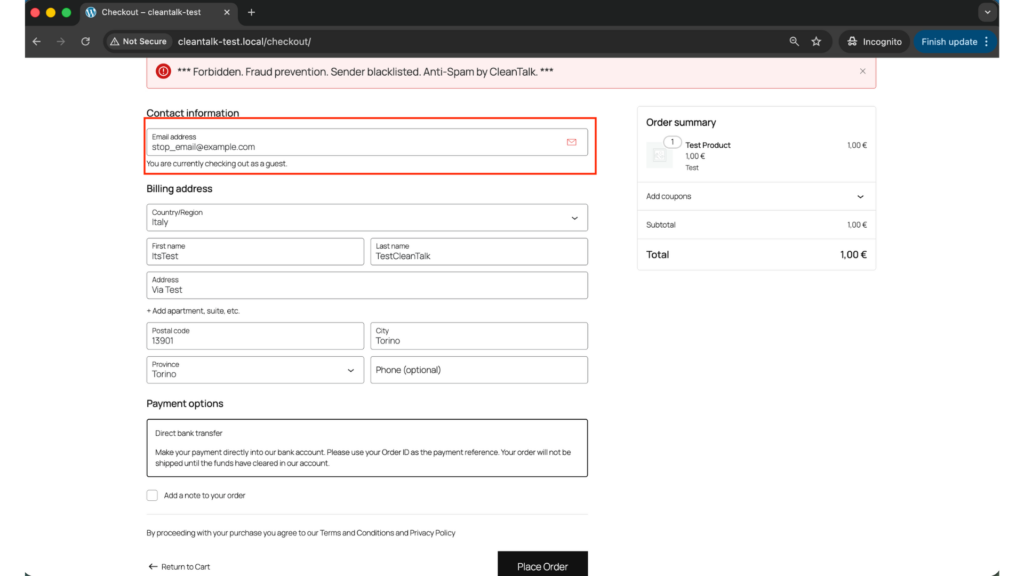
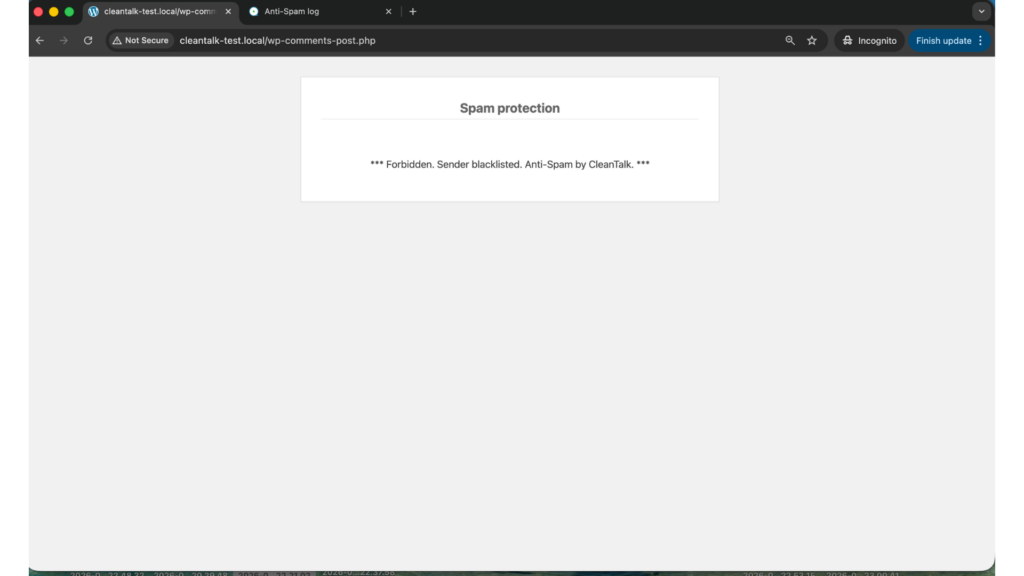
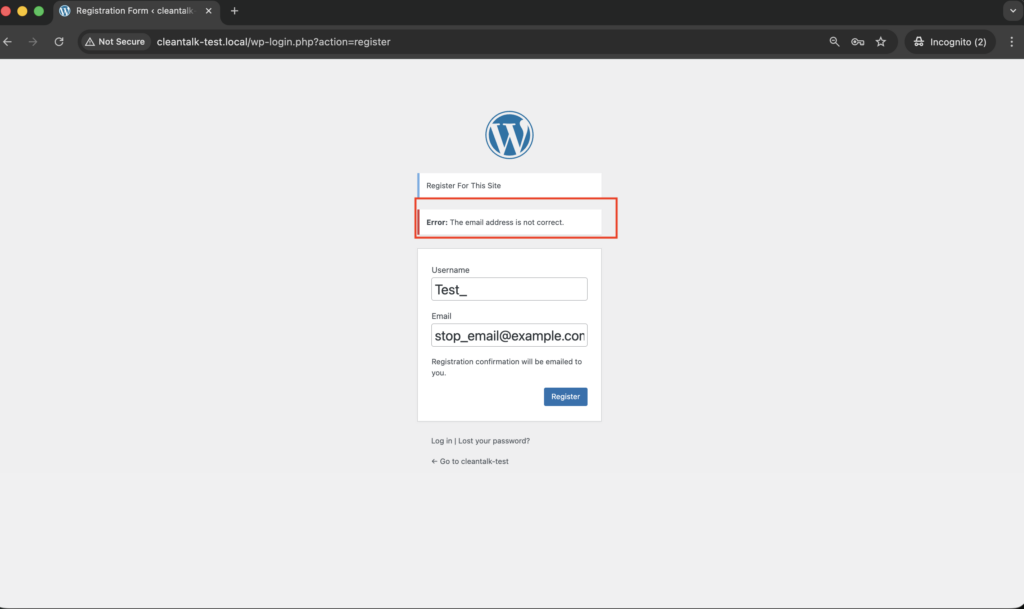
If the protection works correctly, you should see a message like:
Forbidden. Sender blacklisted. Anti-Spam by CleanTalk.
If you see this message, it means CleanTalk successfully blocked the test spam submission.
Testing in Incognito mode is important because anti-spam protection should be checked as a regular website visitor, not as a logged-in WordPress admin.
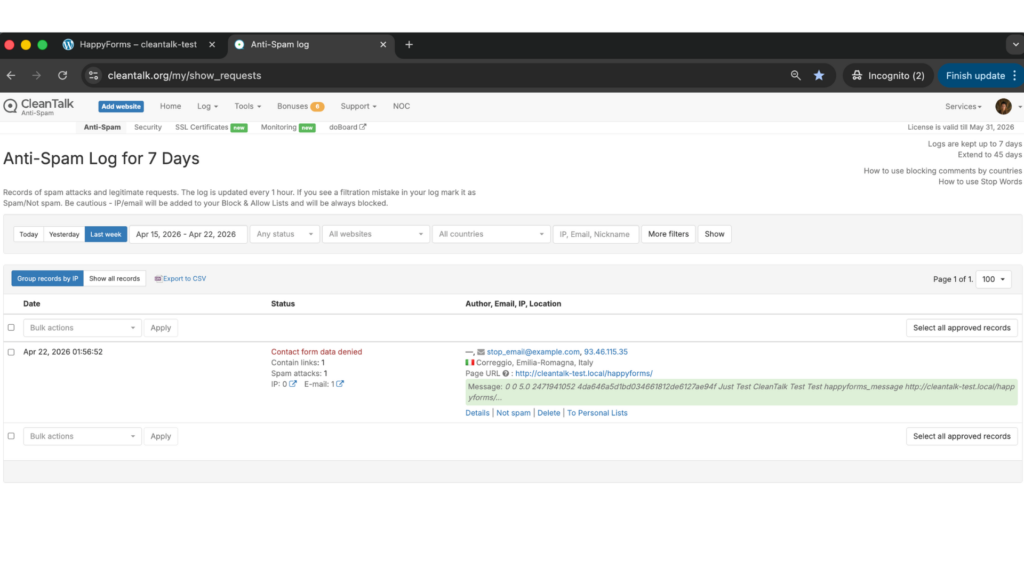
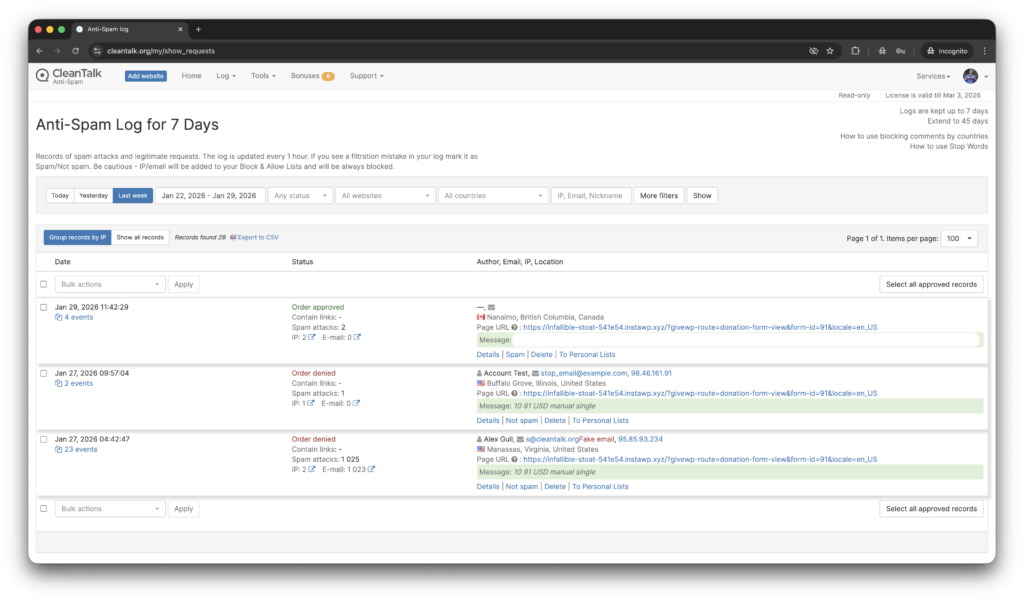
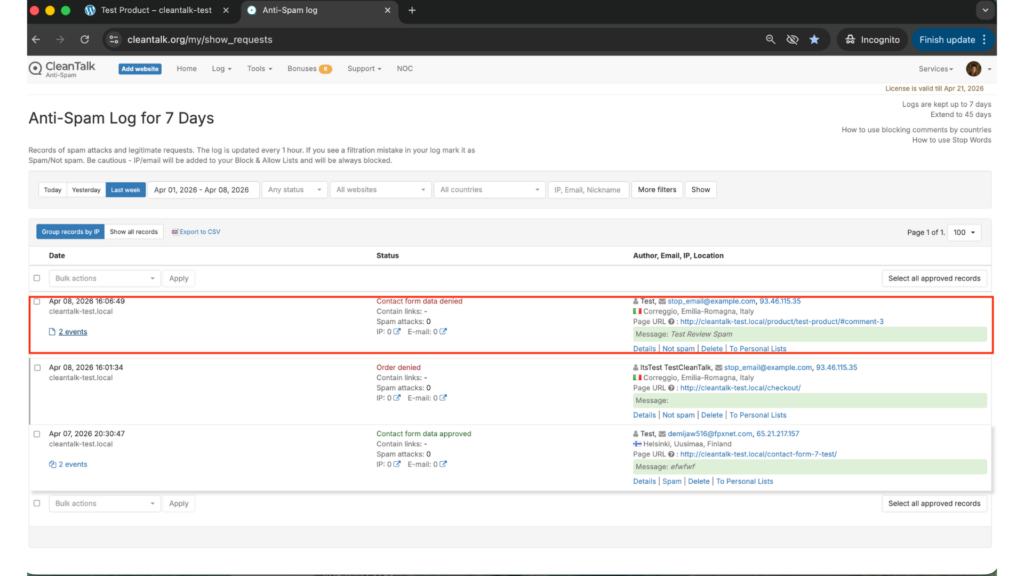
Cloud Dashboard
In the CleanTalk Cloud Dashboard, you can find details about submissions processed by CleanTalk.
The dashboard can help you review:
- sender IP address;
- sender email address;
- sender activity history;
- geolocation;
- date and time of the submission;
- page URL where the form was submitted;
- CleanTalk decision: approved or denied;
- explanation for the decision;
- tools to move senders to allow lists or block lists.
This is useful for KulaHub websites because it helps you understand what happens before a submission reaches your CRM.
If a real user was blocked by mistake, you can review the log and adjust your settings. If repeated spam comes from the same pattern of emails, countries, IPs, or words, you can use CleanTalk personal lists and filters to fine-tune protection.
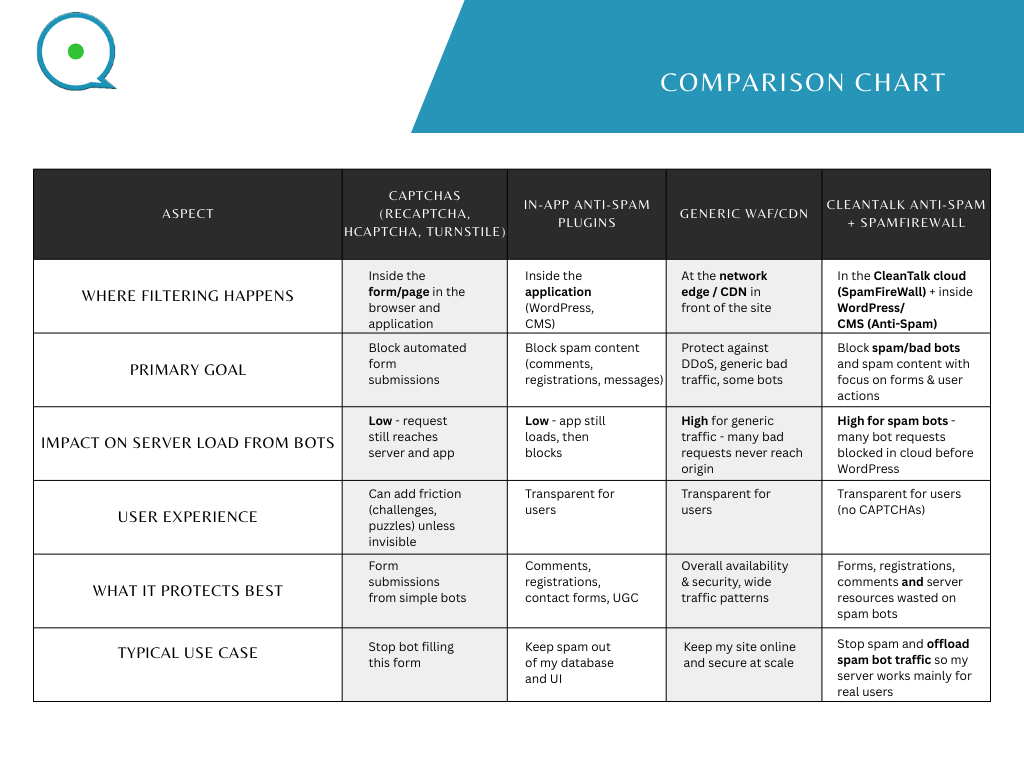
Google reCAPTCHA, hCaptcha, and Cloudflare Turnstile
CleanTalk can be used as the main spam protection layer, but some websites may need additional bot protection.
For example, if your KulaHub forms are placed on high-traffic pages, paid advertising landing pages, or public enquiry pages, you may want to add one more layer.
You can use:
- Google reCAPTCHA;
- hCaptcha;
- Cloudflare Turnstile.
These tools can help stop automated bots before they submit forms. However, they should not replace server-side spam filtering completely.
CAPTCHA and Turnstile can reduce automated spam, but they may not catch every suspicious submission, low-quality human spam, or fake CRM lead. That is why it is better to use them together with CleanTalk, not instead of CleanTalk.
Recommended approach:
- keep CleanTalk enabled as the main anti-spam filter;
- add reCAPTCHA, hCaptcha, or Turnstile only where extra protection is needed;
- avoid adding too much friction to important conversion forms;
- test your forms after adding any extra protection;
- monitor logs in the CleanTalk dashboard.
Honeypot protection
A honeypot is a hidden field added to a form. Real users do not see it, but simple bots may fill it in automatically. If the hidden field is completed, the submission can be treated as spam.
Honeypot protection is useful because it does not interrupt real visitors. There are no puzzles, no image challenges, and no extra clicks.
For KulaHub-connected website forms, honeypot protection can help reduce simple automated spam, especially on public enquiry or contact forms.
However, honeypot protection should usually be treated as an additional layer, not the only anti-spam method. More advanced bots may ignore hidden fields or imitate human behavior more carefully.
Akismet
Akismet is another known anti-spam solution for WordPress. It is often used to reduce spam in comments and basic forms.
For KulaHub websites, Akismet can be used together with CleanTalk to help filter spam in areas outside the main KulaHub workflow, such as:
- blog comments;
- simple contact forms;
- basic website submissions.
However, for CRM-connected forms and website enquiries, CleanTalk should remain the main anti-spam layer because the current CleanTalk KulaHub article is specifically about spam protection for the KulaHub marketing and CRM platform using direct form integration.
To use Akismet, you usually need to:
- Install and activate the Akismet Anti-Spam plugin.
- Get an API key.
- Enable spam checking for the content types you want to protect.
Other universal anti-spam plugins
You can also use other universal anti-spam plugins for WordPress depending on your website setup.
Examples include:
- OOPSpam;
- Maspik;
- Simple CAPTCHA Alternative;
- form-specific CAPTCHA plugins;
- security plugins with anti-bot features.
These tools may help protect comments, contact forms, registrations, or other areas of the website.
But it is better not to install too many anti-spam plugins at once without testing. Several plugins can duplicate checks, create conflicts, slow down forms, or block legitimate submissions.
A simple setup is usually better:
- one main anti-spam plugin;
- one optional CAPTCHA or bot challenge layer;
- clear logging;
- regular testing.
Frequently Asked Questions
Still getting spam through your KulaHub forms?
If spam still reaches your KulaHub forms, check a few things first:
- Make sure CleanTalk Anti-Spam is installed and activated.
- Make sure the CleanTalk access key is connected.
- Test the form with stop_email@example.com in Incognito mode.
- Check the CleanTalk Cloud Dashboard logs.
- Add repeated spam patterns to Personal Lists.
- Use country filters, email masks, or stop words if needed.
- Add reCAPTCHA, hCaptcha, or Cloudflare Turnstile for high-risk forms.
- Contact CleanTalk support with examples of spam submissions.
Does CleanTalk protect KulaHub forms?
Yes. The current CleanTalk KulaHub article states that CleanTalk added spam protection for the KulaHub marketing and CRM platform using direct form integration.
How do I test KulaHub spam protection?
Use the CleanTalk test email:
stop_email@example.com
Open your form in Incognito mode, fill it in, use the test email, and submit the form. If the test works correctly, the submission should be blocked with a message from CleanTalk.
Why should I test in Incognito mode?
Testing in Incognito mode helps you check the form as a regular visitor. If you are logged in as a WordPress admin, some checks may behave differently.
Can I use CleanTalk without CAPTCHA?
Yes. CleanTalk works in the background and does not require real visitors to solve CAPTCHA challenges in most cases.
This is helpful for lead generation because visitors can submit forms without extra friction.
Should I use reCAPTCHA together with CleanTalk?
You can use reCAPTCHA together with CleanTalk if your forms receive many automated attacks. But reCAPTCHA should be an additional layer, not the only spam protection method.
For many websites, CleanTalk can be the primary anti-spam solution, while reCAPTCHA, hCaptcha, or Turnstile can be added only to high-risk forms.
Can honeypot protection replace CleanTalk?
No. Honeypot protection can help catch simple bots, but it should not replace CleanTalk.
A honeypot is useful as an extra layer because it is invisible to real users. But more advanced bots may avoid honeypot fields, so it is better to use honeypot protection together with CleanTalk.
Can Akismet be used with KulaHub?
Akismet can be used on the same WordPress website for comments and some simple forms. However, for KulaHub-specific spam protection, CleanTalk is the more relevant tool because the CleanTalk KulaHub article describes direct form integration for the KulaHub marketing and CRM platform.
What if real enquiries are blocked?
Open the CleanTalk Cloud Dashboard and check the log for that submission. If the enquiry is legitimate, you can move the sender to the allow list or adjust your filtering settings.
Why is spam dangerous for KulaHub CRM?
Spam can create fake contacts, pollute your CRM, distort marketing reports, trigger unnecessary notifications, and waste sales team time.
Since KulaHub is used to capture enquiries, track activity, and manage communication with prospects and customers, clean data is important for accurate sales and marketing work.
Recommended Anti-Spam Stack for KulaHub in 2026
KulaHub is not just a place where enquiries are stored. It can become part of the whole sales and marketing workflow: website enquiries, lead tracking, email campaigns, prospect communication, and reporting. That is why spam protection should not be treated as a small technical setting. If spam gets into the system, it can affect CRM quality, campaign reports, and the daily work of sales teams.
The best approach is to build protection in layers. CleanTalk can be used as the main anti-spam layer for KulaHub forms, while additional tools can be added depending on how visible the form is, how much traffic it receives, and how important the submitted data is.
Basic enquiry forms
For simple website enquiry or contact forms, use:
- CleanTalk Anti-Spam;
- regular test submissions;
- Cloud Dashboard review;
- optional honeypot protection.
This setup helps stop common spam submissions without making the form harder for real visitors to complete.
Lead generation and campaign forms
For landing pages, paid traffic forms, newsletter sign-ups, or forms connected to marketing campaigns, use:
- CleanTalk Anti-Spam as the main filter;
- Cloud Dashboard monitoring;
- Personal Lists for repeated spam patterns;
- country filters or stop words if spam follows a clear pattern;
- Google reCAPTCHA, hCaptcha, or Cloudflare Turnstile only on high-risk forms;
- regular review of lead quality in KulaHub.
This setup is useful when fake submissions can distort campaign results, waste ad budget, or make it harder to understand which channels bring real prospects.
CRM-critical forms
For forms that send important data directly into the sales workflow, use stronger protection:
- CleanTalk Anti-Spam;
- testing for every important form;
- review of approved and blocked submissions;
- Personal Lists for repeated suspicious emails, IPs, or phrases;
- optional CAPTCHA or Turnstile for heavily targeted forms;
- manual review of suspicious enquiries before sales follow-up.
These forms need stronger protection because spam can create fake contacts, trigger unnecessary follow-ups, and make CRM data less reliable.
Best practical setup
For most KulaHub websites, the best starting point is simple: enable CleanTalk, test the form, check the Cloud Dashboard, and watch the first real submissions. If spam still appears, add targeted layers instead of making every form more difficult for users.
This keeps KulaHub cleaner, protects lead quality, and helps sales and marketing teams focus on real enquiries instead of fake submissions.
Final Thoughts
KulaHub can be a valuable tool for managing enquiries, prospects, marketing activity, and customer communication. But like any platform connected to public website forms, it can also become a target for spam if the forms are not properly protected.
Spam protection is not only about blocking unwanted messages. It is also about keeping CRM data clean, preserving the quality of reports, reducing manual work for sales and marketing teams, and making sure real enquiries are easier to notice and process.
CleanTalk Anti-Spam can be used as the main protection layer for KulaHub forms, while additional tools such as CAPTCHA, Turnstile, honeypot protection, Akismet, and manual review can strengthen the setup where needed. The most reliable approach is to combine several layers instead of relying on only one method.
For most websites, the best first step is to enable CleanTalk, test the form, check the Cloud Dashboard, and adjust the settings based on real submissions. This helps create a practical anti-spam system that prote