During routine plugin testing, we discovered a critical security vulnerability in the Shortcodes Ultimate plugin for WordPress which has 600,000+ installations. This plugin, widely used for adding powerful shortcodes to enhance website functionality, is currently vulnerable to a severe security flaw that could potentially allow attackers to exploit and gain unauthorized access to your WordPress site.
The exploit allows contributors to embed malware JavaScript code into new posts via shortcode, subsequently facilitating admin account creation. By exploiting this flaw, attackers can gain unauthorized access and wreak havoc on websites.
Don’t rush to delete the plugin. To mitigate the risk you should just update your Shortcodes Ultimate plugin to the latest version. Additionally, implementing robust security measures, such as regular vulnerability assessments and user role restrictions, can fortify defenses against XSS attacks.
In the expansive domain of WordPress, a critical security flaw has been unveiled within the widely-utilized All-in-One SEO plugin. Known by its identifier, CVE-2024-3368, this vulnerability exposes a concerning loophole that malicious actors can exploit through Stored Cross-Site Scripting (XSS) attacks, jeopardizing the security of numerous websites. The trouble concerns all versions of All-in-One SEO older than 4.6.1.1.
This flaw was unearthed during routine security evaluations, shedding light on a troubling scenario where unauthorized individuals can inject harmful JavaScript code directly into WordPress posts. This unauthorized access allows for the manipulation of administrative privileges, potentially leading to serious repercussions such as website tampering and unauthorized data access.
In response to this alarming revelation, immediate action is crucial. WordPress website owners are strongly advised to promptly update their All-in-One SEO plugin to the latest version, fortified with patches to address this vulnerability. Furthermore, implementing stringent security measures, including regular audits and access controls, is essential to mitigate the risk of exploitation.
Behind the scenes, CleanTalk remains dedicated to safeguarding the WordPress ecosystem. Through vigilant monitoring of plugins and the provision of timely alerts, CleanTalk aims to empower website owners with the necessary tools and knowledge to defend against cyber threats effectively and preserve the integrity of their digital platforms.
Introducing File System Watcher, a new feature of our Security protection. It helps to track changes in your site files to detect suspicious ones in time. File System Watcher has already been added to all plans and is enabled by default.
How the feature works
The feature takes a snapshot of the file system during a selected period and allows you to monitor which files on your site have been modified between selected dates. The snapshots are stored for 7 days.
You can control the frequency of snapshots in the plugin settings. Alternatively, you can run the snapshot immediately by clicking the Create File System snapshot button and refreshing the page.
How to use the feature and see results
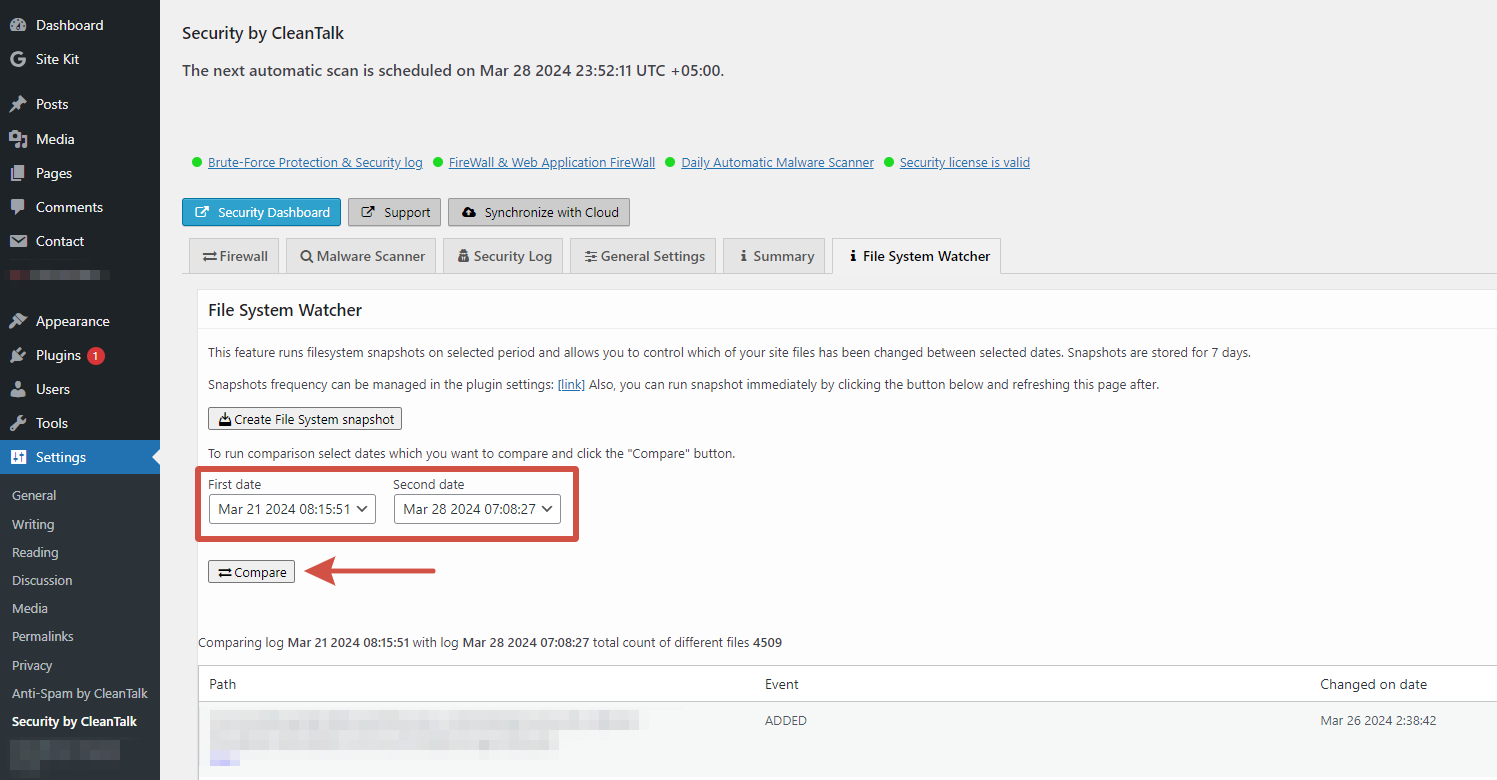
1. Go to your WordPress site dashboard and go to Settings → Security by CleanTalk → File System Watcher.
2. Select the dates you want to compare and click the Compare button.
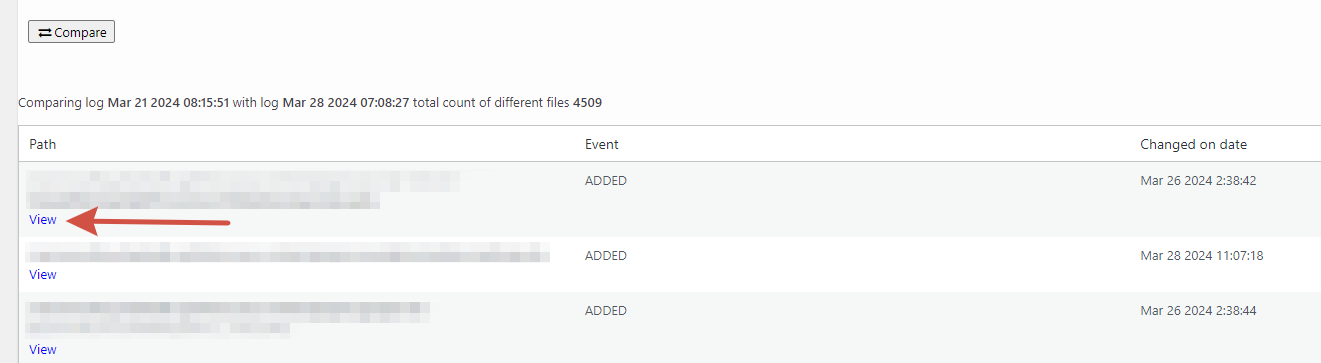
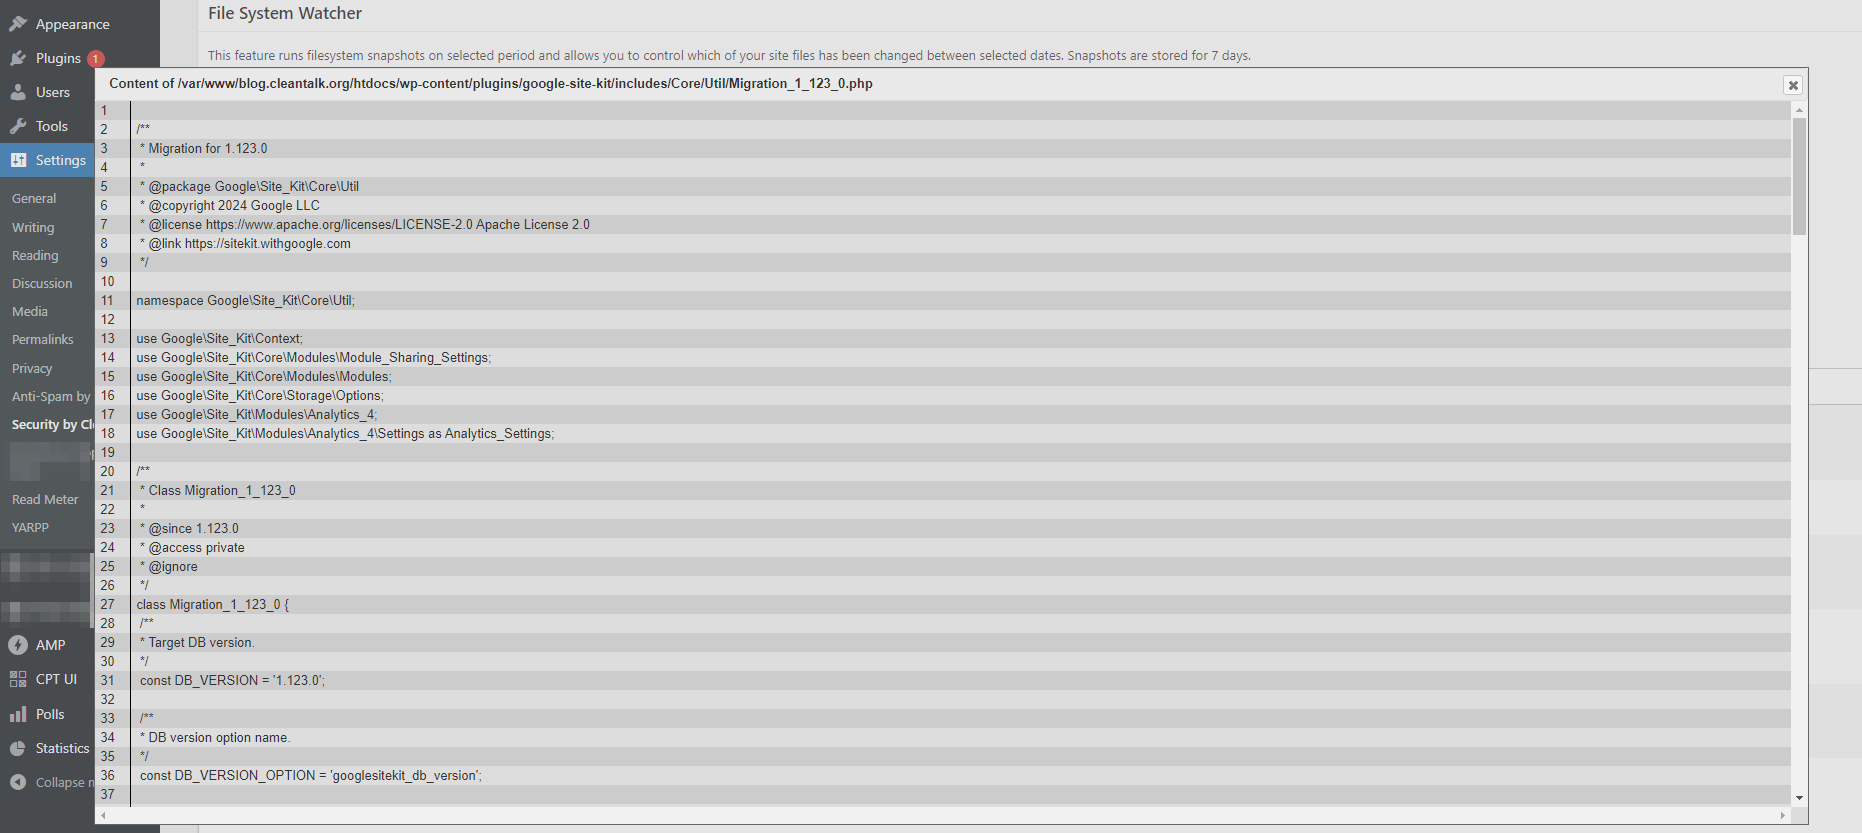
3. Click the View link and you will see the code for the modified version of the specified file.
To use this feature you have to have a Security & Malware scan plugin installed to your WordPress. Feel free to download it in WordPress catalog.
CleanTalk added spam protection for FluentBooking using direct form integration. Always be sure to use the most effective Anti-Spam plugin. For example CleanTalk Anti-Spam will guarantee your FluentBooking spam protection in about 5 minutes.
Once the CleanTalk Anti-Spam plugin is installed it starts to protect all of the existing forms on your WordPress website. It may not only be FluentBooking but many other forms.
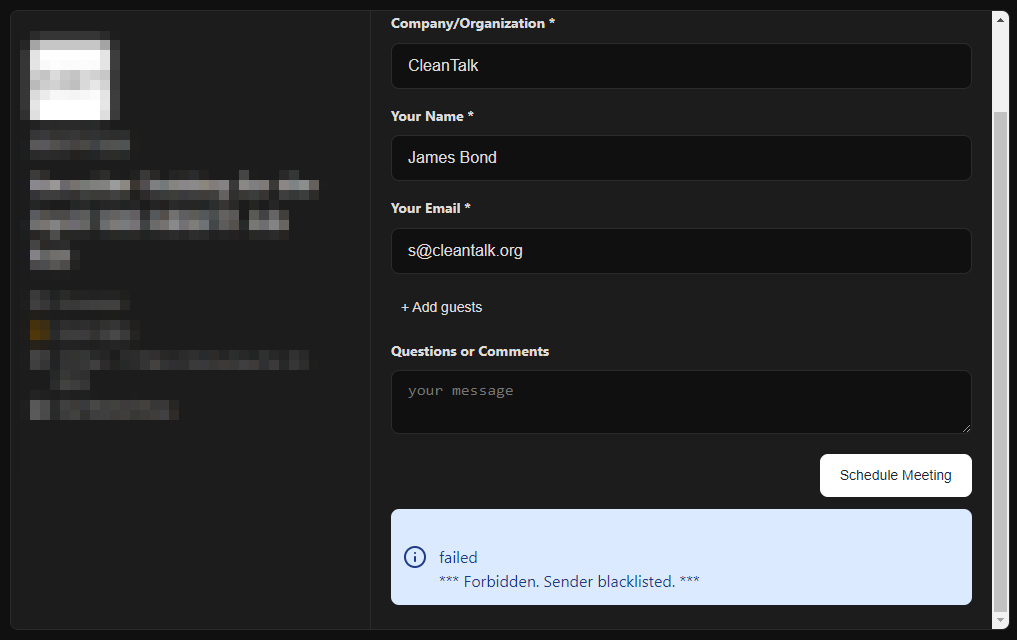
How to check your FluentBooking spam protection in about 5 minutes
You can test the work of Anti-Spam protection for your FluentBooking forms by using a test email s @ cleantalk.org (without spaces). First, open the form in an Incognito browser tab. Fill in all the required form fields and send a form. After submitting the form, you will see a block message about the block on the form submission.
If you have any questions, add a comment and we will be happy to help you. Create your Cleantalk account – Register now and enjoy your spam-free FluentBooking.
CleanTalk added spam protection for Divi Builder email opt-in subscription form using direct form integration. So in case, you prefer using Divi subscription form be sure to use the most effective Anti-Spam plugin. Read the guide below and learn 4 steps to protect your Divi subscription form from spam.
Once the CleanTalk Anti-Spam plugin is installed it starts to protect all of the existing forms on your WordPress website. It may not only be Newsletters subscription forms but also many others.
To install the Anti-Spam plugin, go to your WordPress admin panel → Plugins → Add New.
Then enter «СleanTalk» in the search box and click the Install button for «Spam protection, Anti-Spam, FireWall by CleanTalk».
After installing the plugin, click the «Activate» button.
After it is done go to the plugin settings and click the «Get Access Key Automatically» button. Then just click the «Save Settings» button.
That’s it! From now you How to completely protect your Divi Builder email opt-in subscription form from spam.
How to check spam protection for Divi Builder email opt-in
You can test the work of Anti-Spam protection for your СonvertKit Forms by using a test email s @ cleantalk.org (without spaces). First, open the form in an Incognito browser tab. Fill in all the required form fields and send a form. After submitting the form, you will see a block message about the block on the form submission.
If you have any questions, add a comment and we will be happy to help you.
Create your CleanTalk account – Register now and protect your Divi Builder email opt-in from spam in 5 minutes
Update
The protection works only for website visitors, not for website admins. Be sure to test the form protection using Incognito mode.
Additional features
CleanTalk protects all forms at once: comments, registrations, feedbacks, contacts, and reviews.
Installation takes about 1-2 minutes.
Smart 99% protection against spambots.
Always online – 24/7 technical support.
Logs, SpamFireWall, personal lists, country filters, stop-words, and many others.
Discover the complete list of CleanTalk Anti-Spam plugin features here.
CleanTalk added spam protection for Tribulant Newsletters using direct form integration. So in case, you prefer using Tribulant Newsletters be sure to use the most effective Anti-Spam plugin. Read the guide below and learn 4 steps to protect your Newsletters from spam.
Once the CleanTalk Anti-Spam plugin is installed it starts to protect all of the existing forms on your WordPress website. It may not only be Newsletters subscription forms but also many others.
To install the Anti-Spam plugin, go to your WordPress admin panel → Plugins → Add New.
Then enter «СleanTalk» in the search box and click the Install button for «Spam protection, Anti-Spam, FireWall by CleanTalk».
After installing the plugin, click the «Activate» button.
After it is done go to the plugin settings and click the «Get Access Key Automatically» button. Then just click the «Save Settings» button.
That’s it! From now you How to completely protect your Tribulant Newsletters from spam.
How to check spam protection for Tribulant Newsletters
You can test the work of Anti-Spam protection for your СonvertKit Forms by using a test email s @ cleantalk.org (without spaces). First, open the form in an Incognito browser tab. Fill in all the required form fields and send a form. After submitting the form, you will see a block message about the block on the form submission.
If you have any questions, add a comment and we will be happy to help you.
Create your CleanTalk account – Register now and protect your Tribulant Newsletters from spam in 5 minutes
Update
The protection works only for website visitors, not for website admins. Be sure to test the form protection using Incognito mode.
Additional features
CleanTalk protects all forms at once: comments, registrations, feedbacks, contacts, reviews.
Installation takes about 1-2 minutes.
Smart 99% protection against spambots.
Always online – 24/7 technical support.
Logs, SpamFireWall, personal lists, country filters, stop-words, and many others.
Discover the complete list of CleanTalk Anti-Spam plugin features here.
Building a WordPress website can be a rewarding experience, allowing you to showcase your creativity, share your passion, or promote your business online. In this comprehensive guide, we will walk you through the step-by-step process of creating a WordPress website.
Step 1: Define Your Website’s Purpose and Goals
Before diving into the technical aspects of building a WordPress website, it’s essential to define your website’s purpose and goals. Consider what you aim to achieve with your website, whether it’s to sell products, share information, showcase your portfolio, or attract clients. Understanding your goals will help shape the design and content of your site.
Step 2: Choose a Domain Name and Web Hosting
The next step is to choose a domain name that reflects your brand or business and is easy to remember. You can register a domain name through domain registrars like GoDaddy, Namecheap, or Bluehost. Additionally, select a reliable web hosting provider that offers good uptime, speed, security, and customer support. Popular hosting providers include Bluehost, SiteGround, HostGator and Kinsta.
Step 3: Install WordPress
To install WordPress on your website, you can follow these steps:
Log in to Your Hosting Account. First, log in to your web hosting account. This is where you’ll manage your website files and settings.
Access the Control Panel (cPanel) Most hosting providers use cPanel as the control panel. Look for an option like “cPanel” or “My Account” in your hosting account dashboard.
Find the WordPress Installer In cPanel, look for an icon or section labeled “WordPress” or “Softaculous Apps Installer.” Click on it to access the WordPress installation tool.
Configure Your WordPress Installation Next, you need to configure your WordPress installation by entering details like the site name, description, admin username, password, and email address. You can also choose a language and select any plugins or themes you want to install.
Start the Installation Process Inside the WordPress installer, click on the “Install Now” button. You will be prompted to choose the domain where you want to install WordPress.
Complete the Installation Once you’ve entered all the necessary information, click on the “Install” button. The installer will create the necessary database and install WordPress on your domain.
Access Your WordPress Dashboard After the installation is complete, you will receive a confirmation message with a link to access your WordPress dashboard. This is where you can customize your website, add content, and manage settings.
That’s it! You have successfully installed WordPress on your website. You can now start building your website by choosing a theme, adding pages and posts, installing plugins, and customizing the design. If you encounter any issues during the installation process, reach out to your hosting provider’s support team for assistance.
Step 4: Choose a Theme and Customize Your Website
WordPress offers thousands of free and premium themes that determine the design and layout of your website. Browse the WordPress theme directory or third-party marketplaces like ThemeForest to find a theme that aligns with your brand and goals. Once you’ve selected a theme, customize your website by adding your logo, changing colors and fonts, and creating custom menus.
Step 5: Create Essential Pages and Posts
Now it’s time to add content to your website. Create essential pages such as Home, About Us, Services, and Contact. Write engaging copy, add images or videos, and optimize your content for search engines using relevant keywords. Additionally, publish blog posts regularly to keep your audience engaged and drive traffic to your site.
Step 6: Set Up SEO
Search engine optimization (SEO) is crucial for improving your website’s visibility in search engine results. Install an SEO plugin like Yoast SEO or Rank Math to optimize your pages and posts for target keywords, meta descriptions, and structured data. Create an XML sitemap and submit it to search engines like Google for indexing.
Step 7: Install Essential Plugins
WordPress plugins extend the functionality of your website by adding different features. We recommend that you install the ones that will be useful for the first step and for the whole time you use WordPress:
SEO Plugins to improve website’s visibility in Search engine results: Yoast SEO / All in One SEO / Rank Math SEO – one of them will be enough. Additionaly, using Google Site Kit is our strong recommendation.
E-commerce Plugins in case you sell products or services: WooCommerce / Easy Digital Downloads / Shopify – research and choose one that fits you most.
Contact Form Plugins to allow your visitors contact you: Contact Form 7, WPForms, or Gravity Forms. Regardless of the form you choose make sure you protect it from spam and spambots with anti-spam protection like Anti-Spam.
Security Plugin to protect the site from threats like malware or hacking attempts: Security & Malware scan – it’s a 18-in-1 plugin that will be sufficient for you.
Performance Optimization Plugins: you might want to use WP Rocket, W3 Total Cache, and Smush Image Compression and Optimization to get started.
Step 8: Test Your Website and Launch
Before launching your website, test it on different devices and browsers to ensure it looks and functions correctly. Check for broken links, slow loading times, and mobile responsiveness. Once you are satisfied with the results, launch your website by promoting it on social media, email newsletters, and other marketing channels.
Step 9: Maintain and Update Your Website
After launching your website, it’s crucial to maintain it regularly by updating WordPress core, themes, and plugins. Monitor website performance using tools like Google Search Console and GTmetrix. Create fresh content, engage with your audience, and make necessary adjustments to improve user experience and achieve your goals.
Step 10: Monitor Analytics and Optimize
Monitor your website’s performance using tools like Google Analytics to track visitor behavior, traffic sources, and conversions. Analyze the data to identify areas for improvement and make informed decisions to optimize your website further. Continuously refine your content strategy
SEO efforts, and user experience based on analytics insights.
In conclusion, building a WordPress website involves planning, creativity, and technical know-how. By following this comprehensive guide and investing time in creating quality content, optimizing for search engines, and engaging with your audience, you can build a successful online presence with WordPress. Remember that building a website is an ongoing process that requires regular updates and improvements to stay relevant and effective in achieving your goals.
A WordPress plugin is a piece of software that adds specific functionality to a WordPress website. You can also call in an add-on or extension that enhances the core features of the WordPress platform. Plugins are designed to be easily installed, activated, and configured by users without the need for any coding knowledge.
WordPress plugins are typically written in PHP, the programming language used in WordPress development. They can include various types of files such as PHP scripts, CSS stylesheets, JavaScript code, and images. Plugins can be created by individual developers, companies, or the WordPress community at large.
How Do WordPress Plugins Work?
WordPress plugins work by hooking into the core functionality of the WordPress platform. When you activate a plugin, it can modify or extend various aspects of a WordPress site, such as adding new features, customizing existing ones, or improving performance.
Plugins can interact with different parts of a WordPress site through hooks and filters. Hooks are predefined points in the WordPress code where plugins can insert their own code to modify the behavior of the site. Filters allow plugins to modify data before it is displayed on the site.
WordPress plugins can also include settings pages where users can configure the plugin’s behavior and options. These settings pages are typically accessible from the WordPress admin dashboard and provide users with a way to customize how the plugin functions.
Types of WordPress Plugins
There are thousands of WordPress plugins available for a wide range of purposes. Some of the most common types of plugins include:
SEO Plugins These plugins help optimize a website for search engines by providing tools for keyword research, metatag optimization, XML sitemap generation, and more.
E-commerce Plugins E-commerce plugins enable users to create online stores and sell products or services directly from their WordPress sites. Popular e-commerce plugins include WooCommerce, Easy Digital Downloads, and Shopify.
Contact Form Plugins Contact form plugins allow users to create custom contact forms for their websites to collect visitor information and inquiries. Examples include Contact Form 7, WPForms, and Gravity Forms. Most of contact forms still need an anti-spam protection, so, feel free to use Anti-Spam plugins like Anti-Spam by CleanTalk.
Security Plugins Security plugins help protect WordPress sites from security threats such as malware, hacking attempts, and spam.
Performance Optimization Plugins These plugins help improve the speed and performance of a WordPress site by optimizing images, caching content, and minimizing code. Examples include WP Rocket, W3 Total Cache, and Smush Image Compression and Optimization.
How to Install a WordPress Plugin
Installing a WordPress plugin is a straightforward process that you can do in just a few simple steps. Let’s say, you want to install the Contact Form 7 plugin to your website. That’s how you do it:
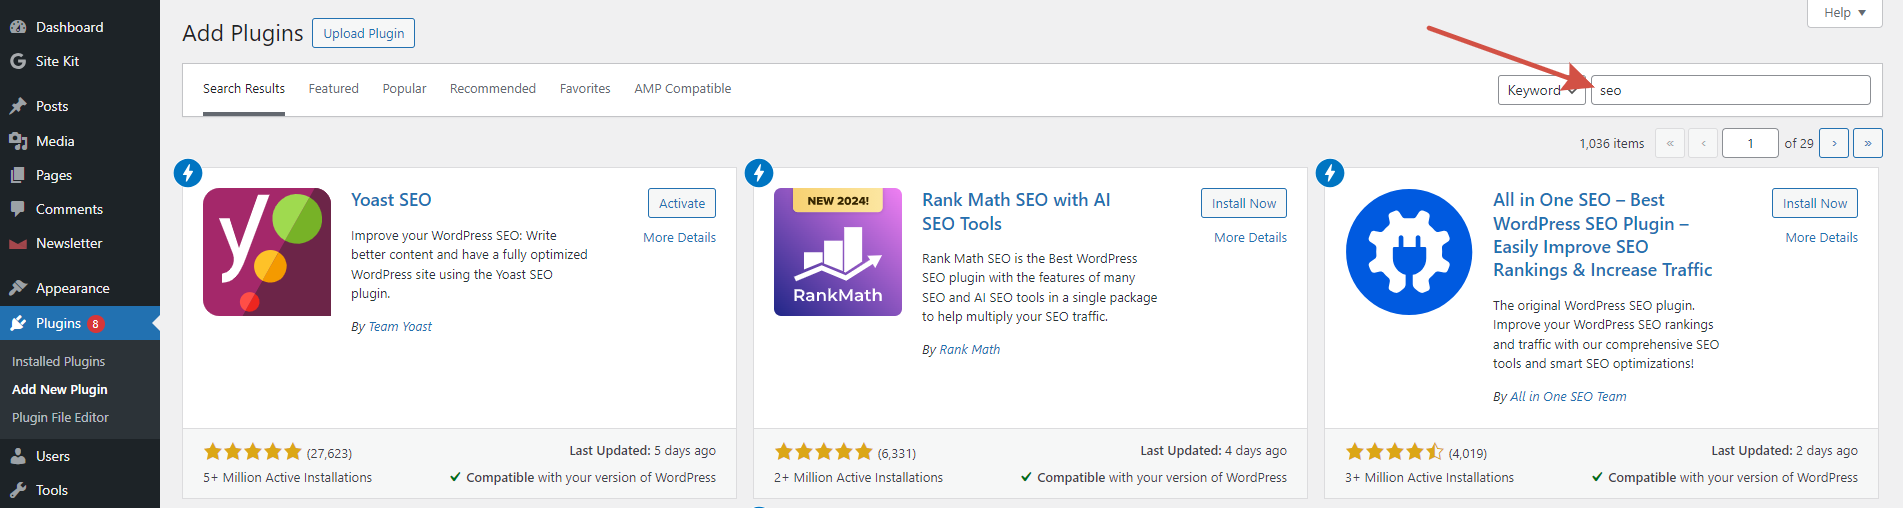
Search for the Plugin: In the WordPress admin dashboard, navigate to Plugins > Add New. Use the search bar to find the plugin you want to install.
Install the Plugin: Click the “Install Now” button next to the plugin you want to install. Once the installation is complete, click the “Activate” button to activate the plugin.
Use the Plugin: Once you installed and activate it, you can start using its features on your WordPress site. Depending on the type of plugin, you may need to add widgets, shortcodes, or configure settings to make use of its functionality.
5 Tips to Use WordPress Plugins Like a Pro
While WordPress plugins offer numerous benefits, it’s essential to use them wisely to avoid potential issues such as conflicts, security vulnerabilities, and performance problems. Here are some tips for using WordPress plugins:
Tip 1: Choose Quality Plugins
Select plugins from reputable sources such as the official WordPress Plugin Directory or trusted third-party developers. Check user reviews, ratings, and update frequency before installing a plugin.
Tip 2: Keep Plugins Updated
Regularly update your plugins to ensure they are compatible with the latest version of WordPress and have any security vulnerabilities patched. Most plugins provide automatic updates for added convenience.
Tip 3: Limit Plugin Usage
Avoid installing too many plugins on your site as this can slow down performance and increase the risk of conflicts. Only install plugins that are necessary for your site’s functionality.
Tip 4: Test Plugins Before Installation
Before installing a new plugin on your live site, test it on a staging environment or local installation to ensure it works as expected and doesn’t cause any issues with existing functionality.
Tip 5: Monitor Plugin Performance
Keep an eye on your site’s performance metrics after installing new plugins to identify any changes in loading times or server resources. Remove or replace plugins that negatively impact performance.
Since our Anti-Spam and Security plugins are fully AMP-compatible, they are now available from the plugin catalog on the amp-wp.org website, where all the most popular AMP-compatible plugins and themes for WordPress are collected.
How this benefits you from using AMP
Using AMP (Accelerated Mobile Pages) for a WordPress website can offer several advantages, including:
Faster loading times AMP pages are designed to load quickly on mobile devices, which can improve user experience and reduce bounce rates.
Improved mobile performance AMP pages are optimized for mobile devices, ensuring a smooth and responsive experience for users.
Higher search engine rankings Google prioritizes AMP pages in search results, which can lead to better visibility and higher rankings for your WordPress website.
Better user engagement Faster loading times and a smoother browsing experience can lead to increased user engagement and higher conversion rates.
Reduced bounce rates With faster loading times and improved performance, AMP pages are less likely to experience high bounce rates, keeping visitors on your website longer.
Cost-effective solution Implementing AMP on your WordPress website is a cost-effective way to improve mobile performance and user experience without investing in expensive development solutions.
CAPTCHA technology is a widely used tool to prevent spam and abuse on websites. This free technology uses risk analysis techniques to distinguish humans from bots. It may seem like a convenient and free solution for protecting contact forms from spam. Still, there are several reasons why using CAPTCHA with Contact Form 7 can be detrimental to user experience and website accessibility.
1. Using CAPTCHA degrades user experience
One of the main issues with using CAPTCHA is its impact on user experience. The traditional CAPTCHA process requires users to solve a challenge, such as identifying objects in images or solving puzzles before they can submit a form. This extra step can be frustrating for users, particularly those with visual or cognitive impairments. It creates a barrier to entry and can discourage potential visitors from engaging with the website. The use of free tools is a saving on the convenience of visitors. And they understand that.
2. Impossible to be used by visitors with disabilities
Moreover, CAPTCHA can be especially challenging for individuals with disabilities. Such as those who rely on screen readers or have difficulty with fine motor skills. The visual and interactive nature of CAPTCHA challenges can make it inaccessible to these users. That helps effectively exclude them from interacting with the contact form.
3. Data Privacy
In addition to accessibility concerns, CAPTCHA also raises privacy issues. The tool collects and processes large amounts of personal data, including user behavior and device information, to determine whether a visitor is a bot or a human. This data collection raises concerns about user privacy and data security, as it involves sharing sensitive information with a third-party service provider. So, when you use a free solution, you still pay, but only with the convenience of your visitors and the security of their data.
For example, Google reCAPTCHA’s reliance on Google’s infrastructure means that website owners have limited control over how their users’ data is handled. This lack of transparency and control can be problematic, especially in light of increasing concerns about data privacy and online security.
4. Slowing down your website
Another drawback of using Contact Form 7 CAPTCHA is the potential impact on website performance. The CAPTCHA script adds additional overhead to the website, increasing load times and affecting overall performance. This can lead to a suboptimal user experience and may deter visitors from engaging with the contact form or other parts of the website.
5. Risk of technical issues
Moreover, CAPTCHA’s reliance on external scripts and resources means that it introduces another point of failure to the website. If the CAPTCHA service experiences downtime or technical issues, it can prevent users from submitting forms or accessing content, disrupting the normal functioning of the website.
6. Ethical issues
In addition to these practical concerns, there are also ethical considerations associated with using Contact Form 7 CAPTCHA spam protection. By relying on a proprietary tool developed by a tech giant like Google, website owners contribute to the consolidation of power in the hands of a few dominant players in the tech industry. This can have far-reaching implications for competition, innovation, and the open web.
What are the alternatives?
Fortunately, there are alternative approaches to protecting contact forms from spam that do not rely on CAPTCHA. The most effective way is to use an invisible cloud-based spam protection, that has a direct integration with Contact Form 7. One of these solutions is the Anti-Spam protection by CleanTalk.
Why CleanTalk Anti-Spam instead of CAPTCHA-based solutions
CleanTalk Anti-Spam offers several advantages over traditional CAPTCHA solutions, making it a more user-friendly and effective option for protecting websites from spam. Here are some reasons why CleanTalk Anti-Spam is considered superior to CAPTCHA:
Compatibility CleanTalk Anti-Spam is compatible with a wide range of platforms and content management systems, making it easy to integrate with existing websites without requiring extensive customization or development work
Privacy and Security The Anti-Spam service prioritizes user privacy and data security and operates without invasive data collection practices. This approach aligns with the growing concerns about online privacy and data protection.
User-Friendly Experience The Anti-Spam provides a seamless and non-intrusive experience for website visitors. It operates in the background without requiring any action from the user. This approach minimizes friction and frustration for visitors, leading to a more positive user experience.
Performance CleanTalk Anti-Spam cloud protection operates efficiently in the background, minimizing the impact on website performance and ensuring a smooth user experience.
Accessibility CleanTalk Anti-Spam does not rely on visual or interactive challenges, making it more accessible to a wider range of users, including those with disabilities.
Effectiveness The Anti-Spam plugin employs advanced algorithms and machine learning techniques to accurately identify and effectively filter out unwanted content while reducing false positives, ensuring that legitimate form submissions are not erroneously blocked.