Category: Security

  • Our client’s story: Berlinkita.com

    Our client’s story: Berlinkita.com

    We continue sharing our clients’ reviews and today’s story is brought to you by Guillaume from berlinkita.com.

    My website berlinkita.com helps parents get a comprehensive list of all day care solutions in Berlin, including their email addresses and phone numbers to ease their search.

    Berlinkita.com got hacked so I decided to up my game and added, based on my developper’s recommendation, the Cleantalk plugin. It helps me block any spam attack, informs me when someone logs in, creates an account, changes an account rights so I know that if my website got hacked ever again, I’ll be informed on the spot as I receive notifications as I want.

    Cleantalk works like a charm, and I feel way much secured this way. No ones wants to get hacked so this is truly a winner.

    Best,
    Guillaume

  • New features added to Malware Web Scanner

    New features added to Malware Web Scanner

    There are some new features in our Malware Web Scanner that we want to tell you about.

    1. Public lists info
      Checks whether your website is mentioned in any of CleanTalk blacklists.

    2.  
    3. Redirects
      Сhecking your website for different types of redirects. For example http→https and redirecting for another server.

    In case you haven’t used it yet – it’s absolutely free and is available by the link below.

  • How to protect your CS-Cart website from spam using Universal Anti-Spam Plugin by CleanTalk

    How to protect your CS-Cart website from spam using Universal Anti-Spam Plugin by CleanTalk

    Part 1: Installing the Universal Anti-Spam Plugin

    Universal Anti-Spam plugin can be installed on any custom websites, CMS and Frameworks. If you don’t have programming experience to add our API on a website it will be a better way to protect your website from spam with CleanTalk. Invisible to the visitors, spam protection has a positive effect on the loyalty of the site’s audience.

    Installation guide

    1. Make backup copies of your website files and database.

    2. Download and unzip the “cleantalk” folder into your websites’ ROOT folder.

    3. Proceed to address (your_website_name/cleantalk/install.php):

    address-strimg

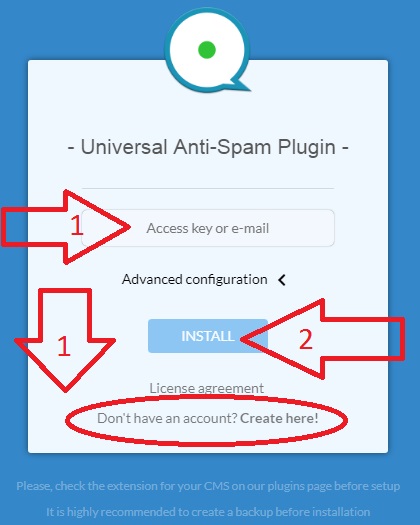
    4. Enter your Access key and click the button “Install” to continue with the installation or enter your e-mail to register a CleanTalk profile and continue with the installation.

    Also, you can register a CleanTalk profile manually by simply clicking the button “Don’t have an account? Create here!“.

    Uni Anti-Spam install

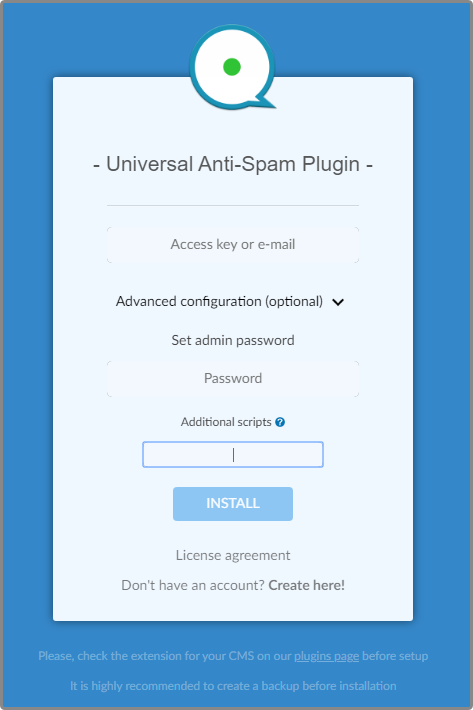
    Universal Anti-Spam plugin will write protection code to index.php file by default. If your contact or registration forms are located in different files/scripts, list them in the “Advanced configuration” section separated by commas. Also, you can set an additional password to the plugin settings.

    Advanced config

    At the end of the successful installation, you will see this message

    Success

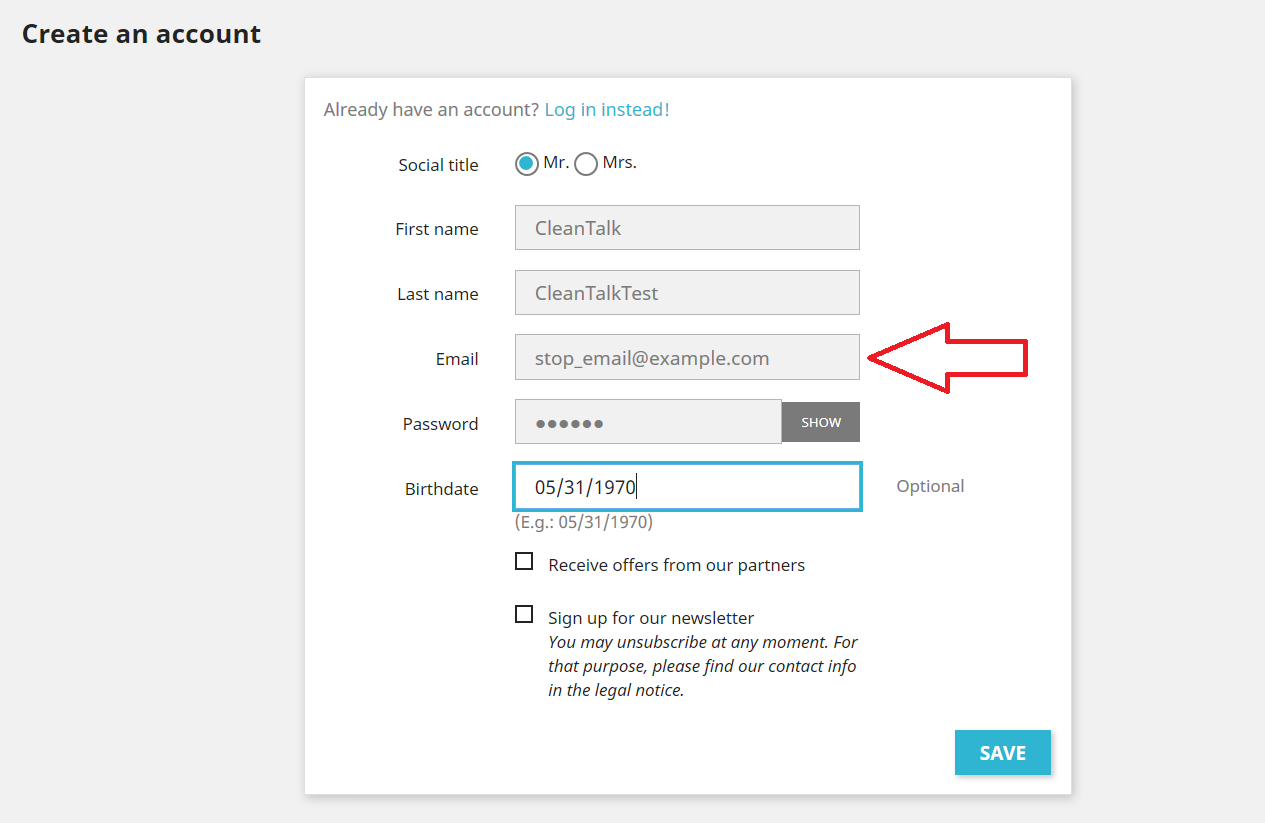
    5. You can test any form on your website by using special e-mail st********@ex*****.com. Every submits with this email will be blocked. There is an example of site registration interface on the image.

    test

    Blocking message

    How to Add Website to Cleantalk Anti-Spam Dashboard

    Please, use this guide to add website to CleanTalk Anti-Spam Dashboard: https://cleantalk.org/help/add-website

    Сongratulations! The setup is complete!

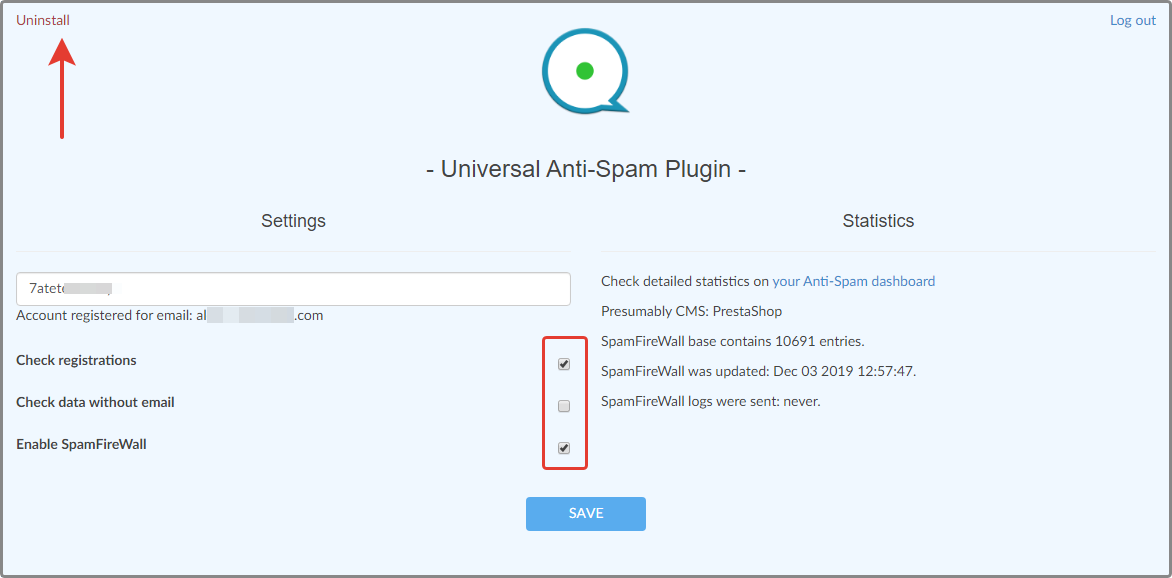
    Notice: To enter the plugin settings go to (your_website_name/cleantalk/settings.php). Here you can manage the plugin options, see statistics and uninstall the plugin.

    Settings

    Please go to your Dashboard to see your anti-spam status, add new websites or manage existing ones!
    Part 2: Adding some settings to CS-Cart to protect your CS-Cart website from spam

    Step 1: Create a block with html content.

    And after that go to its Content tab and enable the html adding mode.

    Then add the following script:

    <script>var apbct_checkjs_val = "Q6b4cecdsec6dc894Fa55387bde069cbee18705a0a25e826c30a11774da0b262";</script>
    <script src="/cleantalk/js/ct_js_test.js"></script>
    <script src="/cleantalk/js/ct_ajax_catch.js"></script>

    Attention!

    The value of the variable Q6b4cecdsec6dc894Fa55387bde069cbee18705a0a25e826c30a11774da0b262 needs to be changed and is equal to SHA256 (your API key).

    Step 2: Go to Layouts and add this block to the layout of your main page to make it display all over the website.

    That’s it! Now you know how to protect your CS-Cart website from spam and from now your site is safe.

    Read more about all CleanTalk anti-spam features. Read the following guide and learn how to protect your CS-Cart website from spam using Universal Anti-Spam plugin.


    December 2021 update:

    We have changed the way frontend hash is generated:

    • MD5 algorithm is replaced by more progressive SHA256 because of collisions, that were making brute-force easier. Now it’s much more safe. This is relevant for all users of the plugin.
    • From now hash also contains Salt (a unique set of characters generated at the installation stage) in order to exclude brute-forcing of an access key.

    Also in the admin panel for CS-CART users there is a snippet that must be inserted into the pages, i.e. no need to go somewhere yourself – everything is at hand in a box. I am attaching a picture.

    Also backward compatibility works here: users who have installed the snippet on MD5 don’t need to redo something.

  • Our client’s story: appwt.us

    Our client’s story: appwt.us

    We continue with our clients’ stories and today’s story is from Anthony, he is a founder, creator, and owner of appwt.us website among others. They provide affordable business services including Web Application Design & Development, Responsive Web Design & Development, E-Commerce Development, SEO, PPC, Programming, Script Correction, Graphic Design, Logo Design, Print Design, QR Code Design, Animation, Social Media, Advertising, Production, Videos and much more.

    And here’s the story from Anthony


    There was an issue with websites we had done for organisations and they were a Children’s Performer. We were getting SPAM displaying on their website about articles related to Viagra and other child inappropriate not related content. It was all because somebody had injected coding through their contact form.

    I found CleanTalk and decided to apply it to my client site to see if it would save us any manual preventive effort. After a couple passes we had ALL of our client websites cleaned up.

    Unlike another services, CleanTalk let me select entire regions and countries to BLOCK with blacklist. Also it let me see where the hack/intrusion attempts were coming from. And also including what code they were trying to interject, their IP Address, and other items.

    The cost of the site licenses has WAY MORE than PAID for itself in saving server bandwidth, site load speed. It works by blocking the intrusion before it floods the server slowing my site a.k.a. DDOS Attacks. And among others my time to remediate it manually which was difficult due to the hundreds of places it had put it’s malware.

    I would recommend it for these reasons and on top of that, the SUPPORT is IMMEDIATELY responsive. My requests were filled and enhancements to the PRODUCT were coded to things specific to my installations. They are great! GET THE ANTISPAM running also. The uptime monitoring tool is useful too for making certain your website is always running, just make certain to Whitelist CleanTalk and their IP Addresses.

  • The story of our client: drinkertoys.com

    The story of our client: drinkertoys.com

    We’re sure you already know most of the advantages of our Anti-Spam and Security services. But it is always easier to understand the way it works by certain examples. So we decided to ask some of our clients to share their experience of using CleanTalk products.

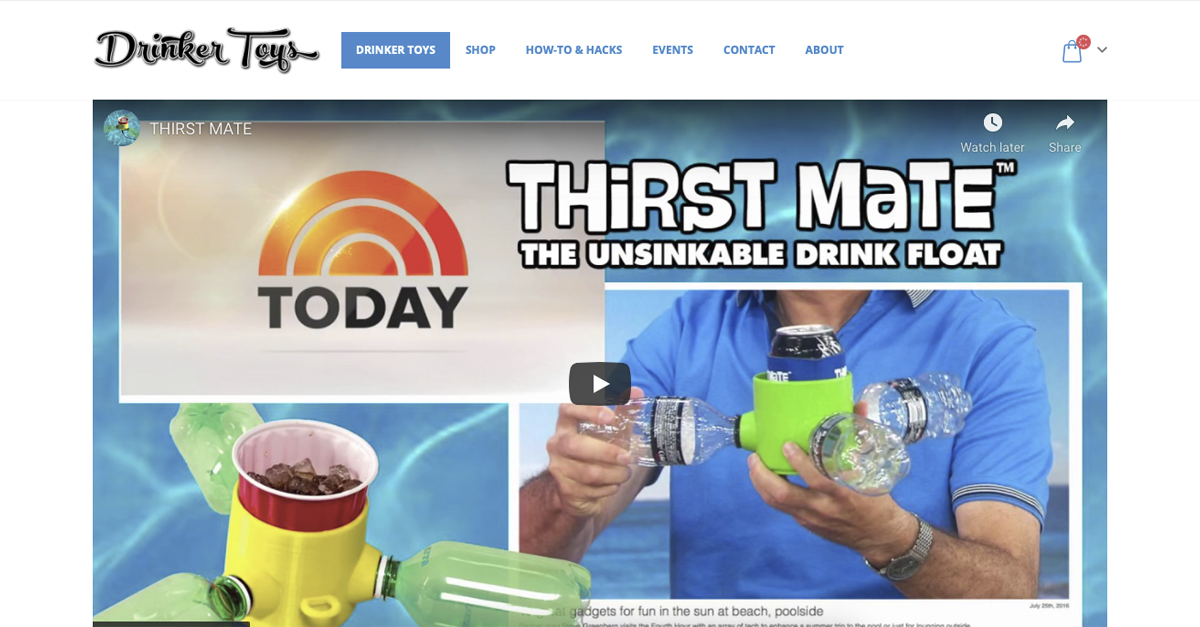
    Our client’s name is David. He is an inventor, a founder, a creator, and the owner of drinkertoys.com website among others. This company makes very useful unsinkable beverage holders for a swimming pool or a lake.

    And here goes the story from David


    I had 5 sites and at some point one of them became compromised with WP-VCD malware. It installed spam servers on every directory and infected every site with this resilient malware that can respawn.

    Another security solution I used before only handled one site at a cost about 10 times more expensive. It isn’t configurable or able to be monitored for manual remediation.

    I went back to CleanTalk security on all the sites and after a couple passes had ALL of my sites cleaned up.

    Unlike another services, CleanTalk let me select entire regions and countries to BLOCK with blacklist and let me see where the hack/intrusion attempts were coming from.

    The cost of the 5 site license has WAY MORE than PAID for itself in saving server bandwidth, site load speed (by blocking the intrustion before it floods the server slowing my site) and my time to remediate it manually which was difficult due to the hundreds of places it had put it’s malware.

    I would recommend it for these reasons and on top of that, the SUPPORT is IMMEDIATELY responsive. My requests were filled and enhancements to the PRODUCT were coded to things specific to my installations. They are great! GET THE ANTISPAM running also.

    We appreciate that kind of feedback and wish David all the best in his business.
    You are welcome to share your reviews at WordPress.org or Trustpilot.com (don’t forget to send us the link via welcome @ cleantalk.org)

  • Hiding your WordPress username from bad bots

    Hiding your WordPress username from bad bots

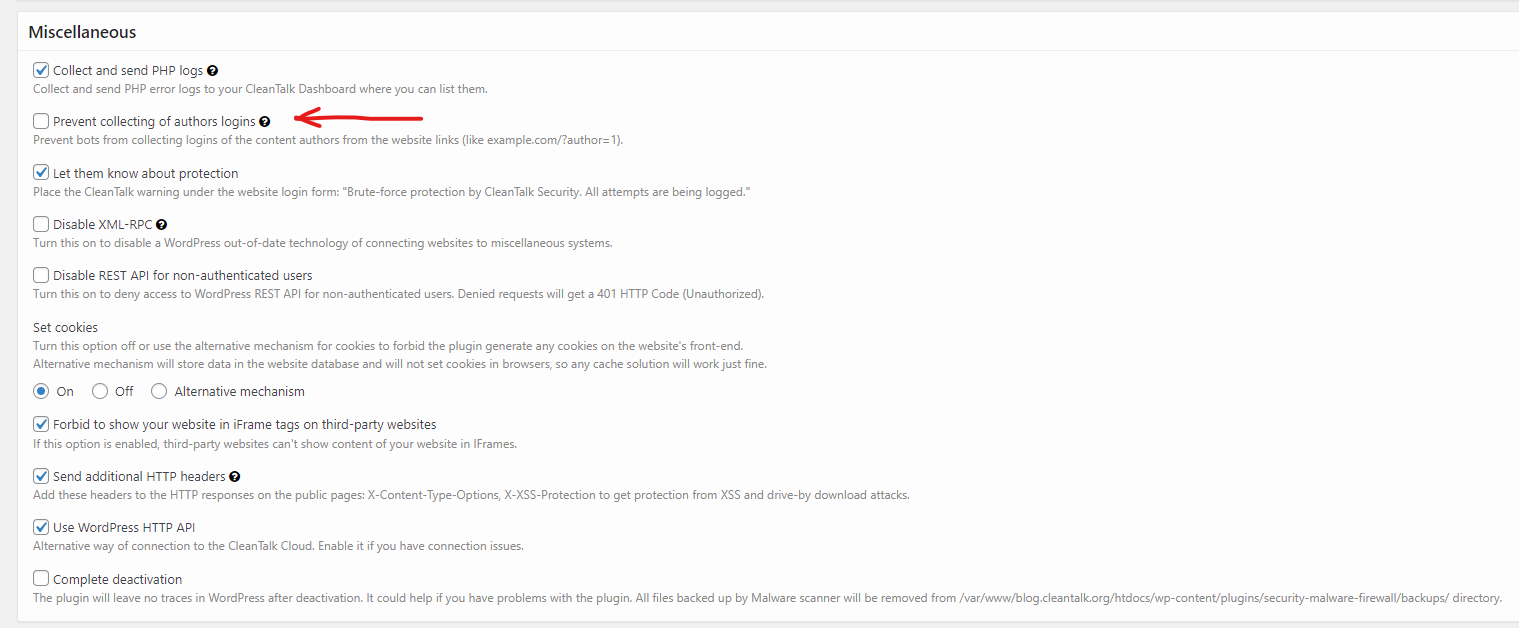
    Do you know how to hide your WordPress usernames from bad bots? We are glad to introduce you a new Security plugin improvement: from now CleanTalk allows you to hide WordPress username from bad bots brute-force.

    Before this improvement became available some bots could learn WordPress usernames by their ID and use it to brute-force these accounts later. For example, a request like «‎https://blog.cleantalk.org/?author=007»‎ could return the username «https://blog.cleantalk.org/author/james_bond».

    This option is switched off by default so in order to avoid vulnerabilities like that we highly recommend to switch it on.

    Step 1: Go to PluginsInstalled Plugins.

    Step 2: Go to Settings beneath the Security plugin.

    And after that choose General Settings.

    Step 3: Go to Miscellaneous section and find checkbox ‎«‎Prevent collecting of authors logins» and just check this box.

    Step 4: Press the «Save Changes» button.

    Success! That’s how quickly CleanTalk allows you to hide WordPress username from bad bots

    If you have any questions, add a comment and we will be happy to help you.

    Create your Cleantalk account – Register now and enjoy while CleanTalk Anti-Spam plugin protects your Clean and Simple Contact Forms from spam.

  • Access key rotation for Anti-Spam and Security

    Access key rotation for Anti-Spam and Security

    In case your website is connected to CleanTalk it uses a special Access key to exchange information. We have improved its functionality to guarantee you the safest user experience.

    Connect your website to CleanTalk in 5 minutes and forget about spam.

    Improved Access key safety

    Your Anti-Spam and Security Access keys don’t have any expiration date. So don’t worry, you don’t have to do anything about it.

    Access key doesn’t need to be manually renewed except several cases:

    • In case you gave your website access to web developer or a freelancer and it may be compromised.
    • When your website had been hacked.
    • When you expect your CleanTalk access being given or copied to a third party.
    • In case you have any other issues and risks with CleanTalk account access.

    Also you can always change your password or email in CleanTalk dashboard.

    How to update your Access key

    Step 1: Add your website to dashboard using the button below. If your site is already connected to CleanTalk pass to Step 3.

    Step 2: Input your website URL in “Site URL” field.

    Step 3: Click on “Settings” button under your website name.

    Step 4: Go to “Change the Access key”.

    Step 5: Click on “Generate key” to create new safe Access key.

    Step 6: Then Apply the key by pressing the button below.

    Step 7: And just close the window after you are finished.

    Well done! Your new Access key is successfully generated and applied to your website. From now it will be active and if needed, you may change it again to guarantee its safety.

  • New feature: Settings and Personal lists templates for Anti-Spam and Security

    New feature: Settings and Personal lists templates for Anti-Spam and Security

    For our clients with more than one website used by Anti-Spam and Security protection we created Templates to save your website settings and personal lists – you can find it in your «Tools» menu. Using Templates you can easily copy any quantity of personal lists and filters, that you have already created for one of your websites, connected to your CleanTalk account.

    How to connect your website to CleanTalk

    In order to connect your website to CleanTalk just register via register link and follow the instructions from email. It may take you about 5 minutes to fully protect your website from spam.

    How to use Templates

    Step 1: If you want to use personal lists template, create at least one list. For more details about adding and working with personal lists use our guide. Website settings for templates are always created automatically when the site is connected to CleanTalk.

    Step 2: After that go to «Tools»«Templates» and press «Add template» button.

    In the dialog window name your Template and select a website that has at least one personal list using «Copy settings from site» field.

    Use «Set as default» checkbox to automatically add personal lists to all the new websites you connect to your CleanTalk account and «Copy personal list from…» checkbox to add personal lists from selected site to this template. If the checkbox is not marked, the template will only copy website settings.

    Step 3: Apply Settings and Personal lists template to your new website. In order to apply the template to any site use «Apply» link under the template that you wish to use.

    After that just use «Apply to services» field in order to select website that you wish to use this template with.

    That’s it! Feel free to use as many templates as needed to save time while protecting your websites from spam and security issues.

    If you’re looking from where to start – create your first template.

    In case you got any problems while using CleanTalk you can always open a private ticket.

  • CleanTalk updated the 2FA (two-factor authentication) option

    CleanTalk updated the 2FA (two-factor authentication) option

    Two-factor authentication is still one of the most effective methods of protecting your account. One of the most common ways to hack WordPress sites is to brute force passwords.
    CleanTalk Security plugin for WordPress already has two-factor authentication by sending an authorization code to the email account.
    We have now expanded the two-factor authentication options and added the Google Authenticator option.
    Now you can choose the most convenient 2FA option for you.
    You can learn more about how to set up two-factor authentication in WordPress here https://cleantalk.org/help/two-factor-auth
    You can further strengthen the protection of accounts and change the URL address of the authorization page. You can read more here https://blog.cleantalk.org/how-to-change-wp-login-url/.


    If you have any questions, we will be happy to help you.
    You can leave a comment below or create a private ticket here.

  • How to change wp-login URL

    How to change wp-login URL

    Hello,

    We have updated the WordPress CleanTalk Security plugin and added a new option that allows you to change the URL of the authorization page wp-login.

    This option helps you change the default wp-login URL. Hackers use scripts for massive brute-force attacks, and since most sites use a default login page URL, hackers configure scripts for such URLs. When you change the URL of the authorization page, hackers will not have the opportunity to perform brute-force attacks in scripts in automatic mode.

    How to enable option to change wp-login URL

    The option allows you to easily change the address of the authorization page to any desired one.
    To enable the option, go to the WP Dashboard plugin settings -> Settings -> Security by CleanTalk -> General Settings and check box Change address to login script. Then add a new URL and click Save Settings.
    You can customize the URL of the page to redirect users who visited the page with the default URL of the wp-login page.

    This option does not change files and does not rewrite URLs in system files. To return the address of the default authorization page, it is enough to disable the option in the plugin settings or set a new value.

    Using an authorization page with a non-default address significantly increases the security of your site’s accounts from hacking using brute-force attacks.

    If you are using caching plugins, then you need to add a new authorization page in the caching exceptions.

    Don’t forget to bookmark your new wp-login page URL.

    If you have any questions, add a comment and we will be happy to help you.