CleanTalk added spam protection for Klaviyo web forms using direct form integration. So in case, you prefer using Klaviyo web forms be sure to use the most effective Anti-Spam plugin. Read the guide below and learn 4 steps to protect your Klaviyo web forms from spam.
Once the CleanTalk Anti-Spam plugin is installed it starts to protect all of the existing forms on your WordPress website. It may not only be Klaviyo web forms but also many others.
To install the Anti-Spam plugin, go to your WordPress admin panel → Plugins → Add New.
Then enter «СleanTalk» in the search box and click the Install button for «Spam protection, Anti-Spam, FireWall by CleanTalk».
After installing the plugin, click the «Activate» button.
After it is done go to the plugin settings and click the «Get Access Key Automatically» button. Then just click the «Save Settings» button.
That’s it! From now you How to completely protect your Klaviyo web forms from spam.
How to check spam protection for Klaviyo web forms
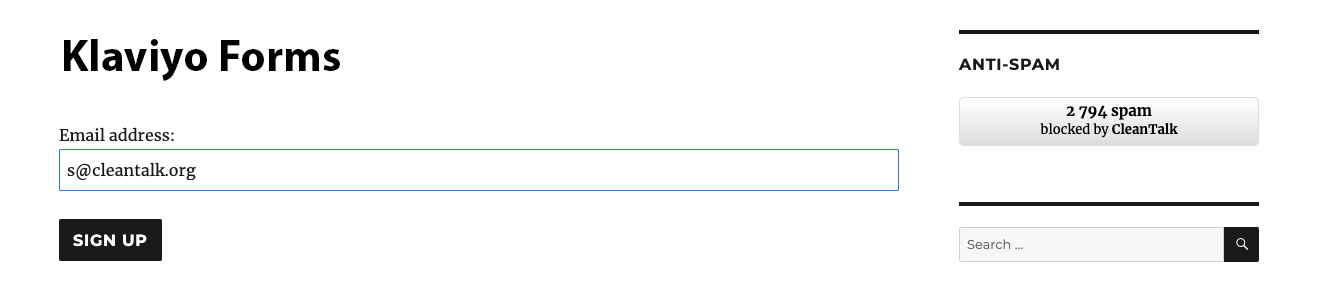
You can test the work of Anti-Spam protection for your СonvertKit Forms by using a test email s @ cleantalk.org (without spaces). First, open the form in an Incognito browser tab. Fill in all the required form fields and send a form. After submitting the form, you will see a block message about the block on the form submission.
2
If you have any questions, add a comment and we will be happy to help you.
Create your CleanTalk account – Register now and protect your СonvertKit Forms from spam in 5 minutes
Update
The protection works only for website visitors, not for website admins. Be sure to test the form protection using Incognito mode.
Additional features
CleanTalk protects all forms at once: comments, registrations, feedbacks, contacts, reviews.
Installation takes about 1-2 minutes.
Smart 99% protection against spambots.
Always online – 24/7 technical support.
Logs, SpamFireWall, personal lists, country filters, stop-words, and many others.
Discover the complete list of CleanTalk Anti-Spam plugin features here.
False positives happen. Don’t be scared if you happen to encounter one of them – any issue always has one or another solution.
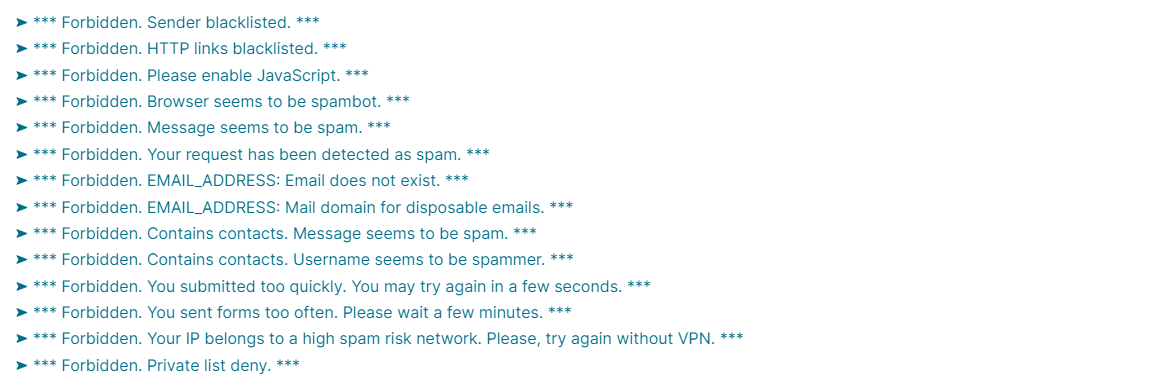
In order to help you and save you time, we have prepared a list of guides for all existing CleanTalk cloud responses (also known as API responses, server answers, service responses). Use it to see the detailed instructions for every type of response and what to do with it if you suppose, you have encountered a false positive.
Hey there, Opencart store owners! Are spammers giving you a headache? Let us put a smile on your face. CleanTalk Anti-Spam plugin for Opencart 4 is your new best friend in the fight against online nuisances!
Imagine a world where your Opencart checkout form is protected from spam and fraudulent orders. Well, guess what? That world is here! Our clever little plugin works tirelessly behind the scenes to keep your store safe and your customers happy.
Here’s why you’ll love CleanTalk:
Spam-Be-Gone: Watch those annoying spam attempts bounce right off your checkout form. It’s like having a bouncer for your online store!
Fraud Fighter: Say “not today” to those sneaky fraud orders. CleanTalk’s got your back, 24/7.
Easy-Peasy Integration: No tech wizardry required! CleanTalk plays nice with Opencart 4, making setup a breeze.
Happy Customers, Happy You: With a smooth, spam-free checkout, your real customers will love shopping with you even more.
Time-Saver Extraordinaire: Less time cleaning up spam means more time growing your business. Who doesn’t want that?
But don’t just take our word for it! Give CleanTalk a spin and see the difference for yourself. Your Opencart store deserves the best protection from checkout form spam and fraud orders, and that’s exactly what we deliver.
Ready to kick spam to the curb and give your store the shield it deserves? Hop on board with CleanTalk today – because a happy checkout is a protected checkout!
As you know, we have direct integration with the most popular contact form plugin – Contact Form 7. Also, you are probably familiar with the Flamingo – a message storage plugin, which doesn’t store submitted messages. Earlier, when using these two plugins simultaneously with CleanTalk Anti-Spam, messages recognized as spam would end up in the “spam” folder instead of just being deleted.
After a couple of requests about this, we decided that it would be a great idea not to store messages recognized as spam in Flamingo. So now we’ve made the “Save Flamingo Spam entries” option in the Anti-Spam plugin settings. It is enabled by default, but you can turn it off, after which messages recognized as spam will stop being stored in this folder.
How to activate the option
1. Install both Contact Form 7 and Flamingo plugins. The option is displayed only if you have both plugins installed and activated.
2. Go to Anti-Spam plugin settings in your WordPress dashboard
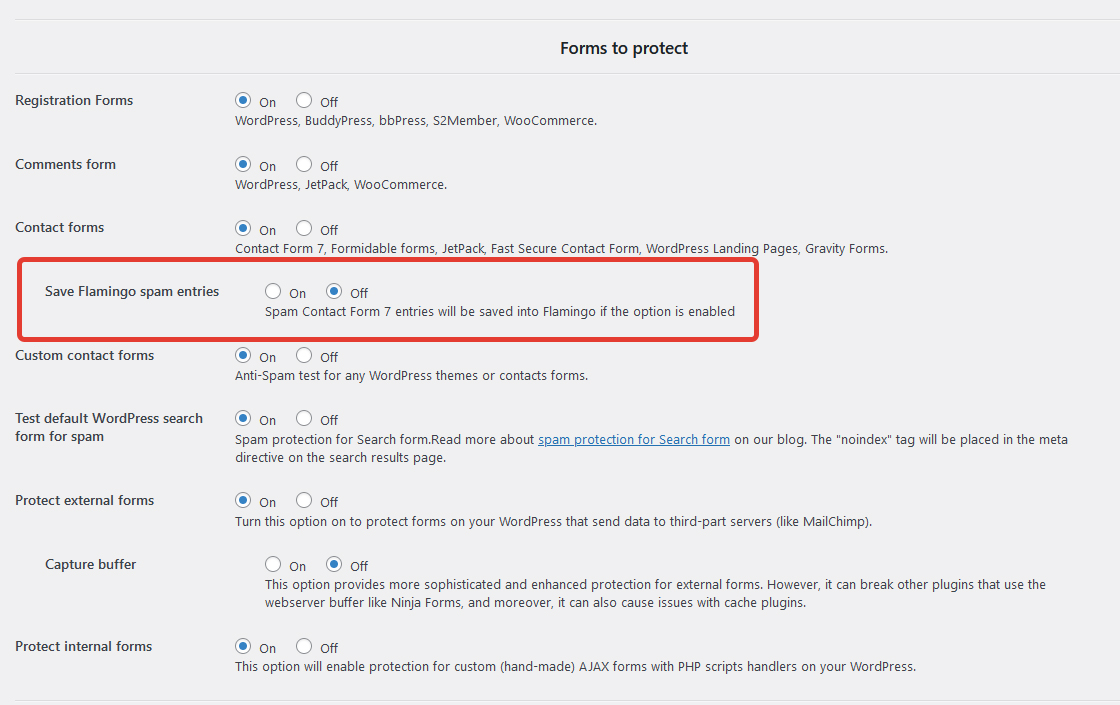
3. Scroll down to “Forms to protect” directory, find the “Save Flamingo spam entries” option and switch it off. The option is switched on by default.
That’s it! Now your messages recognized as spam will not be stored in Flamingo. If you want to see these messages again, just turn this option back on.
Spam is an ongoing issue for website administrators, and Joomla sites are no exception. When spam bots target your registration forms, they can flood your database with fake accounts, consume resources, and make managing your user base a nightmare. Thankfully, tools like CleanTalk Anti-Spam can help protect your Joomla registration forms from spam effectively. This comprehensive guide will walk you through the steps to integrate CleanTalk Anti-Spam with your Joomla site and protect Your Joomla registration form from spam
Why Protect Your Joomla Registration Forms?
Before diving into the steps, it’s crucial to understand why protecting your registration forms from spam is essential. Here are some of the primary reasons:
Database Integrity Spam registrations can clutter your database with unnecessary data, making it harder to manage and slower to operate.
Resource Management Spam bots consume server resources, which can slow down your website and increase hosting costs.
User Experience A flood of spam registrations can impact the user experience by making it difficult for genuine users to register and interact with your site.
Security Risks Some spam accounts may be created with malicious intent, aiming to exploit vulnerabilities or distribute malware.
What is CleanTalk Anti-Spam?
CleanTalk is a cloud-based anti-spam solution designed to protect websites from spam bots without relying on traditional CAPTCHA methods. It offers real-time spam protection by checking form submissions against a comprehensive database of known spam activities. CleanTalk is known for its high accuracy, ease of use, and minimal impact on user experience.
Setting Up Registration form protection
To protect your Joomla registration form from spam, follow these steps to set up CleanTalk Anti-Spam:
Step 1. Make a backup of the site files and database!
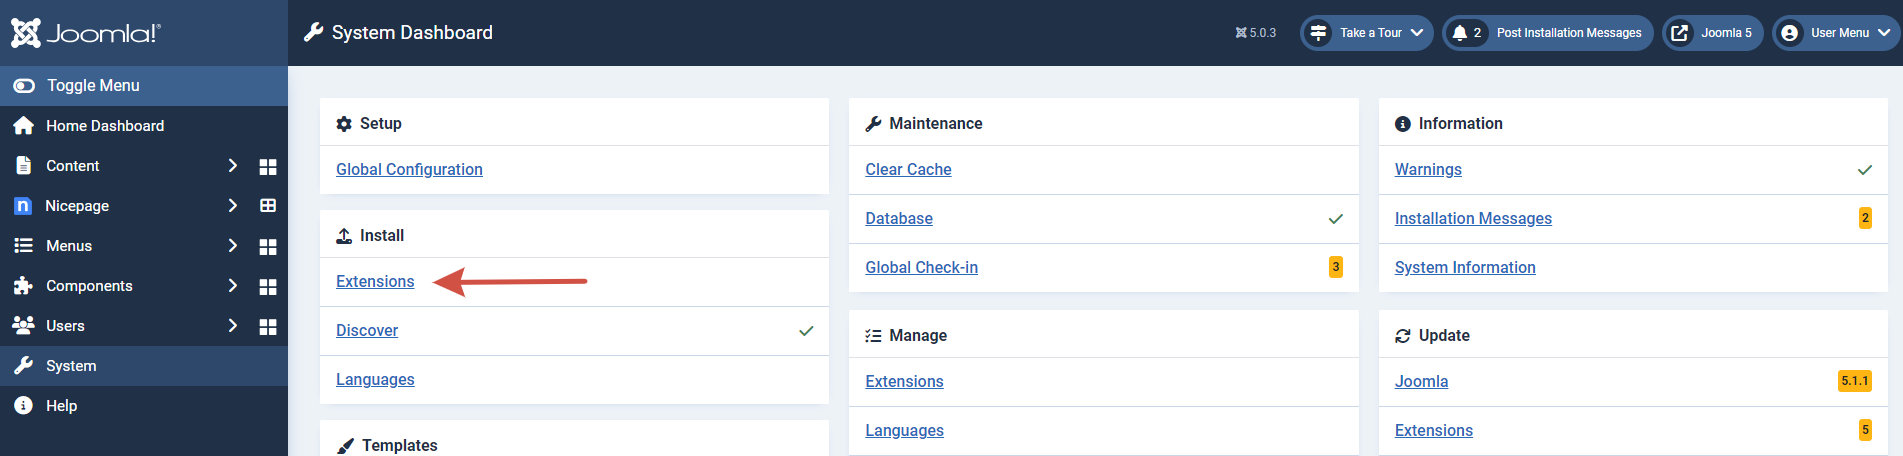
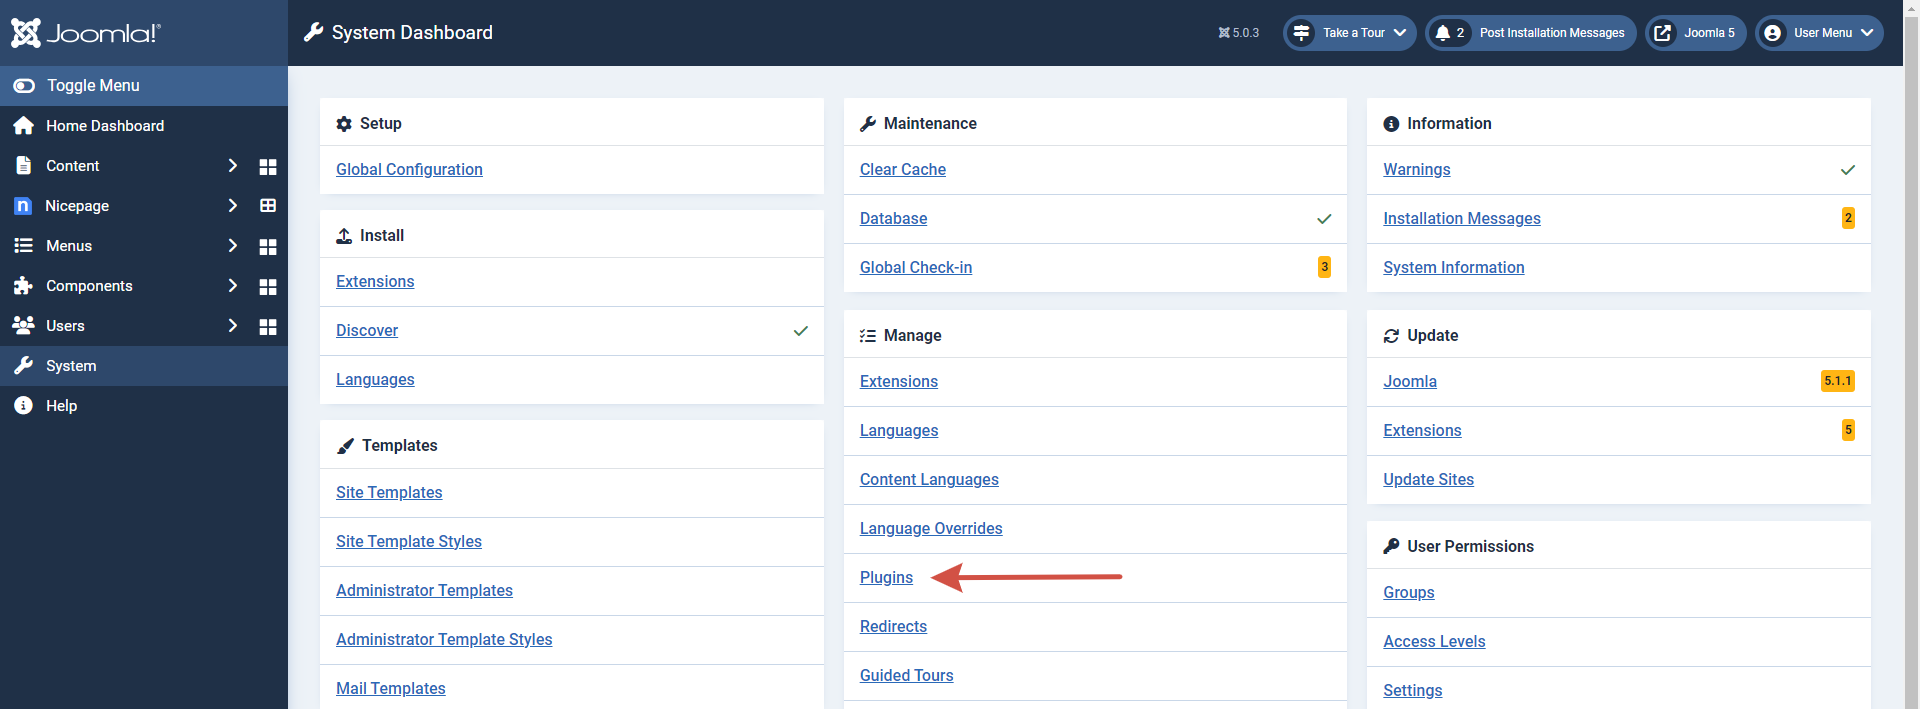
Step 3. In the main Joomla menu open System → Install → Extensions.
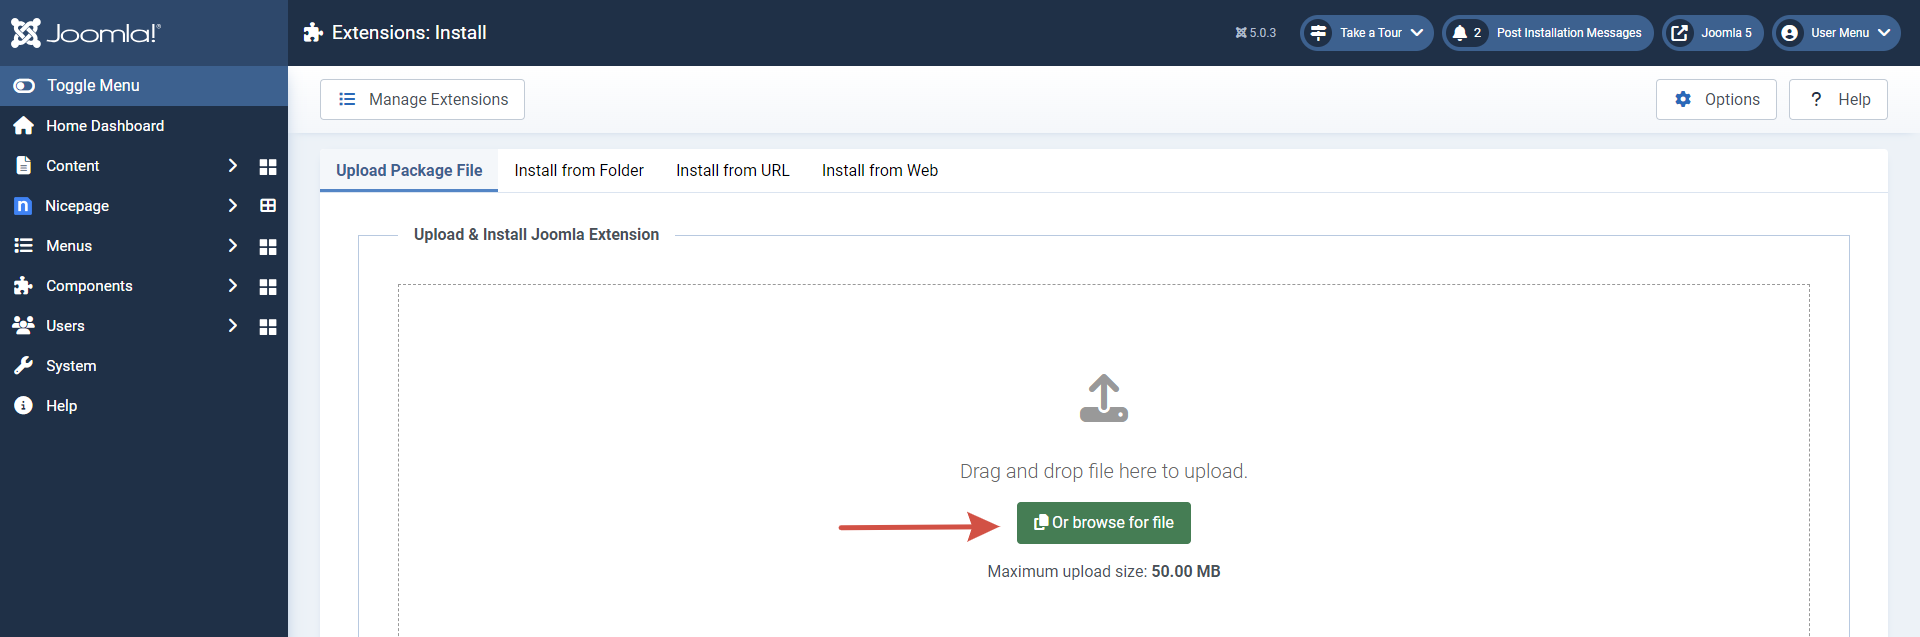
Step 4. Click the “Browse for file” button to upload the archive.
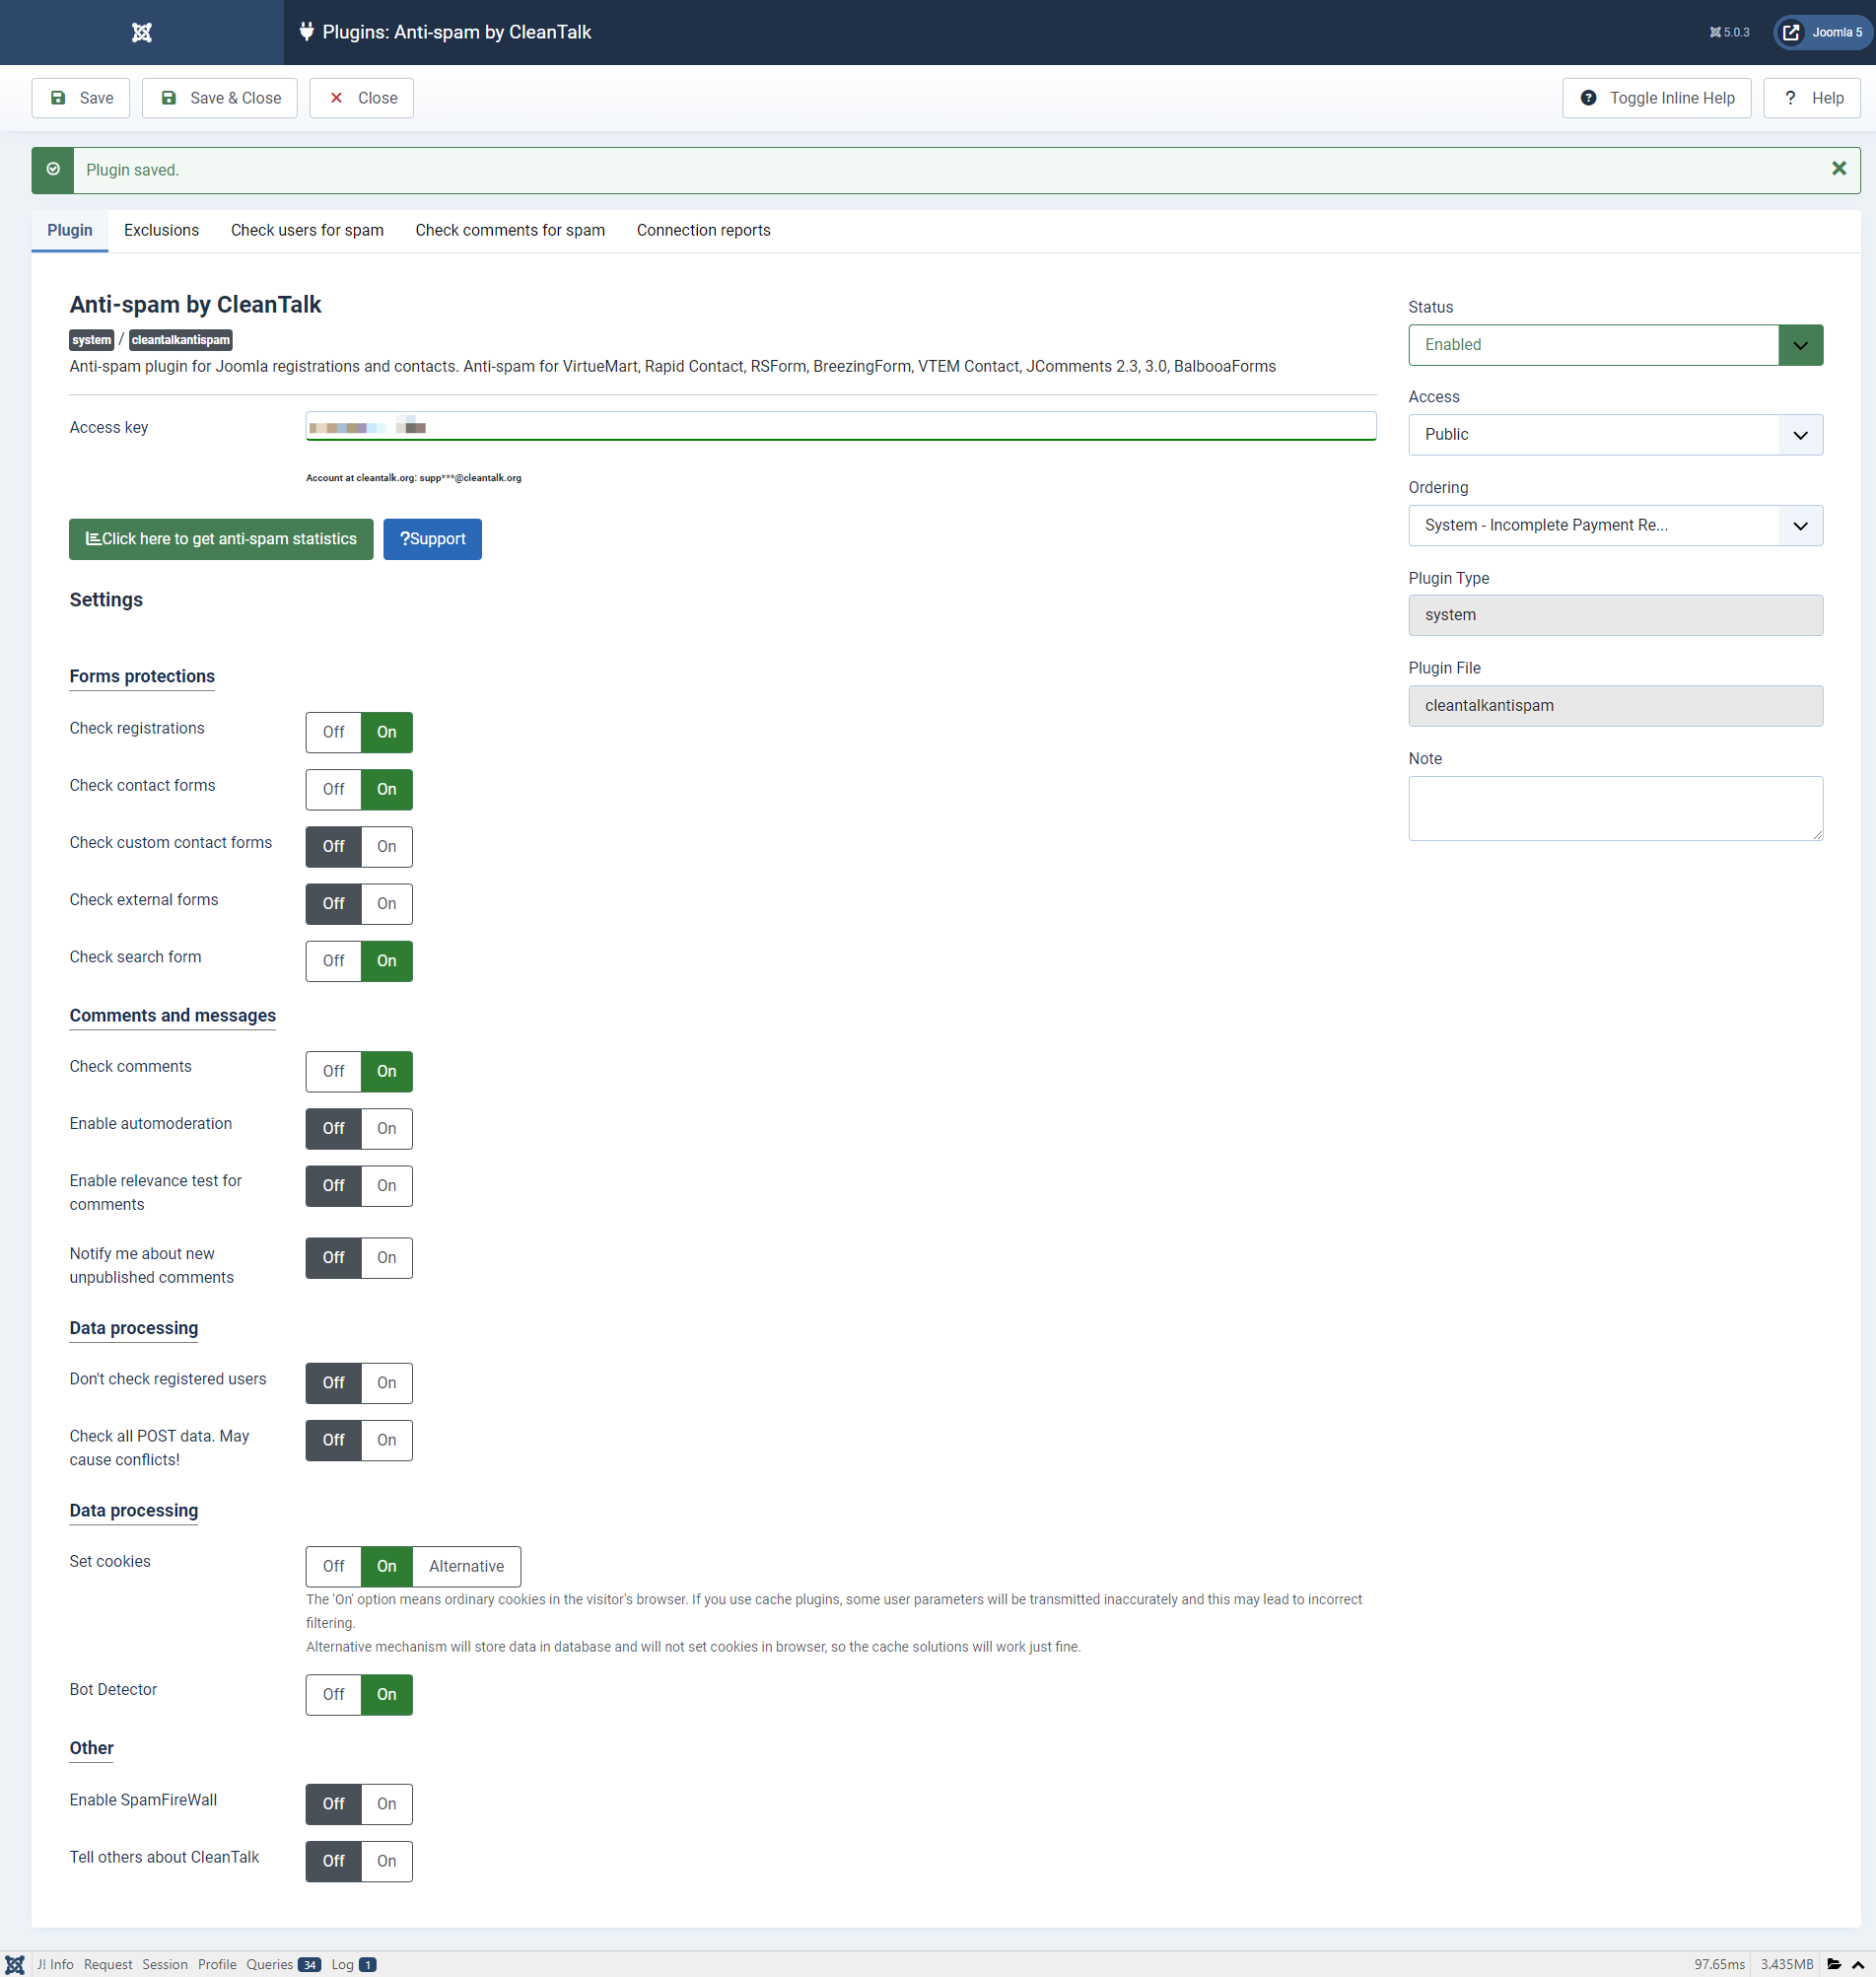
Step 5. After installation, you will see the success message:
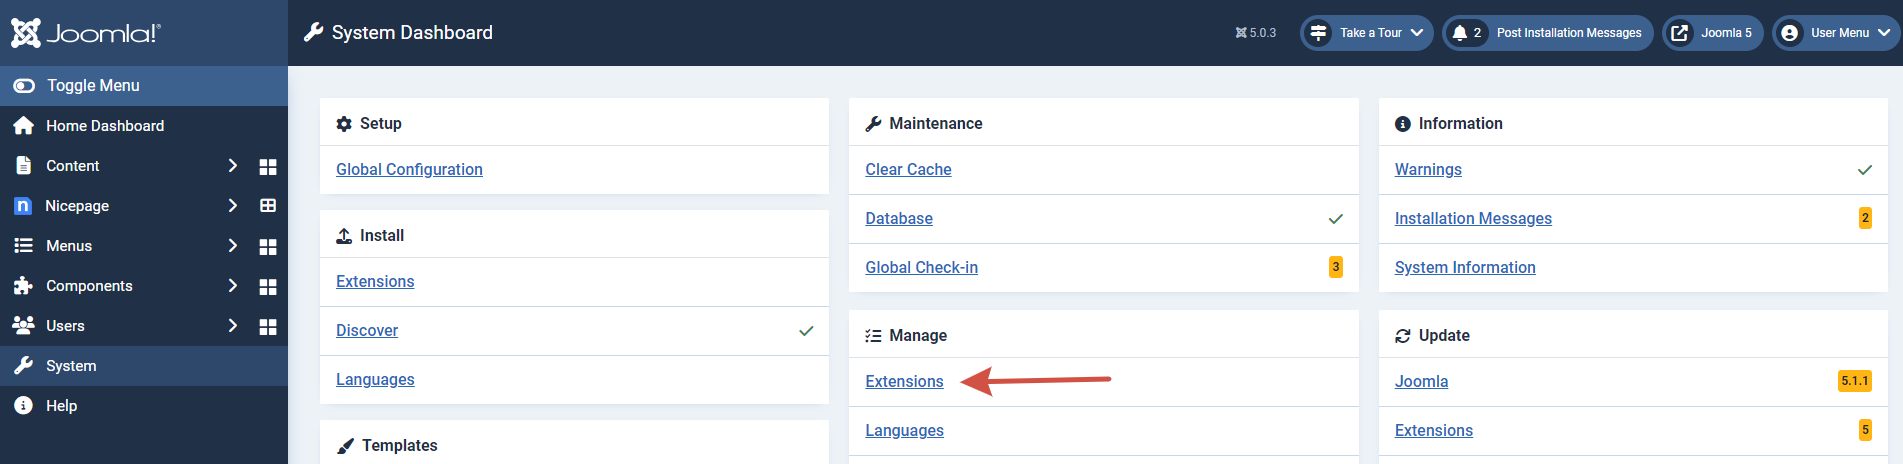
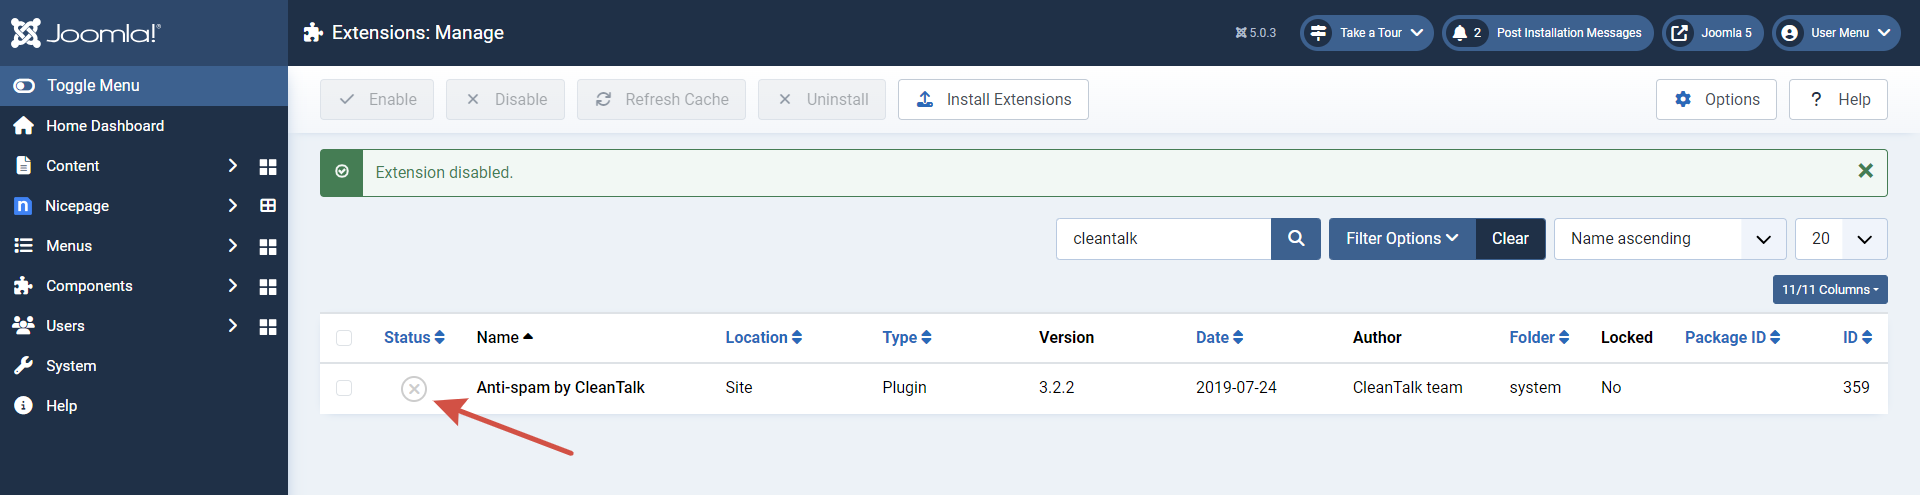
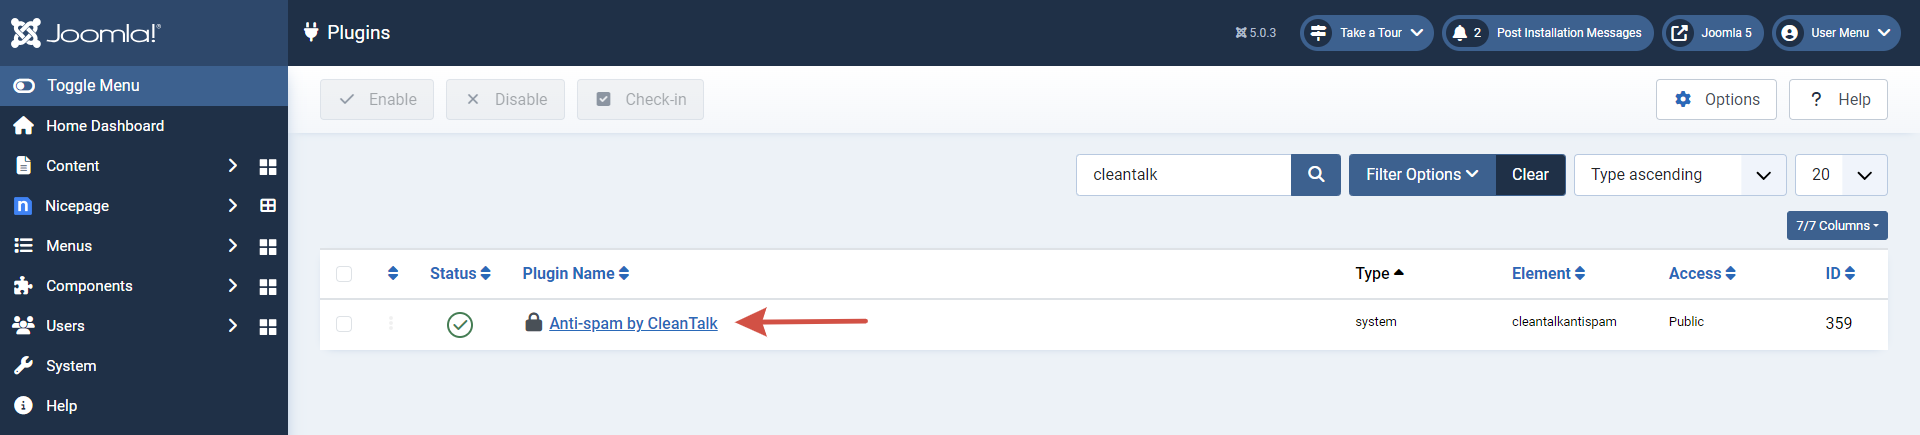
Step 6. Go to plugin settings: Extensions → Anti-Spam by CleanTalk, and enable the plugin.
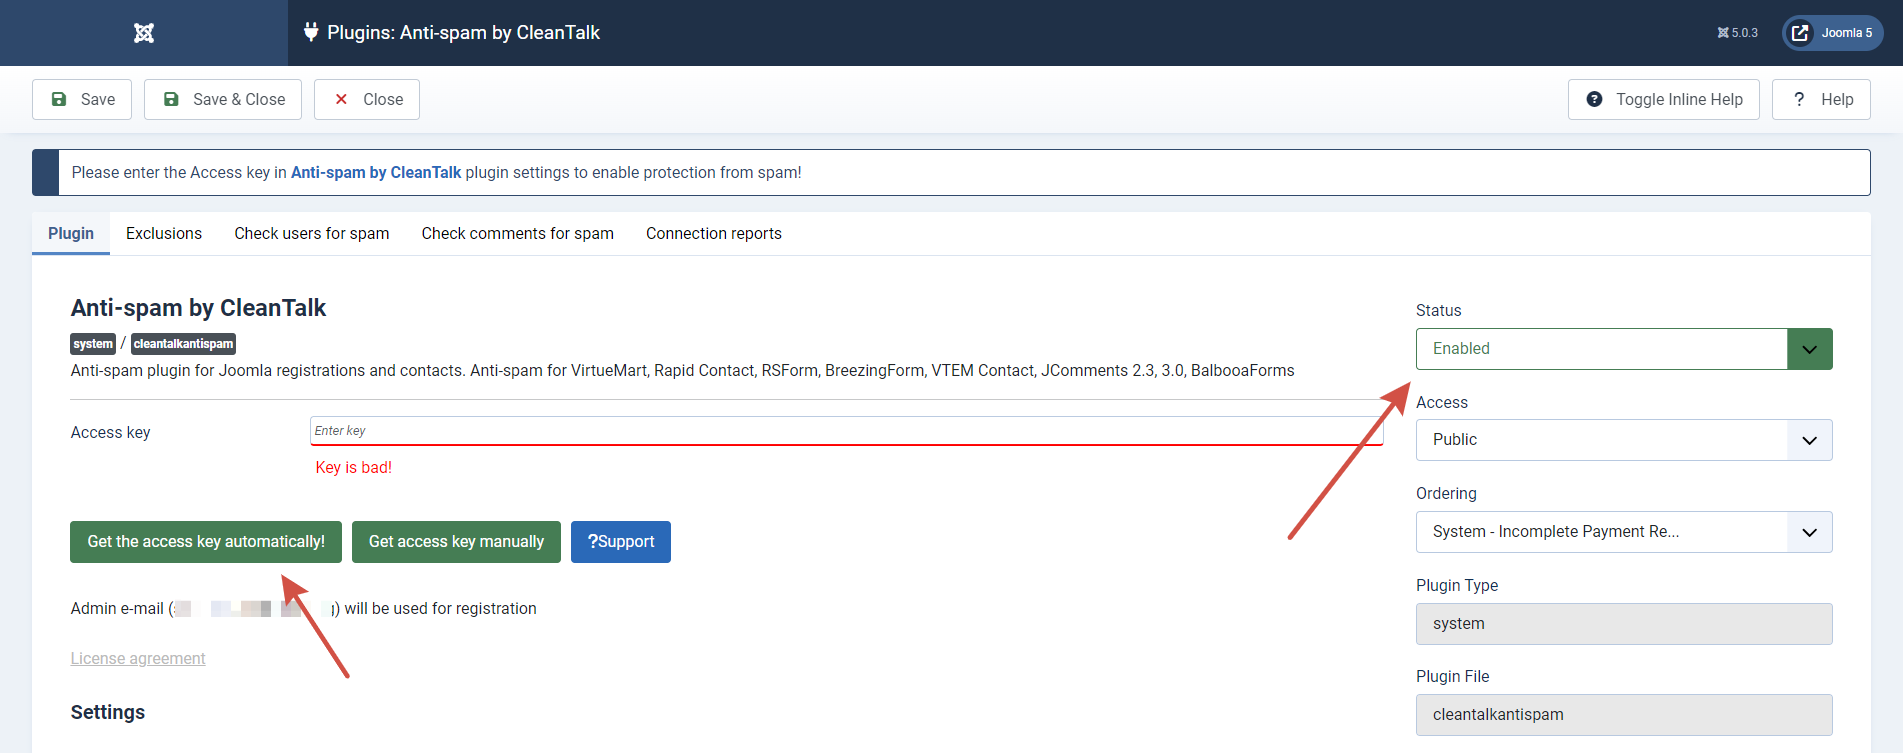
Step 7. In plugin settings press the Get access key automatically button. Admin email address will be used for registration.
If you want to use another address click the button Get access key manually. Fill in the easy registration form and you will receive your key.
Step 8. Enter your Access key in its field, choose protection options, and save settings.
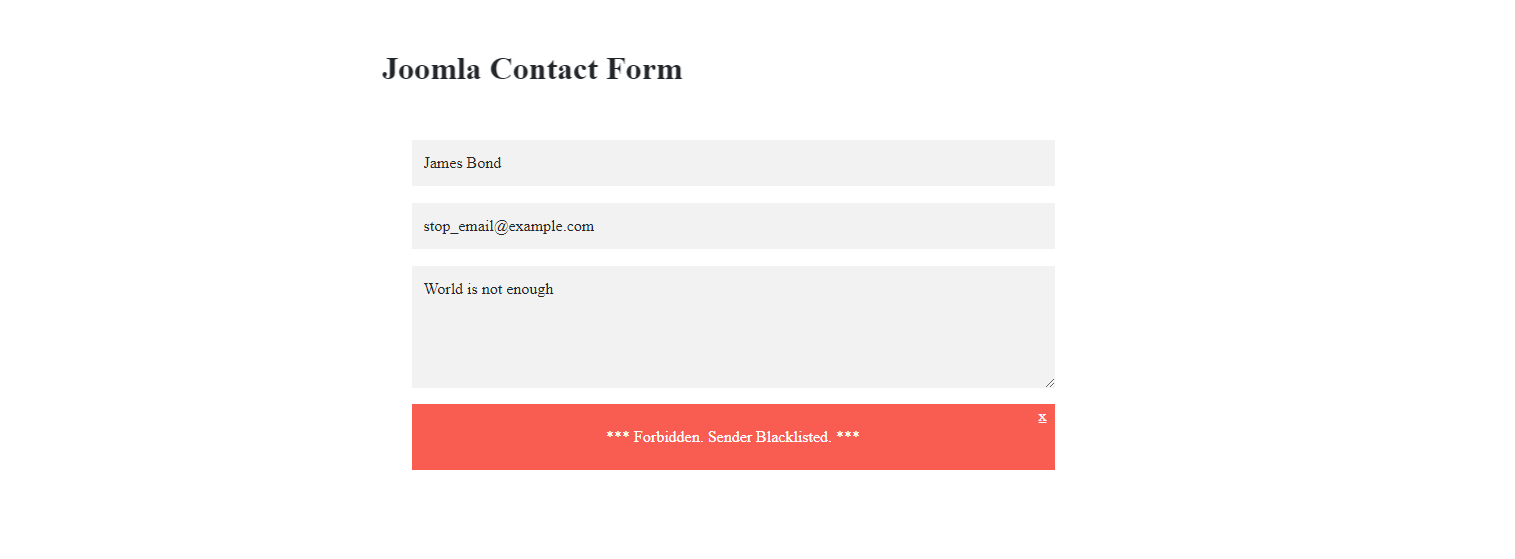
Test Your Registration Form
Test protection with this email address stop_email@example.com. Write a comment, registration, or contact message with this email. Here you should see the plugin respond, like in the screenshot.
You are amazing!
You have successfully installed Anti-Spam and now your registration forms (and all the other forms) are protected from spam. If something went wrong, please let us know in the comments below or create a private ticket.
In April, CleanTalk SpamFireWall achieved a significant milestone by blocking an impressive 777 million bot requests. This accomplishment underscores our commitment to enhancing digital security through cutting-edge technology and vigilant monitoring.
This feat serves as a reminder of the persistent threat posed by automated bots in today’s interconnected world. SpamFireWall plays a crucial role in safeguarding online platforms from exploitation by swiftly identifying and neutralizing suspicious activities.
We owe this success to our team’s dedication and our customers’ support. Their invaluable feedback and collaboration have been instrumental in achieving this remarkable milestone.
You can find our latest spam stats here for those interested in more detailed statistics on bot activity and SpamFireWall’s performance.
SpamFireWall, an optional feature of the CleanTalk Anti-Spam Plugin, enhances website security by blocking access for spam-active IP addresses, effectively denying them entry (via blocking GET requests). By intercepting spambots before they reach the website, SpamFireWall prevents the loading of pages for these malicious bots. This action alleviates the burden on your web server, reducing the load on both the database and server resources.
Moving forward, SpamFireWall remains committed to staying at the forefront of cybersecurity. We will continue to innovate and adapt to emerging threats to ensure a safer digital landscape for all users.
This achievement in April reflects our unwavering resolve to combat cyber threats and uphold the highest standards of digital security. Together, we will continue to protect online ecosystems and instill confidence in users worldwide.
In the expansive domain of WordPress, a critical security flaw has been unveiled within the widely-utilized All-in-One SEO plugin. Known by its identifier, CVE-2024-3368, this vulnerability exposes a concerning loophole that malicious actors can exploit through Stored Cross-Site Scripting (XSS) attacks, jeopardizing the security of numerous websites. The trouble concerns all versions of All-in-One SEO older than 4.6.1.1.
This flaw was unearthed during routine security evaluations, shedding light on a troubling scenario where unauthorized individuals can inject harmful JavaScript code directly into WordPress posts. This unauthorized access allows for the manipulation of administrative privileges, potentially leading to serious repercussions such as website tampering and unauthorized data access.
In response to this alarming revelation, immediate action is crucial. WordPress website owners are strongly advised to promptly update their All-in-One SEO plugin to the latest version, fortified with patches to address this vulnerability. Furthermore, implementing stringent security measures, including regular audits and access controls, is essential to mitigate the risk of exploitation.
Behind the scenes, CleanTalk remains dedicated to safeguarding the WordPress ecosystem. Through vigilant monitoring of plugins and the provision of timely alerts, CleanTalk aims to empower website owners with the necessary tools and knowledge to defend against cyber threats effectively and preserve the integrity of their digital platforms.
Many online comments and reviews are helpful, but some might not be written by real users. A special verification badge could indicate if a comment/review is confirmed to be written by a real person. This might help you decide which reviews to trust more when reading/discussing online.
Why it is important to protect a mobile app from spam bots
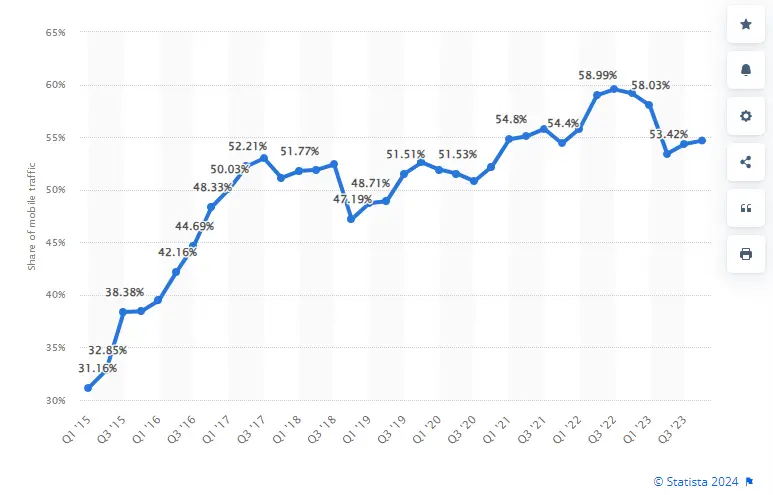
Spam bots are a serious threat to your website, but it affects your mobile app just the same. More than 54% of traffic goes from mobile devices and 76% of internet traffic comes from bad bots. This means that bad bots generate up to 41% of your mobile traffic However, we have listed 5 reasons to protect your mobile app from bots and to stop bad bots before harming your app.
Why it is important to protect your mobile app from spam bots
User experience Spam bots can flood your app with fake accounts, comments, and messages, which can eventually lead to degrading the user experience for legitimate users.
Security Spam bots can carry out malicious activities such as spreading malware, phishing attacks, and stealing sensitive information from users.
Resource consumption Spam bots can overwhelm your servers and consume valuable resources, leading to slower performance and increased costs.
Reputation If your app is known for being overrun by spam bots, it can damage your reputation and deter legitimate users from using your app.
Compliance Depending on the nature of your app, you may be required to comply with regulations related to data privacy and security. Allowing spam bots to operate unchecked can put you at risk of violating these regulations.
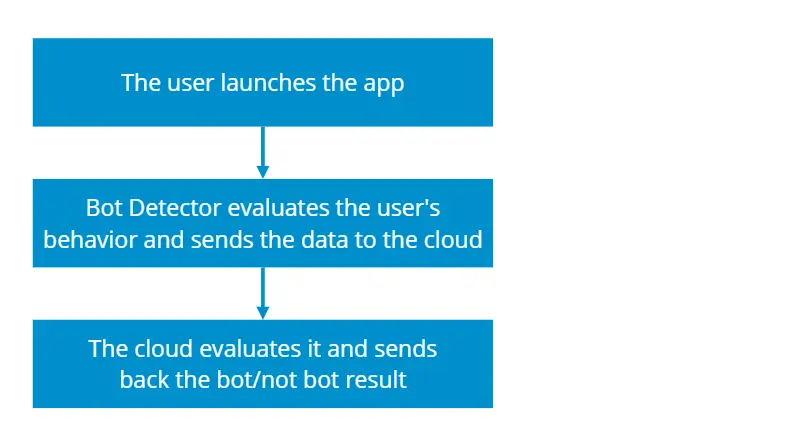
How it works
The Bot Detector works in the background and is not visible to the user. It does not require the user to confirm that he is not a bot.
How to install your mobile app spam protection
If you need to protect mobile apps from spam, you will definitely need a solution that uses API to check registrations for spam. The Bot Detector service uses the CleanTalk check_bot API method via a special library that you can download and integrate with just 1 line of code. You can check out our detailed instructions on GitHub below.