Contact Form 7 remains one of the most widely used contact form plugins in the WordPress ecosystem, with more than 10 million active installations listed in the official WordPress plugin directory. It has stayed popular for years because it gives site owners a practical, lightweight, and flexible way to add contact forms without switching to a heavier all-in-one form builder. WordPress.org also notes that the plugin uses its own Schema-Woven Validation technology, which shows that Contact Form 7 is built not just as a basic form tool, but as a structured system for handling user input reliably.
In 2026, however, popularity also means exposure. Public-facing contact forms are easy for bots and abusive senders to find, test, and submit at scale, which is why Contact Form 7 gets spammed so often. Contact Form 7’s own documentation treats spam as a normal operational issue, not a rare exception: the plugin officially supports multiple anti-spam layers, including Akismet, Cloudflare Turnstile, the disallowed list, and reCAPTCHA v3. The project also explicitly warns that weak protection or unsafe mail configuration can allow spammers to abuse a form and send messages through the site itself.
That is why Contact Form 7 spam should not be framed as a plugin defect or an unusual technical failure. It is a predictable consequence of running a highly visible form on a public website. In practice, especially in 2026, the real question is not whether a Contact Form 7 form can attract spam, but which protection stack is strong enough to block automated submissions without creating unnecessary friction for real users. Contact Form 7 itself recommends combining different types of spam protection rather than relying on a single mechanism alone.

Common types of spam in Contact Form 7 (CF7)
Spam in Contact Form 7 is not limited to one obvious pattern. The most common and best-documented category is automated bot spam – scripts that submit forms at scale faster than a human team can review them manually. Google has explicitly warned that bots are commonly used to fill out web forms automatically, which is one of the main reasons public-facing forms become a frequent target for abuse. Contact Form 7 reflects the same reality in its own documentation by offering multiple official anti-spam options and integrations rather than treating spam as an exceptional case.
Another important category is human spam or human-assisted spam. Contact Form 7’s own reCAPTCHA FAQ explains that CAPTCHA tools can block spambots effectively but are “helpless against other types of spam,” and specifically notes that human spammers can easily get around them. That makes this a critical distinction for site owners: blocking bots alone does not mean the form is fully protected. This is also why Contact Form 7 advises using two or more spam protection modules together instead of relying on one layer only.
A third risk is form abuse caused by unsafe configuration. Contact Form 7 explicitly warns that if mail settings are configured unsafely and sufficient spam protection is not in place, spammers may abuse the form to send messages through the site itself. In other words, some Contact Form 7 abuse is not just about junk submissions cluttering an inbox – it can also turn the form into a delivery mechanism for unwanted email.
If you want to broaden this section beyond strictly official Contact Form 7 documentation, you can also mention fake contact data, direct POST abuse, and human-like spam that slips through basic CAPTCHA checks as practical patterns observed by CleanTalk in real-world Contact Form 7 cases. Those points are useful, but they should be framed as product or field observations rather than as claims directly documented by Contact Form 7 itself.
Official anti-spam options and integrations in Contact Form 7
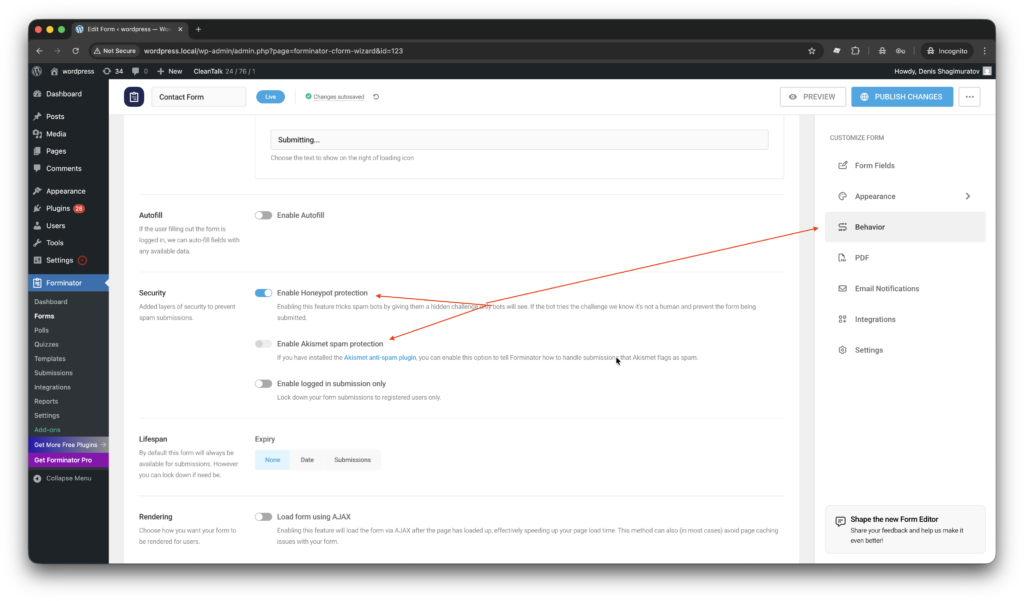
Contact Form 7 includes several official anti-spam options and integrations, which shows that spam protection is not treated as an afterthought. In its own FAQ, Contact Form 7 says users can protect forms with anti-spam features such as Akismet, Cloudflare Turnstile, and the disallowed list. The plugin also maintains an official integration for reCAPTCHA v3, which remains part of its supported anti-spam stack.
One of the most important options is Akismet. Contact Form 7 explains that Akismet works through specific form-tag options such as akismet:author, akismet:author_email, and akismet:author_url, allowing the plugin to evaluate the submission itself rather than simply challenge the user. The documentation goes even further and says that Akismet forms the “centerpiece” of Contact Form 7’s spam prevention strategy.
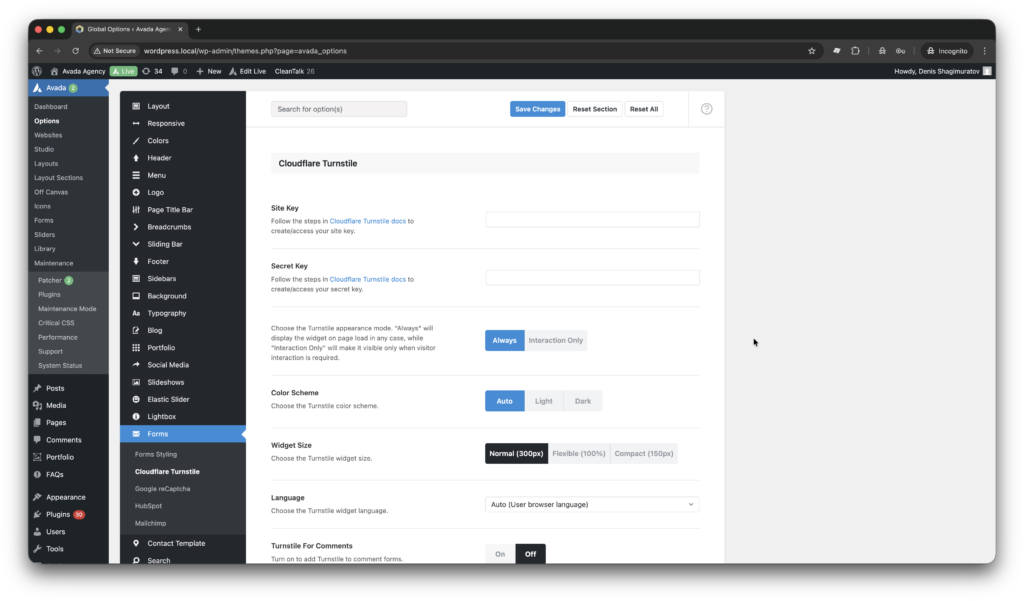
Another major option is Cloudflare Turnstile. Contact Form 7 now provides an official Turnstile integration module and describes it as an effective way to protect forms from spam bots. More importantly, the project explicitly states, “We recommend Turnstile unless you have reasons to use reCAPTCHA.” That makes Turnstile the strongest current CAPTCHA-style recommendation inside the official Contact Form 7 ecosystem.
Contact Form 7 also supports reCAPTCHA v3, but it should be described carefully. The official documentation says the integration is designed to block abusive submissions by spam bots, and the reCAPTCHA FAQ clarifies that Contact Form 7 5.1 and higher support only reCAPTCHA v3 natively. In other words, reCAPTCHA is still a valid option, but it is no longer the only CAPTCHA path inside Contact Form 7.
The simplest built-in filtering layer is the disallowed list. According to Contact Form 7’s FAQ, it can block messages containing specified keywords or submissions coming from specified IP addresses. It is not a complete anti-spam solution on its own, but it works well as an extra rule-based layer when a site repeatedly sees the same phrases, links, or IP-based abuse patterns.
Taken together, these options show that Contact Form 7 approaches spam protection as a layered system, not as a one-click fix. Akismet helps filter suspicious submissions, Turnstile and reCAPTCHA v3 are aimed at stopping spambots, and the disallowed list adds a simple keyword- and IP-based filter. Contact Form 7’s own guidance also recommends combining different anti-spam modules rather than relying on a single method alone.
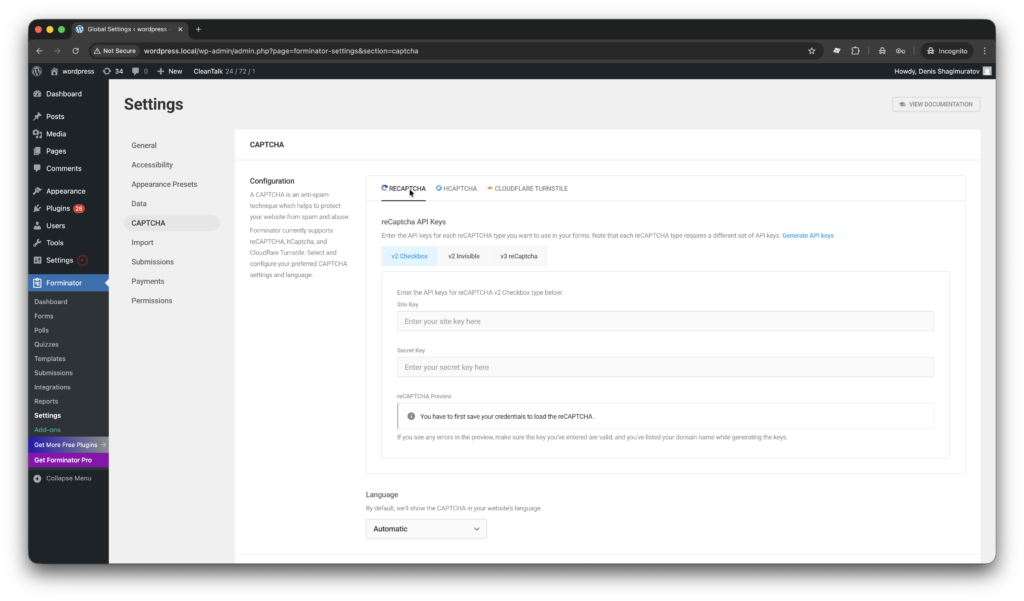
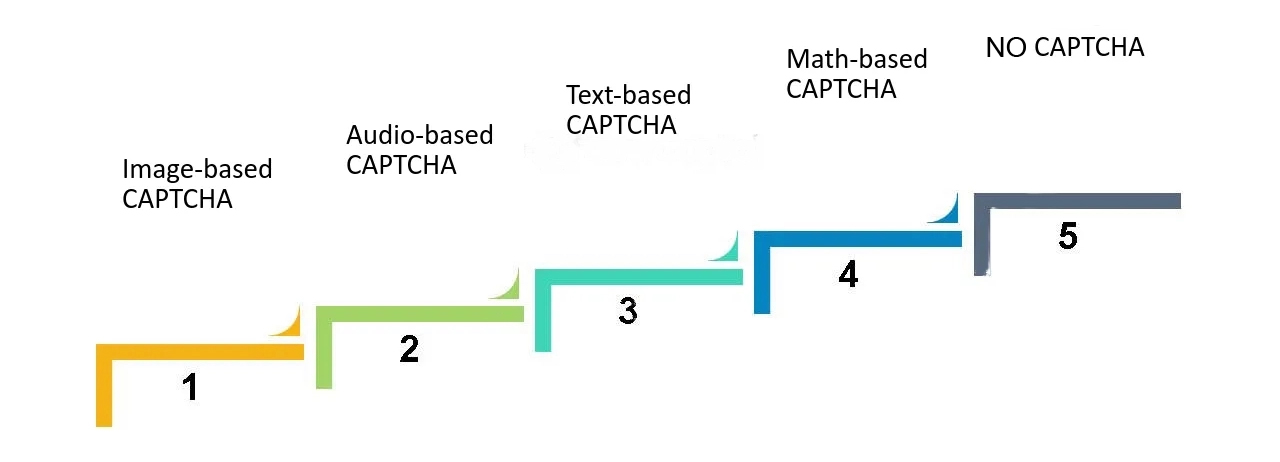
CAPTCHA options in Contact Form 7
If you specifically want to add CAPTCHA protection to Contact Form 7, there are two main options to focus on in the current Contact Form 7 ecosystem: reCAPTCHA v3 and Cloudflare Turnstile. Both are supported in Contact Form 7, but they should not be treated as identical solutions. They solve a narrower problem – mainly reducing automated bot submissions – and are usually most effective when combined with other filtering layers rather than used alone.
reCAPTCHA v3 is Contact Form 7’s native Google-based CAPTCHA option. It works in the background and uses a score-based system instead of the classic checkbox challenge most users associate with older CAPTCHA tools. That makes it more convenient from a UX perspective, but it also means it is better at dealing with bots than with every kind of spam. In practice, reCAPTCHA v3 is still a valid option for Contact Form 7, especially for sites already using Google services, but it should not be positioned as a complete anti-spam solution by itself.
Cloudflare Turnstile is now the stronger default recommendation for many Contact Form 7 sites. It is designed as a more lightweight CAPTCHA alternative and usually creates less friction for visitors than traditional challenge-based verification. More importantly, current Contact Form 7 documentation treats Turnstile as the preferred CAPTCHA-style option unless there is a specific reason to stay with reCAPTCHA. For that reason, if the goal is to choose the most up-to-date CAPTCHA layer inside the official Contact Form 7 stack, Turnstile is the better place to start.
Some websites also use third-party CAPTCHA plugins, such as hCaptcha-based integrations, but these should be described as external add-ons rather than as Contact Form 7’s main official path. They can still be useful in certain setups, especially where privacy, policy, or infrastructure preferences matter, but for most readers the core CAPTCHA decision in Contact Form 7 today is really reCAPTCHA v3 vs Cloudflare Turnstile.
The key point is that CAPTCHA is only one part of the protection strategy. It can help reduce automated spam, but it does not replace submission filtering, keyword blocking, or broader server-side anti-spam protection. That is why the best Contact Form 7 setups usually combine a CAPTCHA-style layer with other anti-spam methods instead of relying on CAPTCHA alone.
Best ways to stop spam in Contact Form 7
The most reliable way to reduce spam in Contact Form 7 is to use more than one protection layer. Contact Form 7’s own documentation says that the plugin provides several spam protection modules and advises users to use two or more modules together. In practice, that means the best setup is usually not a single tool, but a combination of bot protection, submission filtering, and rule-based blocking.
For websites that want to stay within Contact Form 7’s official ecosystem, Cloudflare Turnstile is now the clearest starting point. Contact Form 7 provides an official Turnstile integration, says it effectively protects forms from spam bots, and explicitly states, “We recommend Turnstile unless you have reasons to use reCAPTCHA.” That makes Turnstile the strongest default CAPTCHA-style recommendation in the current Contact Form 7 stack.
A second important layer is Akismet. Contact Form 7 says that Akismet forms the centerpiece of its spam prevention strategy and recommends combining different protection types instead of relying on only one module. Unlike a visible CAPTCHA challenge, Akismet is configured through specific form-tag options and evaluates the submission data itself, which makes it a strong complementary layer alongside Turnstile.
The disallowed list is also worth using as a supporting layer. Contact Form 7’s FAQ says it can block messages containing specific keywords or submissions coming from specified IP addresses. It is not presented as a full standalone solution, but it is useful when a site repeatedly receives the same phrases, links, or IP-based abuse patterns.
reCAPTCHA v3 remains a supported option, but it should be described carefully. Contact Form 7’s documentation says that version 5.1 and later uses the reCAPTCHA v3 API, while the FAQ notes that CAPTCHA tools are effective against spambots but can be ineffective against other spam types, including spam generated by humans. For that reason, reCAPTCHA is better presented as one possible layer, not as a complete answer by itself.
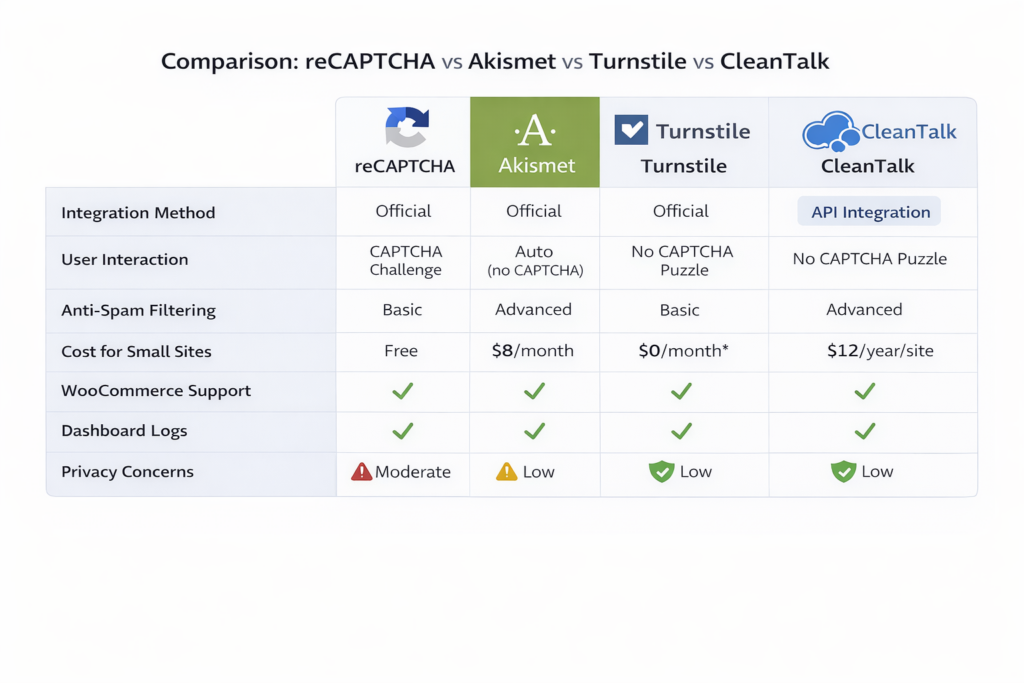
Comparison table: reCAPTCHA vs Akismet vs Turnstile vs CleanTalk
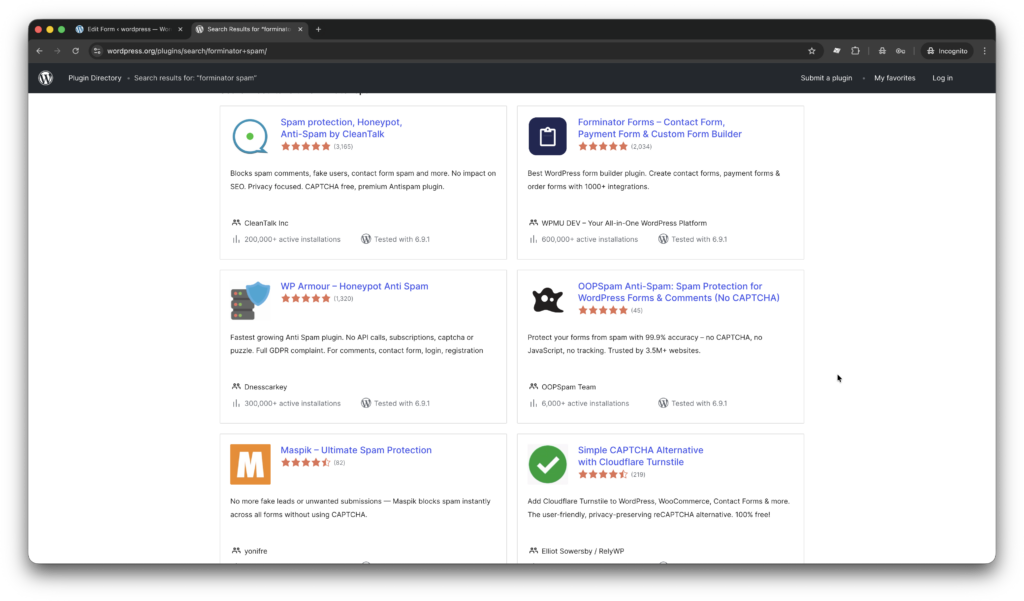
If you want to compare Contact Form 7’s native stack with an external service, CleanTalk is a reasonable option to include in the comparison section. WordPress.org describes it as a CAPTCHA-free anti-spam plugin that blocks contact form spam, fake users, and spam comments, and lists it at 200,000+ active installations. That makes it a valid external alternative to compare against Turnstile, Akismet, and reCAPTCHA – but in the article it should be presented as an external anti-spam service, not as one of Contact Form 7’s built-in protections.
How to read this table: inside the official Contact Form 7 ecosystem, the strongest setup is usually Turnstile + Akismet, because CF7 explicitly recommends using multiple spam-protection modules together, calls Akismet the “centerpiece” of its spam-prevention strategy, and says, “We recommend Turnstile unless you have reasons to use reCAPTCHA.”
reCAPTCHA v3 is still an official CF7 option, but it should be positioned carefully. Contact Form 7 says reCAPTCHA v3 is its officially supported CAPTCHA solution and that it works in the background, but the same FAQ also warns that CAPTCHA tools can be helpless against other spam types, including human spammers.
Akismet deserves a higher position in the comparison than many WordPress articles give it. CF7 says Akismet is the centerpiece of its spam-prevention strategy and explains that it works by evaluating submission data, not just by placing a challenge in front of the visitor.
Turnstile is the clearest current default inside Contact Form 7. CF7’s integration page says all contact forms are protected after setup, while Cloudflare positions Turnstile as a CAPTCHA replacement that works without showing visitors a traditional CAPTCHA and aims for a less intrusive experience.
CleanTalk should be presented honestly as an external alternative, not a native Contact Form 7 feature. The WordPress.org listing describes it as a no-CAPTCHA anti-spam plugin and says it stops spam contact emails; the same listing also has a dedicated Contact Form 7 section saying the plugin extends spam protection for CF7 and can be used with other third-party spam filters.
Bottom line: if the article is comparing the best practical options, the cleanest conclusion is this – Turnstile is the best default native entry point, Akismet is the strongest native filtering layer, reCAPTCHA v3 is still valid but weaker as a primary recommendation, and CleanTalk is the most natural external no-CAPTCHA alternative to compare against the CF7 stack.
Anti-Spam plugin by CleanTalk for WordPress
The next tool we’re going to use is the Anti-Spam plugin by CleanTalk.
Here’s a short overview:
- CleanTalk is a cloud-based spam protection service for websites, founded in 2012.
- It automatically blocks spam without CAPTCHAs and doesn’t interrupt the user experience.
- Protects many types of forms: contact forms, payment forms, registrations, comments, surveys and more.
- Stops both automated bots and human spam submissions.
- Uses advanced filtering algorithms and a global spam detection network.
- Detects spam based on IP address, email address and user behavior.
- Lets you create custom filtering rules for specific cases.
- Allows blocking or filtering by IP, email and country.
- Works quietly in the background and is very easy to install and configure.
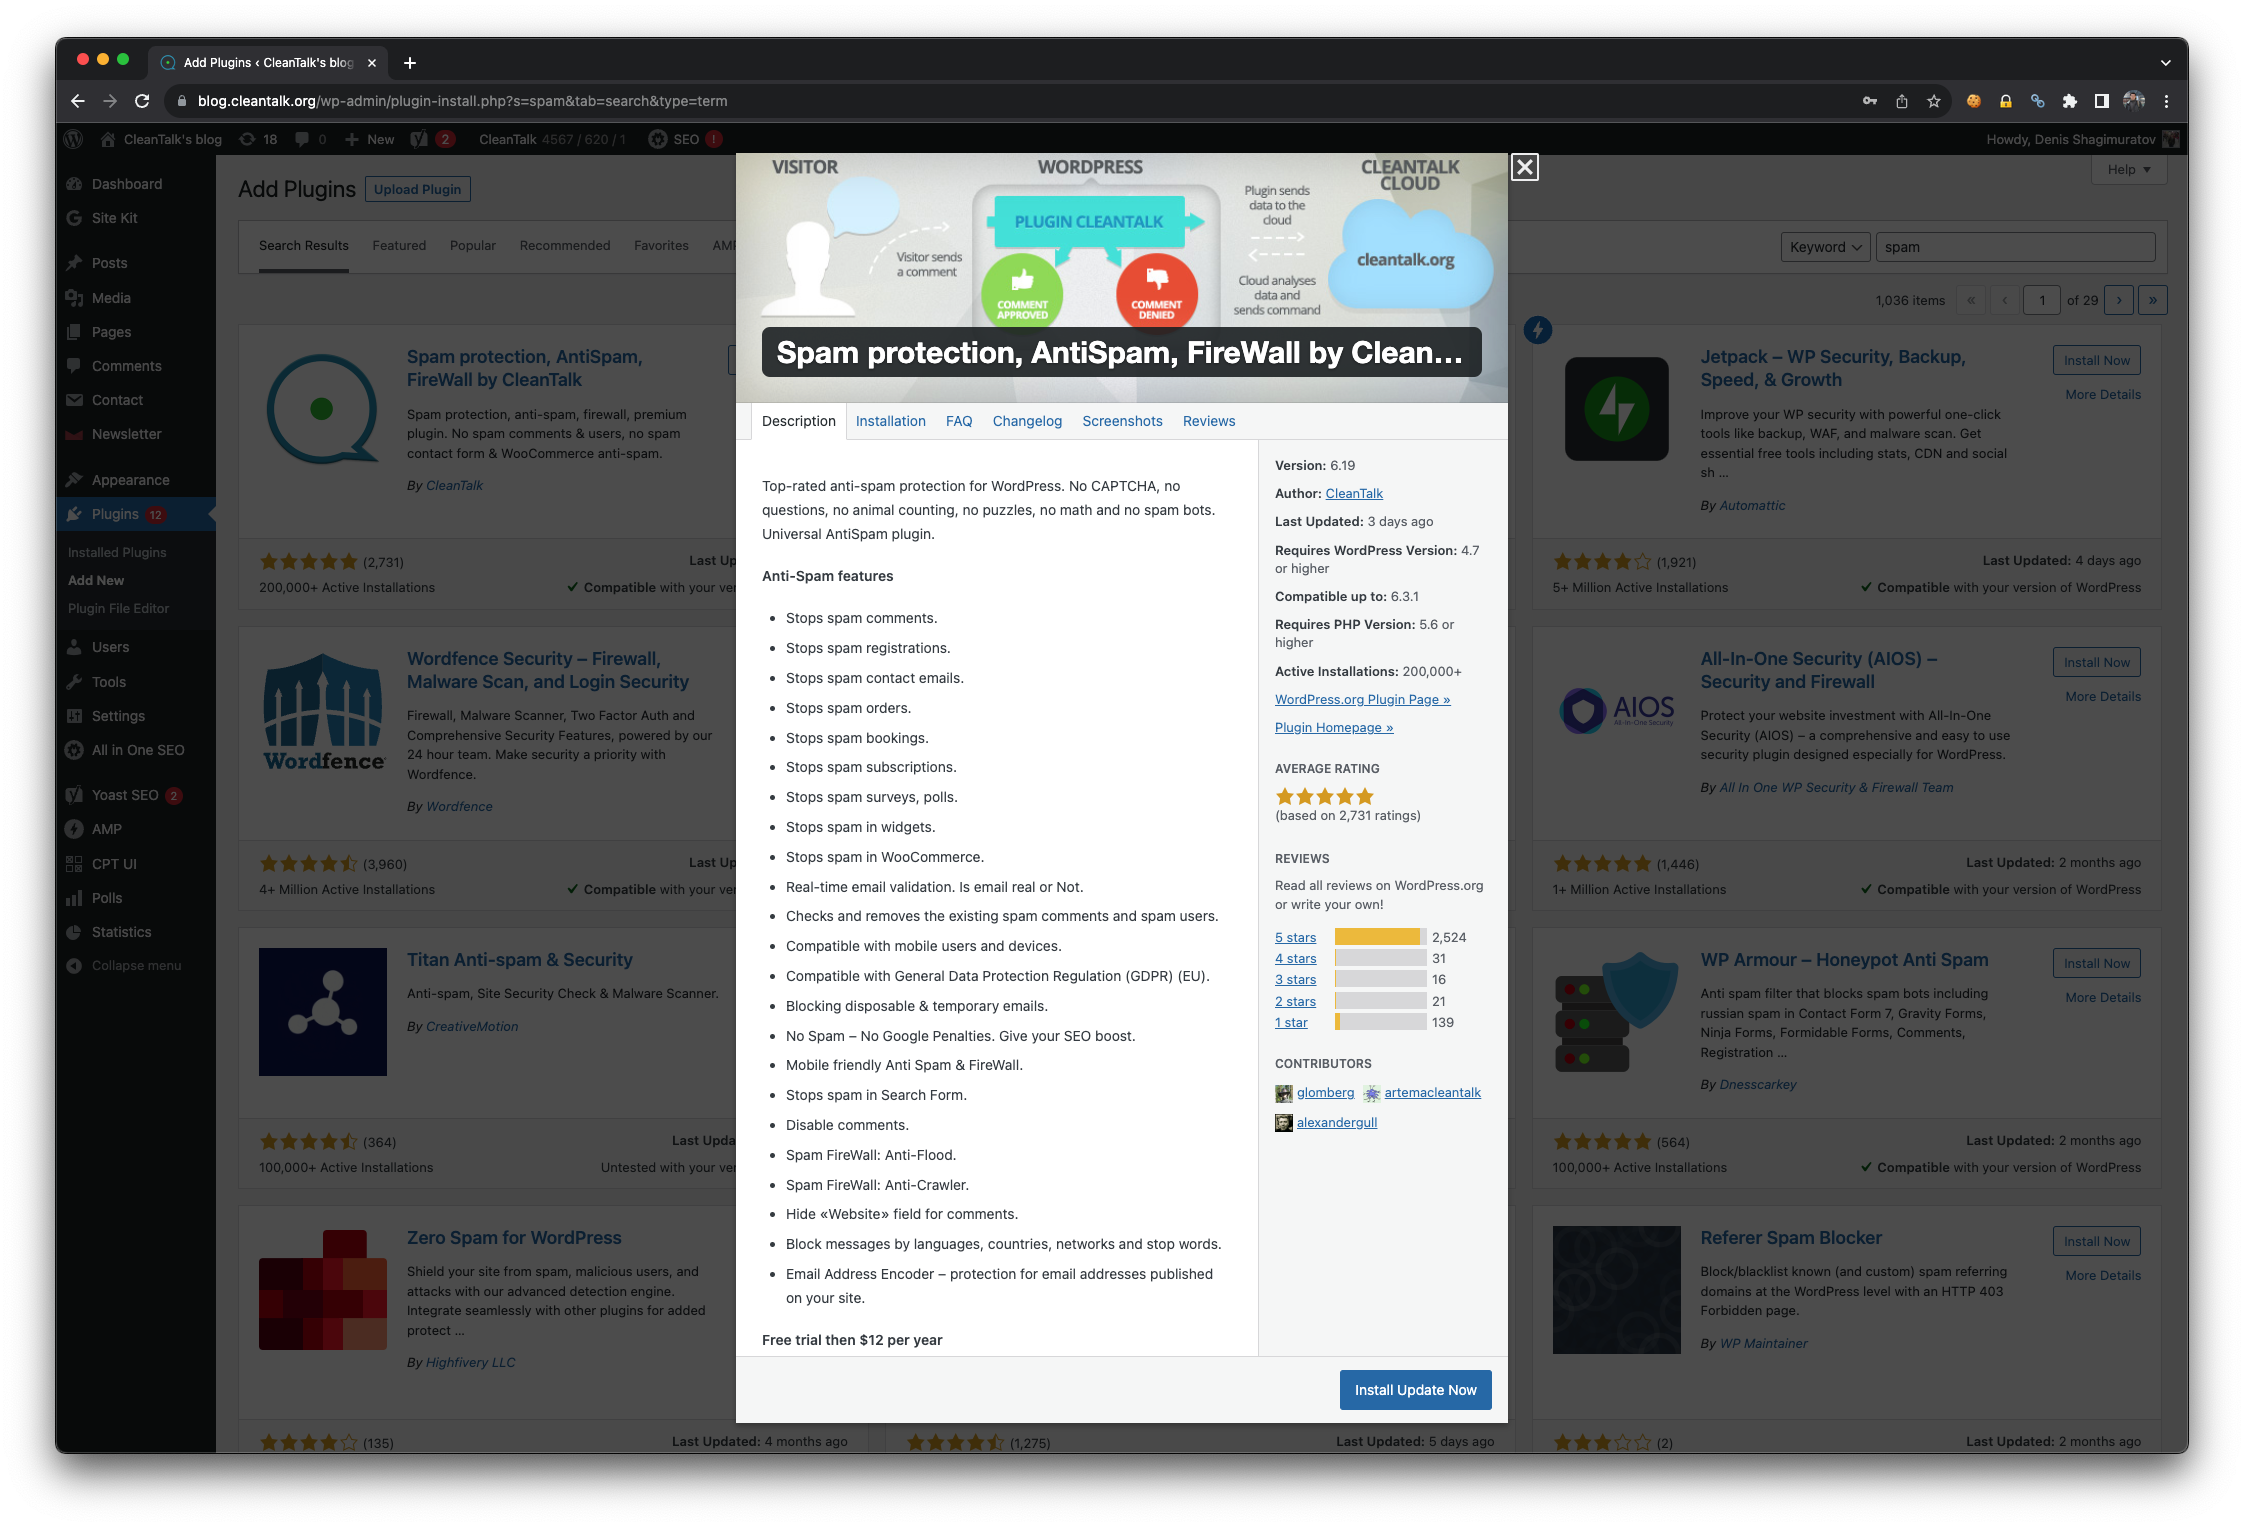
According to WordPress.org, Anti-Spam by CleanTalk for WordPress has over 200,000 active installations, with thousands of reviews and an average rating around 4.7 out of 5.
Plugin Homepage at cleantalk.org | Latest release at GitHub.com | Website cleantalk.org
According to WordPress.org, Anti-Spam by CleanTalk for WordPress has over 200,000 active installations, with 3,168 reviews and an average rating of 4.7.
Plugin Homepage at cleantalk.org | Latest release at GitHub.com
Install the CleanTalk Anti-Spam plugin
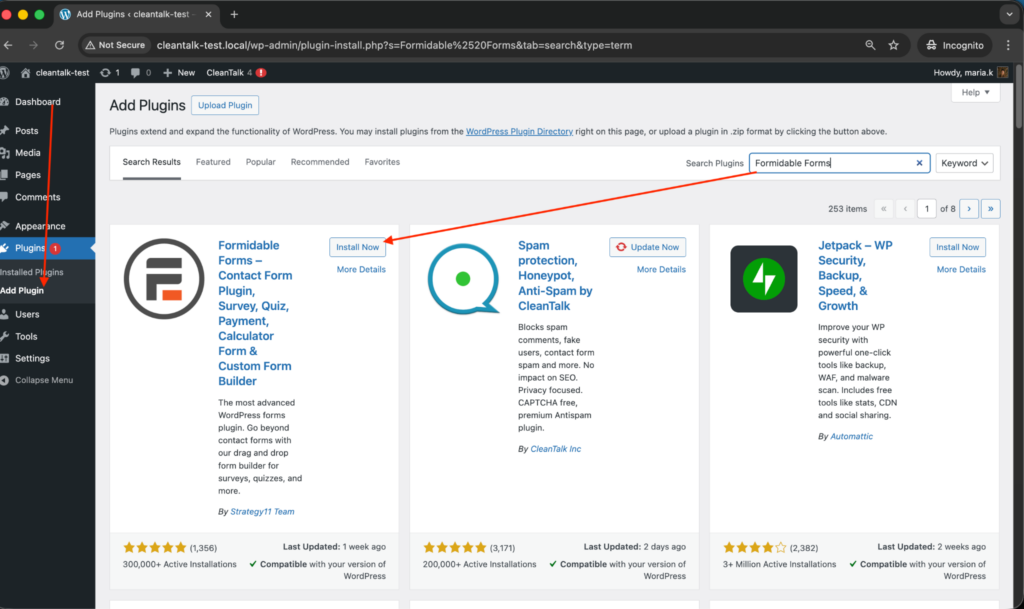
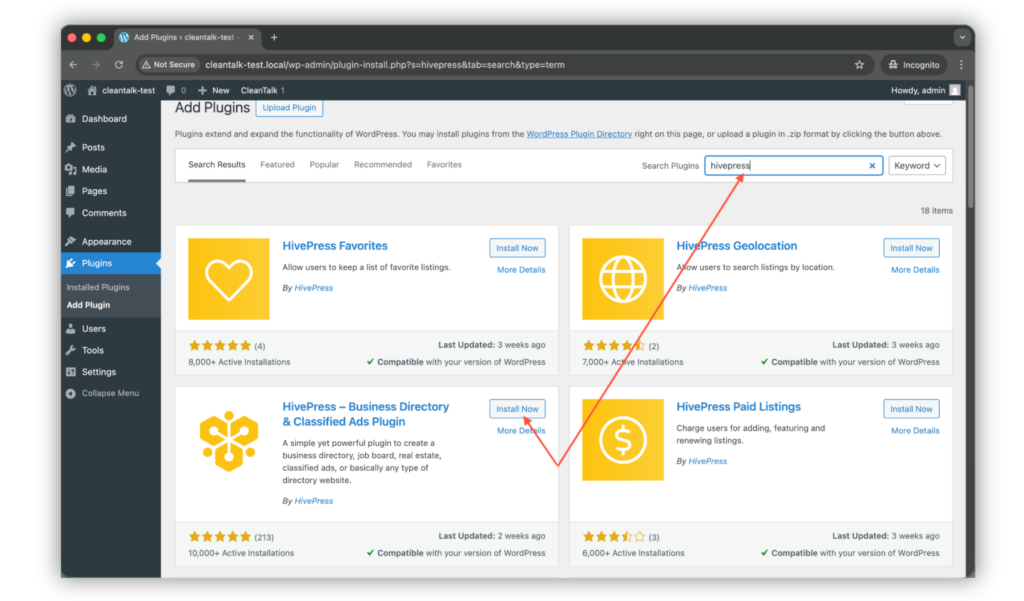
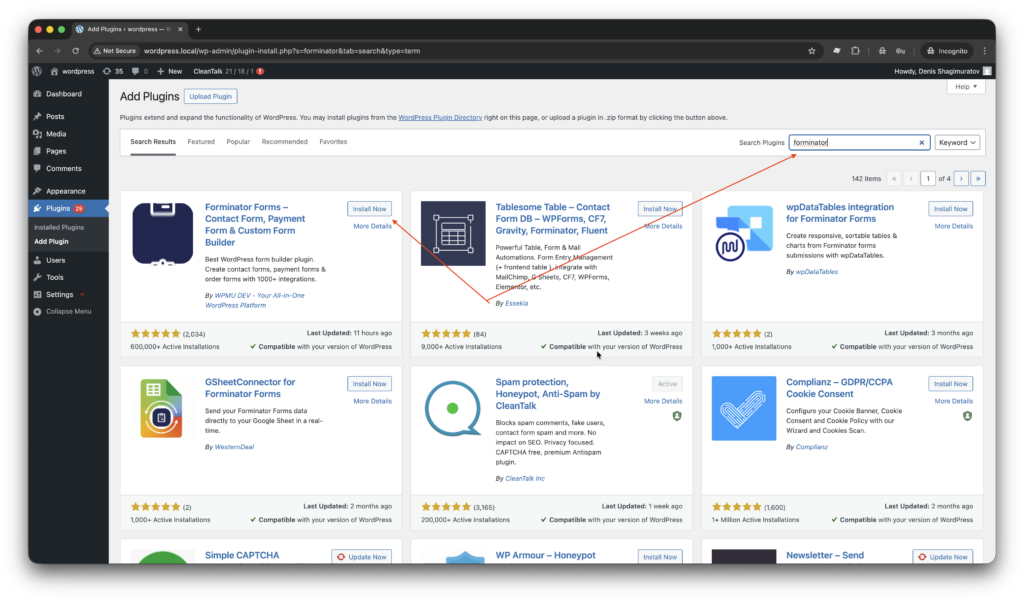
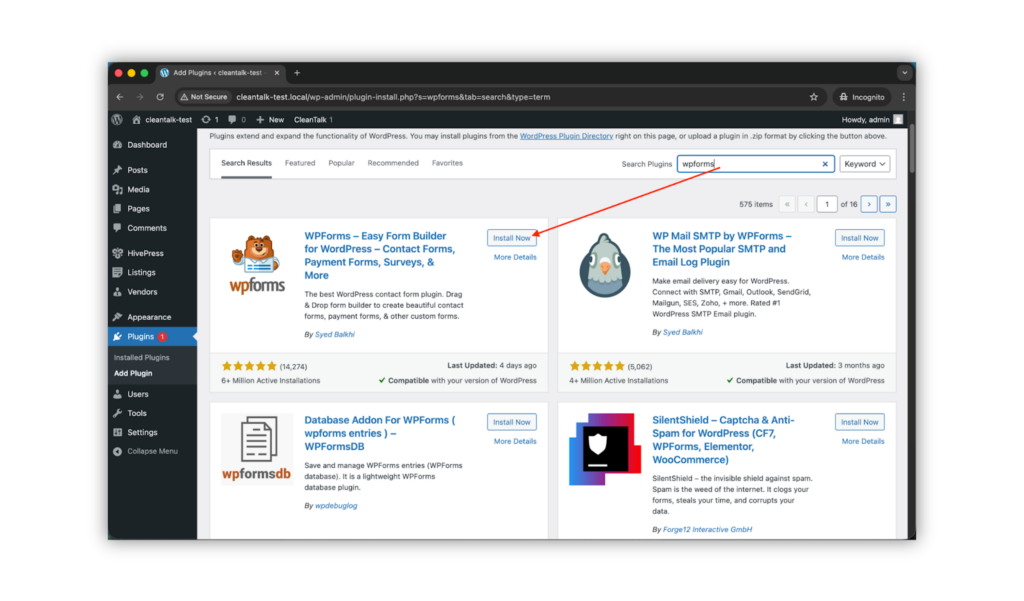
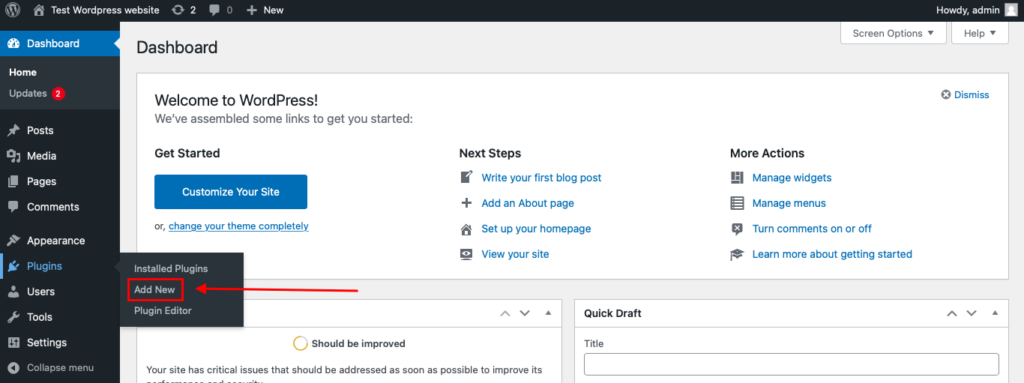
To install the Anti-Spam plugin, go to your WordPress admin panel→ Plugins→ Add New.
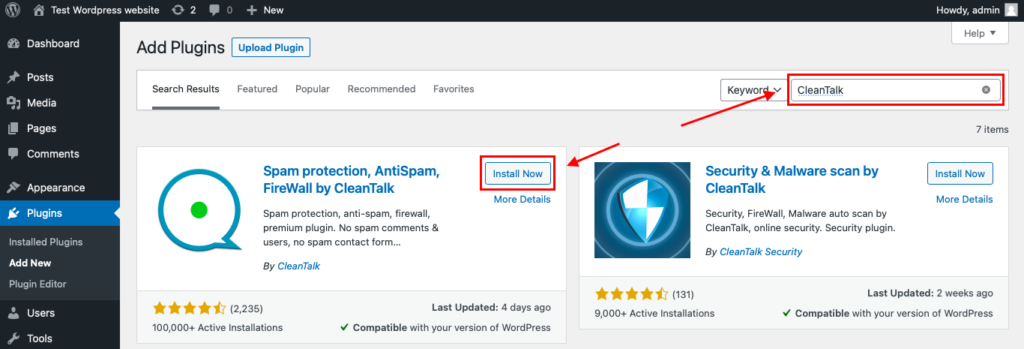
Then enter «СleanTalk» in the search box and click the Install button for «Spam protection, Anti-Spam, FireWall by CleanTalk».
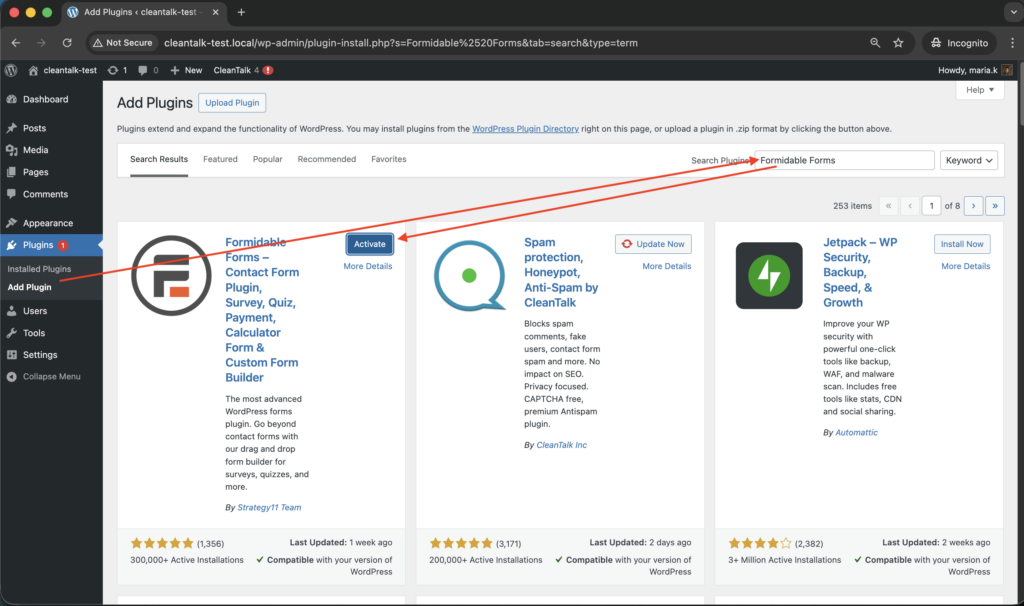
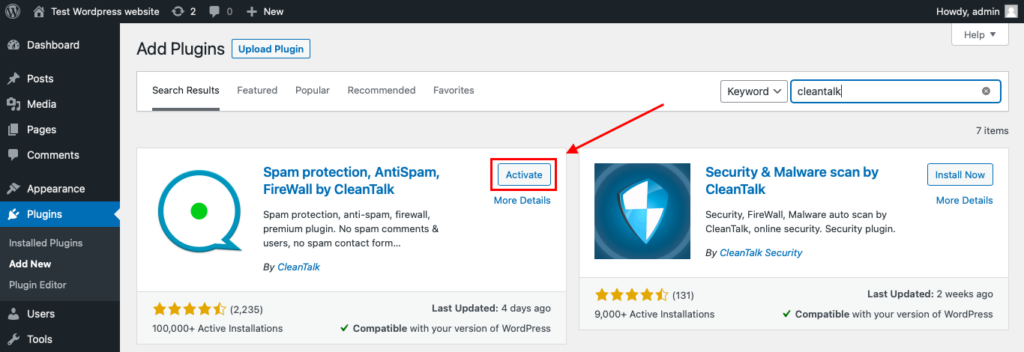
After installing the plugin, click the «Activate» button.
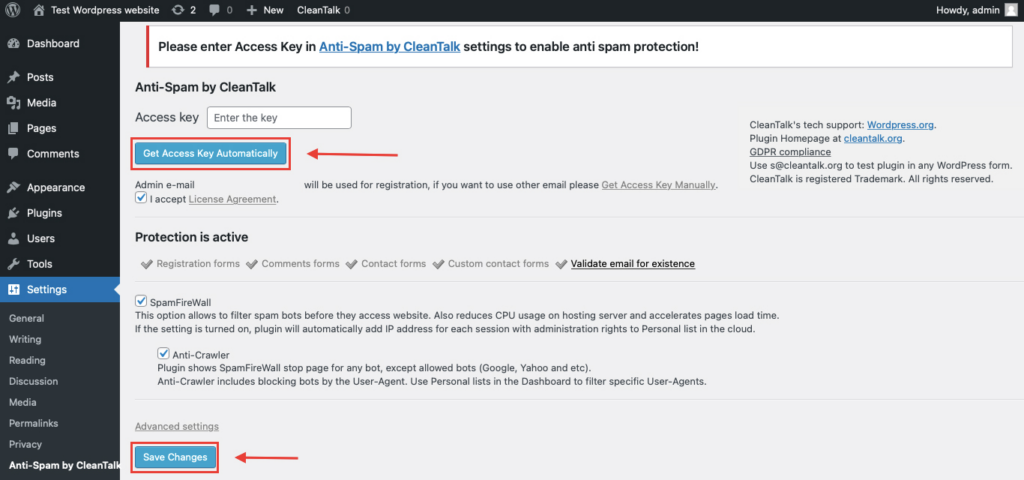
After it is done go to the plugin settings and click the «Get Access Key Automatically» button. Then just click the «Save Settings» button.
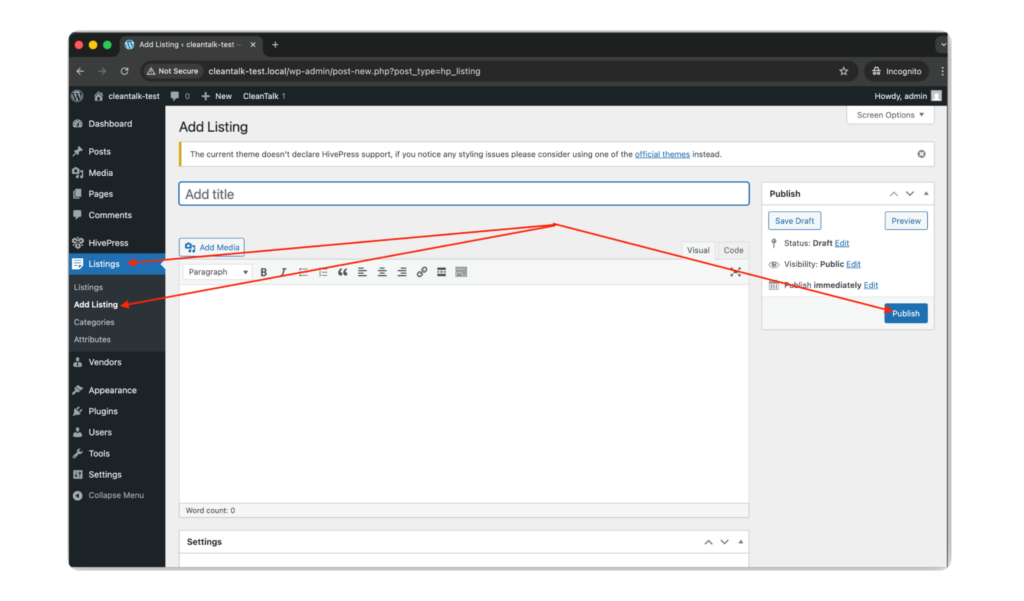
That’s all – Contact Form 7 are now protected From this moment,CleanTalk automatically protects the Contact Form 7 registration form (REST route /wp-json/Contact Form 7press/v1/users/), and the Add Listing form used to submit new listings.
You don’t need to paste any shortcodes – just use Contact Form 7 as usual, and CleanTalk will filter spam in the background.
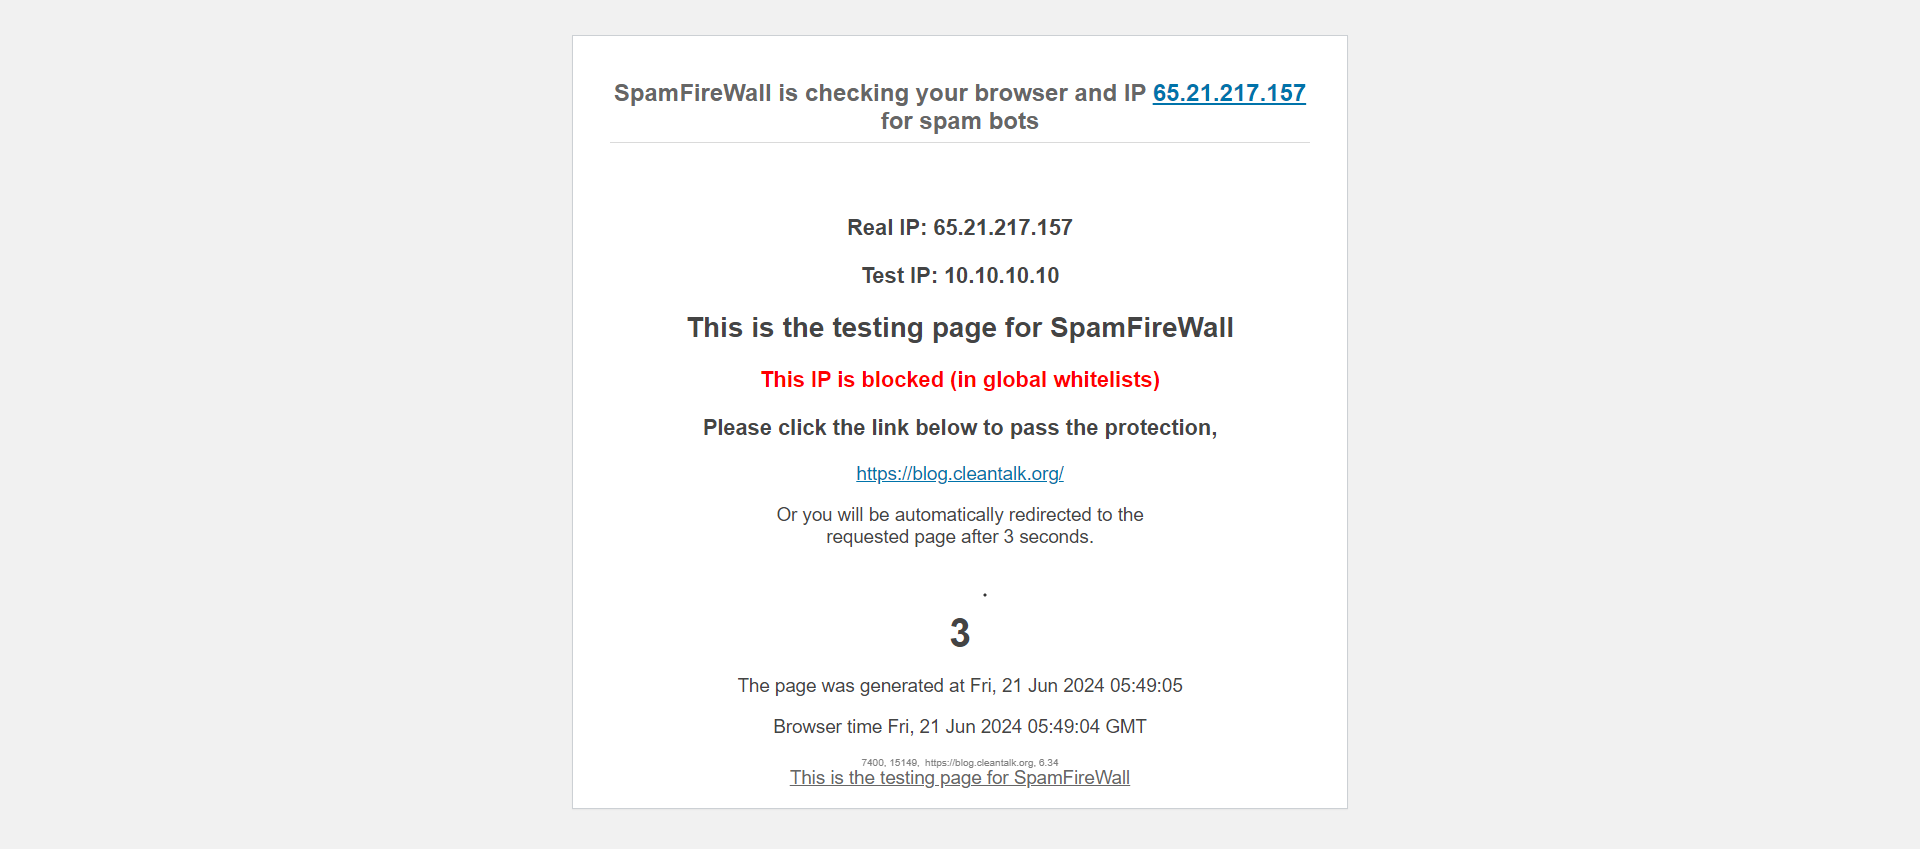
Check if spam protection works with Contact Form 7 (CF7)
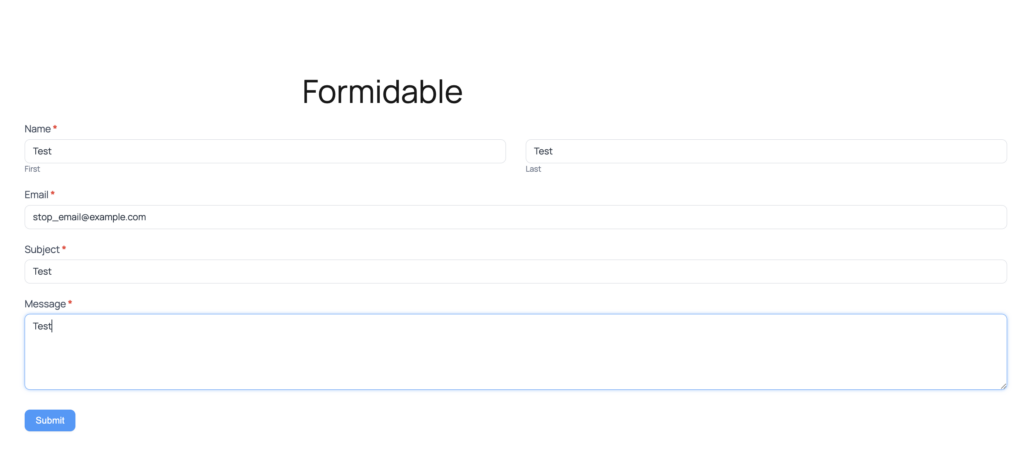
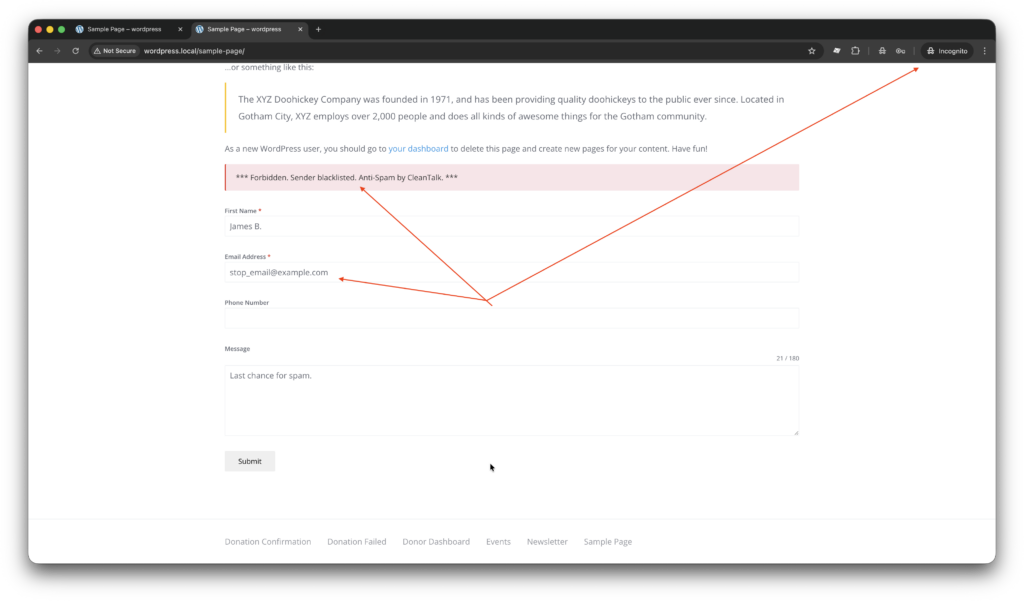
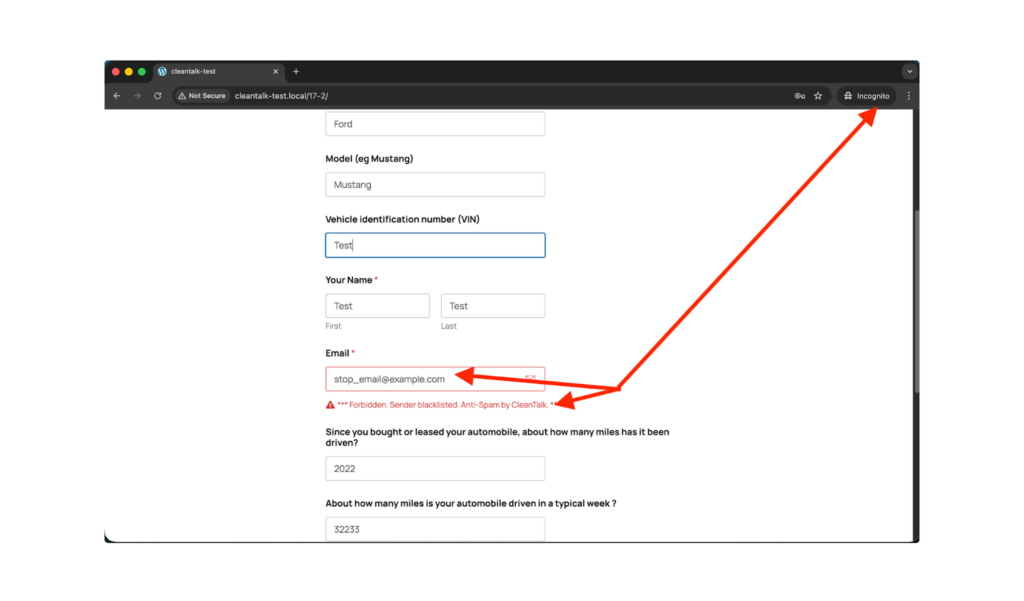
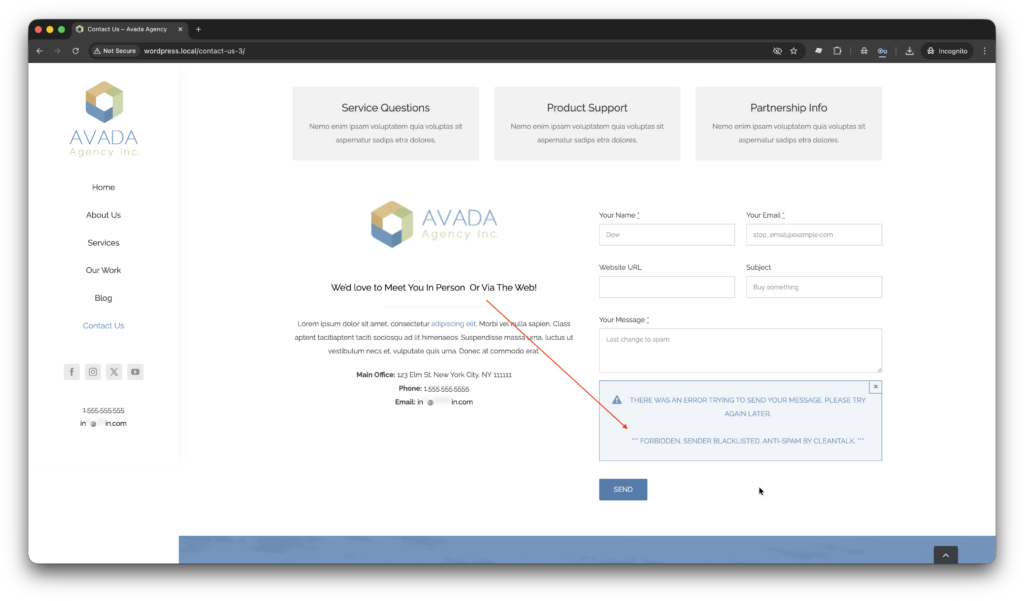
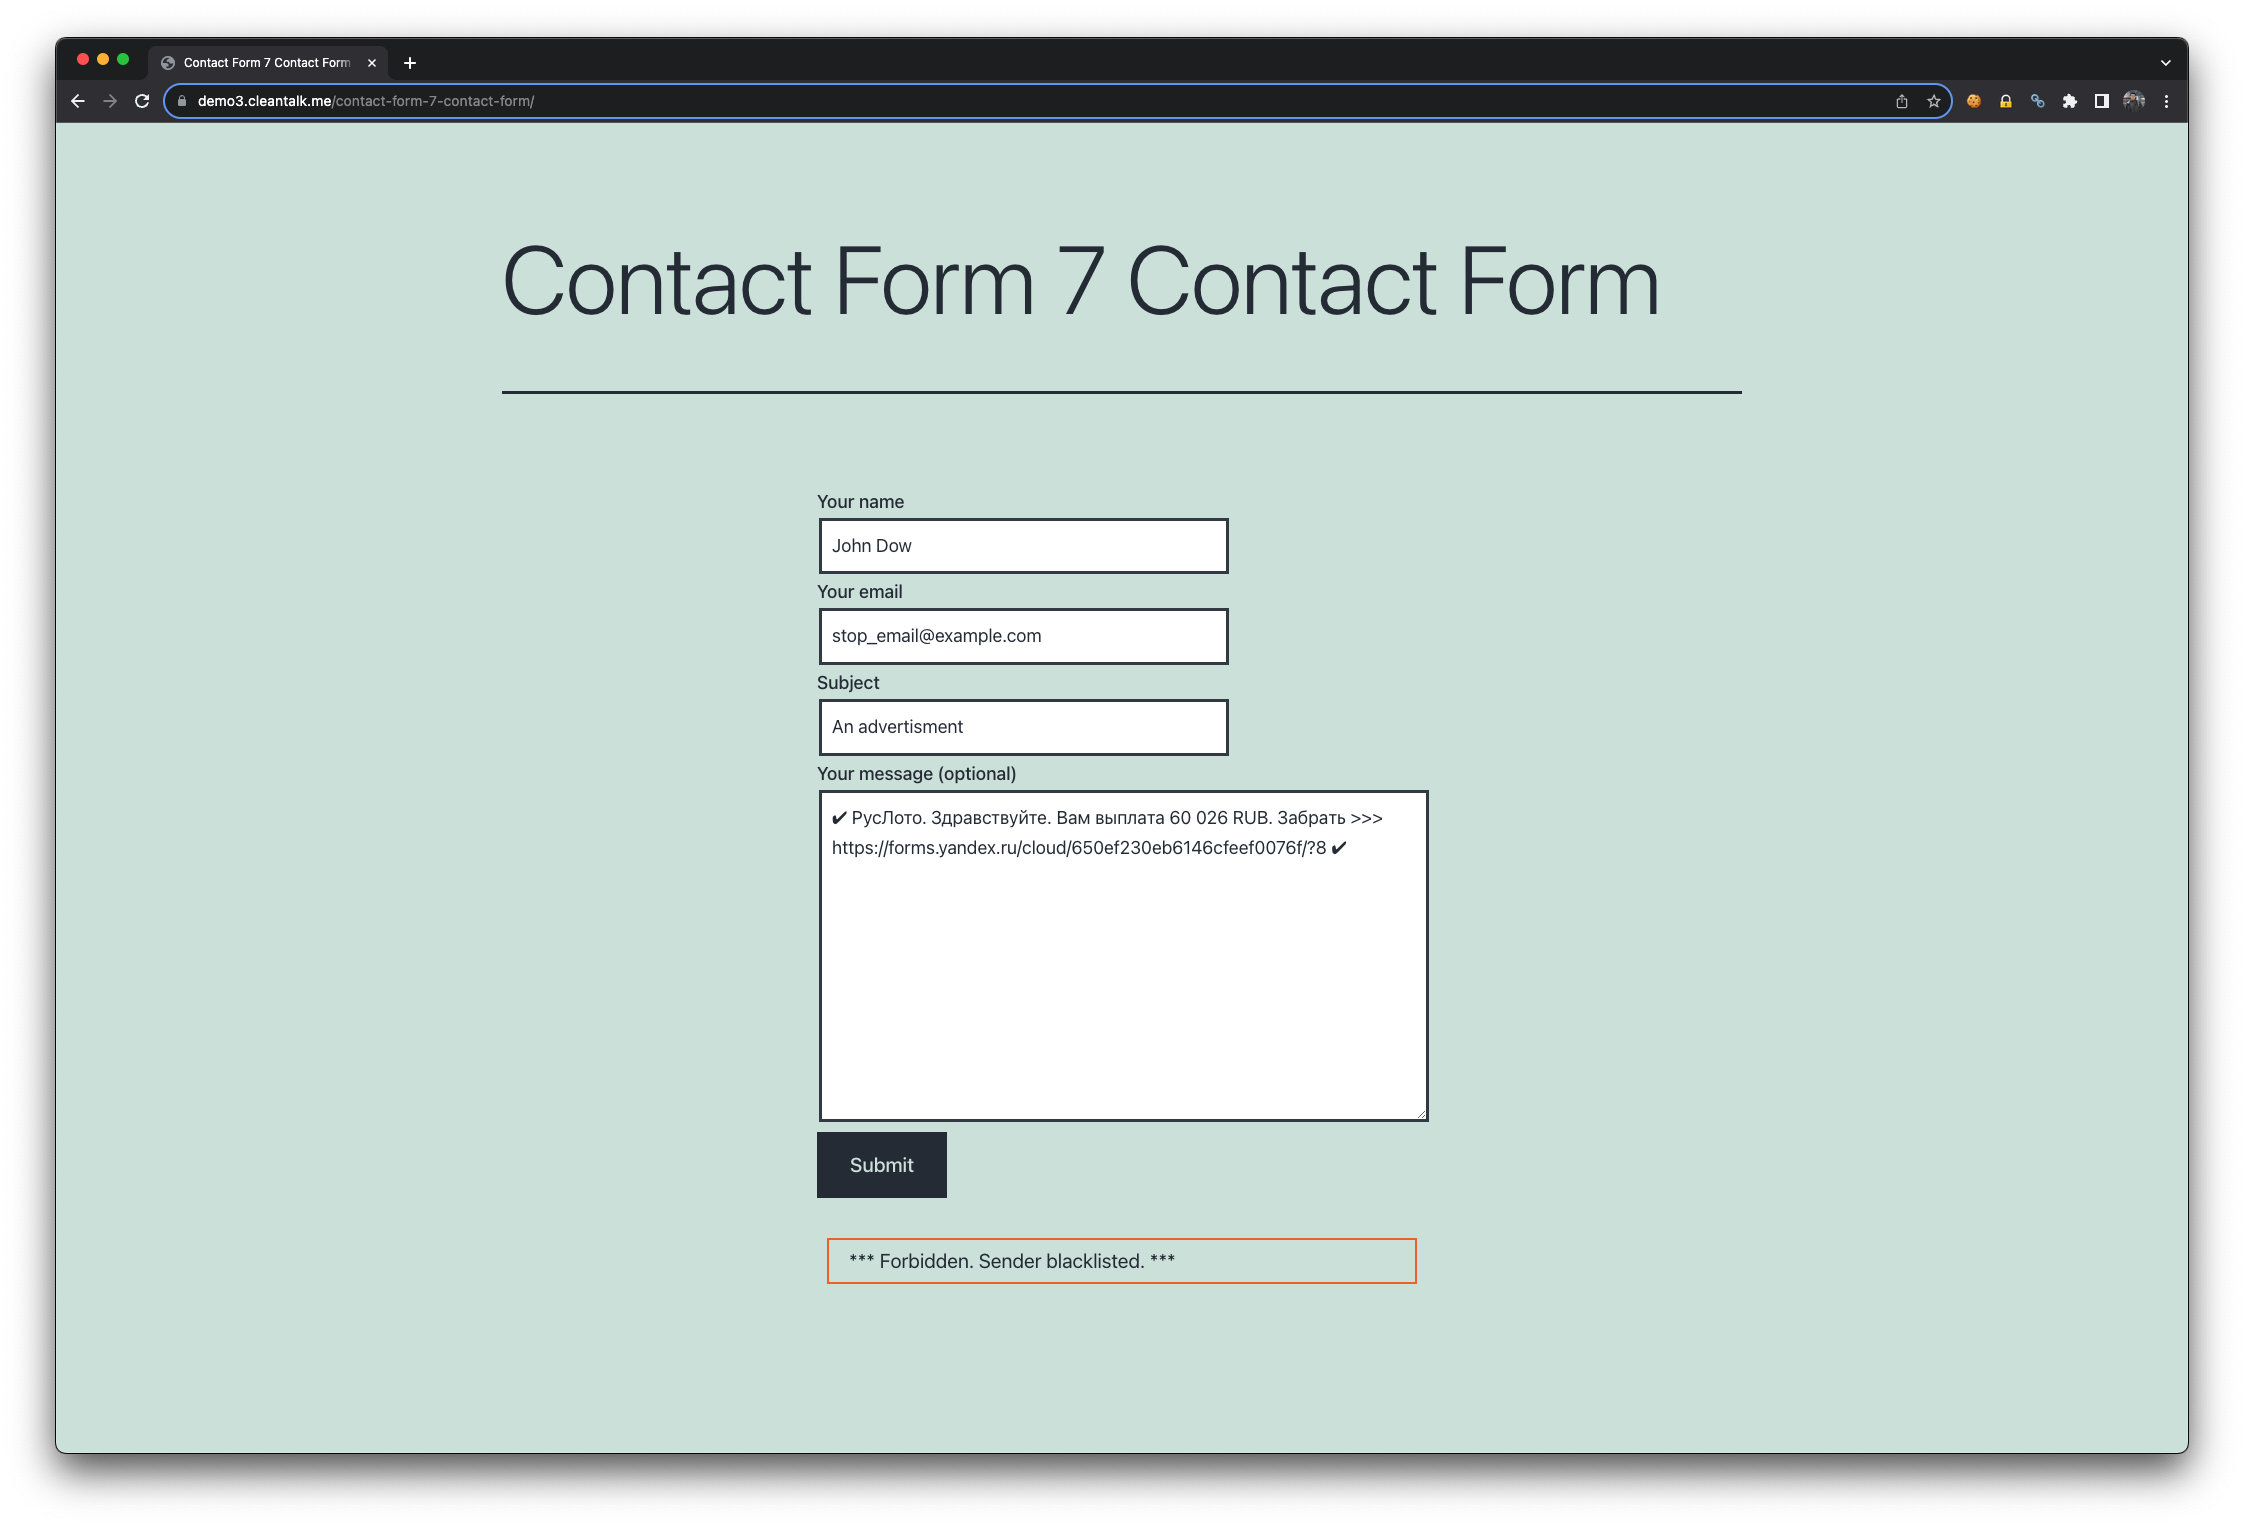
The best way to text the spam protection by using a test email,
stop_email@example.com
- Open a page with a Contact Form 7 (for example, the registration popup or the Add Listing form) in an Incognito / private browser tab.
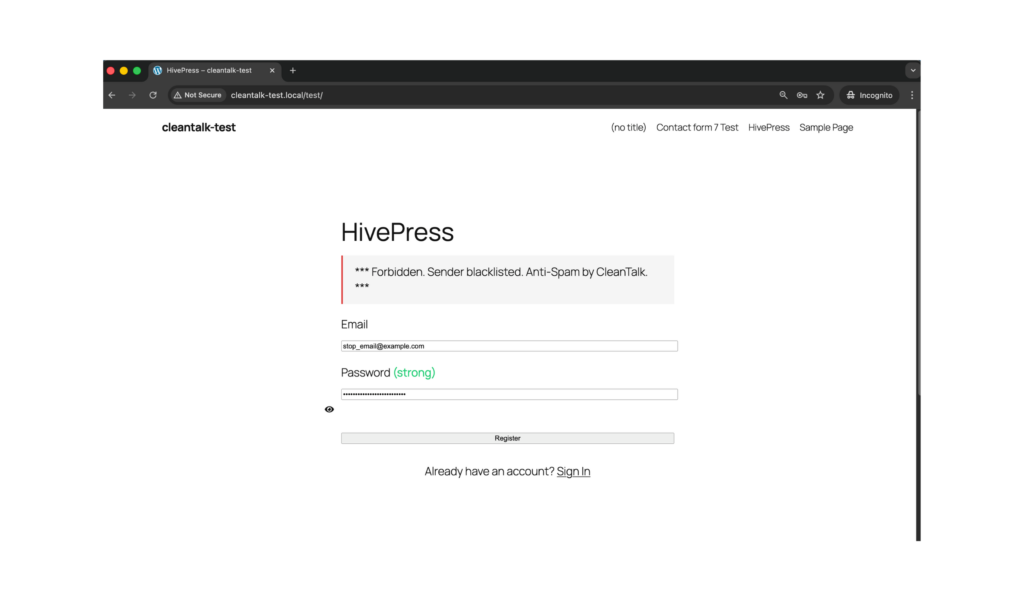
- Fill out the Contact form using stop_email@example.com as sender’s email.
- Send the form.
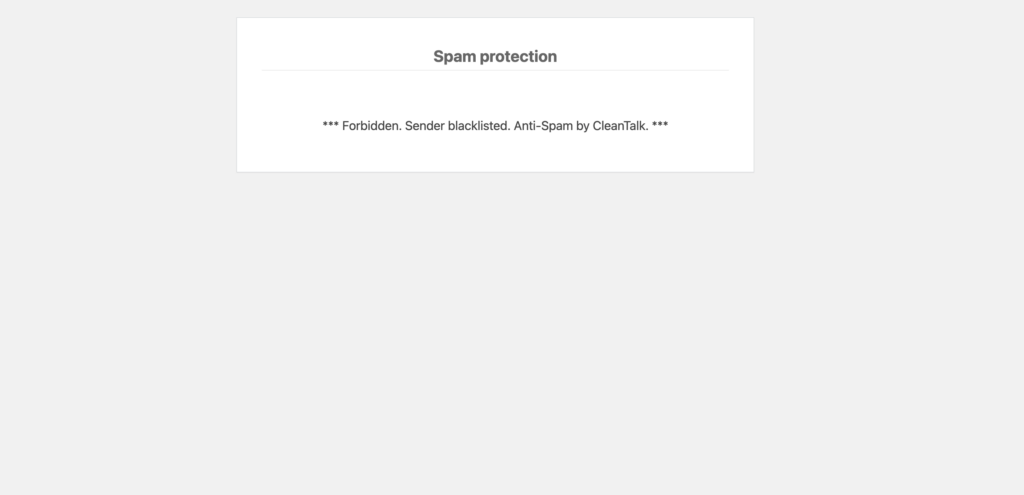
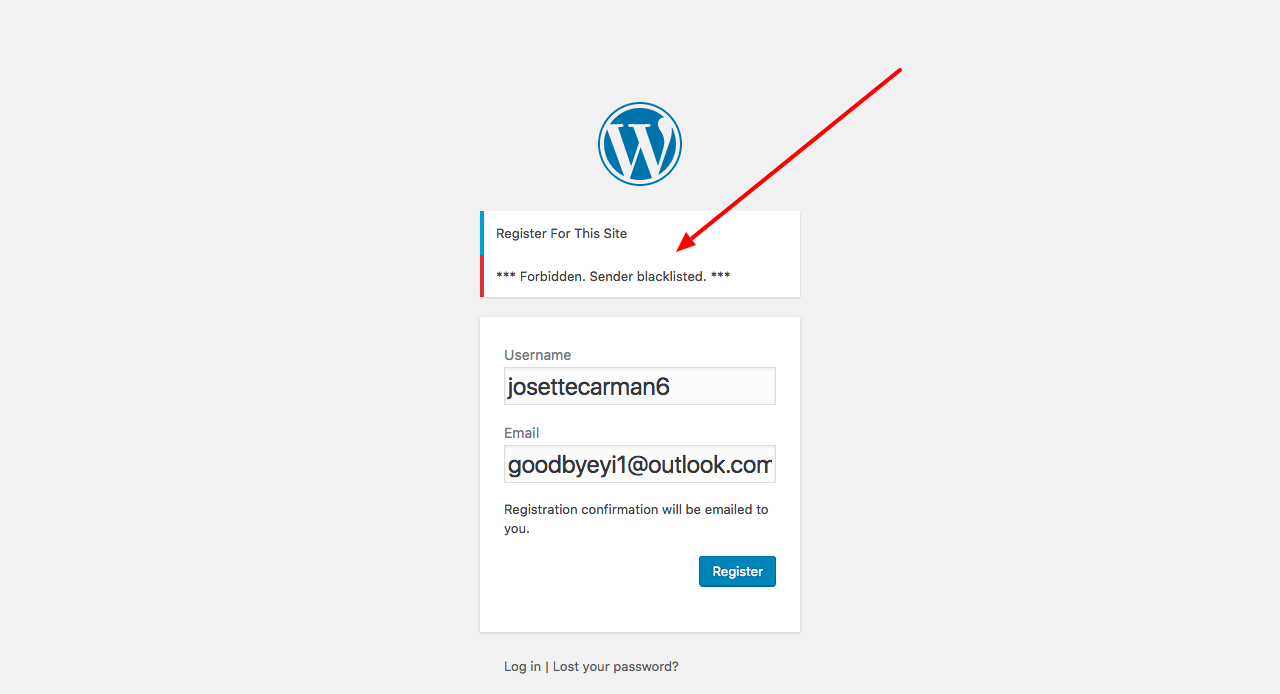
- You should see a message from the Anti-Spam plugin confirming that a spam submission was blocked.
*** Forbidden. Sender blacklisted. Anti-Spam by CleanTalk. ***
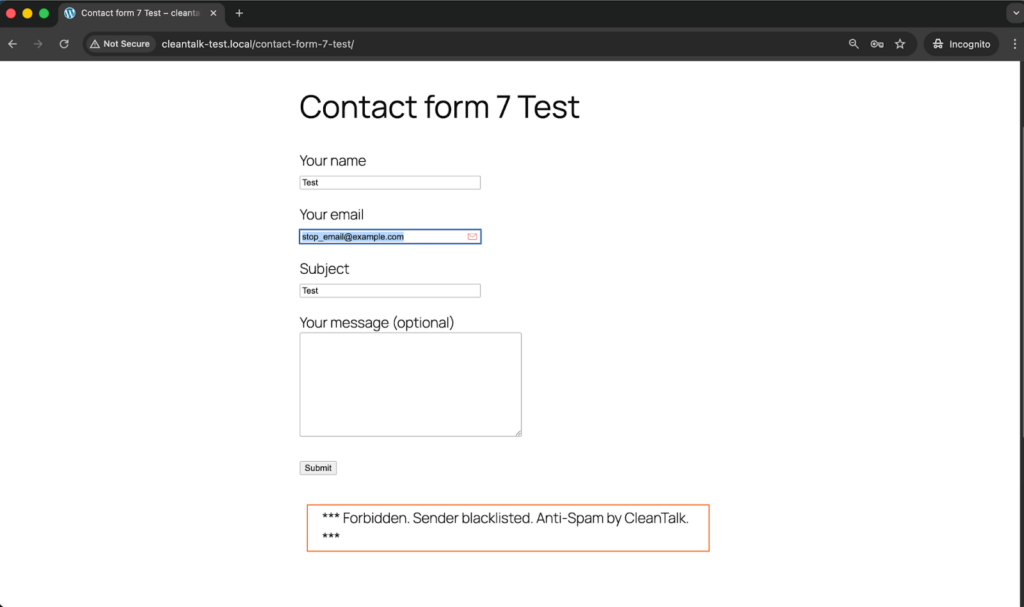
If you see this message, it means CleanTalk successfully protects your Contact Form 7 (registration and Add Listing) from spam.
Cloud Dashboard
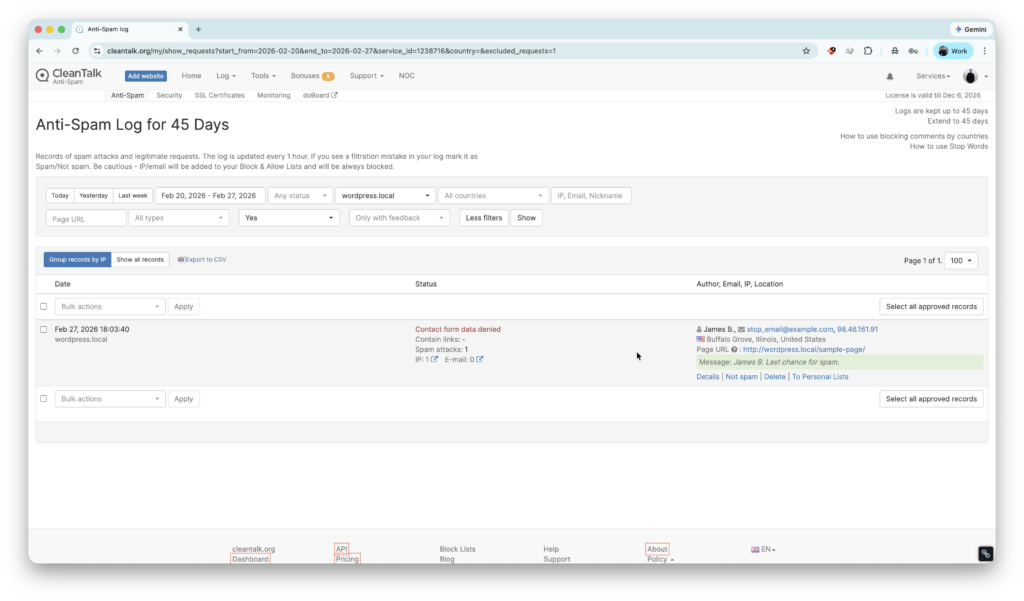
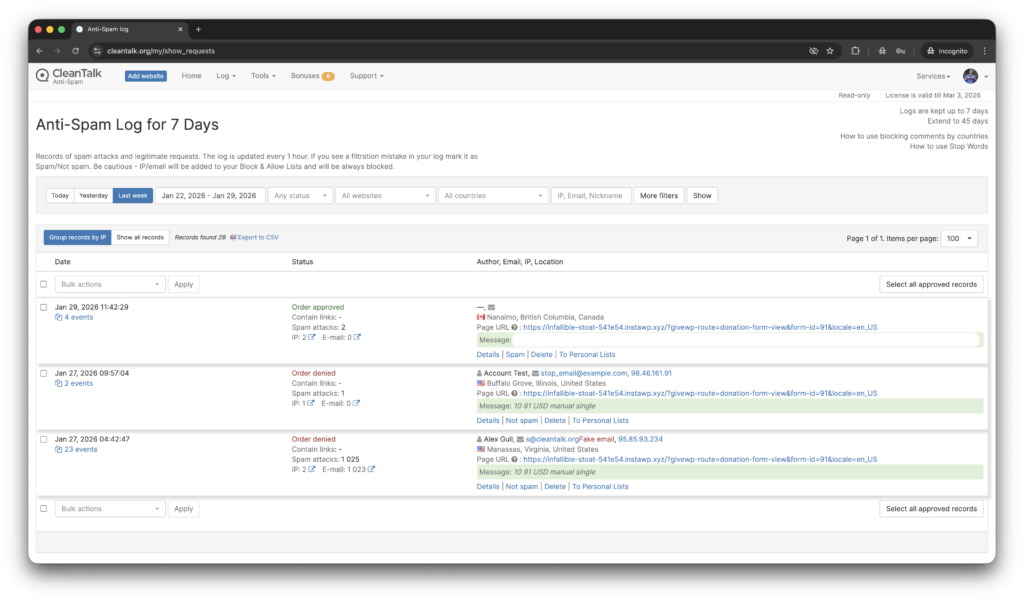
In addition, in the Cloud Dashboard you can find extra details regarding all submissions processed by CleanTalk, including Contact Form 7 registration and Add Listing forms:
- IP and email of the sender, as well as the sender’s activity history across other websites connected to the CleanTalk cloud.
- Geolocation of the sender.
- Date and time of the submission.
Page (URL) where the form was submitted (for example, a specific listing submission page). - Cloud decision – Approved or Denied.
- Cloud explanation for the decision (e.g. blacklisted email, bad IP reputation, spam text, etc.).
- Tools to move the sender to Block or Allow lists so you can fine-tune Contact Form 7 spam protection.
FAQ
I still get spam in Contact Form 7 after setting everything up. What should I do?
If spam still gets through, the first step is to stop treating any one plugin as a complete solution. Contact Form 7 itself recommends using two or more spam-protection modules together, because different tools catch different abuse patterns. In practice, that usually means combining a bot-reduction layer such as Turnstile or reCAPTCHA with a filtering layer such as Akismet or an external service such as CleanTalk, plus simple rule-based blocking through the disallowed list when you see repeated phrases or IP-based abuse.
Should I choose Turnstile or reCAPTCHA for Contact Form 7?
If you want to stay within Contact Form 7’s official CAPTCHA-style options, Cloudflare Turnstile is now the clearer default choice. Contact Form 7 explicitly says, “We recommend Turnstile unless you have reasons to use reCAPTCHA.” reCAPTCHA v3 remains supported, but Contact Form 7 also warns that CAPTCHA solutions are mainly effective against spambots and can be weak against other types of spam, including human spam.
Is Akismet enough on its own?
Akismet is one of the strongest native filtering layers in the Contact Form 7 stack, and CF7 even calls it the “centerpiece” of its spam-prevention strategy. But Contact Form 7 does not frame Akismet as a one-plugin answer to every spam problem. The project recommends combining different protection types, which is why Akismet works best alongside another layer such as Turnstile, reCAPTCHA, or an external server-side anti-spam service.
Contact Form 7 says the message was sent, but I never received the email. Is that a spam issue?
Not necessarily. Contact Form 7’s FAQ explains that if you see the green success message, the PHP mail function completed successfully, but the message may still have been filtered or lost afterward. The same FAQ notes that spam filters often cause this kind of problem. That means this is usually a mail deliverability issue rather than a form-spam issue.
How do I improve email deliverability for Contact Form 7 notifications?
Start with Contact Form 7’s own mail best practices. The plugin recommends using a From address that belongs to the same domain as the website, setting a proper Reply-To header for the sender’s real email, and enabling email authentication methods such as SPF and DKIM. WordPress also explains that wp_mail() depends on the site’s mailing environment, so if local mail is not configured properly, routing mail through a correctly configured SMTP or mail provider setup is often more reliable.
Final recommendation
If your goal is to stop Contact Form 7 spam reliably without making the form harder for real users, the best approach is a layered protection stack. In 2026, inside the official Contact Form 7 ecosystem, the strongest starting point is usually Cloudflare Turnstile + Akismet, supported by the disallowed list where repeated patterns appear. That recommendation matches Contact Form 7’s own guidance: use multiple anti-spam modules together, treat Akismet as a core filtering layer, and prefer Turnstile over reCAPTCHA unless there is a specific reason to stay with Google’s solution.
If you want broader site-wide protection without relying only on CAPTCHA-style challenges, an external server-side solution such as CleanTalk is a reasonable alternative to include in the comparison, especially for sites that want a CAPTCHA-free layer across Contact Form 7, comments, and registrations. The right choice depends on how much spam you get, how much friction you can tolerate, and whether you need protection only for Contact Form 7 or across WordPress more broadly.
The most important takeaway is simple: in 2026, no single anti-spam method is enough for every Contact Form 7 site. CAPTCHA can reduce automated abuse, Akismet can evaluate suspicious submissions, rule-based filters can block recurring patterns, and external services can add broader server-side protection. The sites that perform best usually combine these layers instead of expecting one plugin or one checkbox to solve the entire problem.