Stop spam without frustrating your visitors

Create your CleanTalk account and start blocking spam — no CAPTCHA challenges and no impact on visitors.

Security Block Lists

CleanTalk Account

No credit card required • Setup takes less than a minute • Your temporary password will be sent by email.

Tag: wordPress plugins

  • 6 reasons not to use Contact Form 7 CAPTCHA spam protection for your website

    6 reasons not to use Contact Form 7 CAPTCHA spam protection for your website

    CAPTCHA technology is a widely used tool to prevent spam and abuse on websites. This free technology uses risk analysis techniques to distinguish humans from bots. It may seem like a convenient and free solution for protecting contact forms from spam. Still, there are several reasons why using CAPTCHA with Contact Form 7 can be detrimental to user experience and website accessibility.


    1. Using CAPTCHA degrades user experience

    One of the main issues with using CAPTCHA is its impact on user experience. The traditional CAPTCHA process requires users to solve a challenge, such as identifying objects in images or solving puzzles before they can submit a form. This extra step can be frustrating for users, particularly those with visual or cognitive impairments. It creates a barrier to entry and can discourage potential visitors from engaging with the website. The use of free tools is a saving on the convenience of visitors. And they understand that.


    2. Impossible to be used by visitors with disabilities

    Moreover, CAPTCHA can be especially challenging for individuals with disabilities. Such as those who rely on screen readers or have difficulty with fine motor skills. The visual and interactive nature of CAPTCHA challenges can make it inaccessible to these users. That helps effectively exclude them from interacting with the contact form.


    3. Data Privacy

    In addition to accessibility concerns, CAPTCHA also raises privacy issues. The tool collects and processes large amounts of personal data, including user behavior and device information, to determine whether a visitor is a bot or a human. This data collection raises concerns about user privacy and data security, as it involves sharing sensitive information with a third-party service provider. So, when you use a free solution, you still pay, but only with the convenience of your visitors and the security of their data.

    For example, Google reCAPTCHA’s reliance on Google’s infrastructure means that website owners have limited control over how their users’ data is handled. This lack of transparency and control can be problematic, especially in light of increasing concerns about data privacy and online security.


    4. Slowing down your website

    Another drawback of using Contact Form 7 CAPTCHA is the potential impact on website performance. The CAPTCHA script adds additional overhead to the website, increasing load times and affecting overall performance. This can lead to a suboptimal user experience and may deter visitors from engaging with the contact form or other parts of the website.


    5. Risk of technical issues

    Moreover, CAPTCHA’s reliance on external scripts and resources means that it introduces another point of failure to the website. If the CAPTCHA service experiences downtime or technical issues, it can prevent users from submitting forms or accessing content, disrupting the normal functioning of the website.


    6. Ethical issues

    In addition to these practical concerns, there are also ethical considerations associated with using Contact Form 7 CAPTCHA spam protection. By relying on a proprietary tool developed by a tech giant like Google, website owners contribute to the consolidation of power in the hands of a few dominant players in the tech industry. This can have far-reaching implications for competition, innovation, and the open web.


    What are the alternatives?

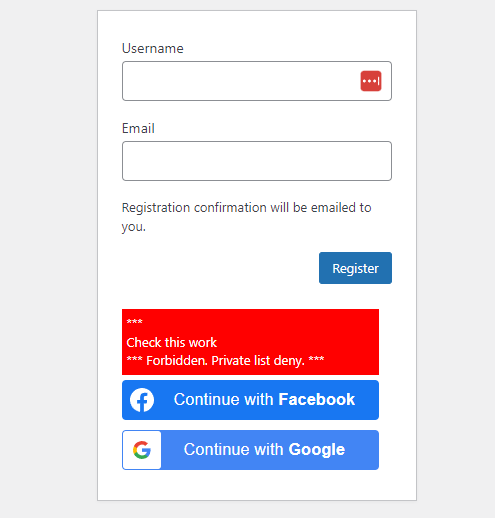
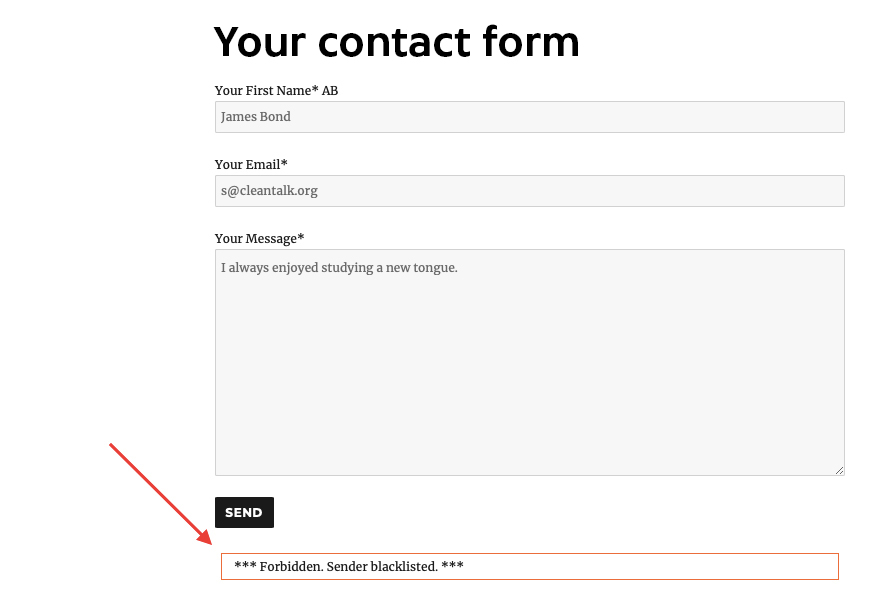
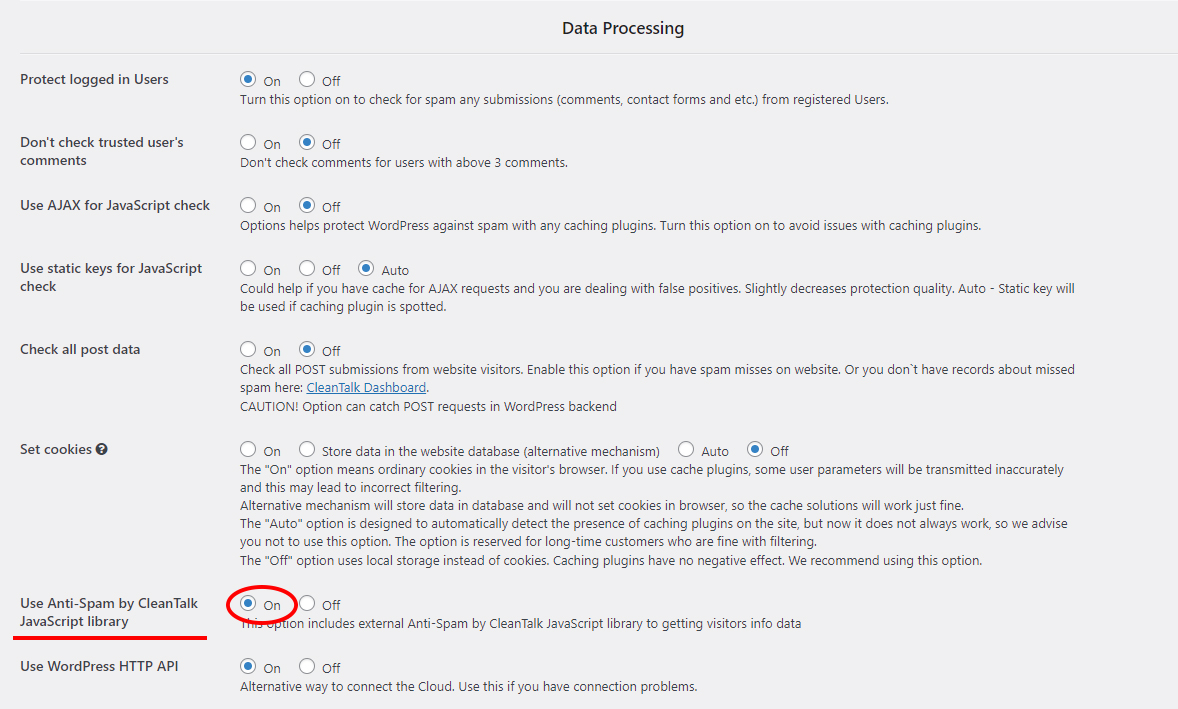
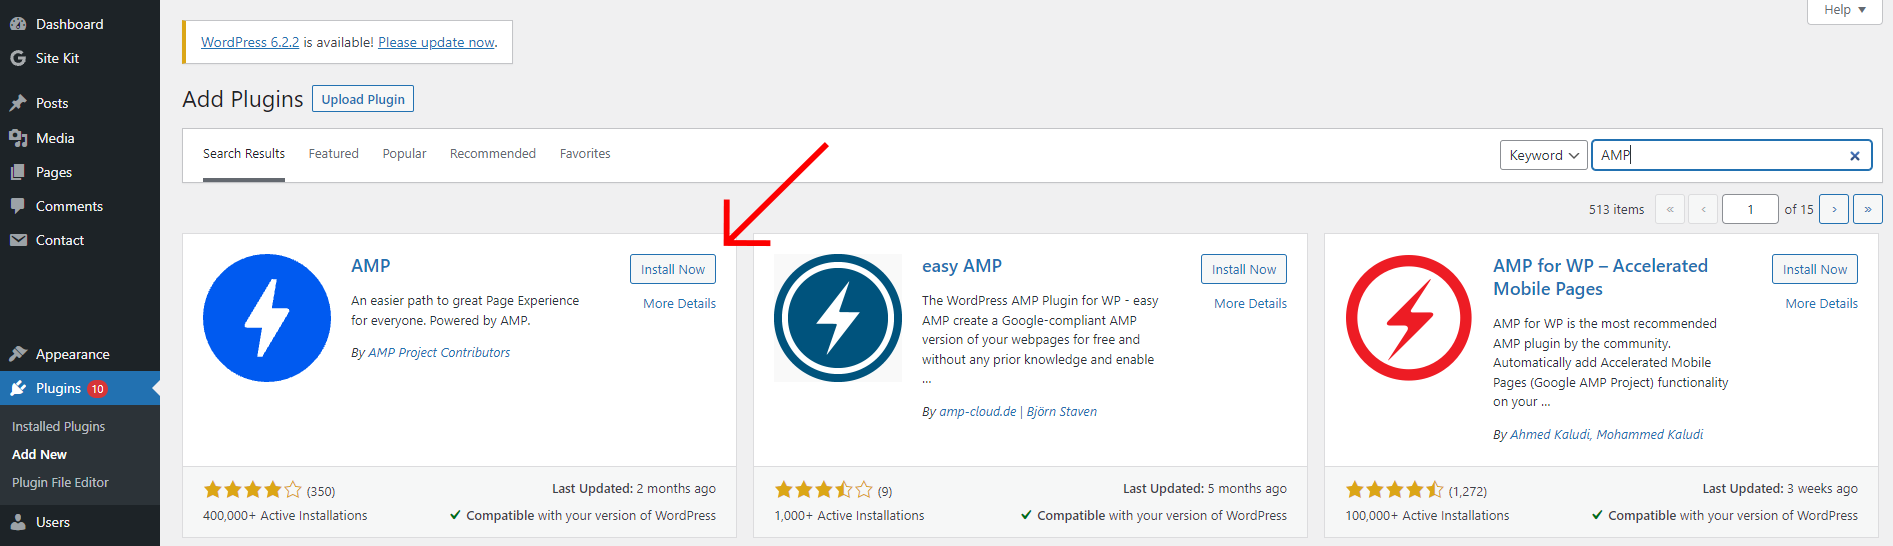
    Fortunately, there are alternative approaches to protecting contact forms from spam that do not rely on CAPTCHA. The most effective way is to use an invisible cloud-based spam protection, that has a direct integration with Contact Form 7. One of these solutions is the Anti-Spam protection by CleanTalk.


    Join 842,000+ websites, already trusting CleanTalk

    Why CleanTalk Anti-Spam
    instead of CAPTCHA-based solutions

    CleanTalk Anti-Spam offers several advantages over traditional CAPTCHA solutions, making it a more user-friendly and effective option for protecting websites from spam. Here are some reasons why CleanTalk Anti-Spam is considered superior to CAPTCHA:

    Compatibility
    CleanTalk Anti-Spam is compatible with a wide range of platforms and content management systems, making it easy to integrate with existing websites without requiring extensive customization or development work

    Privacy and Security
    The Anti-Spam service prioritizes user privacy and data security and operates without invasive data collection practices. This approach aligns with the growing concerns about online privacy and data protection.


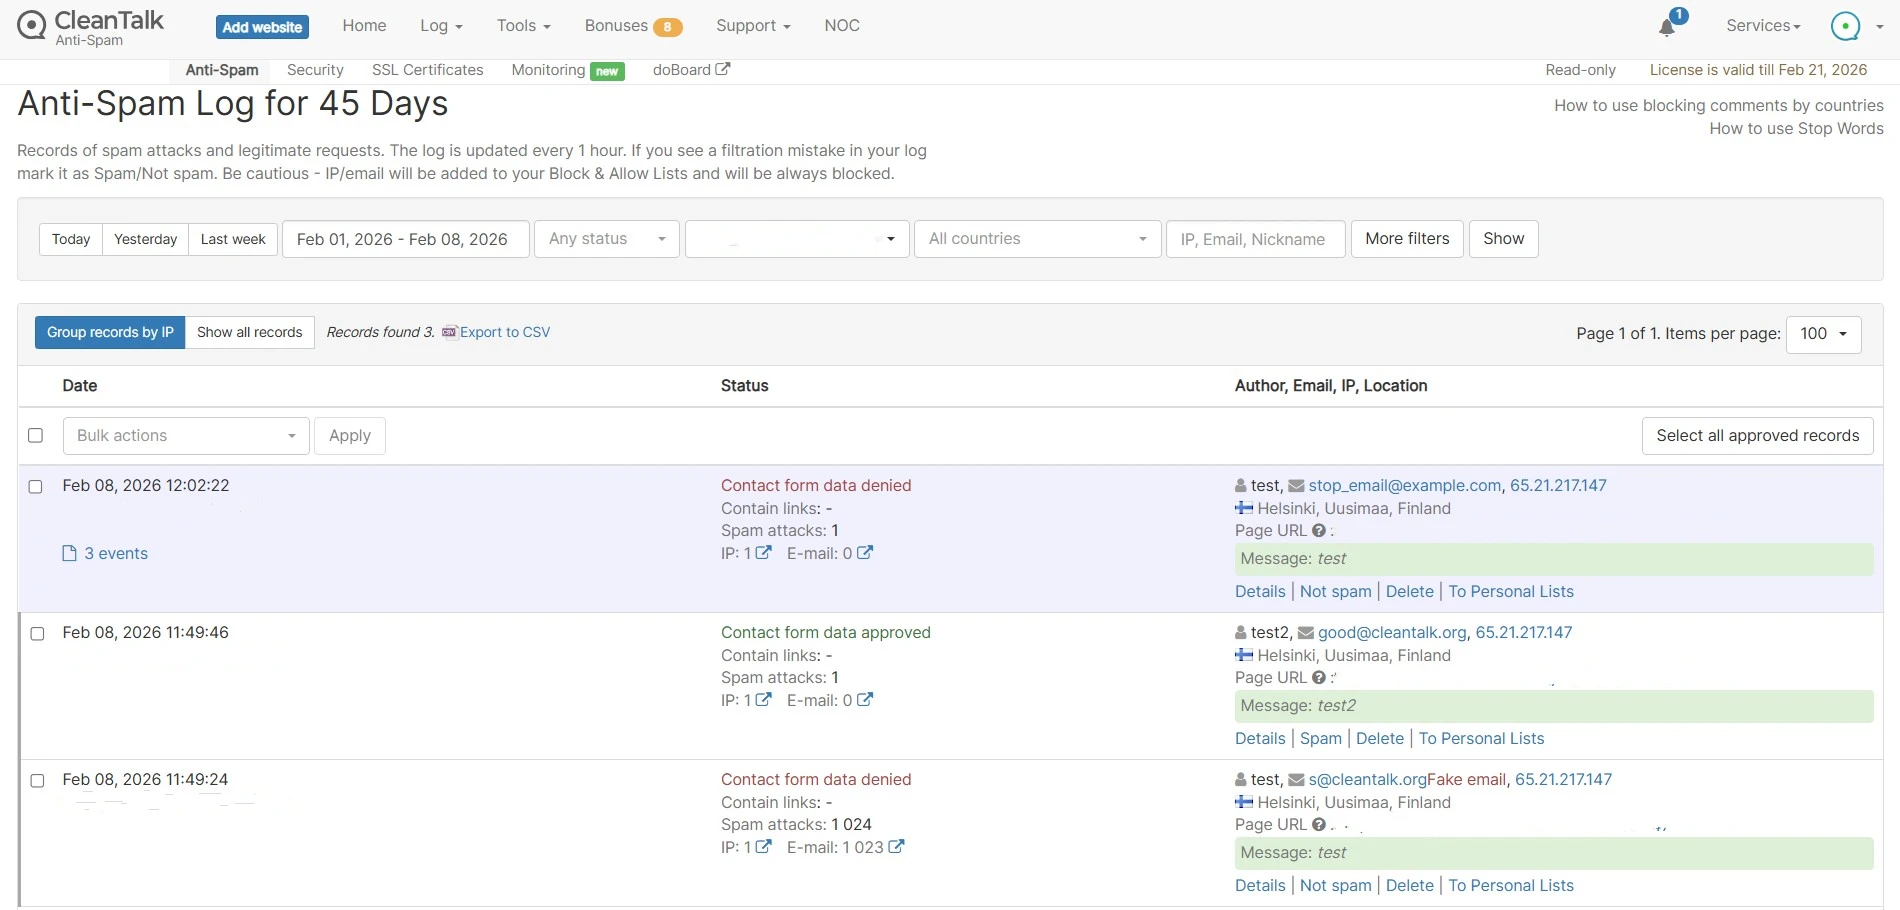
    User-Friendly Experience
    The Anti-Spam provides a seamless and non-intrusive experience for website visitors. It operates in the background without requiring any action from the user. This approach minimizes friction and frustration for visitors, leading to a more positive user experience.
    Performance
    CleanTalk Anti-Spam cloud protection operates efficiently in the background, minimizing the impact on website performance and ensuring a smooth user experience.
    Accessibility
    CleanTalk Anti-Spam does not rely on visual or interactive challenges, making it more accessible to a wider range of users, including those with disabilities.
    Effectiveness
    The Anti-Spam plugin employs advanced algorithms and machine learning techniques to accurately identify and effectively filter out unwanted content while reducing false positives, ensuring that legitimate form submissions are not erroneously blocked.
  • Nextend Social Login and Register spam protection

    Nextend Social Login and Register spam protection

    Nextend Social Login and Register is a very useful plugin when you need to set up, for example, login or registration via Facebook. Still even while using this plugin spam registrations happen, so be sure to use some anti-spam protection. For example CleanTalk Anti-Spam will guarantee your Nextend plugin spam protection in about 5 minutes.

    Once CleanTalk Anti-Spam plugin is installed it starts to protect all of the existing forms on your WordPress website. It may not only be Nextend but many others.

    Download CleanTalk Anti-Spam plugin | Download Nextend Social Login and Register 

    How to install CleanTalk Anti-Spam plugin

    To install the Anti-Spam plugin, go to your WordPress admin panelPluginsAdd New.

    Then enter «СleanTalk» in the search box and click the Install button for «Spam protection, Anti-Spam, FireWall by CleanTalk».

    After installing the plugin, click the «Activate»‎ button.

    After it is done go to the plugin settings and click the «Get Access Key Automatically» button. Then just click the «Save Settings»‎ button.

    After that, go to Settings → Advanced → Forms to protect and switch on the Protect external forms option.

    That’s it! From now your WordPress website and Nextend Social Login and Register plugin are protected from spam.

    How to check your Nextend plugin spam protection in about 5 minutes

    You can test the work of Anti-Spam protection for your Nextend plugin by using a test email s @ cleantalk.org (without spaces). First, open the form in an Incognito browser tab. Fill in all the required form fields and send a form. After submitting the form, you will see a block message about the block on the form submission.

    If you have any questions, add a comment and we will be happy to help you.

    Create your Cleantalk account – Register now and enjoy your spam-free using of Nextend Social Login and Register.

    Update

    The protection works only for website visitors, not for website admins. Be sure to test the form protection using Incognito mode.

    You may view a complete list of CleanTalk Anti-Spam plugin features here. https://cleantalk.org/help/introduction 

    WordPress spam protection

  • Ninja Forms Spam Protection for WordPress

    Ninja Forms Spam Protection for WordPress

    As soon as you create your contact form using contact Forms you may get spam through the contact form. You can always use reCAPTCHA to separate bots from real visitors but it will take some time for your visitors to pass this test. Otherwise, you can use the CleanTalk Anti-Spam plugin instead so it will protect all of your Ninja forms and save your visitors’ time.

    Once the CleanTalk Anti-Spam plugin is installed it starts to protect all of the existing forms on your WordPress website. It may not only be Ninja contact forms but many others.

    How to install CleanTalk Anti-Spam plugin to stop Ninja Forms spam

    To install the Anti-Spam plugin, go to your WordPress admin panel → Plugins → Add New.

    cleantalk-anti-spam

    Then enter «СleanTalk» in the search box and click the Install button for «Spam protection, Anti-Spam, FireWall by CleanTalk».

    ninja-forms-spam-protection

    After installing the plugin, click the «Activate»‎ button.

    ninja-forms-spam-protection

    After it is done go to the plugin settings, click the «Get Access Key Automatically» button. Then click the «Save Settings»‎ button.

    testing-ninja-forms-spam-protection

    That’s it! From now your WordPress website and Ninja forms are protected from spam.

    You can always use our detailed installation instructions.

    Download CleanTalk Anti-Spam plugin | Download Contact Form by Ninja Forms 

    How to check that your Ninja Forms are protected properly

    You can test the work of Anti-Spam protection for your Ninja contact form by using a test email s @ cleantalk.org (without spaces). First, open the form in an Incognito browser tab. Fill in all the required form fields and send a form. After submitting the form, you will see a block message about the block on the form submission.

    spam-protection

    If you have any questions, add a comment and we will be happy to help you.

    Create your Cleantalk account – Register now and enjoy while CleanTalk Anti-Spam plugin protects all of your Ninja forms from spam.

    WordPress spam protection

    Update

    The protection works only for website visitors, not for website admins. Be sure to test the form protection using Incognito mode.

  • Brevo Forms (formely Sendinblue) – Spam Protection for WordPress

    Brevo Forms (formely Sendinblue) – Spam Protection for WordPress

    CleanTalk added spam protection for Brevo Forms using direct form integration. So in case, you prefer using Brevo Forms be sure to use the most effective Anti-Spam plugin. Read the guide below and learn 4 steps to protect your Brevo Forms from spam.

    Once the CleanTalk Anti-Spam plugin is installed it starts to protect all of the existing forms on your WordPress website. It may not only be Brevo Forms but also many others.

    Download CleanTalk Anti-Spam plugin | Download Brevo Forms 

    How to install CleanTalk Anti-Spam plugin

    To install the Anti-Spam plugin, go to your WordPress admin panelPluginsAdd New.

    Then enter «СleanTalk» in the search box and click the Install button for «Spam protection, Anti-Spam, FireWall by CleanTalk».

    After installing the plugin, click the «Activate»‎ button.

    After it is done go to the plugin settings and click the «Get Access Key Automatically» button. Then just click the «Save Settings»‎ button.

    That’s it! From now you How to completely protect your Brevo Forms from spam.

    How to check spam protection for Brevo Forms

    You can test the work of Anti-Spam protection for your СonvertKit Forms by using a test email s @ cleantalk.org (without spaces). First, open the form in an Incognito browser tab. Fill in all the required form fields and send a form. After submitting the form, you will see a block message about the block on the form submission.

    If you have any questions, add a comment and we will be happy to help you.

    Create your CleanTalk account – Register now and protect your СonvertKit Forms from spam in 5 minutes

    Update

    The protection works only for website visitors, not for website admins. Be sure to test the form protection using Incognito mode.

    Additional features

    • CleanTalk protects all forms at once: comments, registrations, feedbacks, contacts, reviews.
    • Installation takes about 1-2 minutes.
    • Smart 99% protection against spambots.
    • Always online – 24/7 technical support.
    • Logs, SpamFireWall, personal lists, country filters, stop-words, and many others.

    Discover the complete list of CleanTalk Anti-Spam plugin features here.

  • AWeber Forms – Spam Protection for WordPress

    AWeber Forms – Spam Protection for WordPress

    CleanTalk added spam protection for Aweber Forms using direct form integration. So in case, if you prefer using Aweber Forms be sure to use the most effective Anti-Spam plugin. Read the guide below and learn 4 steps to protect your Aweber Forms from spam.

    Once the CleanTalk Anti-Spam plugin is installed it starts to protect all of the existing forms on your WordPress website. It may not only be Aweber Forms but also many others.

    Download CleanTalk Anti-Spam plugin | Download Aweber Forms 

    Install AWeber – Free Sign Up Form and Landing Page Builder Plugin for Lead Generation and Email Newsletter Growth

    Please follow this guide: https://docs.aweber.com/integrations/integrations/how-do-i-install-the-aweber-for-wordpress-plugin

    How to install CleanTalk Anti-Spam plugin

    To install the Anti-Spam plugin, go to your WordPress admin panelPluginsAdd New.

    Then enter «CleanTalk» in the search box and click the Install button for «Spam protection, Anti-Spam, FireWall by CleanTalk».

    After installing the plugin, click the «Activate»‎ button.

    After it is done go to the plugin settings and click the «Get Access Key Automatically» button. Then just click the «Save Settings»‎ button.

    That’s it! Now you know how to completely protect your AWeber forms from spam.

    How to check spam protection for Aweber Forms

    You can test spam protection for your Aweber forms using the test email address stop_email@example.com. First, open the form in Incognito mode. Fill in all required fields and submit. Once submitted, you will see a message as shown in the screenshot below.

    aweber form

    In addition, in the Cloud Dashboard you can find extra details regarding all submissions for the AWeber form:

    • Sender’s IP address and email. As well as the sender’s activity history on other sites connected to CleanTalk’s cloud service.
    • Geolocation of the sender.
    • Date and time of submission.
    • Page (URL) of the submission.
    • Cloud decision – Approved, Denied.
    • Cloud explanation for the decision.
    • Tools to move the sender to Block or Allow lists.
    6(1)

    The Dashboard and Anti-Spam log is here: https://cleantalk.org/my/show_requests

    If you have any questions, add a comment and we will be happy to help you.

    Create your CleanTalk account – Register now and protect your Aweber Forms from spam in 5 minutes

    Update

    The protection works only for website visitors, not for website admins. Be sure to test the form protection using Incognito mode.

    Additional features

    • CleanTalk protects all forms at once: comments, registrations, feedback, contacts, and reviews.
    • Installation takes about 1-2 minutes.
    • Smart 99% protection against spambots.
    • Always online – 24/7 technical support.
    • Logs, SpamFireWall, personal lists, country filters, stop-words, and many others.

    Discover the complete list of CleanTalk Anti-Spam plugin features here.

    Create your CleanTalk account


    By signing up, you agree with license. Have an account? Log in.
  • How to stop spam on WordPress – Back In Stock Notifier for WooCommerce

    How to stop spam on WordPress – Back In Stock Notifier for WooCommerce

    CleanTalk added spam protection for Back In Stock Notifier using direct form integration. So in order to stop Back In Stock Notifier for WooCommerce spam, be sure to use the most effective Anti-Spam plugin. Read the guide below and learn 4 steps to protect your Back In Stock Notifier from spam.

    Once the CleanTalk Anti-Spam plugin is installed it starts to protect all of the existing forms on your WordPress website. It may not only be Back In Stock Notifier but also many others.

    Note: the protection only works with alternative cookies on and only for website visitors, not for website admins. Be sure to test the form protection using Incognito mode.

    Download CleanTalk Anti-Spam plugin | Download Back In Stock Notifier 

    How to install CleanTalk Anti-Spam plugin

    To install the Anti-Spam plugin, go to your WordPress admin panelPluginsAdd New.

    Then enter «CleanTalk» in the search box and click the Install button for «Spam protection, Anti-Spam, FireWall by CleanTalk».

    After installing the plugin, click the «Activate»‎ button.

    After it is done go to the plugin settings and click the «Get Access Key Automatically» button. Then just click the «Save Settings»‎ button.

    Then go to Advanced settings and scroll down to the Data Processing section. Find the Use Anti-Spam by CleanTalk JavaScript library option and switch it on. Press the Save Changes button.

    That’s it! From now you know how to stop Back In Stock Notifier for WooCommerce spam. If you have any questions, add a comment and we will be happy to help you.

    Create your CleanTalk account – Register now and protect your Back In Stock Notifier from spam in 5 minutes


    Additional features

    • CleanTalk protects all forms at once: comments, registrations, feedbacks, contacts, reviews.
    • Installation takes about 1-2 minutes.
    • Smart 99% protection against spambots.
    • Always online – 24/7 technical support.
    • Logs, SpamFireWall, personal lists, country filters, stop-words, and many others.

    Discover the complete list of CleanTalk Anti-Spam plugin features here.

  • How to Stop Spam on WordPress – Delivra Forms

    How to Stop Spam on WordPress – Delivra Forms

    CleanTalk added spam protection for Delivra Forms using direct form integration. So in case, if you prefer using Delivra Forms be sure to use the most effective Anti-Spam plugin. Read the guide below and learn 4 steps to protect your Delivra Forms from spam.

    Once the CleanTalk Anti-Spam plugin is installed it starts to protect all of the existing forms on your WordPress website. It may not only be Delivra Forms but also many others.

    Download CleanTalk Anti-Spam plugin | Download Delivra Forms 

    How to install CleanTalk Anti-Spam plugin

    To install the Anti-Spam plugin, go to your WordPress admin panelPluginsAdd New.

    Then enter «CleanTalk» in the search box and click the Install button for «Spam protection, Anti-Spam, FireWall by CleanTalk».

    After installing the plugin, click the «Activate»‎ button.

    After it is done go to the plugin settings and click the «Get Access Key Automatically» button. Then just click the «Save Settings»‎ button.

    After that, go to Settings Advanced Forms to protect and switch on the Protect external forms option.

    In Settings Advanced go to Data Processing and switch Cookies to alternative mechanism. Then press the Save Changes button below.

    When done, please add attribute id=”delivra-external-form” to the form code as shown in the screenshot below.

    id="delivra-external-form"

    That’s it! From now you know, how to completely protect your Delivra Forms from spam.

    How to check spam protection for Delivra Forms

    You can test the work of Anti-Spam protection for your Delivra Forms by using a test email s @ cleantalk.org (without spaces). First, open the form in an Incognito browser tab. Fill in all the required form fields and send a form. After submitting the form, you will see a block message about the block on the form submission.

    If you have any questions, add a comment and we will be happy to help you.

    Create your CleanTalk account – Register now and protect your Delivra Forms from spam in 5 minutes

    Update

    The protection works only for website visitors, not for website admins. Be sure to test the form protection using Incognito mode.

    Need help with settings or missed spam?

    If you have any issues with the plugin settings, test submissions or missed spam signups, feel free to ask for help in the comments section down below.

    Additional features

    • CleanTalk protects all forms at once: comments, registrations, feedbacks, contacts, reviews.
    • Installation takes about 1-2 minutes.
    • Smart 99% protection against spambots.
    • Always online – 24/7 technical support.
    • Logs, SpamFireWall, personal lists, country filters, stop-words, and many others.

    Discover the complete list of CleanTalk Anti-Spam plugin features here.

  • Our client’s review: TAILORMADEAFRICA.COM

    Our client’s review: TAILORMADEAFRICA.COM

    We continue sharing our clients’ reviews and today’s one is kindly brought to you by our client from tailormadeafrica.com on WordPress.

    Makes such a huge difference!

    Since we’ve been using Cleantalk our spam form completions have disappeared! Thank you Cleantalk!
    Update: We are still using CleanTalk and it has made such a huge difference to the websites we are using it on!

  • CleanTalk Security Plugin Tools for WordPress

    CleanTalk Security Plugin Tools for WordPress

    1. Protection against brute-force attacks is essential to prevent unauthorized access to systems and accounts. Brute-force attack is a method where attackers sequentially try all possible combinations of account passwords and sometimes gain access to the system. The CleanTalk plugin has options such as:
      1.1. Number of unsuccessful authorizations before blocking occurs.
      1.2. Lockout time of the visitor which is the time period between login attempts.
      1.3. Time period the IP will be blocked for when the limit of unsuccessful authorizations is reached.

    2. User Actions Log is designed to track user actions in the WordPress Dashboard and ensure security. It allows you to record and display user actions in real time, to see which pages of the website backend and at what time they were visited. This tool is useful for detecting and preventing hacking attempts, unauthorized access, and other suspicious activities on the website.

    3. Security Firewall is designed to block access to the site under certain conditions:
      3.1. CleanTalk Database of Dangerous IP Addresses is being used to block access to the site for those IP addresses that have already participated in hacking attempts into other sites.
      3.2. Your Personal Lists of IP Addresses is being used to block access to the site.
      You can add custom IP addresses, networks, and countries on your CleanTalk Dashboard.
      Visitors that were blocked by the Security FireWall will not be able to pass it and get to your site.

    4. Security Report provides a summary of how the plugin works on your websites. The report is being sent once a week to your email address and provides the following statistics:
      4.1. Blocked requests in Security FireWall
      4.2. Number of brute-force attempts
      4.3. Successful admin logins
      4.4. Malware scanner statistics

    5. The option “Notifications of administrator users authorizations” sends you a notification by email every time you successfully log in with an administrator account. This allows you to quickly receive information about unauthorized users.

    6. Real-Time Traffic Monitor feature provides you with real-time traffic information on your website. It helps you in tracking visitors activity and detect potentially malicious traffic — these can be password cracking attempts, SQL injections, DDOS attacks, and other threats.

      The feature also allows you to see bots activity on your site. Bots can have different intentions, but it’s important to be able to distinguish real users from automated bots. You can view the list of bots and take action to block unwanted activity.
      You can see data such as IP address, location, country, and other information that will help determine if a visitor is a suspicious or unwanted bot. It will also help you make the appropriate security settings.

      The feature works In real time, meaning you can see the activity immediately without a delay. You can view the current users on the site, as well as which pages or sections of the site are currently being viewed.

    7. Malware Scanner is one of the features of the CleanTalk Security Plugin for WordPress that is designed to detect and remove malicious code on your website.
      Daily automatic site scanning. The plugin scans your site once a day and you will receive up-to-date information about your site cleanness. You can choose the time period for the automatic site scanning — every 12 hours, 24 hours, 3 days, 7 days, 14 days, or every 30 days.

      The Malware Scanner feature analyzes all files on your site, including the WordPress core files, themes and plugins. It looks for vulnerabilities, malicious scripts, and other suspicious elements that may be related to malicious code.

      When Malware Scanner detects malware or suspicious files, it alerts you instantly via email. You will receive a detailed report of the found threats, including the file names. This will help you quickly respond and take necessary actions to remove malware.

      Automatic Malicious Code Removal: The CleanTalk Security Plugin for WordPress provides this feature to automatically remove malicious code. If there is a known signature for the detected malicious code, the file will be disinfected automatically.

    8. The option “Collect and send PHP log” allows you to automate the process of checking your PHP logs for errors that occur while your site is running. Errors could appear for a short period of time and only when one specific function is running, they can’t be spotted in other circumstances so sometimes it’s hard to catch them. The CleanTalk Scanner will check your website backend once per hour. Statistics of errors are available in your CleanTalk Dashboard.

    9. 2FA: WordPress Two-Factor Authentication is a tool to provide an additional level of security for the website administrator account.
      The main purpose of 2FA is to protect user accounts from unauthorized access, even if an attacker knows the user’s password.
      When a user enters their password to log into their WordPress account, 2FA requires them to provide a second authentication code. The code is being sent to the WordPress account email address.

      The CleanTalk Security plugin allows administrators to set up 2FA for various user roles. So they can grant 2FA to certain groups of users.
      The option “Custom WP-Login URL” in the CleanTalk Security Plugin for WordPress allows you to change the default login URL of your WordPress Dashboard (wp-login.php). This is useful for several reasons:

      • Protection against brute-force attacks: Changing the login URL of the admin panel makes it less predictable and harder for attackers to determine. Most brute-force scripts and bots look for the standard URL, so using a custom URL improves security.
      • Hiding the fact that WordPress is being used: Many hackers and attackers specifically look for sites built on WordPress in order to gain access to them. Changing the login URL makes your site less vulnerable for attacks that are being made by the principle “Default WordPress Login URL Search” .
      • If you use a custom login URL, this may be more memorable and convenient for you. You can choose an URL that is easy to remember or related to your brand.
      • Prevent spam and DDoS attacks: Changing your login URL can help you prevent spam bots and DDoS attacks that often target a standard URL. This can significantly reduce the amount of unwanted activity and improve the performance of your site.

    10. The option “Prevent collecting of authors’ logins” in the CleanTalk Security Plugin for WordPress is an additional tool to protect your site from malicious attacks and unauthorized access.

      One of the most common ways of attacking websites is by attempting to hijack the accounts of the administrator or content authors. A hacker can use various methods to gain access to usernames and passwords and use them for malicious purposes such as injecting malicious code, modifying website content, and even stealing user data.

      The option in the CleanTalk Security Plugin can greatly reduce the risk of such attacks. This feature allows you to hide the names of your authors (logins) from public view on the site, storing them in the database for administrative access only.

      Firstly, it will prevent attackers from accessing authors’ data, which will significantly complicate the hacking process. Secondly, the site will look more secure and inaccessible to hackers. Thirdly, using this option reduces the likelihood of data leakage and privacy violations.

    11. The option “Disable XML-RPC” in the CleanTalk Security Plugin is an important step to increase security and prevent potential attacks on your site.

      XML-RPC is a protocol that allows you to remotely interact with your WordPress site. It was created to facilitate data transfer and information exchange with other platforms. However, due to several vulnerabilities, XML-RPC can become an entry point for hackers.

      One of the main reasons for disabling XML-RPC is the possibility of an attack called brute-force. This attack involves attempts to forcefully input different random passwords for administrative accounts in a rapid succession. XML-RPC, by its very nature, allows attackers to carry out such attacks because it allows iterative validation of multiple passwords without restrictions. Disabling XML-RPC greatly reduces the risk of such attacks and prevents unauthorized access to your site.

      In addition, XML-RPC can also be used to carry out DDoS (Distributed Denial of Service) attacks. Attackers can use XML-RPC to send a large number of requests to your site at the same time, which can lead to server overload and temporary site denial of service. Disabling XML-RPC protects your site from such attacks and helps keep it running for your visitors.

      Disabling XML-RPC in WordPress is quite simple. You can do this with the CleanTalk Security Plugin and enable the option “Disable XML-RPC”. It is recommended to disable XML-RPC unless you are using it to communicate with other platforms or services.

    12. The option “Disable REST API for non-authenticated users”. The REST API is a set of programming interfaces that allow you to interact with your WordPress site and access data and functionality. However, access to the REST API can become a vulnerability for attackers if the option “Disable REST API for non-authenticated users” is not enabled. Examples: getting a list of all posts, creating a new post or updating an existing one, deleting a post, getting/creating users and comments.

      Disabling the REST API for unauthenticated users has several benefits. First, it reduces the risk of an attack on your site. If an attacker gains access to the REST API, they can use this opportunity to obtain sensitive data, change site content, or perform other unwanted actions. Disabling the REST API for unauthenticated users helps in preventing these potential attacks.

      Second, disabling the REST API for unauthenticated users helps improve the performance of your site. The REST API can put a load on the server, especially when trying to process many requests from unauthenticated users. Disabling this feature for these users reduces the server load and speeds up your site response.

      Enabling the option “Disable REST API for non-authenticated users” in the CleanTalk Security Plugin is very simple. Just activate this option in the plugin settings and save the changes. It is important to note that this option will not affect authenticated users, and they will be able to continue using the REST API without any issues. If you only use the WordPress Dashboard to work with the site and want to increase the security level of your resource, then it is recommended to disable the WP REST API.

    13. The option “Forbid to show your website in <iframe> tags on third-party websites” in CleanTalk Security prevents your site from being embedded in an <iframe> on other websites. An <iframe> is an HTML element that allows you to embed one web page inside another. Technically speaking, <iframe> can be used to display your site on other third-party sites while still maintaining visual and functional content. However, this can also lead to security risks and undesirable consequences.

      This has several advantages. First, it protects your site from potential fraudulent activities. Some attackers may create embedded iframe-copies of your website to fraudulently collect personal information from your visitors or malicious targets. Disabling <iframe> prevents this possibility and protects your users.

      Second, opting out of showing your site in an <iframe> on third-party websites helps you control content and prevent copyright loss. If your site is embedded in another website’s <iframe> without your consent, this may result in improper display and control of your content. Disabling <iframe> allows you to retain full control over how and where your site is displayed.

      Enabling the option “Forbid to show your website in <iframe> tags on third-party websites”in the CleanTalk Security Plugin is very simple. It is enough to activate this option in the plugin settings, and your site will be protected from embedding in <iframe> tags on third-party websites.

    14. The option “Add these headers to the HTTP responses on the public pages: X-Content-Type-Options, X-XSS-Protection” in CleanTalk Security allows you to add the X-Content-Type-Options and X-XSS-Protection security headers to the HTTP responses on your site’s public pages. These headers tell browsers how to process the content of the page and prevent possible XSS-based attacks and malware downloads.

      XSS (cross-site scripting) and drive-by download attacks are among the most common and dangerous threats in the online environment. XSS attacks can allow attackers to inject and execute malicious code on your site, while drive-by download attacks attempt to download and install malicious software without the admin’s knowledge.

      The X-Content-Type-Options header tells the browser that page content should only be processed according to the specified MIME type (Multipurpose Internet Mail Extensions). This helps prevent possible attacks based on the content type and provides an additional layer of protection.

      The X-XSS-Protection header is designed to protect against XSS (cross-site scripting) attacks. It includes built-in protection mechanisms in the browser that allow you to detect and block attempts to execute malicious scripts in a timely manner.
      Enabling the option “Add these headers to the HTTP responses on the public pages: X-Content-Type-Options, X-XSS-Protection” in the CleanTalk Security Plugin is very simple. Just enable this option in the plugin settings and headers will be automatically added to the HTTP responses on public pages of your site.

      In this article we have tried to tell you about the main and most useful options of the CleanTalk Security Plugin for WordPress. You can install the plugin from the official WordPress directory here: https://wordpress.org/plugins/security-malware-firewall

      If you have any questions about the CleanTalk Security Plugin functions, feel free to ask them in the comments and we will be happy to assist you.
  • How to make your CleanTalk Anti-Spam plugin 100% AMP-compatible

    How to make your CleanTalk Anti-Spam plugin 100% AMP-compatible

    AMP (Accelerated Mobile Pages) is a free technology, that makes your website pages optimized for mobile web browsing and helps webpages load faster.

    There is a way to make your WordPress website AMP-compatible while keeping it protected with CleanTalk Anti-Spam plugin. And there is how you do it:

    1. In your WordPress dashboard go to Plugins Add New and type “AMP” in the search form.


    2. After that, press the Install Now button near the plugin and the Activate button once the plugin is installed.
    3. After that go to AMPSettings and click on the Open Wizard button.


    4. The final step is just to follow the instruction on the page and scan the website. After the scan there is nothing else that should be done – the plugin works automatically and if you open your website page, you will see, that all the AMP-incompatible code is already gone.

    Congratulations! Now your WordPress website is 100% AMP-compatible.