Tag: wordpress plugin

  • Hiding your WordPress username from bad bots

    Hiding your WordPress username from bad bots

    Do you know how to hide your WordPress usernames from bad bots? We are glad to introduce you a new Security plugin improvement: from now CleanTalk allows you to hide WordPress username from bad bots brute-force.

    Before this improvement became available some bots could learn WordPress usernames by their ID and use it to brute-force these accounts later. For example, a request like «‎https://blog.cleantalk.org/?author=007»‎ could return the username «https://blog.cleantalk.org/author/james_bond».

    This option is switched off by default so in order to avoid vulnerabilities like that we highly recommend to switch it on.

    Step 1: Go to PluginsInstalled Plugins.

    Step 2: Go to Settings beneath the Security plugin.

    And after that choose General Settings.

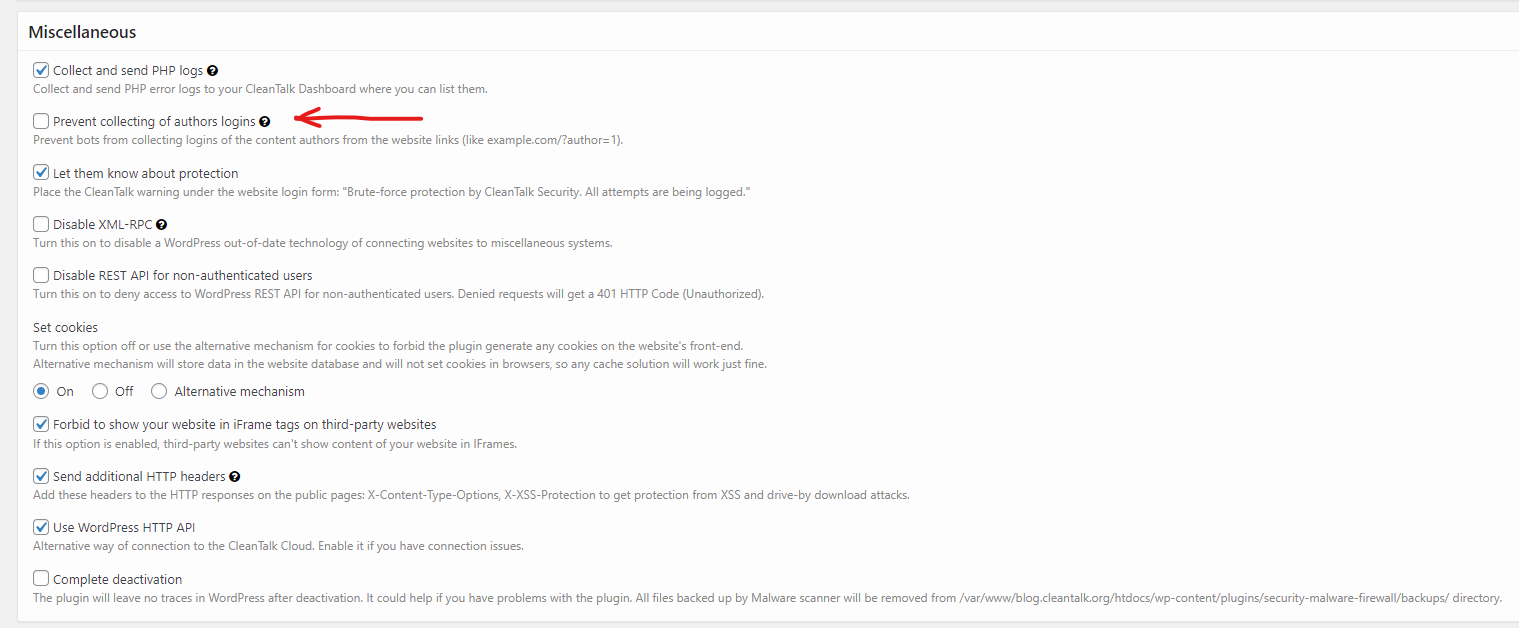
    Step 3: Go to Miscellaneous section and find checkbox ‎«‎Prevent collecting of authors logins» and just check this box.

    Step 4: Press the «Save Changes» button.

    Success! That’s how quickly CleanTalk allows you to hide WordPress username from bad bots

    If you have any questions, add a comment and we will be happy to help you.

    Create your Cleantalk account – Register now and enjoy while CleanTalk Anti-Spam plugin protects your Clean and Simple Contact Forms from spam.

  • How to protect your Jetpack forms using CleanTalk Anti-Spam plugin

    How to protect your Jetpack forms using CleanTalk Anti-Spam plugin

    After you created your contact form using Jetpack Forms you may get spam through comments and contact forms. Jetpack has an integrated system of manual moderation of 100% comments, but if you want to save your own time we have a smart solution for your site. CleanTalk Anti-Spam plugin protects all of your Jetpack forms from spam.

    Once CleanTalk Anti-Spam plugin is installed it starts to protect all of the existing forms on your WordPress website. It may not only be Jetpack contact forms but many others.

    How to install CleanTalk Anti-Spam plugin

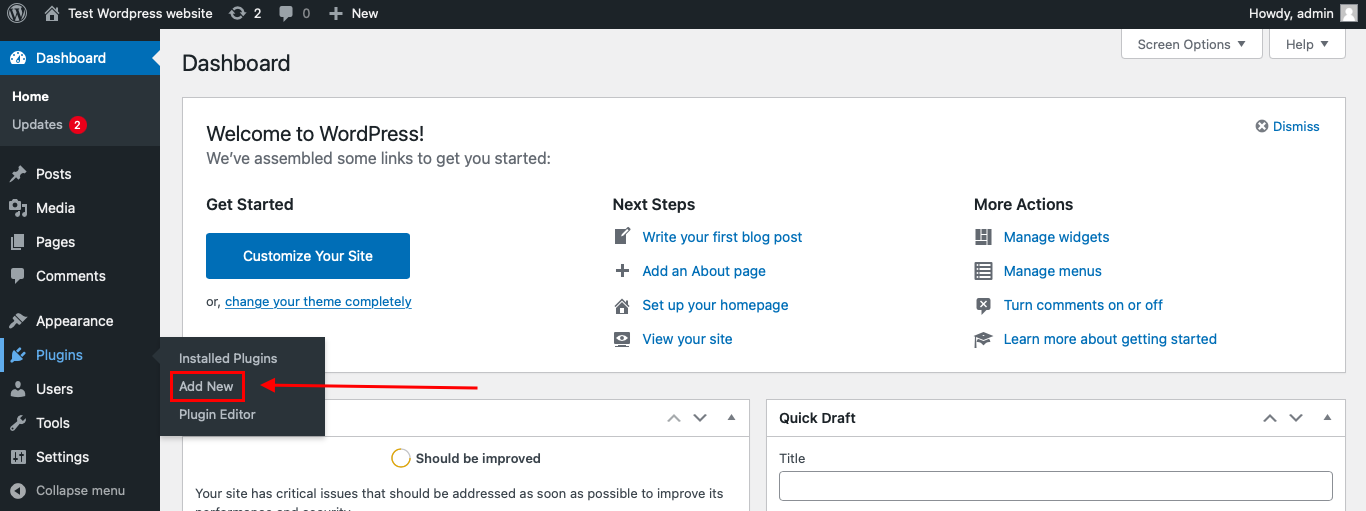
    To install the Anti-Spam plugin, go to your WordPress admin panel → Plugins → Add New.

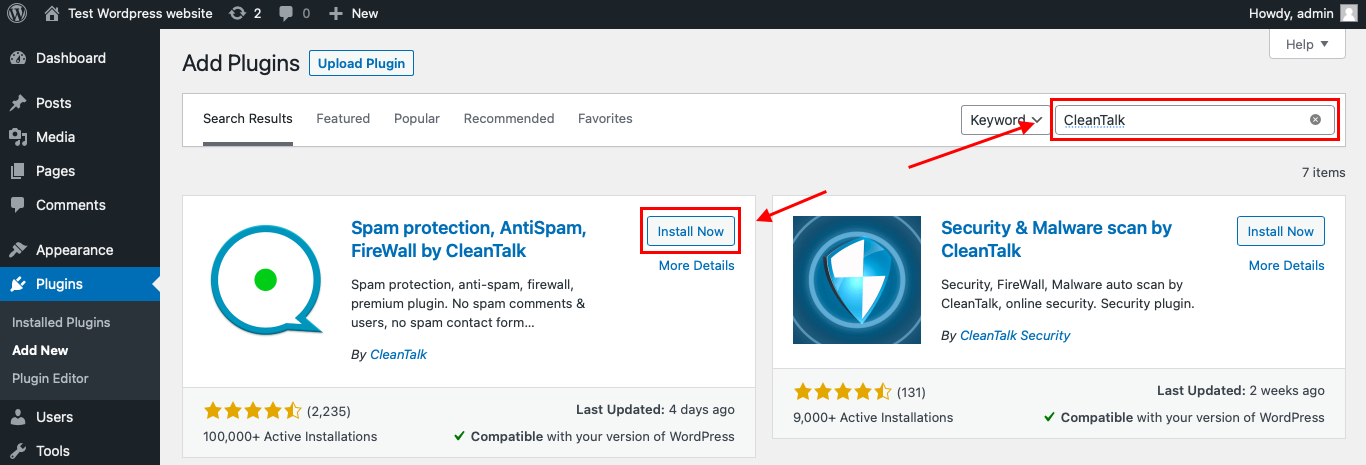
    Then enter «СleanTalk» in the search box and click the Install button for «Spam protection, Anti-Spam, FireWall by CleanTalk».

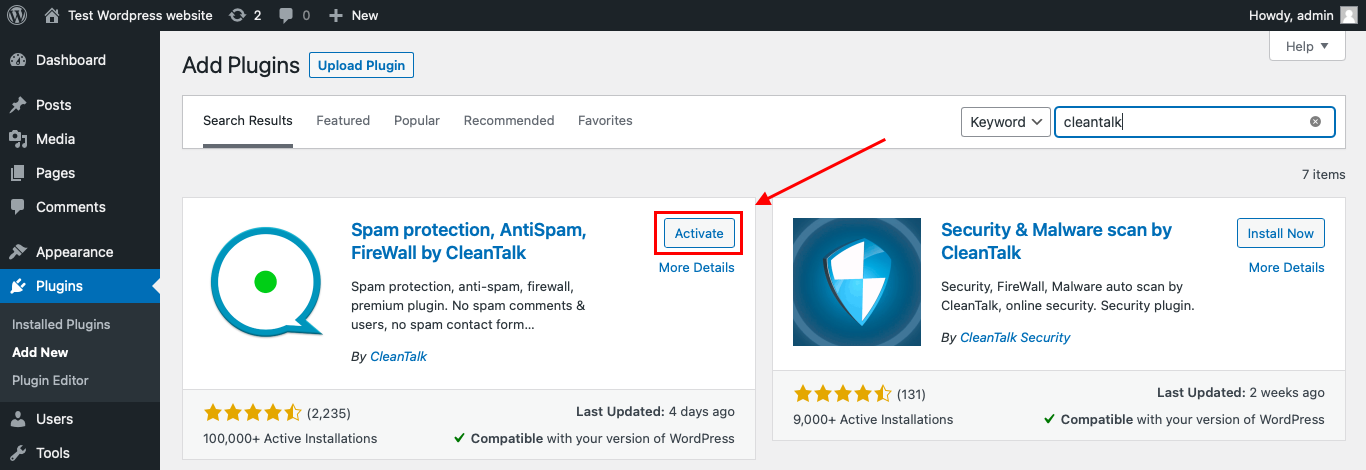
    After installing the plugin, click the «Activate»‎ button.

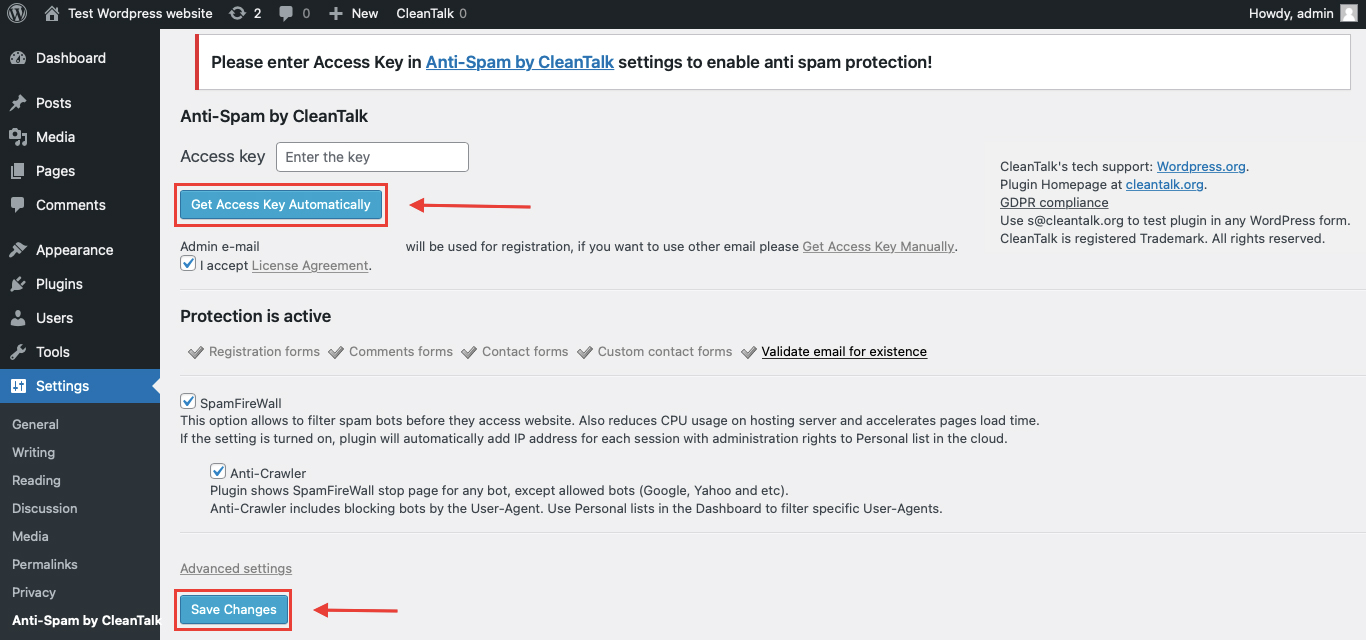
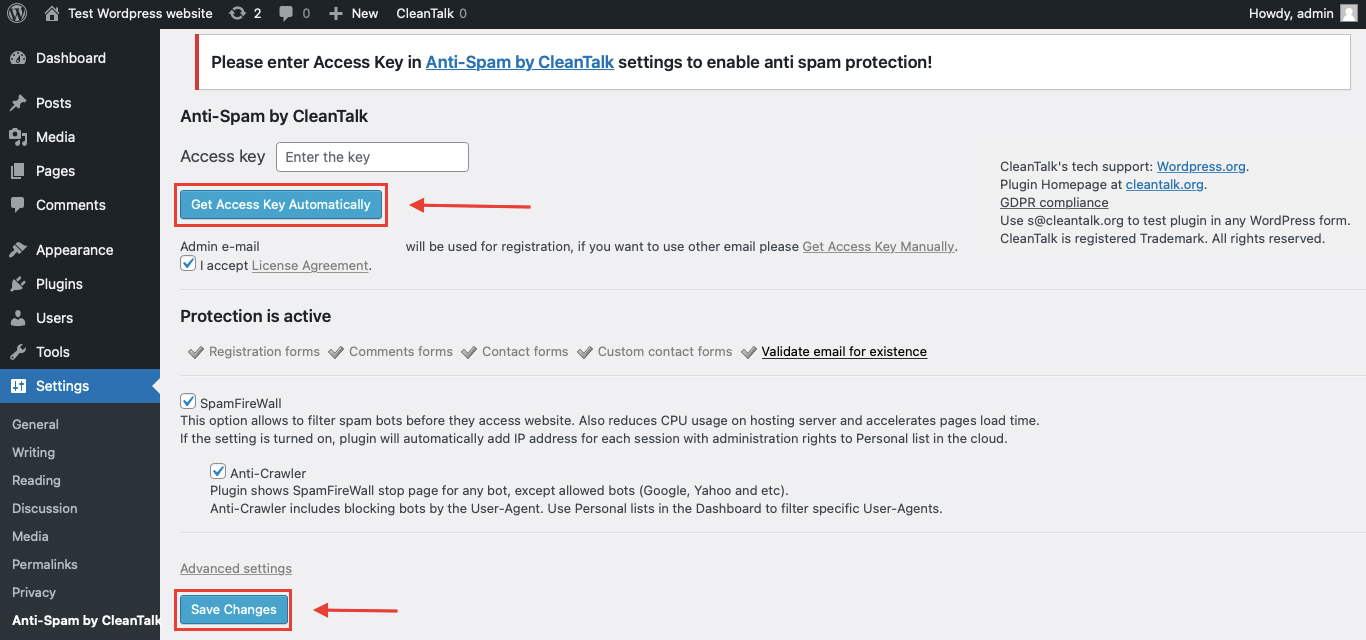
    After it is done go to the plugin settings, click the «Get Access Key Automatically» button. Then click the «Save Settings»‎ button.

    That’s it! From now your WordPress website and Jetpack forms are protected from spam.

    You can always use our detailed installation instructions.

    Download CleanTalk Anti-Spam plugin | Download Contact Form by Jetpack Forms 

    How to check that CleanTalk already protects your Jetpack forms from spam

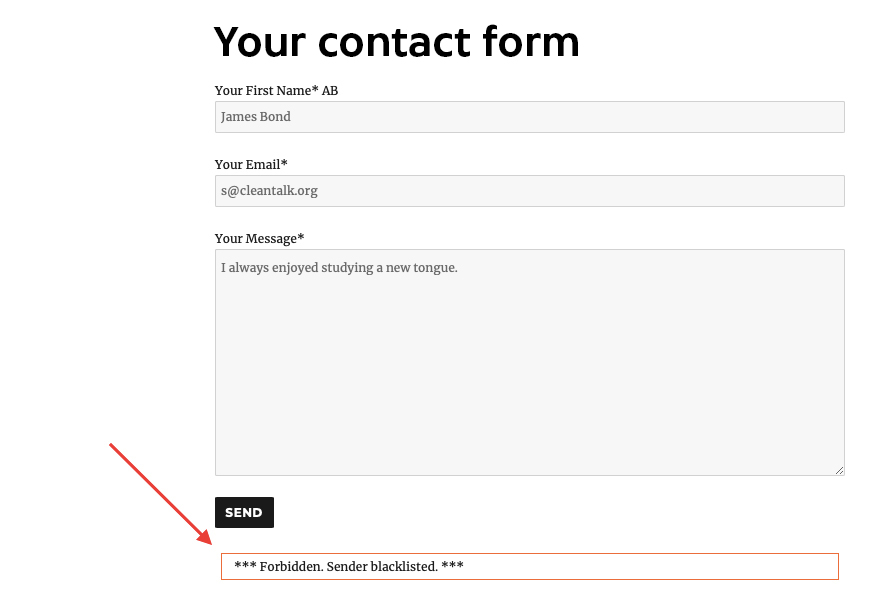
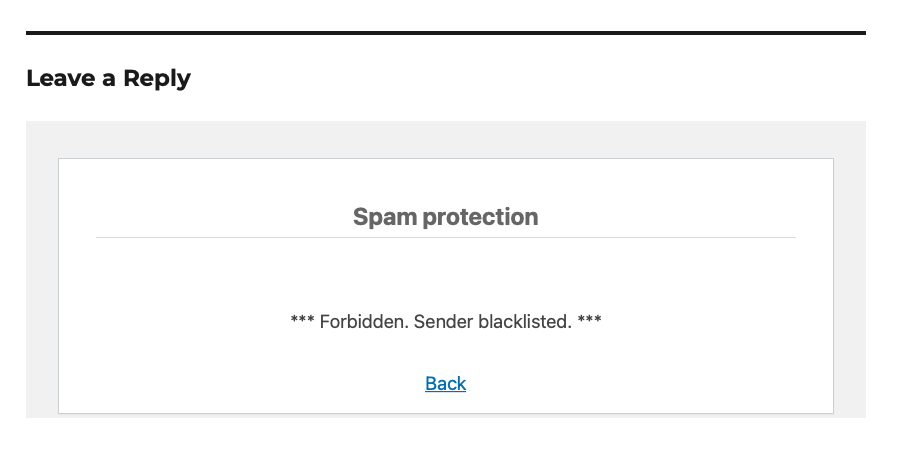
    You can test the work of Anti-Spam protection for your Jetpack contact and comments form by using a test email s @ cleantalk.org (without spaces). First, open the form in an Incognito browser tab. Fill in all the required form fields and send a form. After submitting the form, you will see a block message about the block on the form submission.

    If you have any questions, add a comment and we will be happy to help you.

    Create your Cleantalk account – Register now and enjoy while CleanTalk Anti-Spam plugin protects all of your Jetpack forms from spam.

    Update

    The protection works only for website visitors, not for website admins. Be sure to test the form protection using Incognito mode.

    Additional features

    • CleanTalk protects all forms at once: comments, registrations, feedbacks, contacts, reviews.
    • Installation takes about 1-2 minutes.
    • Smart 100% protection against spambots.
    • Always online – 24/7 technical support.
    • Logs, personal lists, country filters, stop-words and many another.

    A complete list of CleanTalk Anti-Spam plugin features can be viewed here. https://cleantalk.org/help/introduction 

    WordPress spam protection

  • Introducing: CleanTalk Pixel

    Introducing: CleanTalk Pixel

    Our mission is to protect your website from spam. In order to do so we need to firstly identificate visitor’s IP address. But detecting IP address sometimes may go wrong because it may be substituted by some bots. So we decided to exclude the probability of false triggering and here comes the CleanTalk Pixel that improves your website spam protection.

    What is CleanTalk Pixel and how does it improve your site spam protection

    It is an «invisible» 1×1px image that Anti-Spam plugin integrates to your WordPress website. And when someone visits your website the Pixel is triggered and reports this visit and some other data including true IP address.

    This Pixel is not located on some server but is created in HTML every time you load your website page. This exactly helps our system to get the most true IP address and not be confused by CDN or plugins caching site requests. And that’s exactly how CleanTalk Pixel improves your website spam protection.

    How to connect Pixel to your website

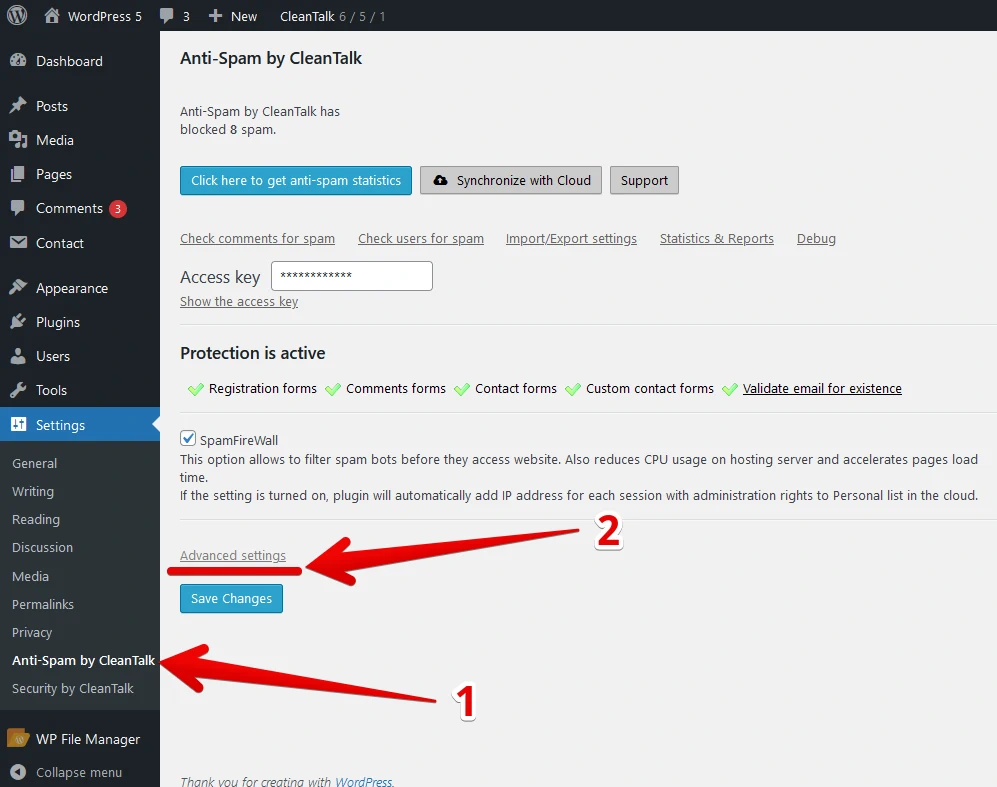
    Step 1: Go to Plugins Installed Plugins.

    Then go to Settings link next to CleanTalk Anti-Spam plugin.

    Step 2: Click on «Advanced settings» button at the bottom of the screen. More setting will appear.

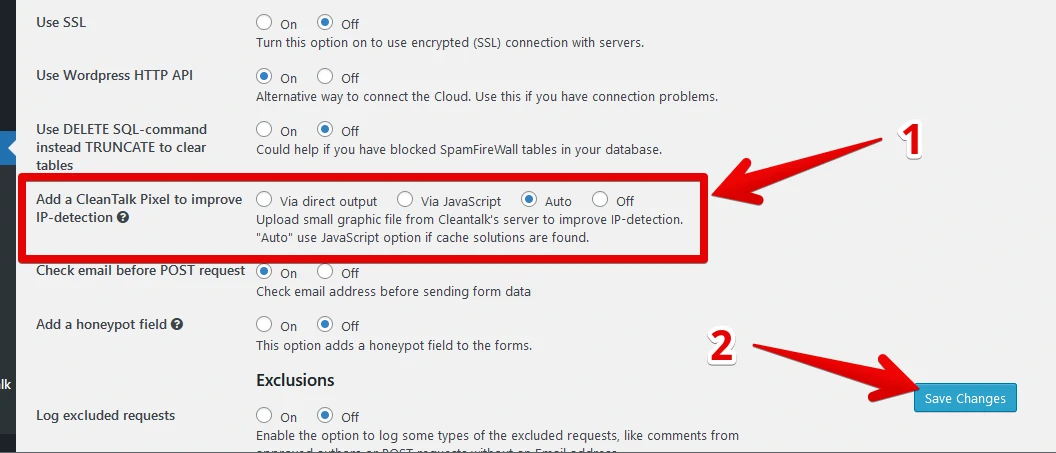
    Then find Add a CleanTalk Pixel… field in Data Processing section.

    Step 3: Choose, how exactly Pixel will act:

    • Via direct output – insert Pixel code into HTML from the backend.
    • Via Javascript – insert Pixel code into HTML from the frontend.
    • Auto – insert Pixel code into HTML from the backend if pixel detects a caching plugin (Recommended).
    • Off – Pixel if disabled.

    After that just press the Save Changes button.

    Done! It really is that simple.

    If you have any questions, add a comment and we will be happy to help you.
    Create your Cleantalk account – Register now

    You can see a complete list of CleanTalk Anti-Spam plugin features here.

    WordPress spam protection