Tag: security

  • DDoS on 600 GB/s as the democratization of censorship

    DDoS on 600 GB/s as the democratization of censorship

    Well-known American journalist Brian Krebs for a long time writes on the topics of information security, revealing the identity of dark speculators mainly from Eastern Europe. Over the years, Brian had to over pass through a lot. Evil Ukrainian hacker has gathered on the forums for two bitcoins to buy heroin and send it to Krebs by post, other hackers have sent a SWAT team into the house on call 911 supposedly his number, took out a loan for $20 thousand to his name, has transferred $1000 to his Paypal account with stolen payment card. The authors of malicious software mention Brian Krebs even in the code of their programs. What can we do, these are the costs of the work of journalists in the field of information security.

    Now Krebs has been targeted with new attacks. This time the attackers organized the most powerful DDoS-attack 600 Gbps on the website KrebsOnSecurity.com. A few days later the company Akamai gave up. To protect other customers, it brought out KrebsOnSecurity.com from under its protection.

    The attack began on the evening of Tuesday September 20. Initially, it had no effect thanks to the operational work of Akamai engineers. Traffic was filtered out, but experts Akamai have admitted that this attack was almost twice as powerful as the biggest DDoS ‘ and what they saw in life. And probably one of the biggest in the history of the Internet in general.

    September 20 at 20:00 the flow of garbage traffic reached 620 GB/s. This is more than enough to drop any website. Up to this maximum DDoS -ttack on Akamai resources was 363 Gbit/s.

    DDoS was not organized by the standard method with amplification of queries through DNS servers. Instead, most of the traffic consisted of packets of data generic routing encapsulation (GRE). Communication protocol GRE is used to establish direct P2-connections between network nodes. Such a large amount of traffic surprised the experts – it is not entirely clear hot the amplification is carried out. If amplification was not, it turns out that the attacker used to attack hundreds of thousands of infected machines. It’s some kind of record botnet. Perhaps it consists of IoT devices such as routers, IP-cameras and digital consoles (DVR).

    Brian Krebs is not offended by Akamai. For four years they are many times together with a subsidiary firm Prolexic protect it from DDoS-attacks. Just the current DDoS was too large. When it became obvious that the attack will affect other customers, the company Akamai in advance on September 21 at 16:00 warned Brian Krebs that he has two hours to go to another network, and at 18:00 they remove the protection.

    The company’s management later explained that otherwise the reflection of such an attack would cause them loss of millions of dollars. Perhaps the head is a bit exaggerated, but in fact protect against attacks of this scale really worth from $100 thousand to $150 thousand per year. They always defended Krebs for free.

    In order not to fail their host, the journalist asked to redirect all traffic to 127.0.0.1, and he tried to use the services of Project Shield — Google’s charity project, designed specifically to protect journalists from DDoS attacks. It turned out that this is ideal, so that on 25 September the site was back online and still works flawlessly.

    These events pushed Brian Krebs to philosophical thoughts about the nature of Internet censorship. He recalls the famous words of businessman and libertarian John Gilmore about the impossibility of censoring the Internet. Gilmore said: “the Network recognizes censorship as damage and avoids it.” Those are some great words that have been repeatedly confirmed by life. Even now in Russia can be clearly seen how ineffective censorship of the Internet. Attempts of Roskomnadzor and other censors to block specific network resources really perceives as damage to the integrity of its structure, as an anomaly in normal operation — and offers options to work around this anomaly.

    But this principle applies only in the case of “political” censorship, which is traditionally implemented by governments of different countries, limiting free access of its citizens to information.

    In the case of a DDoS-attack, we see another example of an attempt to “gag” an opponent, to silence him. Here the state is not involved. Censorship is implemented by the coordinated efforts of many people or bots. In this sense, we can say that a DDoS-attack is a “democratic” version of censorship when the majority imposes its will on the minority and silences the opponent (of course, to a true democracy, such actions are irrelevant).

    Brian Krebs believes that currently the greatest threat of censorship are just not the toothless attempts by state officials to ban something on the Internet (officials still understand absolutely nothing about technology and are not capable of inflicting significant damage), and namely acts of experienced professionals. Underground hacker community in recent years quietly turned into a powerful transnational organization, in whose hands is concentrated the enormous computer resources. These resources under certain conditions can turn into cyber weapon.

    It is difficult to imagine that the government of any country could organize a DDoS-attack with a capacity of 600 GB/s, it’s incredible. But transnational hacker community — can. In this sense, Brian Krebs speaks of “the democratization of censorship”.


    This text is a translation of the article “DDoS на 600 Гбит/с как демократизация цензуры”  published by @alizar on habrahabr.ru.

    About the CleanTalk service

    CleanTalk is a cloud service to protect websites from spam bots. CleanTalk uses protection methods that are invisible to the visitors of the website. This allows you to abandon the methods of protection that require the user to prove that he is a human (captcha, question-answer etc.).

  • How to protect a Linux system: 10 tips

    How to protect a Linux system: 10 tips

    At the annual LinuxCon conference in 2015 the Creator of the GNU/Linux core Linus Torvalds has shared his opinion about the safety of the system. He stressed the need to mitigate the effect of the presence of certain bugs by competent protection order in violation of one component to the next layer overlaps the problem.

    In this article we will try to uncover this subject from a practical point of view:

    • start with the presets and recommendations for choosing and installing Linux distributions;
    • then talk about simple and effective item of protection — security update;
    • next, consider how to set restrictions for programs and users.
    • how to secure the connection to the server via SSH;
    • we give some examples of configuring firewall and limit unwanted traffic;
    • in the concluding part will explain how to disable unnecessary programs and services, as further to protect the servers from intruders.
    1. To configure the environment preloading before installing Linux

    Take care of the security of the system is necessary before installing Linux. Here is a set of recommendations for the settings of the computer, which should be considered and executed before the installation of the operating system:

    • Booting in UEFI mode (not legacy BIOS –a sub-section of it below)
    • Set a password on the UEFI setup
    • Activate SecureBoot mode
    • Set a password on UEFI level to boot the system
    1. Select the appropriate Linux distribution

    Most likely, you will choose popular distributions — Fedora, Ubuntu, Arch, Debian, or other similar branches. In any case, you need to consider the obligatory presence of these functions:

    • Support of forced (MAC) and role-based access control (RBAC): SELinux/AppArmor/GrSecurity
    • Publication of security bulletins
    • Regular release of security updates
    • Cryptographic verification of packages
    • Support for UEFI and SecureBoot
    • Support of full native disk encryption

    Recommendations for installing distributions

    All distributions are different, but there are moments that are worth to pay attention and perform:

    • Use full disk encryption (LUKS) with reliable key phrase
    • The process of paging needs to be encrypted
    • Set a password for editing the boot-loader
    • Reliable password on root access
    • Use an account without the privileges, belongs to the group of administrators
    • Set for user a strong password different from the password for root
    1. Set up automatic security updates

    One of the main ways to ensure the safety of the operating system – to update the software. Updates often fix found bugs and critical vulnerabilities.

    In the case of server systems, there is the risk of failure during the upgrade, but, in our opinion, problems can be minimized if automatically install only security update.

    Auto-update works only for installed from the repositories, not compiled independently packages:

    • In Debian/Ubuntu for updates use the package unattended upgrades
    • In CentOS to auto-update use yum-cron
    • In Fedora for these purposes there is the dnf-automatic

    To upgrade, use any of the available RPM-managers of packages by commands:

    yum update

    or

    apt-get update && apt-get upgrade

    Linux can be configured to send notifications of new updates by email.

    Also , to maintain the security of the Linux core there are protective extensions, e.g. SELinux. This extension will help keep the system from incorrectly configured or dangerous programs.

    SELinux is a flexible system of forced access control, which can work simultaneously with selective access control system. Running programs are allowed to access files, sockets and other processes, and SELinux sets limits so that harmful applications are unable to break the system.

    1. Limit access to external systems

    Next after the update method of protection is to limit access to external services. For this you need to edit the file /etc/hosts.allow and /etc/hosts.deny.

    Here is an example of how to restrict access to telnet and ftp:

    In file /etc/hosts.allow:

    hosts.allow in.telnetd: 123.12.41., 126.27.18., .mydomain.name, .another.name  
    in.ftpd: 123.12.41., 126.27.18., .mydomain.name, .another.name

    Example of the above will allow you to perform telnet and ftp connections to any host in IP-classes 123.12.41.* and 126.27.18.*, and also the host with the domain mydomain.name and another.name.

    Next, in file /etc/hosts.deny’:

    hosts.deny 
    in.telnetd: ALL 
    in.ftpd: ALL

    Adding a user with limited rights

    We do not recommend to connect to the server as root user — it has the right to run any commands, even critical to the system. Therefore, it is better to create user with restricted rights and work through it. Administration can be performed through sudo (substitute user and do) – this is a temporary elevation to administrator level.

    How to create a new user:

    In Debian and Ubuntu:

    Create a user, replacing administrator with the desired name and specify the password in response to the request.  Input password characters are not displayed it the command line:

    adduser administrator

    Add the user to the sudo group:

    adduser administrator sudo

    Now you can use the prefix sudo when executing commands that require administrator rights, for example:

    sudo apt-get install htop

    In CentOS and Fedora:

    Create a user, replacing administrator with your desired name, and create a password for his account:

    useradd adminstrator && passwd administrator

    Add the user to the group wheel for the transfer of the rights sudo:

    usermod –aG wheel administrator

    Use only strong passwords — minimum of 8 letters of the different register, digits and other special characters. To search for weak passwords among users of your server, use the utilities as “John the ripper”, change the settings in file pam_cracklib.so to set passwords forcibly.

    Set the expiration period of the password with the command chage:

    chage -M 60 -m 7 -W 7 UserName

    Disable password aging with the command:

    chage -M 99999 UserName

    Find out when a user’s password will expire:

    chage -l UserName

    Also, you can edit the fields in the file /etc/shadow:

    {UserName}:{password}:{lastpasswdchanged}:{Minimum_days}:{Maximum_days}:{Warn}:{Inactive}:{Expire}:

    where

    • Minimum_days: the Minimum number of days before the expiration of the password.
    • Maximum_days: the Maximum number of days before password expiration.
    • Warn: Number of days before expiration when the user will be warned of the approaching day shift.
    • Expire: the exact date of the expiration of the login.

    Also it is necessary to limit reuse of old passwords in module pam_unix.so to set a limit on the number of failed login attempts of the user.

    To see the number of failed login attempts:

    faillog

    Unblock account after failed login:

    faillog -r -u UserName

    To lock and unlock accounts, you can use the command passwd:

    lock account
    
    passwd -l UserName
    unlocak account
    
    passwd -u UserName

    To make sure that all users set passwords with the command:

    awk -F: '($2 == "") {print}' /etc/shadow

    To block users without passwords:

    passwd -l UserName

    Make sure that the UID parameter was set to 0 only for root account. Enter this command to see all users with UID equal to 0.

    awk -F: '($3 == "0") {print}' /etc/passwd

    You should see only:

    root:x:0:0:root:/root:/bin/bash

    If there are other lines, then check whether you have installed for them UID to 0, delete unnecessary lines.

    1. Set access rights for users

    After you install the password is worth to make sure that all users have access appropriate to their rank and responsibility. In Linux you can set access permissions on files and directories. So there is the ability to create and control different levels of access for different users.

    Access categories

    Linux is based on work with multiple users, so each file belongs to one specific user. Even if the server is administered by one person for various programs created multiple accounts.

    To view users in the system with the command:

    cat /etc/passwd

    The file /etc/passwd contains a line for each user of the operating system. Under services and applications can be created separate users who will also be present in this file.

    In addition to the individual accounts there is a category of access for groups. Each file belongs to one group. One user can belong to several groups.

    View the groups to which belongs your account, use the command:

    groups

    Display a list of all groups in the system, where the first field indicates the name of the group:

    cat /etc/group

    There is a category of access “other”, if the user does not have access to the file and does not belong to the group.

    Types of access

    For categories of users there is the ability to set types of access. Usually it’s right to run, read and modify the file. In Linux, access types are marked by two types of notations: alphabetic and octal.

    In alphabetic notation, permissions are indicated by letters:

    r = reading

    w = change

    x = start

    In octal notation the level of access to files is determined by the numbers from 0 to 7, where 0 indicates no access, and 7 means full access to modify, read and execute:

    4 = read

    2 = change

    1 = start

    1. Use the keys to connect via SSH

    To connect to the host via SSH is usually used password authentication. We recommend a more secure way – input  a pair of cryptographic keys. In this case, the private key is used instead of a password, which will seriously complicate the selection by brute-force.

    For example, let’s create a key pair. Actions should be performed on the local computer, not on a remote server. In the process of key generation you can specify a password to access them. If you leave this field blank, you will not be able to use the generated keys to store them in keychain-manager of the computer.

    If you have already created the RSA keys before, then skip command generation. To check the existing keys for a start:

    ls ~/.ssh/id_rsa*

    To generate new keys:

    ssh-keygen –b 4096

    Download of the public key to the server

    Replace administrator with the name of the key owner, and 1.1.1.1 with the ip-address of your server. From the local computer, type:

    ssh-copy-id administrator@1.1.1.1

    To test the connection, disconnect and re-connect to server — login must occur with the created keys.

    Setting up SSH

    You can disable connect via SSH as root-user, and to obtain administrator rights to use sudo at the beginning of the command. On the server in the file /etc/ssh/sshd_config you need to find the parameter PermitRootLogin and set the value to no.

    You can also deny SSH connection by entering the password so that all users use keys. In the file /etc/ssh/sshd_config, set for parameter PasswordAuthentification value no. If this line doesn’t exist or it is commented out, respectively, add or uncomment it.

    In Debian or Ubuntu you can enter:

    nano /etc/ssh/sshd_config
    
    ... PasswordAuthentication no

    The connection can also additionally secure with two-factor authentication.

    1. Install firewalls

    Recently was discovered a new vulnerability, allowing to carry out DDoS attacks on servers running Linux. A bug in the core system came with version 3.6 at the end of 2012. The vulnerability allows the hackers to embed viruses into boot files, web page and open up the Tor-connection, with no need for hacking a lot of effort to make — work the IP-spoofing method.

    Maximum damage for encrypted HTTPS connection or SSH – termination of the connection, but in the unsecured traffic, the attacker can put new content, including malware. To protect against such attacks is suitable firewall.

    Block access using Firewall

    Firewall is one of the most important tools for blocking unwanted incoming traffic. We recommend you to skip only really need the traffic and fully deny all the rest.

    To filter packages in most Linux distributions there is iptables controller. Usually it is used by advanced users, and to simplify configuration, you can use utilities UFW on Debian/Ubuntu or FirewallD in Fedora.

    1. Disable unnecessary services

    Experts from the University of Virginia recommend to disable all services that you don’t use. Some background processes installed on the startup and operate to shutdown the system. To configure these programs, you need to check the initialization scripts. Starting services can be done using inetd or xinetd.

    If your system is configured with inetd, in the file /etc/inetd.conf you can edit the list of background programs “demons”, to disable startup of service enough to put in the beginning of the line the sign “#”, turning it from the executable to comment.

    If the system uses xinetd, its configuration will be in the directory /etc/xinetd.d. Every file in the directory defines a service, which can be disabled by specifying the item disable = yes, as in this example:

    service finger
    
    {
    
    socket_type = stream
    
    wait = no
    
    user = nobody
    
    server = /usr/sbin/in.fingerd
    
    disable = yes }

    Also worth checking out an  ongoing processes that are not managed by inetd or xinetd. To configure the startup scripts in the directories /etc/init.d or /etc/inittab. After done the changes, run the command under root account.

    /etc/rc.d/init.d/inet restart

    9.Protect the server physically

    It is impossible to completely defend against malicious attacks with physical access to the server. It is therefore necessary to protect the premises where your system is located. The data centers seriously monitor the safety, restrict access to servers, install security cameras and assign permanent guards.

    To enter the data center all visitors must pass certain stages of authentication. Also, it is strongly recommended to use motion sensors in all areas of the centre.

    1. To protect the server from unauthorized access

    System of unauthorized access or IDS collects data about system configuration and files, and further compares these data with the new changes to determine whether they are harmful for the system.

    For example, tools Tripwire and Aide collected a database of system files and protect them with a set of keys. Psad is used to track suspicious activity by using reports firewall.

    Bro is created for network monitoring, tracking suspicious schemes of actions, collection of statistics, perform system commands, and generating alerts. RKHunter can be used to protect from viruses, most rootkits. This utility checks your system by database of known vulnerabilities and can identify unsafe settings it applications.

    Conclusion

    The above tools and settings will help you to partially protect the system, but safety depends on your behavior and understanding of the situation. Without care, caution and constant self learning all the safety measures might not work.

    This text is a translation of the article “Как обезопасить Linux-систему: 10 советов”  published by @1cloud on habrahabr.ru.

    About the CleanTalk service

    CleanTalk is a cloud service to protect websites from spam bots. CleanTalk uses protection methods that are invisible to the visitors of the website. This allows you to abandon the methods of protection that require the user to prove that he is a human (captcha, question-answer etc.).

  • How to reduce a possibility of brute force attacks on WordPress

    How to reduce a possibility of brute force attacks on WordPress

    Until the moment when CleanTalk launched a security plugin, I didn’t pay much attention to the security of the admin account of WordPress and relied only on the complexity of the password.

    The most dangerous thing is when the bots use brute-force; pick up the password to the administrator account of the site. This can lead to very serious problems, as the attacker gets full access to the administrator account. On your website can be added malicious code, the site can be added to a botnet and participate in other attacks or the spread of viruses. The consequences for the reputation can be very sad.

    When the security plugin was launched I began to receive reports on the work of the plugin in which specify the statistics of failed login attempts to the admin account of WordPress. And for each day of such attempts was from 4 to 25, from different IP addresses. These were attempts of bots password guessing.

    What I noticed:

    1. Bots knew my login and password was selected to it.
    2. I do not use the default username Admin and changed it.
    3. In the blog there are other admin accounts, but attempts to break them for a few days of observation did not happen.

    Wondering how the bots found out my account and why not try to hack other accounts of administrators? Quite simply, under my account I place posts and write comments, and other accounts are made for employees, host and other people that perform actions only in the dashboard of the website.

    Based on this, I realized that the bots find out the login via the parsing of pages. Many publish posts and comments from the admin account.

    For example, you publish a blog post; the link to the author will be like this http://example.com/author/admin***/. Bots browsing the code of your website looking for recordings of this type on all pages of the website and collect links from all accounts.

    The same thing will happen if you write a comment from the admin account, only the link will be a bit of a different kind http://example.com/members/admin***/

    Even if you once published a post or comment from admin account, then the bots will find it and will try to crack it.

    I described one of the possible scenarios of obtaining a list of accounts for hacking, there may be others. But experience has shown that if the WordPress administrator account is not used for publications and comments on the website, its bots do not know.

    What to do in order to minimize the possibility of hacking the account of the administrator of the website.

    1. Not to publish posts and comments from the administrator account.
    2. Create an account for each administrator with another role such as Author or Editor. It all depends on your needs.
    3. Change the current administrator user. Attention! Before that, you need to backup your website and databases. I can’t recommend this and if you do this at your own risk, as this may lead to undesirable consequences.

    You will need to create a new user with administrator rights and a user with another role such as Author. Login to the dashboard with the new account and test the capabilities of the Administrator to manage site, settings and users.

    Go to the “Users” and delete the previous admin account, WordPress will ask you to whom to reassign the articles and comments, here is useful pre-created user Author. Reassign articles on it and in the future use to publish posts and comments.

    These actions can be done for other accounts administrators. But for most WordPress users would rather to install one of the plugins for protection from brute-force attacks, such as plugin Security & Firewall from CleanTalk.

  • CleanTalk launches a project to ensure the safety of websites

    CleanTalk launches a major project to create a cloud service for the safety of websites. The project will include several functions: protect the site against brute force attacks, vulnerability scanner and virus removal.

    Each function will have a number of features which help you easily keep the website safe from hackers.

    (more…)

  • Best practices to protect e-commerce sites

    Best practices to protect e-commerce sites

    Online shopping has always attracted intruders: it is a source of credit card data (now almost irrelevant); user data; data about orders and market trends (consumer demand); a traffic source; manipulation with the discount coupons, etc. An e-commerce site may be attacked as intruders in “free hunting” (non-targeted attack) and by the request of unfair competition. Recently are popular different kinds of DoS/DDoS attacks, as to disable a competitor and as a tool for blackmail.

    In this topic, I will describe best practices for the protection of e-commerce sites.

    (more…)

  • Limiting the number of password attempts in the web login form using Nginx or HAProxy by way of example of WordPress

    By the example of WordPress consider a method for enhancing security by limiting the number of HTTP-requests to the form of entering the password. This helps protect against brute force published a blog (search and crack the password by trying all possible scenarios of a particular set of characters, or the selection of a dictionary of common passwords). This method, in principle, can be used to protect other Web applications.

    The task can be realized using Nginx module ngx_http_limit_req_module [1] acts as a front-end to the Apache Web server or FastCGI, or via HAProxy [2, 3], acts as a load balancer in front of web servers.

    In both cases, the algorithm works as follows. When authentication browser refer to the addresses containing the substring “/wp-login.php”. It is necessary to keep track of it and to limit the number of requests from the same IP without affecting circulation to all other addresses. Block settings must be chosen in such way as not to create a normal user inconvenience. Especially attentively should be configured to lock when the authorization form uses a large number of users with the same IP-address.

    Method №1: Nginx

    http {
    <...>
    
    limit_req_zone $binary_remote_addr zone=login:10m rate=15r/m;
    
    server {
    listen 80;
    server_name frontend.example.org;
    
    location ~* /wp-login.php {
    limit_req zone=login burst=4;
    proxy_pass http://backend:8080;
    <...>
    }
    
    location / {
    proxy_pass http://backend:8080;
    <...>
    }
    }

    Block settings:

    limit_req_zone $binary_remote_addr zone=login: 10m rate=15r/m; Sets an area of shared memory, which stores the state for different IP-addresses. In our case, the state is stored in the zone “login” size of 10 megabytes, and the average speed of query processing for the zone can not exceed 15 requests per minute. The processing speed can be specified in requests per second (r/s) or requests per minute (r/m).

    limit_req zone=login burst=4; sets the login area and the maximum size of the burst of requests. If the requests rate higher than described in the area, their processing is delayed so that the request is being processed at a given speed. Excessive requests are delayed as long as their number does not exceed the maximum size of the burst. When exceeding the request fails with the error 503.

    Method №2: HAProxy

    In this section of the backend, serving our blog, add the following lines [2]:

    tcp-request inspect-delay 10s
    tcp-request content accept if HTTP
    # brute force protection
    acl wp_login path_beg -i /wp-login.php
    stick-table type binary len 20 size 500 store http_req_rate(20s) peers local
    tcp-request content track-sc2 base32+src if METH_POST wp_login
    stick store-request base32+src if METH_POST wp_login
    acl bruteforce_detection sc2_http_req_rate gt 5
    acl flag_bruteforce sc1_inc_gpc0 gt 0
    http-request deny if bruteforce_detection flag_bruteforce
    

    Upon detection of POST-request to the page /wp-login.php saved hash of three elements: header HTTP Host, URL-path and IP source. Identified on the basis of the hash the user can make requests for five to 20 seconds, the sixth request will be blocked.

    Sourses

    1. Module ngx_http_limit_req_module – nginx.org
    2. http://blog.haproxy.com/2013/04/26/wordpress-cms-brute-force-protection-with-haproxy/ – blog.haproxy.com
    3. Better Rate Limiting For All with HAProxy – blog.serverfault.com

    This text is a translation of the article “Ограничение количества попыток ввода пароля в веб-форме авторизации при помощи Ngnix или HAProxy на примере WordPress” published by foboss on habrahabr.ru.

    Anti-Spam by CleanTalk.

  • 84% of the WordPress site can be hacked: What’s Next?

    CleanTalk is a SaaS spam protection service for Web-sites. CleanTalk uses protection methods which are invisible for site visitors. Connecting to the service eliminates needs for CAPTCHA, questions and answers and other methods of protection, complicating the exchange of information on the site.

    f3ca345cc7ed3cf2bb0e3396a0596528

    If you often read IT-news, you probably already tired of the horror stories about another vulnerability that was found in the popular OS / database / CMS / coffee maker. Therefore, this post is not about the vulnerability and about monitoring how people react to it.

    But first – a few words about “the villain of the peace”. Critical vulnerabilities in popular WordPress blogging engine was found in September by the Finnish specialists from companies with funny name Klikki Oy. Using this hole, the hacker can lead as a comment to the blog a special code that will be executed in the browser of the site administrator when reading comments. Attack allows you to secretly take over the site and do unpleasant things under the admin access.

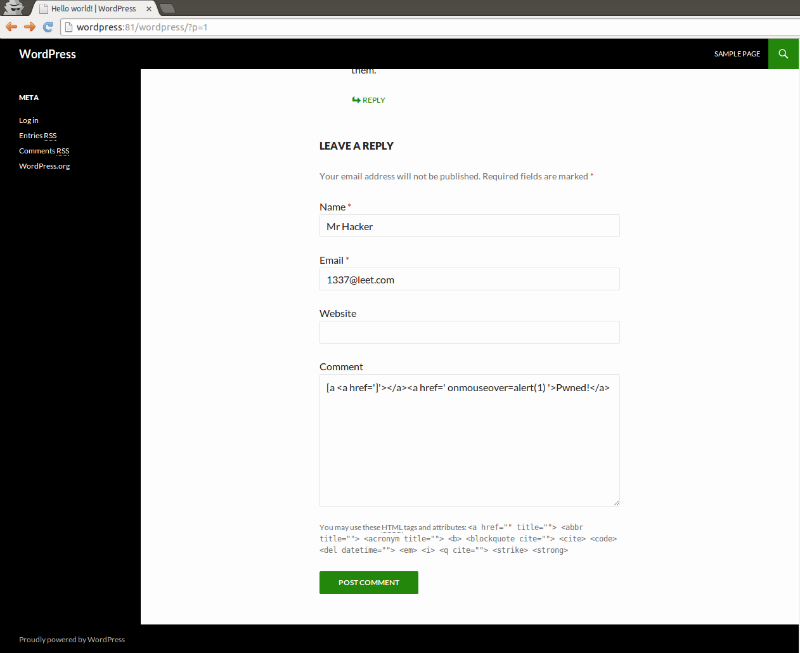
    Here’s how easy it looks like in practice. Go to the blog by WordPress and enter a bad comment:

    8758dfb3bad2ce0e7a14dd14cdd535db

    Next we see a specially crafted comment allows to bypass checks and conduct XSS-attack:

    b76d8a02ea439497f939a01fd973e02a

    After capturing admin permissions an attacker can run their code on the server that is hosting the attacked blog, that is, can develop an attack on a broad front. Now is the time to remember that just recently 800,000 credit cards were stolen by a bank trojan which was distributed across WordPress sites.

    This vulnerability applies to all versions of WordPress 3.0 and higher. Problem can be solved upgrade engine to version 4, where no such problem.

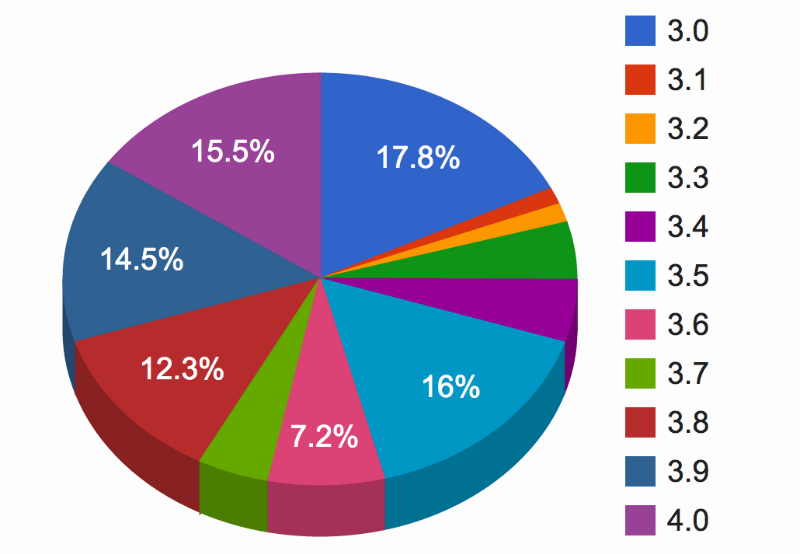
    And now about the actual reaction. Finnish security experts discovered a vulnerability reported it to the vendor on September 26. At the time of this writing, that is, two months later after finding renewed no more than 16% of users of WordPress (see diagram on the title picture post). What Finnish experts concluded that all the other 84%, that is tens of millions of users of this engine in the world, stay potential victims.

    In fact, the victims will certainly be less because there is a small additional condition for the operation – need the opportunity to comment on posts or pages (default is available without authorization). However, we are interested in here is the lifetime of vulnerability, and in this case it is possible to observe in real time – to monitor the statistics update WordPress here. Although you probably already understand the meaning of these figures: don’t lock the barn door after the horse is stolen.

    We also follow the intruders attempt to exploit this vulnerability “in the wild”. To do this, use a network attack detection based applications PT Application Firewall. The mechanism of intrusion detection based on the analysis of anomalies in this case worked well, and we did not have to add the signature. In other words, PT AF elicited this “0 day” from the very beginning:

    7cb201b9b1a2dd366483e30842c7c00f

    At the moment, the vulnerability exploitation attempts is already found. They can not be called mass – but if you have an older WordPress, should still be updated.

    This text is a translation of article “84% сайтов на WordPress могут быть взломаны: что дальше?” by ptsecurity published on habrahabr.ru.

    Forums and blogs without spam

    CleanTalk is a SaaS spam protection service for Web-sites. CleanTalk uses protection methods which are invisible for site visitors. Connecting to the service eliminates needs for CAPTCHA, questions and answers and other methods of protection, complicating the exchange of information on the site.