Hey there, Opencart store owners! Are spammers giving you a headache? Let us put a smile on your face. CleanTalk Anti-Spam plugin for Opencart 4 is your new best friend in the fight against online nuisances!
Imagine a world where your Opencart checkout form is protected from spam and fraudulent orders. Well, guess what? That world is here! Our clever little plugin works tirelessly behind the scenes to keep your store safe and your customers happy.
Here’s why you’ll love CleanTalk:
Spam-Be-Gone: Watch those annoying spam attempts bounce right off your checkout form. It’s like having a bouncer for your online store!
Fraud Fighter: Say “not today” to those sneaky fraud orders. CleanTalk’s got your back, 24/7.
Easy-Peasy Integration: No tech wizardry required! CleanTalk plays nice with Opencart 4, making setup a breeze.
Happy Customers, Happy You: With a smooth, spam-free checkout, your real customers will love shopping with you even more.
Time-Saver Extraordinaire: Less time cleaning up spam means more time growing your business. Who doesn’t want that?
But don’t just take our word for it! Give CleanTalk a spin and see the difference for yourself. Your Opencart store deserves the best protection from checkout form spam and fraud orders, and that’s exactly what we deliver.
Ready to kick spam to the curb and give your store the shield it deserves? Hop on board with CleanTalk today – because a happy checkout is a protected checkout!
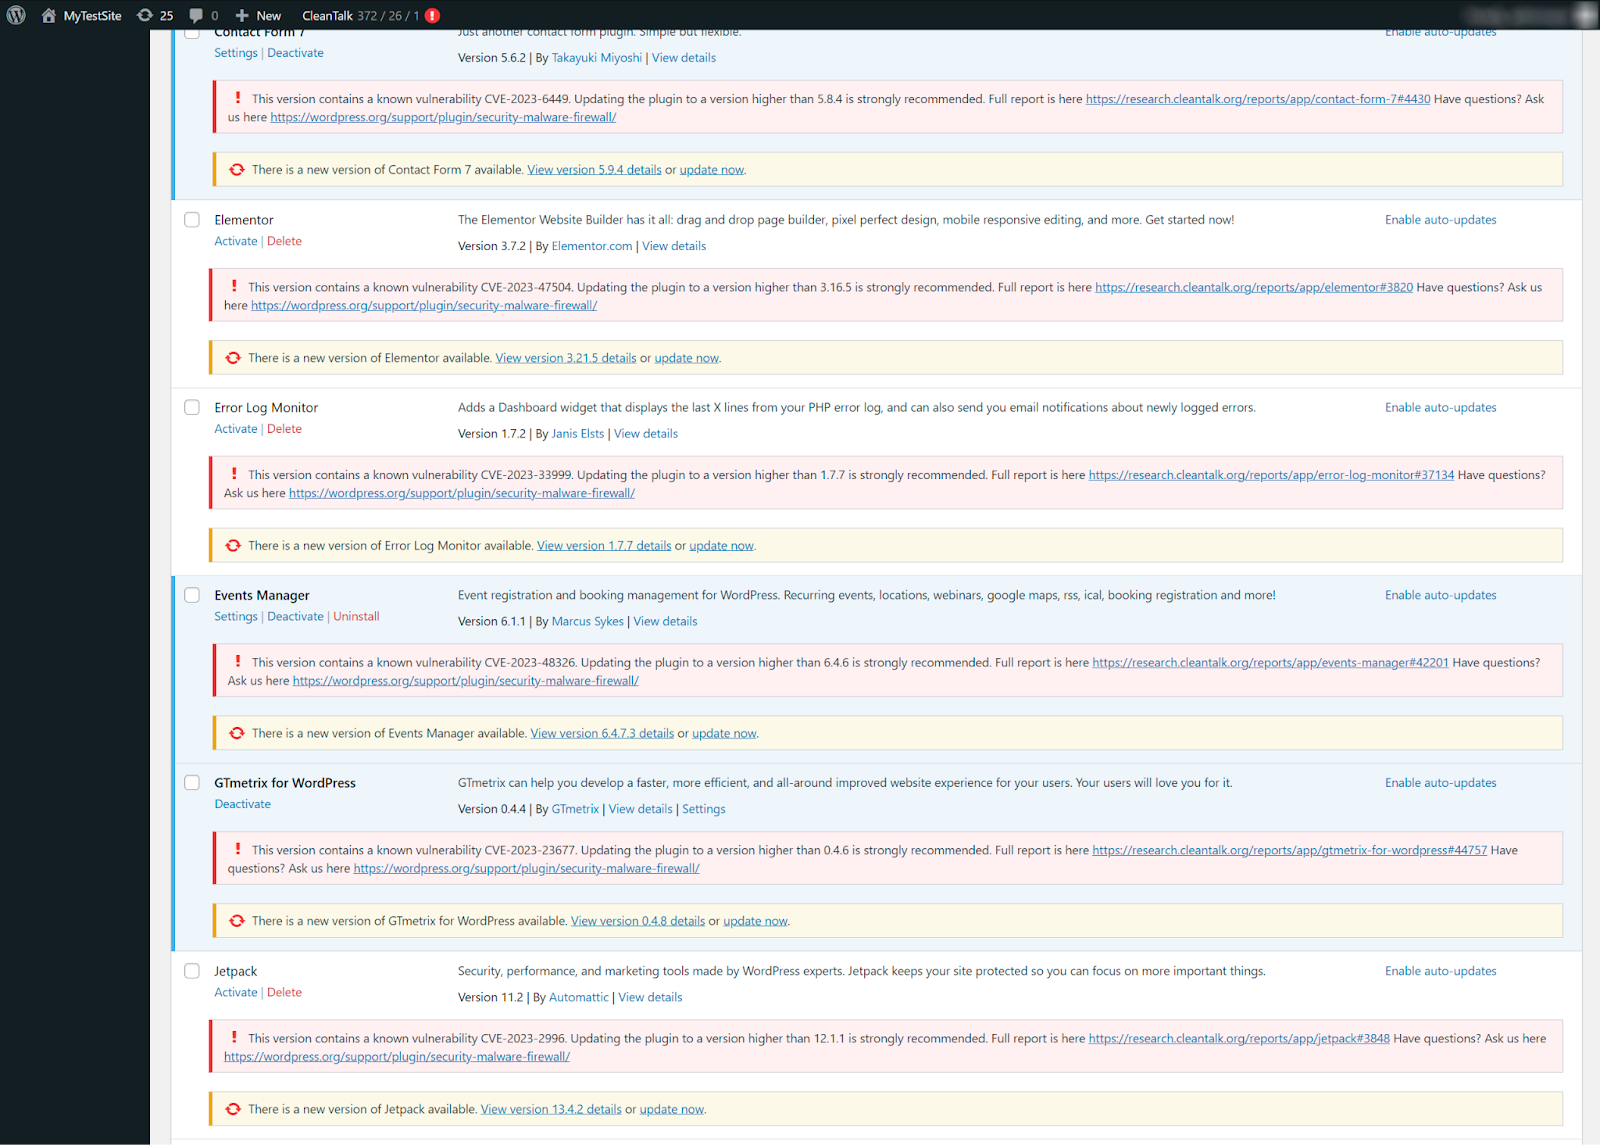
The CleanTalk Security plugin now offers built-in plugin vulnerability checks, empowering you to safeguard your WordPress website proactively. Just a friendly reminder if you haven’t try it till now: feel free to pick up the plugin and install it according to these instructions.
While plugins add valuable functionality, they can also introduce security risks if vulnerabilities exist. To address this, CleanTalk regularly scans popular plugins and integrates the findings directly into the Security plugin.
Here’s how it benefits you:
Real-time Vulnerability Insights: Get notified within the plugin itself whenever potential vulnerabilities are detected in your active plugins.
Proactive Security Measures: Take immediate action to address vulnerabilities and minimize the risk of attacks.
Simplified Security Management: No need to visit external platforms for vulnerability information; it’s all accessible within the plugin.
This integration strengthens your WordPress security by informing you about potential threats and allowing you to take immediate action.
Stay Updated, Stay Secure!
The CleanTalk Security plugin continues to evolve, offering comprehensive security solutions for your WordPress site. Remember to update the plugin to benefit from the latest features and vulnerability checks.
As a WordPress user let me share my experience of using CAPTCHA less and CAPTCHA style Anti-Spam tools on the example of Contact form 7.
Is reCAPTCHA good or bad for Contact form 7?
Contact Form 7 users may prefer Anti-spam by CleanTalk over reCAPTCHA for several reasons, as each solution has its own advantages and disadvantages. Here are some potential reasons why some users prefer Anti-spam by CleanTalk:
Simplicity: Anti-spam by CleanTalk offers a simpler and more user-friendly solution compared to reCAPTCHA. It doesn’t require users to solve puzzles or click checkboxes, which can be seen as an added step that may deter some visitors from submitting forms.
Reduced User Friction: reCAPTCHA can sometimes lead to a less than ideal user experience, especially for those who find it challenging to complete the visual or interactive challenges. Anti-spam by CleanTalk doesn’t require any user interaction, so it doesn’t add any friction to the form submission process.
Invisible to Users: Anti-spam by CleanTalk works invisibly in the background, so users are not aware of its presence. In contrast, reCAPTCHA typically requires users to complete a task to prove they are not a bot.
Accessibility: Some users have accessibility concerns with reCAPTCHA, as it relies on visual verification. Anti-spam by CleanTalk does not present accessibility challenges in the same way, making it a more inclusive solution.
Accuracy: Anti-spam by CleanTalk uses a combination of methods, including machine learning and a vast database of known spam sources, to identify and block spam submissions. This approach can be effective in detecting and preventing spam without relying on user interaction.
Reduced False Positives: reCAPTCHA, while effective at blocking bots, may occasionally generate false positives, blocking legitimate users. Anti-spam by CleanTalk aims to minimize false positives, ensuring that genuine inquiries are not inadvertently marked as spam.
Customization: Users have the ability to customize Anti-spam by CleanTalk settings to meet their specific needs and preferences, tailoring the spam protection to their site’s requirements.
Integration: Anti-spam by CleanTalk is designed to seamlessly integrate with Contact Form 7 and other popular form plugins, making it easy for users to implement spam protection without significant configuration.
Anti-Spam by CleanTalk
It’s important to note that the choice between Anti-spam by CleanTalk and reCAPTCHA may depend on the specific needs and preferences of individual website owners. Some users may prioritize ease of use and a seamless user experience, while others may prioritize the high level of bot detection offered by reCAPTCHA. Ultimately, the choice between these solutions should align with your website’s goals and the user experience you want to provide. Additionally, some users may opt to use both solutions in combination to enhance spam protection further.
How to install Anti-Spam by CleanTalk?
To install and configure the “Anti-Spam by CleanTalk” WordPress plugin for your website, follow these steps:
1. Log in to Your WordPress Dashboard:
Navigate to your WordPress admin dashboard by entering your site’s URL followed by “/wp-admin” (e.g., “https://yourwebsite.com/wp-admin“).
2. Access the Plugins Section:
In the WordPress dashboard, locate and click on the “Plugins” option in the left-hand menu.
3. Click “Add New”:
On the Plugins page, click the “Add New” button at the top of the screen. This will take you to the Add Plugins page.
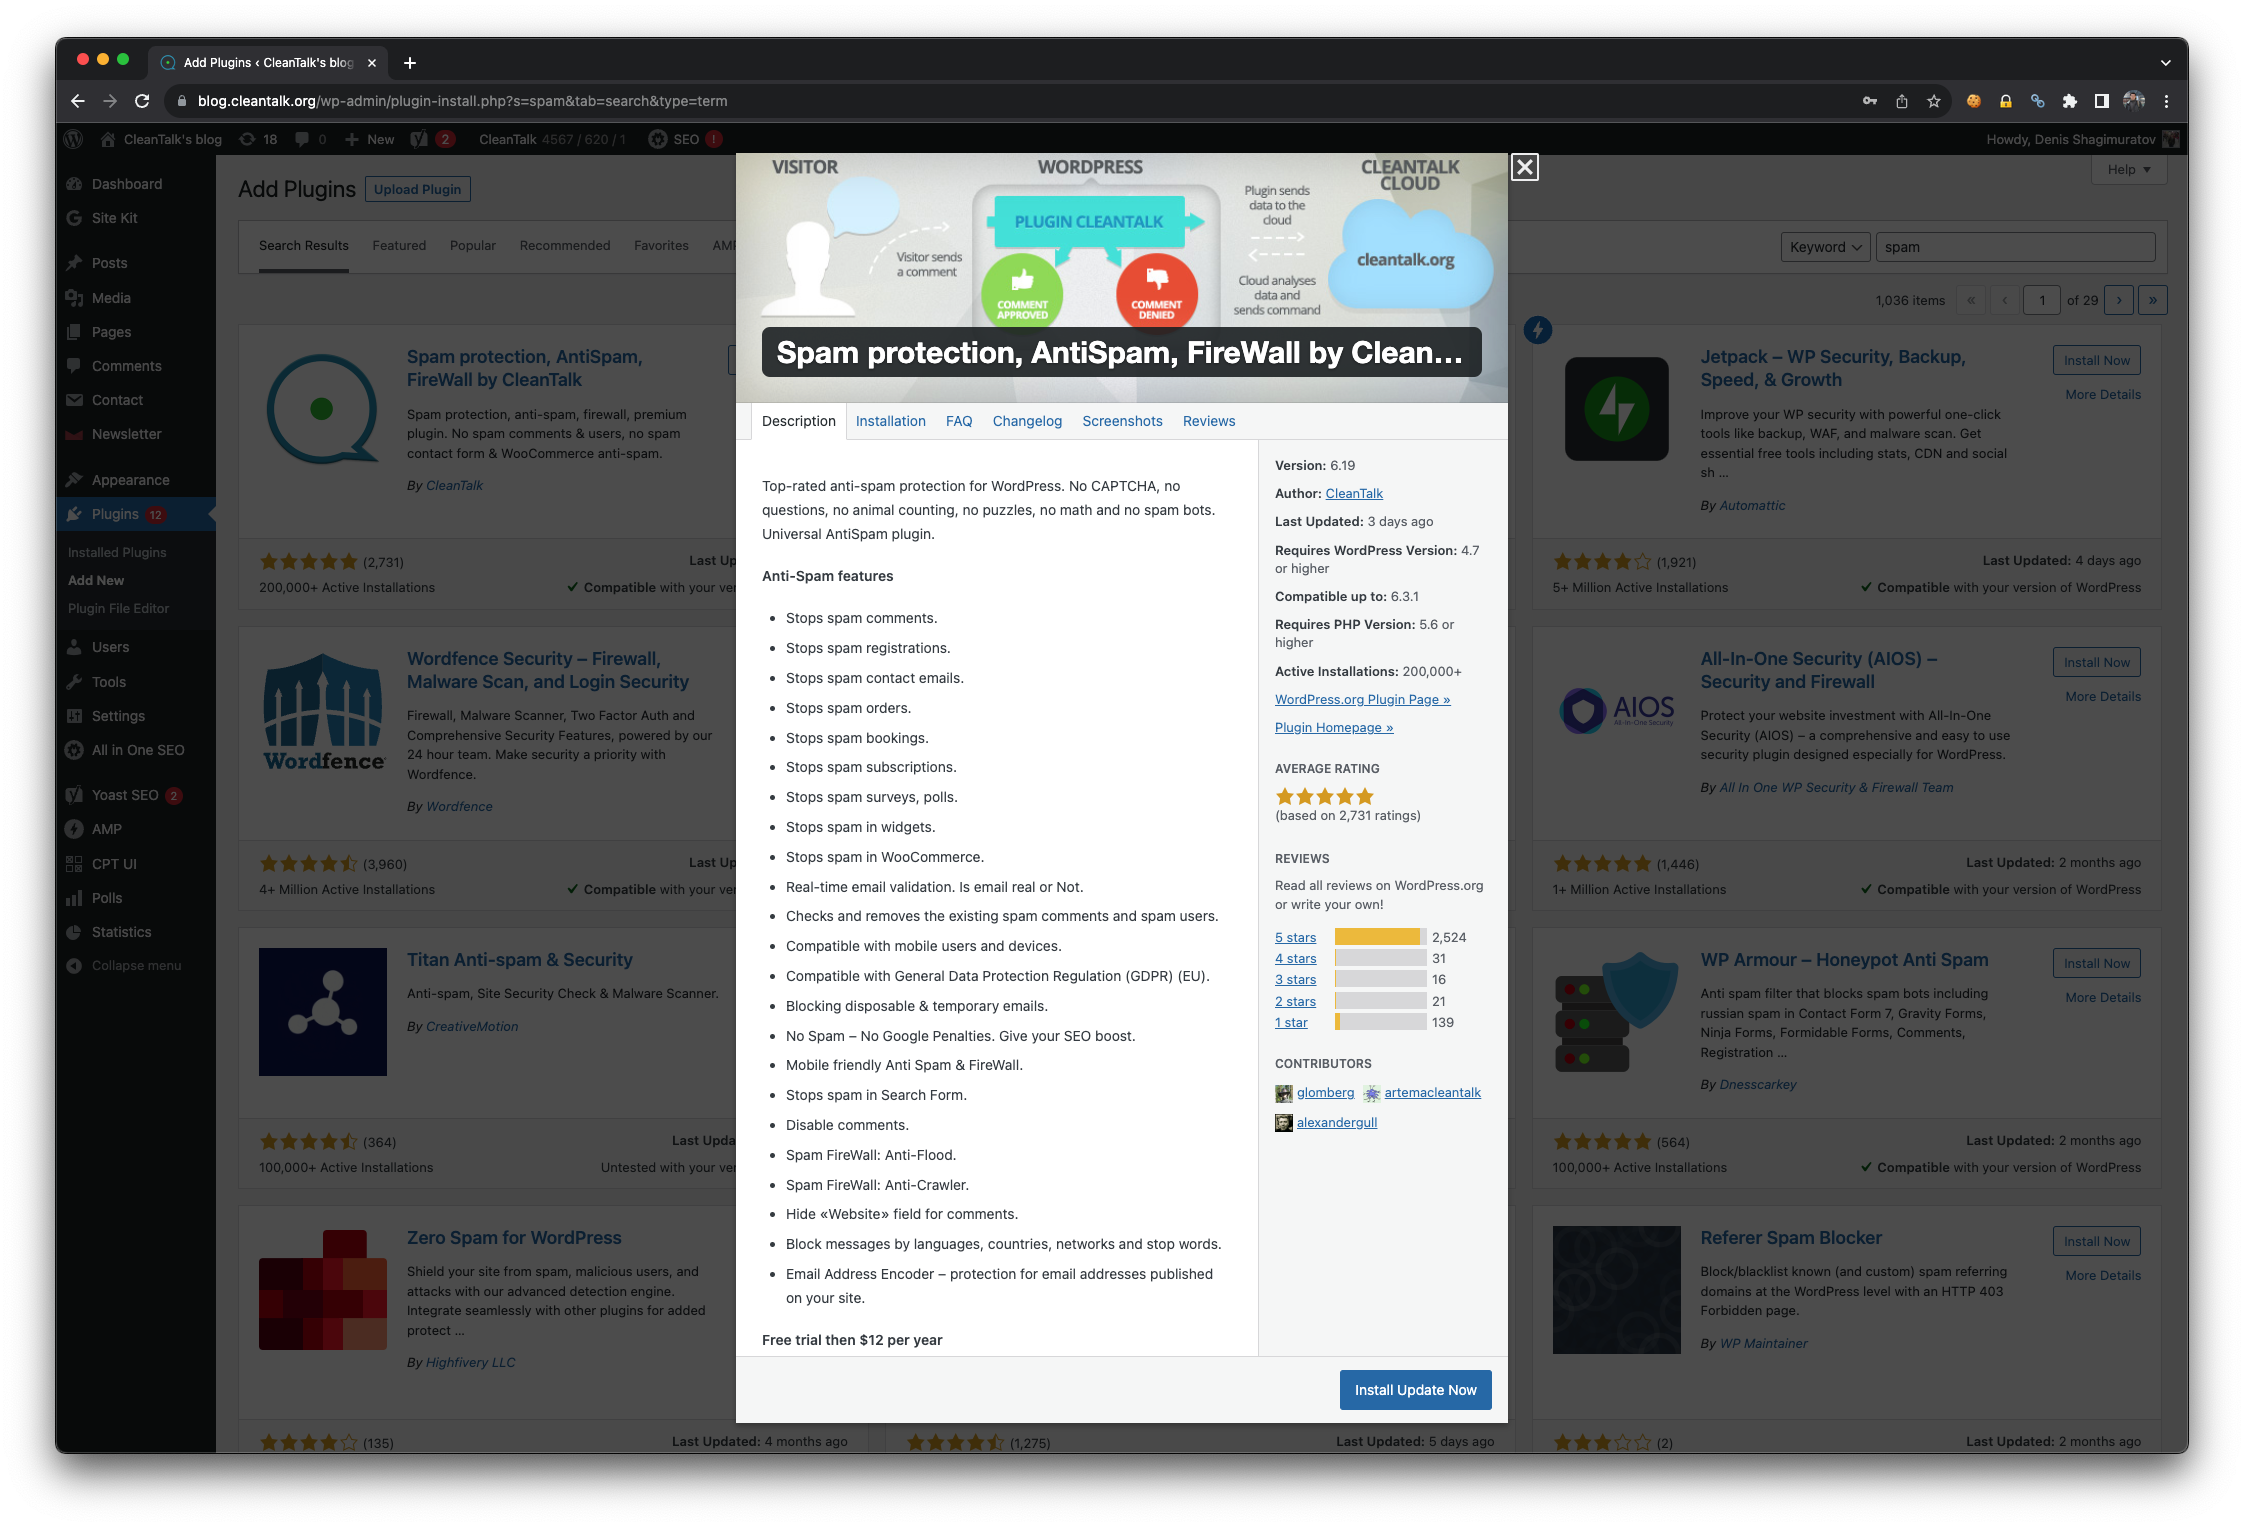
4. Search for “Anti-Spam by CleanTalk”:
In the search bar on the Add Plugins page, type “Anti-Spam by CleanTalk” and press Enter. The search results will appear.
5. Install the Plugin:
Locate the “Anti-Spam by CleanTalk” plugin in the search results. Click the “Install Now” button next to the plugin’s name.
6. Activate the Plugin:
After installation, a new button will appear that says “Activate.” Click this button to activate the Anti-Spam by CleanTalk plugin.
7. Enter Your Access Key:
Once the plugin is activated, you’ll need to enter your access key to enable the anti-spam features. You can obtain the access key by signing up for CleanTalk on their website (https://cleantalk.org/) and subscribing to their service. After subscribing, you’ll receive an access key via email.
a. In the WordPress dashboard, go to “Settings” in the left-hand menu.
b. Click on “Anti-Spam by CleanTalk” from the submenu.
c. Enter your access key in the provided field.
d. Click the “Check Access Key” button to validate your access key.
8. Configure Settings:
Once your access key is validated, you can configure the plugin settings according to your preferences. The settings allow you to customize the anti-spam protection for your site, including options for comments, registrations, contact forms, and more.
9. Save Changes:
After configuring your settings, don’t forget to click the “Save Changes” button to apply your chosen anti-spam settings.
10. Verify That It’s Working:
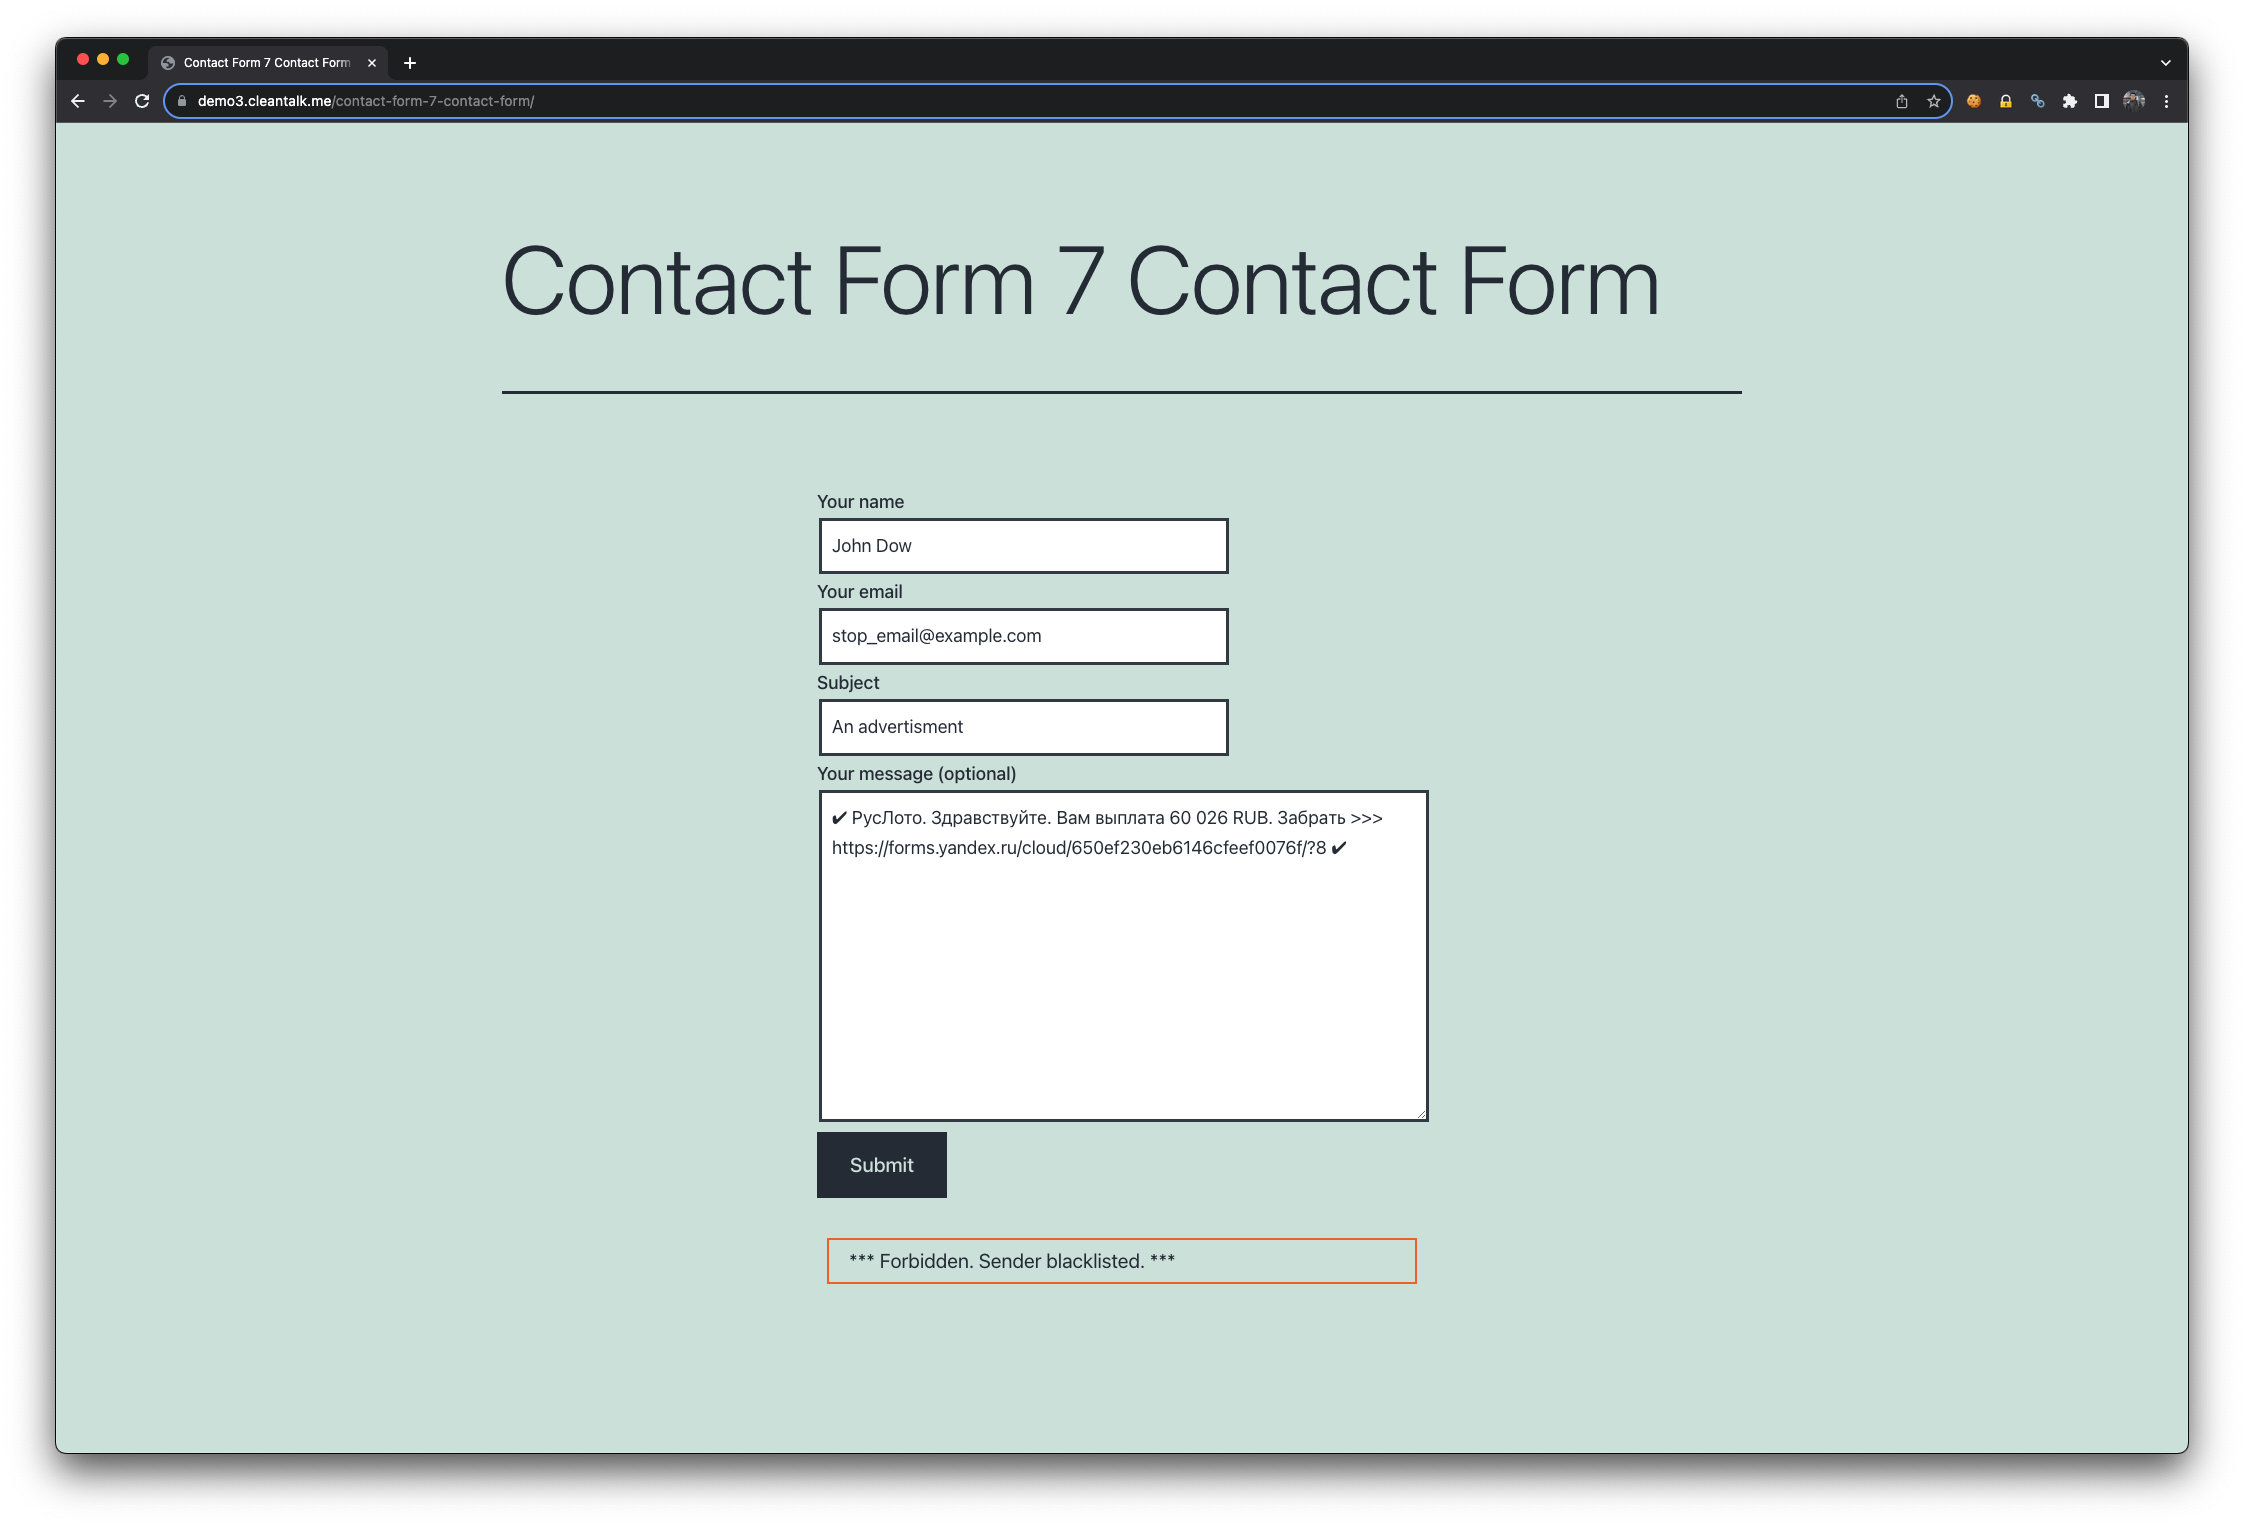
To ensure that the plugin is effectively blocking spam, just use email st********@*****le.com in a contact form 7. You have to see a special response from Anti-Spam by CleanTalk that describes a reason for blocking.
*** Forbidden. Sender blacklisted. ***
Anti-Spam by CleanTalk shows the reason of blocking form submission.
11. Periodic Review:
Periodically review the plugin’s dashboard to check its performance and verify that it’s actively blocking spam submissions. CleanTalk provides statistics on the number of spam attempts blocked.
That’s it! You’ve successfully installed and configured the “Anti-Spam by CleanTalk” plugin on your WordPress website. This plugin will help protect your site from unwanted spam submissions and improve the overall security and user experience of your WordPress site.
If you get spam through your comments forms you can always use our Anti-Spam plugin for complete spam protection. But if you decided to disable all WordPress Comments on your website we also have a simple decision for you.
Follow our guide to disable all the Comments fields you don’t need in less than 5 minutes.
How to install CleanTalk Anti-Spam plugin
To install the Anti-Spam plugin, go to your WordPress admin panel → Plugins → Add New.
Then enter «СleanTalk» in the search box and click the Install button for «Spam protection, Anti-Spam, FireWall by CleanTalk».
After installing the plugin, click the «Activate» button.
After it is done go to the plugin settings and click the «Get Access Key Automatically» button. Then just click the «Save Changes» button.
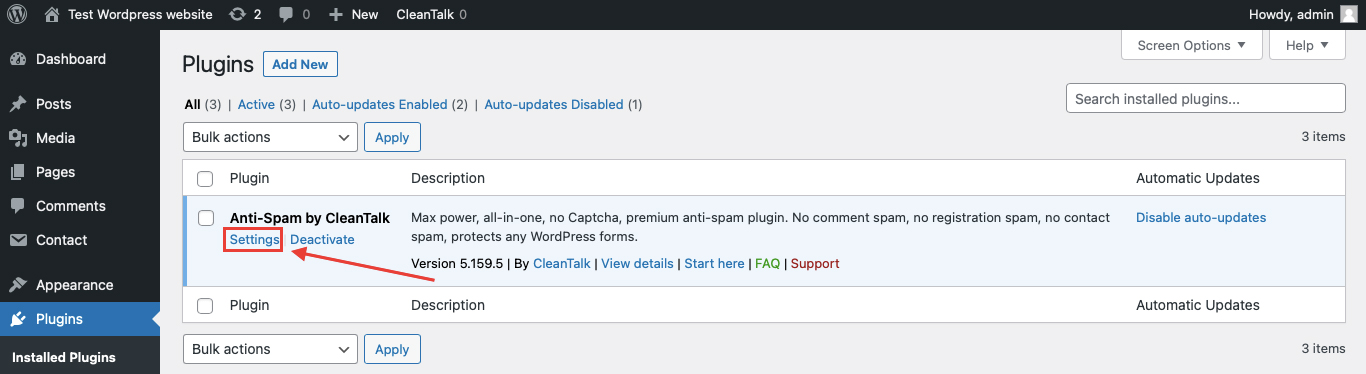
Disable all WordPress Comments in 3 steps
Step 1: Go to Plugins → Installed Plugins.
Then go to Settings link next to CleanTalk Anti-Spam plugin.
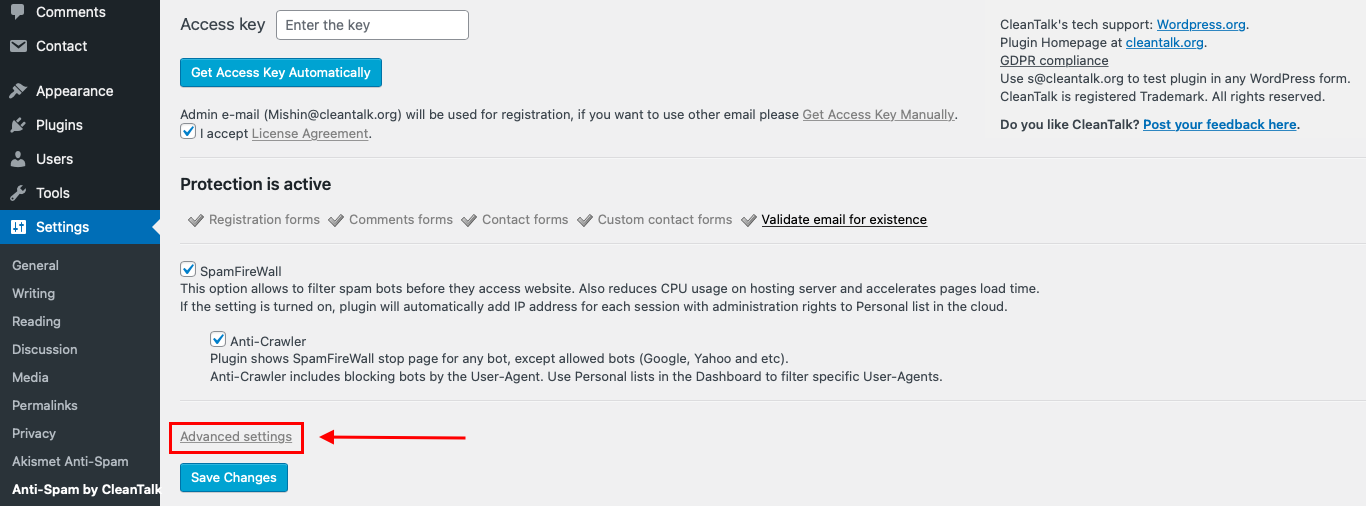
Step 2: Click on «Advanced settings» button at the bottom of the screen. More setting will appear.
Then find Disable all comments in Comments and Messanges section.
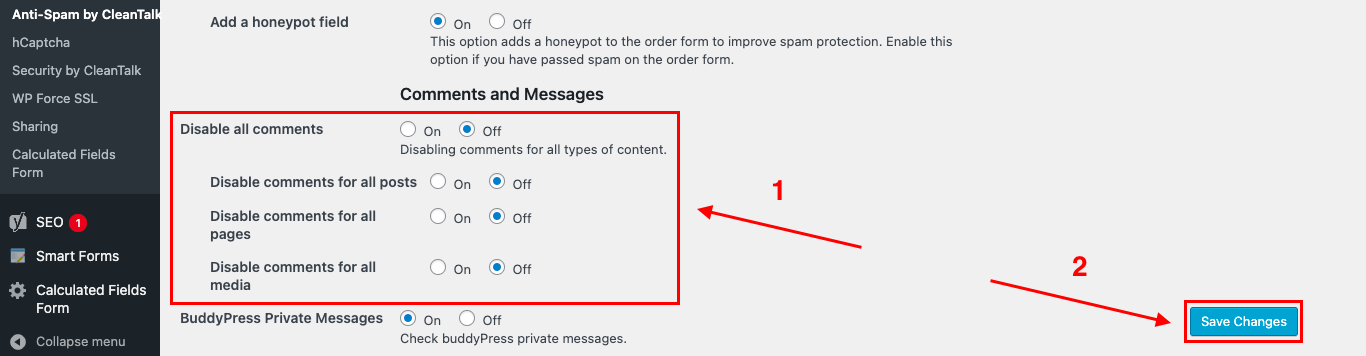
Step 3: Choose wherever you want to disable comments (1) and then press the Save Changes button (2).
Done! It really is that simple.
If you have any questions, add a comment and we will be happy to help you.
One of the most important things about protecting your website from hackers is understanding that one-time setting the security settings for your site is not enough. Taking care of your website protection is a permanent process like advertising or helping your clients with their issues.
Security tools for your website become stronger and more progressive every day but so do hacking technologies. The most simple way to find out if your site is in danger is to proceed through a complete WordPress security audit and figure out if your security measures are up-to-date.
If you do not go through a regular WordPress security audit every 3 months this may cause a breach in site security and your business can get a lot of damage.
But this risk can be avoided – just check if your security measures are up-to-date. In this instruction we will describe how to do a complete WordPress security audit to fully protect your website from hackers using standard security tools.
Sometimes the problem of security issues may be caused by missing security patch or update, some plugin vulnerability or a flaw in WordPress core that may result into a hack. Actually, only about 36% of users run up-to-date WordPress versions.
What is a WordPress Security Audit?
A WordPress security audit is a regular procedure that will inspect your website for different security vulnerabilities like weak admin passwords and outdated plugins. This audit also offers some steps for fixing these potential dangers.
Some website owners know how to perform a WordPress security audit but see it only as a one-time thing – it is a very popular mistake that may result in a threat to your site’s security. So it is highly recommended to perform the security audit of your WordPress site regularly to avoid hacker attacks and keep your website safe.
Without regular security audits performed your website becomes much more vulnerable to hacker attacks. You can use special WordPress plugins to automatically analyze and find security breaches for you. But vost security audits are performed manually by following 8 steps. Only several steps to find out how to perform WordPress security audit and fully protect your website from any attacks.
Why do you need a WordPress Security Audit?
Actually there is no magic about the main reasons to perform a WordPress security audit. In case you are a website owner and you don’t look after it’s security – no surprise it is vulnerable and can be hacked. It leads us to an easy conclusion that a security audit is necessary to find security breaches and vulnerabilities in your site until it becomes a problem. Without this procedure hackers may detect this vulnerabilities before your and so they can:
Hack your website;
Sell your and your client’s data via dark web;
Inject spam to your WordPress site pages so that will lead the website to search engine blacklist;
Steal your credit card info from your WordPress site that may result lawsuits and hefty fines against you;
Use your website to infect other users;
Many other bad things.
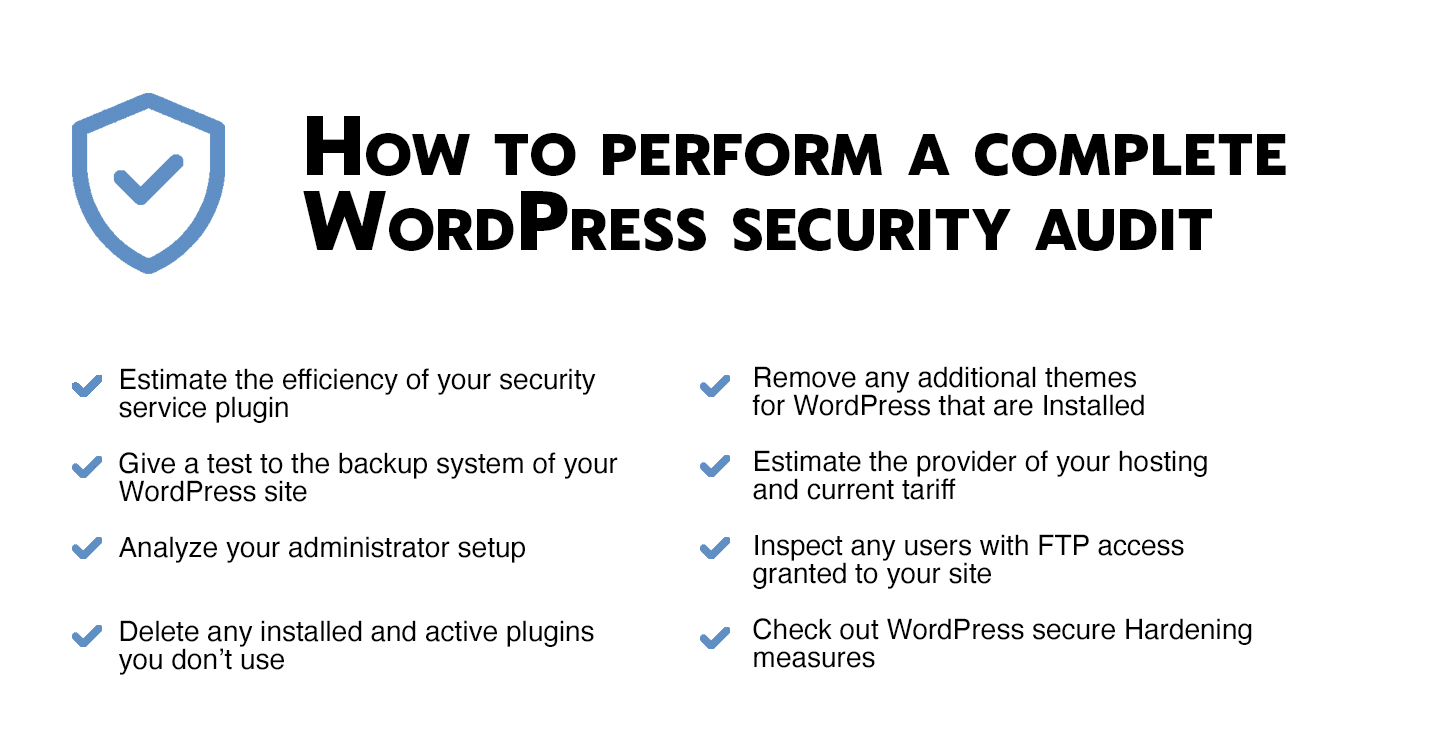
How to perform a complete WordPress security audit
1. Estimate the efficiency of your Security plugin
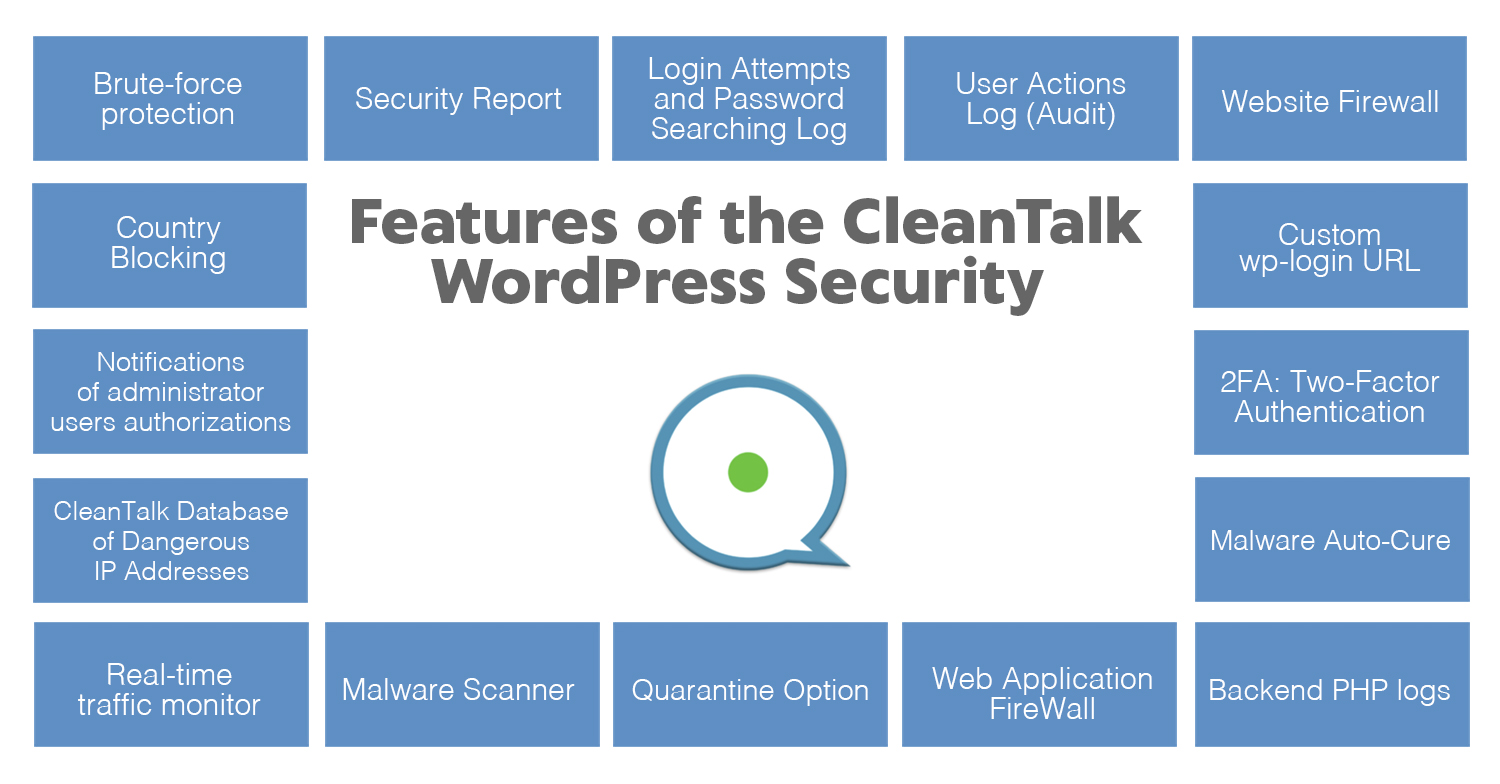
It all starts with your website’s security plugin. In case you still don’t use one, be sure to connect it and activate on your site as soon as possible. Security plugin protects all the WordPress sites from bots and hackers. Different security plugins offer various options to protect your site and not all of them guarantee a safe work for your website. When you choose a plugin during WordPress Security Audit, be sure it includes the following features:
Brute-force Protection Adds a delay of a few seconds for any failed attempt to login to the WordPress back-end. It makes your website security tougher and doesn’t waste the server’s resources on these IPs.
Daily Security Report Every day the plugin sends a Security report to your email. The report provides data on the number of incorrect password entries and the IP addresses from which they tried to sign in.
Login Attempts and Password Searching Log Security log keeps online a log of attempts to log in. Security log includes IP / Country / data / time, username and action result, was authorization successful or failed.
User actions log Keeps track of actions in the WP Dashboard to let you know what is happening on your site. With the Security Audit Log is very easy to see user activity in order to understand what changes have been done and who made them. Security Audit Log shows who logged in and when and how much time they spent on each page.
Security FireWall This option may significantly reduce the risk of hacking and reduces the load on your web server. Always use personal BlackList to block IP addresses with suspicious activity to enhance WordPress security. It also allows you to block access to your website by HTTP/HTTPS for individual IP addresses, IP networks, and e-mails.
Compatibility It should be compatible with the most popular VPN services and search engines like Google, Bing, Yahoo, Baidu, MSN, Yandex and etc.
Malware scan Scans WordPress files for hacked files or hacker code. Every day Malware Scanner will launch scanning automatically for files that have been changed from the last scanning or found new files. The scanner works in the background and doesn’t affect performance. All detailed results must be sent to your Security Dashboard so you are able to investigate them and see if those were legitimate changes or some bad code was injected. If any files were changed in your WordPress system you will be able to delete them or restore the original WordPress files.
We recommend using CleanTalk as it covers all these features. It has one of the best malware scanners that can detect any kind of malware. And more of that, you can clean up any malware infection in under a few minutes!
2. Give a test to the WordPress backup solution
In case something goes wrong with your website, having a backup may be very useful. You may get your site back to work with no problem. Any fail in a backup process may be critical and may cause a lot of trouble restoring your website.
That is the main reason you need to give a regular test for your site backup solution. Even if you use host backup it may not always include any test options.
So we recommend some actions to test your backup:
Go to your WordPress plugins page and install BlogVault backup plugin. This plugin automatically initializes a complete backup procedure for your site. If it is the first backup it may take a bit more time as it will copy the whole site to it’s servers. After that every backup will copy only files that were changed from the previous backup process.
After completing the backup, the option “Test Restore” will appear in the BlogVault dashboard.
After it is done the system will notify you about a successful restore.
3. Analyze your administrator setup
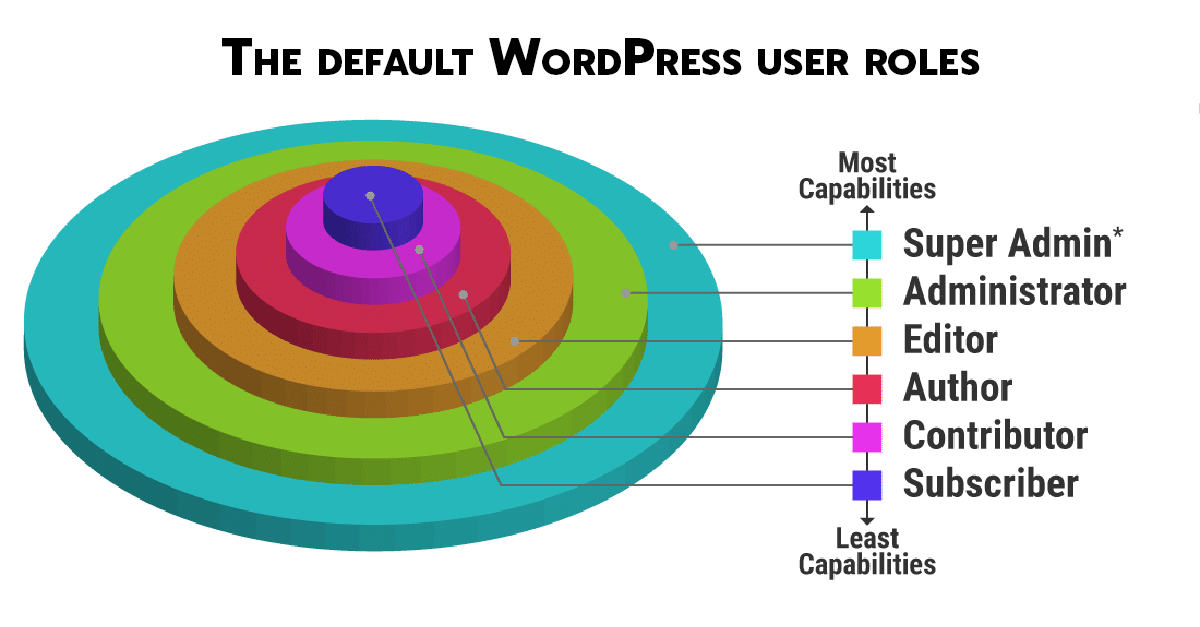
WordPress has a smart system of user access options to let them collaborate and work together to be more efficient themselves and WordPress maintenance and development. Though not all WordPress users need to have complete access to your website. For example, a person who writes news, articles, and other materials only needs access to writing and publishing content. They don’t need to have access to other website options like managing plugins and changing WordPress themes.
In order to avoid giving complete access to every website user WordPress has 6 different user roles that can be assigned to them:
Super Admin
Administrator
Editor
Author
Contributor
Subscriber
Each role has different levels of permissions for your website.
While providing your WordPress Security Audit one of the first things you should do is to check all of the users who are added to your WordPress.
Be sure to recognize all of the users on your dashboard. If you don’t recognize any of them – you should immediately delete this user because it may be created by hackers.
Check the number of users who have admin access to your site.
Decide how many of them really need that access level.
Change roles for users and lower permissions for those who doesn’t need that access level.
After that ensure that none of your website administrators uses the “admin” username. This is the most popular username for all of the administrators. Hackers know about this and may obviously try to use it to get access to your website.
If you decide to change the admin name you have to create another user account for that person. After that, you have to grant all the content access to this new user. And finally, just delete the old admin account.
Another important thing for you to protect your admin setup from hackers is hiding your admin’s username. If you leave settings unchanged it may cause some troubles.
All of the hackers know that the only thing that should be done to retrieve your most likely admin username is to add ?author=1 at the end of your URL. It is how easily hackers can brute force a website’s admin panel after they know the admin’s username.
The easiest way to avoid it is to hide all usernames with code in functions.php file:
add_action(‘template_redirect’, ‘bwp_template_redirect’);

function bwp_template_redirect()
{
  if (is_author())
  {
    wp_redirect( home_url() ); exit;
  }
}
If you use the CleanTalk Security plugin it already has a special field that automatically hides all of the usernames on your site.
This may seem a very easy step but it also makes a hacker’s work more difficult.
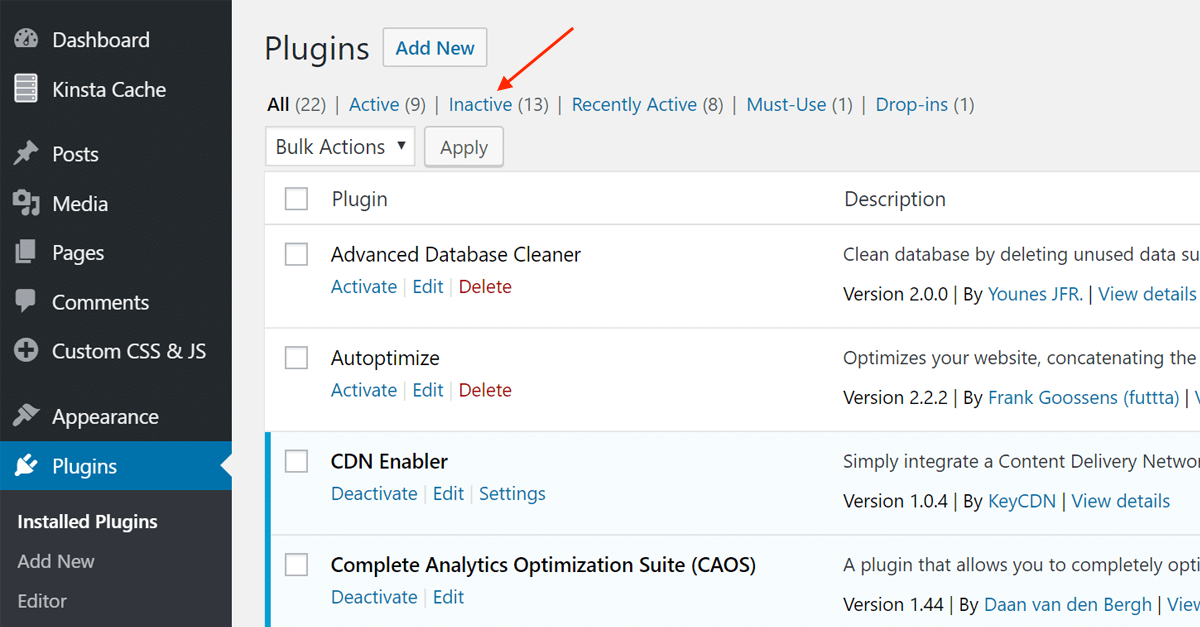
4. Remove unused plugins installed and active
Different WordPress plugins are one of the most vulnerable places on your website. It may be the main reason for you site to be hacked.
WordPress plugins are always created, maintained, and updated by their developers. But like any other software, these plugins may have vulnerabilities. So developers always fix these vulnerabilities and release updates. When you download this update it removes vulnerability from your website.
But in case you skip or delay downloading the newest update your site may remain vulnerable.
Do you still use these plugins? While performing a complete WordPress Security Audit check the list of plugins that are installed in your WordPress. In case you already don’t use them, they still have access to your website. So, at first, delete the plugins that you don’t use. It should reduce the chance of being hacked using one of them.
Do you recognize all of the plugins? In case you and your colleagues do not recognize some of your plugins it would be better to delete them. It is because when hackers break into your site they may install their own plugins that can cause even more damage as they contain backdoors which actually is a secret access to your website.
Do you have any nulled version or pirated plugins? If yes, then you should delete them at once. Hackers often use pirated software to spread their malware. Any quantity of such malware is contained in these plugins and it may infect your website at the moment you install the plugin.
From the moment you left only the plugins you use, be sure to update them right after developers release updates.
5. Remove any additional themes for WordPress that are Installed
A complete WordPress Security Audit is also about themes. It is no surprise that all the WordPress site owners install different themes in order to find the ones that they like. Favorite themes are used but others are often But most of these users don’t know that just like plugins, themes may contain different vulnerabilities.
Our recommendation is to delete all the themes except the one you already use. Also, be sure you use the most up-to-date version available of your active theme.
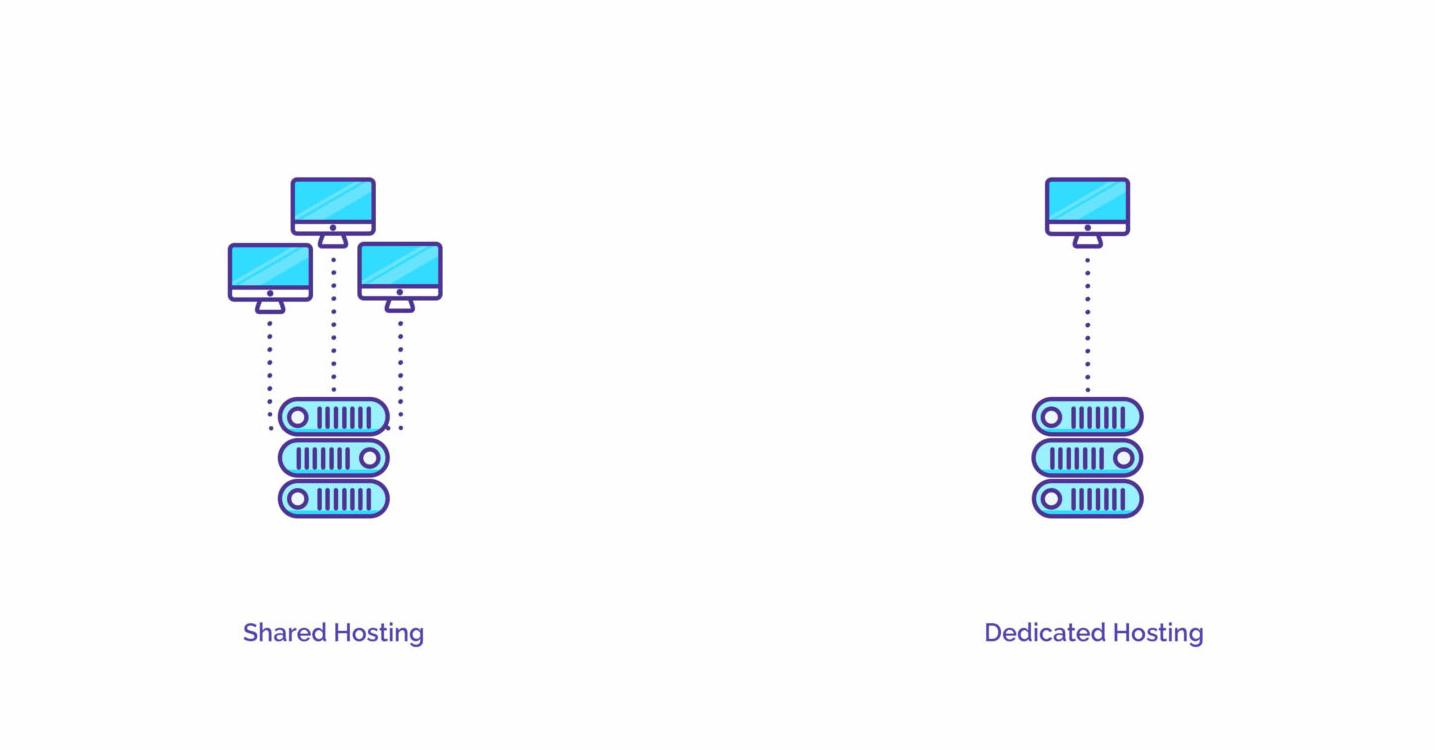
6. Estimate the provider of your hosting and current tariff
Nowadays you can create a website without serious money investment. Shared hosting allows you cheaper plans for small WordPress sites. Also hosting is an important part of a proper WordPress Security Audit.
But everything has its pros and cons. Shared hosting means that you share a server with other users and sites. It is out of your vision what happens with other websites on your hosting. If someone other’s website was hacked it may consume a large amount of server’s resources. It may obviously slow down your website and lower its performance.
That is also a slight chance of a malware infection will spread to different websites on the same hosting. So if you can afford to switch to a dedicated server – it will be our recommendation to do so – to evaluate your hosting plan. In case some hosting doesn’t fit you well, you may look through a better one, comparing some of them that cost your attention.
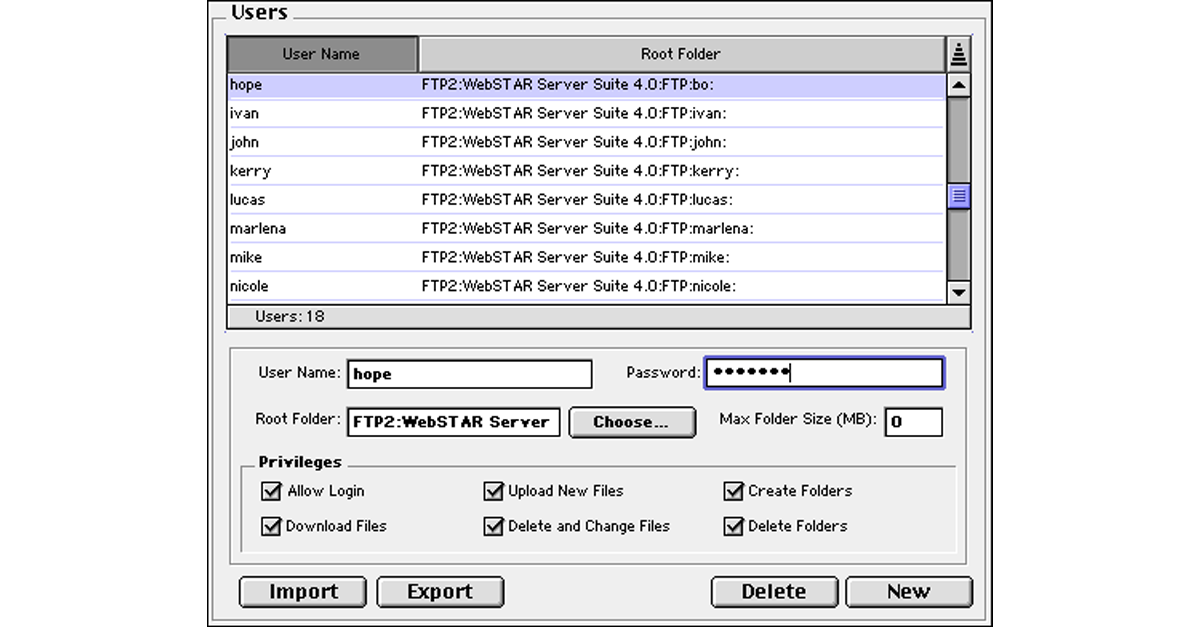
7. Inspect any users with FTP access granted to your site
As you already know FTP is a File Transfer Protocol. It provides your computer to your site on the server. Using FTP you may access all the website folders and files and change them.
As FTP has almost full control of your website you should be very careful and grand that kind of access to only users that you trust the most and only in case they really need that access.
In order to increase the protection of your website we strongly recommend you reset FTP passwords if necessary and check the list of your FTP users. You can make it if you go to your hosting account → cPanel → FTP accounts.
Check all the users in this list and just delete the ones you already do not need.
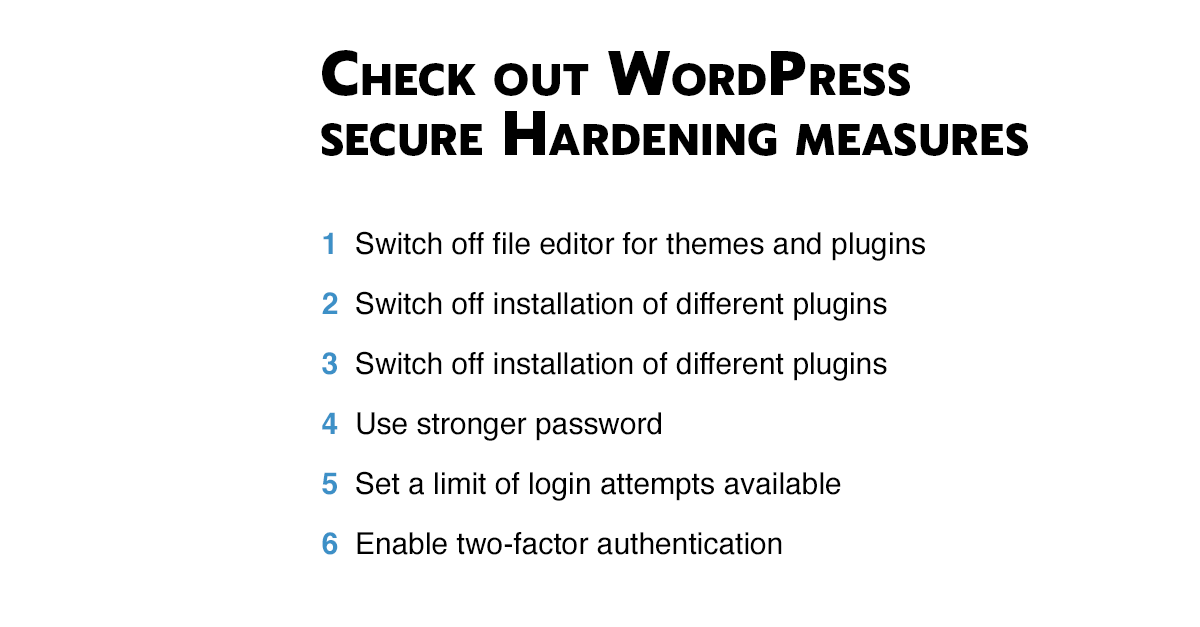
8. Check out WordPress secure Hardening measures
While providing a WordPress Security Audit there are several recommendations for your WordPress site to become more secure. What are these steps:
Switch off file editor for themes and plugins
Switch off installation of different plugins
Reset salts and keys on your WordPress website
Use stronger password
Set a limit of login attempts available
Enable two-factor authentication
Also we strongly recommend giving these steps a regular test. For example, if you use a two-step authentification or login attempts limit – be sure to use the actual up-to-date plugin. Or if it is not so, just switch to another solution that is updated more often.
Some of these hardening steps need some skill for the appliance. Or in case you use the CleanTalk Security plugin most of these features are enabled in a few seconds.
Conclusion
After reading this article you know how to perform a WordPress Security Audit by yourself. Just be sure to deal with all of these 8 steps and you will prevent most of the bad things that could happen with your website.
For example, if you will regularly check your site backup system and will be sure that it works well, you will avoid a lot of troubles in case of a security breach or something more serious happens to your website.
The process of Security audit involves a lot of steps and takes some skill and time. But some of the most important processes are just about keeping all the components of your website up-to-date, being sure that your login page is well-protected, and using very strong passwords.
So in the cost of a few hours spent for this WordPress Security Audit, you can avoid a lot of security issues and guarantee the best protection for your website.
We released the first version of anti spam extensions CleanTalk for phpBB 3.1. The extension protects phpBB 3.1 from registration spam bots, spam posts and new spam topics on the board.
The full list of features
Protection from spam bots registrations.
Protection from spam bots topics and posts.
Filtering by the user groups Guests and New users.
Filtering posts by “stop words”.
The extension is compatible with phpBB version 3.1.1 and above.
- Added anti spam protection for any custom/plugin contact form. To enable this option please set 'Enable anti spam test for any contact forms' in plugin settings.
- Added onSpamTest() method. This method should be used to filter spam on third party plugins.
- Updated CleanTalk API.
We remind all the plugin functions,
Protection from spam bots registrations at Joomla,
Protection from spam bots at feedback form,
Anti-spam for VirtueMart 1.x, 2.x
Anti-spam for One Page Checkout (Rupostel).
Anti-spam for JComments 2.3, 3.0.
Anti-spam for Rapid Contact, VTEM Contact.
Anti-spam for BreezingForms.
Anti-spam protection for any contact forms plugins.
- Improved JavaScript anti spam test. Now JS code loaded for every
page. Test result inserts in Cookies.
- Added Cookies anti spam test.
- Disabled relevance test for comments.
- Added URL to page where comment posted.
- Updated CleanTalk API.
We remind all the plugin functions,
Protection from spam bots registrations at Joomla,
In the spam filter police for registrations/comments added changes, now if a request there are no data for multiple antispam tests, the requests considered as spam, the server returns response,
*** User forbidden. Check plugin setup. Request number 412dfcd6925edac260874365f9f3fcf6. Antispam service cleantalk.org. ***
Please do dummy registrations/comments with email st********@*****le.com, you shouldn’t see plugin response as described agove.