False positives happen. Don’t be scared if you happen to encounter one of them – any issue always has one or another solution.
In order to help you and save you time, we have prepared a list of guides for all existing CleanTalk cloud responses (also known as API responses, server answers, service responses). Use it to see the detailed instructions for every type of response and what to do with it if you suppose, you have encountered a false positive.
A few months ago I’ve got a great chance to visit Stripe Sessions 2024 at SF, CA. Here are my notes from this,
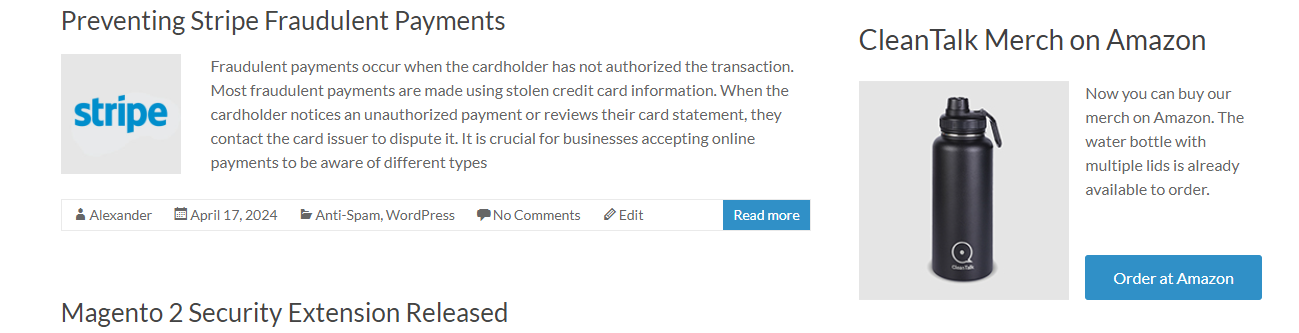
Stripe uses machine learning to protect merchants against fraud, as data they look through completed transactions. They identify two types of fraud – card testing and card caching. The false positive rate is 0.05%, meaning 5 false transaction per 1,000. Here is our solution against fraud for Stripe’s merchants https://blog.cleantalk.org/preventing-stripe-fraudulent-payments/
Stripe offers around one hundred payment methods (besides cards) and recommends enabling these methods either manually with country linkage or conducting payment in the buyer’s local currency. In this case, Stripe automatically shows to buyers their local payment methods. In my opinion, payments in local currency brings losses on conversion to USD, but in return a merchant improves payment conversion rates.
Stripe recommends using an embedded payment form on the seller’s website instead of redirecting the user to the Stripe site. This increases conversion by up to 11% due to fewer clicks for the buyer. We are going to implement such feature on our payment page as well, p.cleantalk.org. Here is a draft of the new design.
For clients from the US and Europe, it makes sense to offer credit/installment options at checkout. A representative from affirm.com (online credits/installments) mentioned that they work with payments starting at $50, and adding such a payment method can increase conversion by up to 60%, as well as increase the average check (typical buyer behavior when purchasing on credit).
Stripe measures the reliability of its infrastructure by the number of seconds of downtime. Currently, their downtime is 26 seconds per month, which they consider a key product feature.
There was an interesting session with the CEO of Nvidia, Jensen. He said, We are currently experiencing a new industrial revolution, comparable to the time when humans transformed the energy of fire into steam, and then steam into electrons. Now electrons are being transformed into tokens (GPU computational cycles), and the number of these tokens will change the economy and industry. He is driving the AI industry towards solving real human problems, namely building multi-stage processes and using external (to AI) ways of solving problems. For example, AI should independently write an email or call a third party to provide the correct solution to the user who requested it. We use own AI to design new chips. Nvidia employees would never have started doing what AI is currently doing in chip design.
There were also several sessions on product design (Figma, Linear) and pricing systems (Adobe, Stripe). I didn’t learn anything new here; we are doing what the experts recommend.
Stripe has launched Usage-Based Billing, which is similar to our Pay-as-you-go model (that we have launched in the end of 2023). Interestingly, it features a simple API for interacting with Stripe’s billing system, and it provides real-time tracking of consumed resources and costs. In CleanTalk we considered using Stripe before starting work on our universal page but decided against it because Stripe didn’t support cross-selling. Otherwise, it’s a good solution if you don’t have the desire or capability to develop your own system.
At the developer session, about 80% of the audience (approximately 1000 developers) use GitHub Copilot (https://github.com/features/copilot), which is GitHub’s AI language model that assists with coding. From what I quickly gathered, this tool:
Writes documentation.
Writes unit tests.
Provides clear descriptions for pull requests and commits.
And, of course, writes code.
The head of development at GitHub explained that the system is designed so that the developer must oversee the AI-written code to avoid issues similar to Tesla’s self-driving problems. Overall, we should try it out.
Stripe is very focused on code documentation. They have many in-house developments to keep their documentation up to date, which they consider a strong point and a reason why they are widely used (which I think is true, as their documentation was among the best during my time as a developer).
To enter the corporate market, besides complying with ISO standards, it would be good to implement Bring Your Own Key (BYOK). This feature allows users to encrypt their cloud data with their own key.
Stripe sees a reduction in payment processing costs by offering users the least expensive payment methods for the seller (Surcharge). However, it’s unclear whether Stripe plans to launch this feature for everyone or if they are suggesting users consider this option themselves.
In the summer of 2024, Stripe is launching cryptocurrency payment acceptance. They had previously tried accepting such payments but abandoned it in 2018 because the process took up to 30 minutes (due to insufficient computing power on buyers’ devices). Now, thanks to the increased performance of client devices, they have reduced this process to 15 seconds.
We should look into Linear, as they have ideas regarding project management and tracking. As well as Mindbody, which provides software (SaaS) around fitness, including financial services for their clients.
Bonus
In San Francisco, self-driving taxis are already fairly common. White cars with sensors are seen in the photos. Subjectively, 2 out of 10 cars are on autopilot. It’s a bit eerie to imagine that such a car will come to pick you up and take you somewhere, it immediately reminds me of Skynet.
Patrick and JensenFidji Simo, Patrick and JohnJohn and LawrenceDesign talksPayments featuresMe, morning of the first dayDriver less taxi
We continue sharing our clients’ reviews and today’s one is kindly brought to you by Matt Erney on Trustpilot.
The service works well to keep our form spam under control!
TWe have been using the CleanTalk plugin for 3 years to control form spam on any of our client websites (and our own site). CleanTalk does a fabulous job of preventing the vast majority of spam. We use the WordPress plugin as our primary integration.
As you know, we have direct integration with the most popular contact form plugin – Contact Form 7. Also, you are probably familiar with the Flamingo – a message storage plugin, which doesn’t store submitted messages. Earlier, when using these two plugins simultaneously with CleanTalk Anti-Spam, messages recognized as spam would end up in the “spam” folder instead of just being deleted.
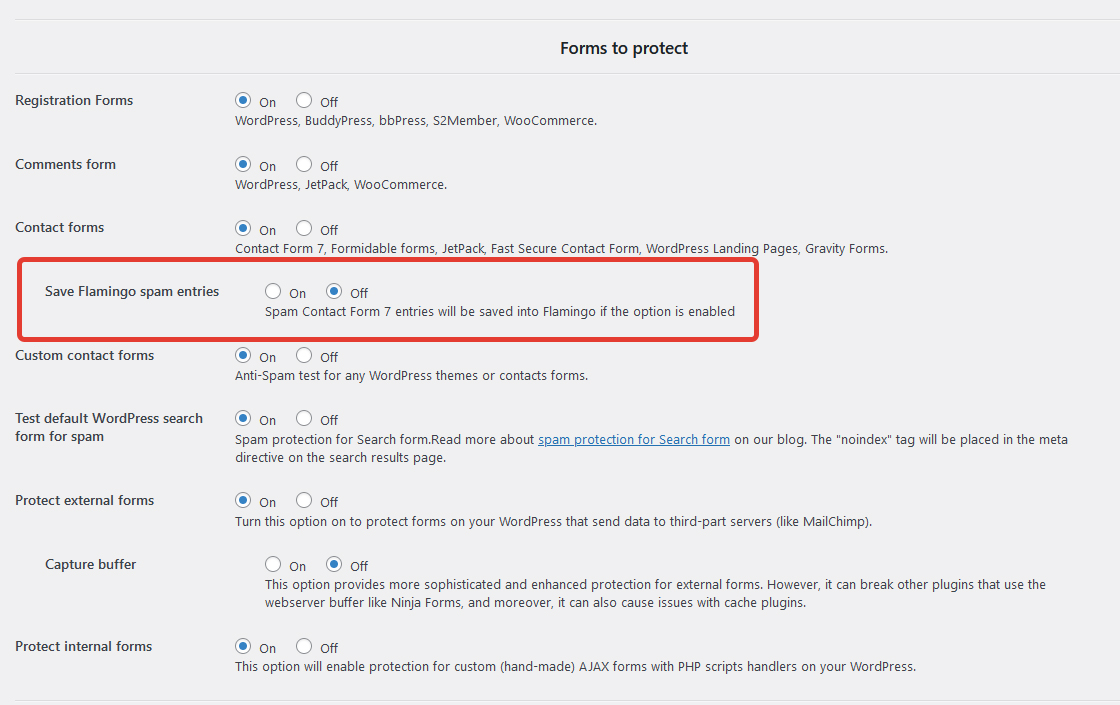
After a couple of requests about this, we decided that it would be a great idea not to store messages recognized as spam in Flamingo. So now we’ve made the “Save Flamingo Spam entries” option in the Anti-Spam plugin settings. It is enabled by default, but you can turn it off, after which messages recognized as spam will stop being stored in this folder.
How to activate the option
1. Install both Contact Form 7 and Flamingo plugins. The option is displayed only if you have both plugins installed and activated.
2. Go to Anti-Spam plugin settings in your WordPress dashboard
3. Scroll down to “Forms to protect” directory, find the “Save Flamingo spam entries” option and switch it off. The option is switched on by default.
That’s it! Now your messages recognized as spam will not be stored in Flamingo. If you want to see these messages again, just turn this option back on.
Spam is an ongoing issue for website administrators, and Joomla sites are no exception. When spam bots target your registration forms, they can flood your database with fake accounts, consume resources, and make managing your user base a nightmare. Thankfully, tools like CleanTalk Anti-Spam can help protect your Joomla registration forms from spam effectively. This comprehensive guide will walk you through the steps to integrate CleanTalk Anti-Spam with your Joomla site and protect Your Joomla registration form from spam
Why Protect Your Joomla Registration Forms?
Before diving into the steps, it’s crucial to understand why protecting your registration forms from spam is essential. Here are some of the primary reasons:
Database Integrity Spam registrations can clutter your database with unnecessary data, making it harder to manage and slower to operate.
Resource Management Spam bots consume server resources, which can slow down your website and increase hosting costs.
User Experience A flood of spam registrations can impact the user experience by making it difficult for genuine users to register and interact with your site.
Security Risks Some spam accounts may be created with malicious intent, aiming to exploit vulnerabilities or distribute malware.
What is CleanTalk Anti-Spam?
CleanTalk is a cloud-based anti-spam solution designed to protect websites from spam bots without relying on traditional CAPTCHA methods. It offers real-time spam protection by checking form submissions against a comprehensive database of known spam activities. CleanTalk is known for its high accuracy, ease of use, and minimal impact on user experience.
Setting Up Registration form protection
To protect your Joomla registration form from spam, follow these steps to set up CleanTalk Anti-Spam:
Step 1. Make a backup of the site files and database!
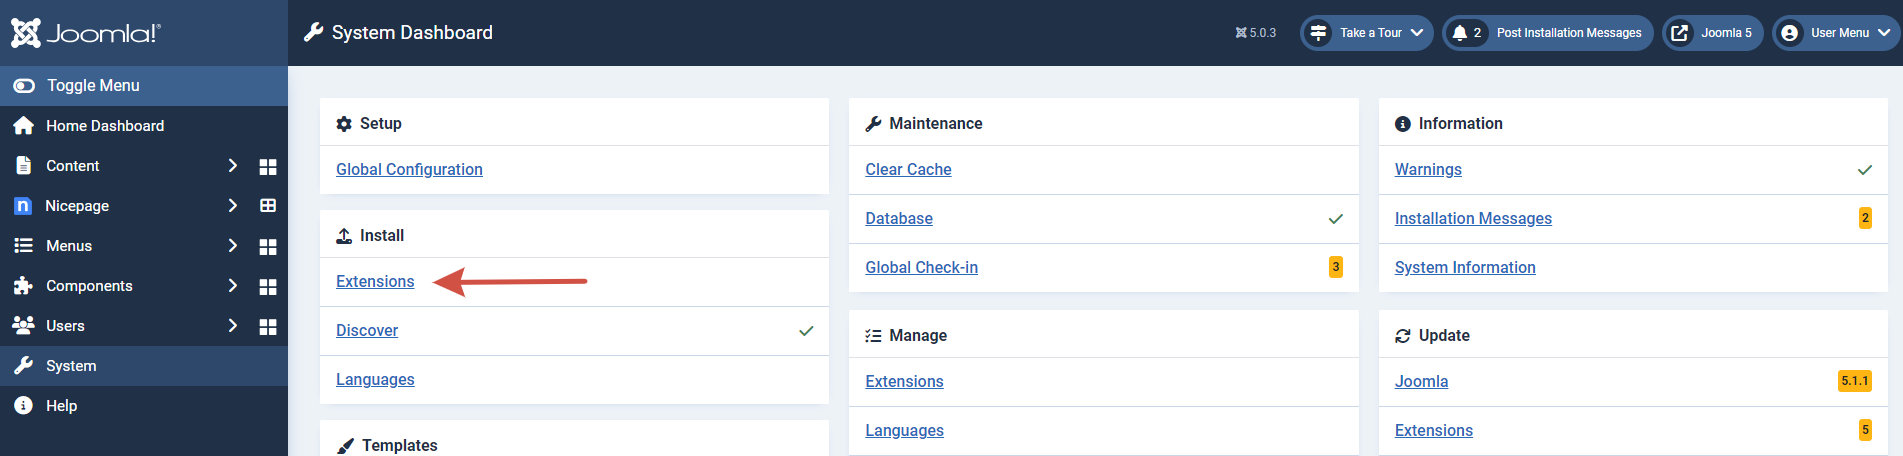
Step 3. In the main Joomla menu open System → Install → Extensions.
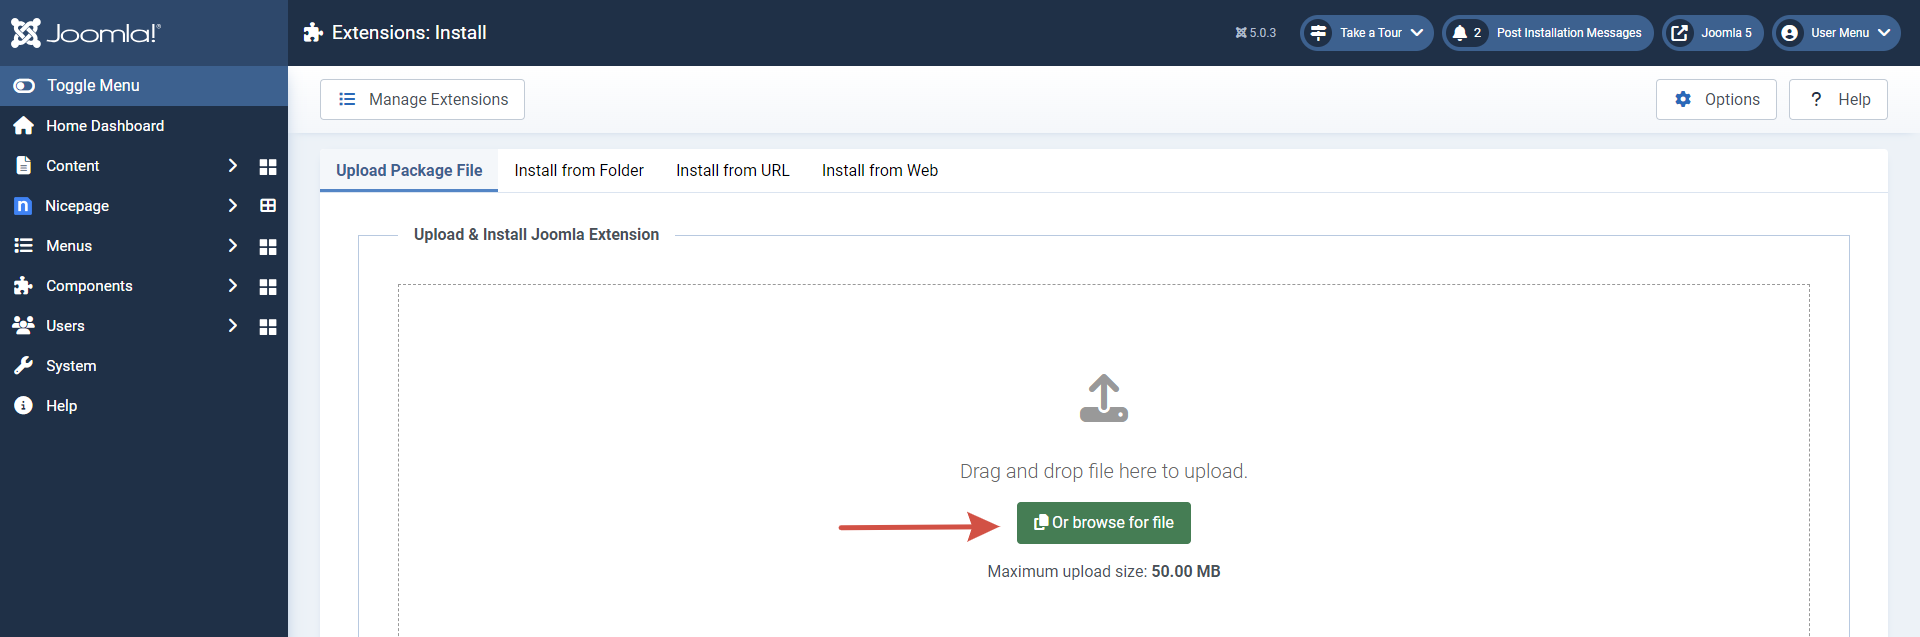
Step 4. Click the “Browse for file” button to upload the archive.
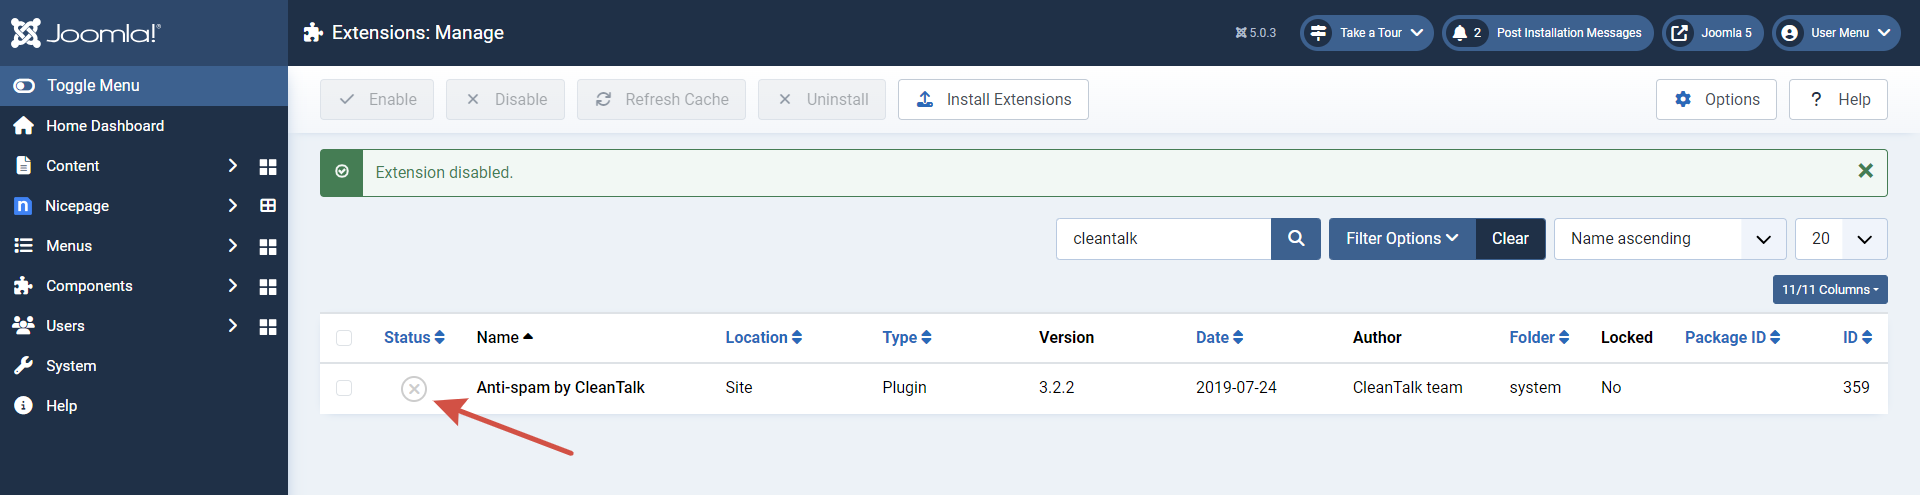
Step 5. After installation, you will see the success message:
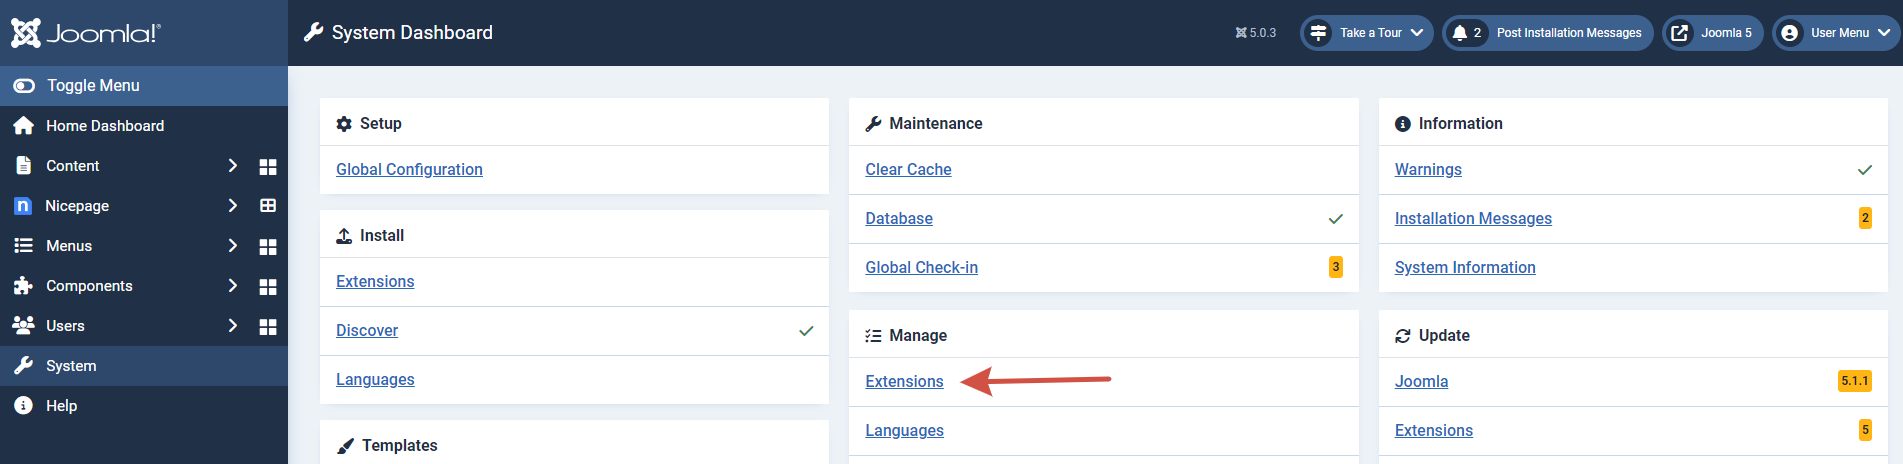
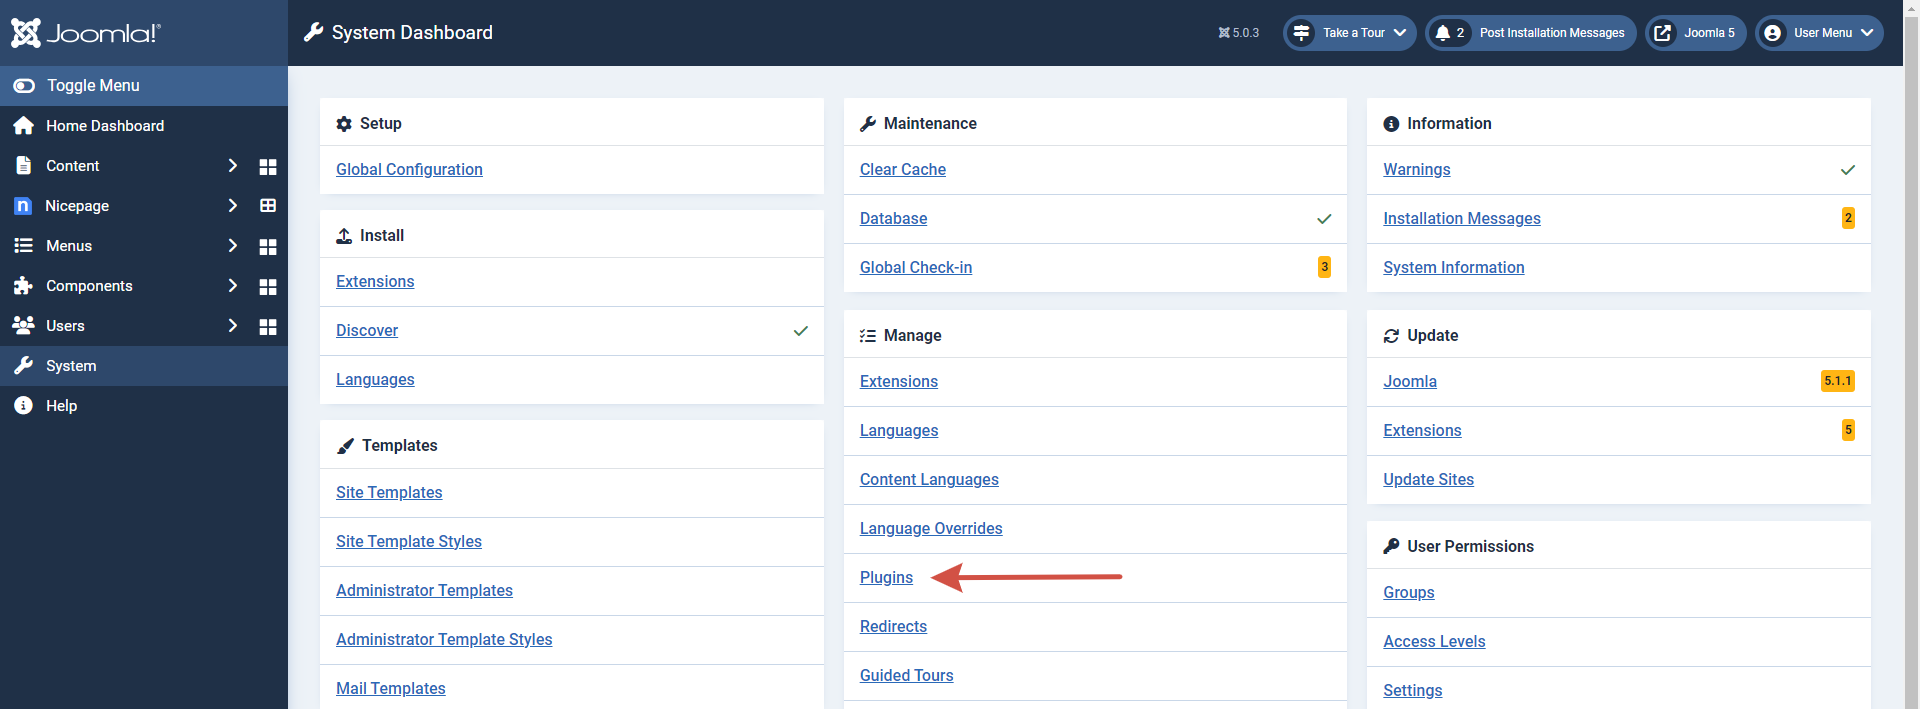
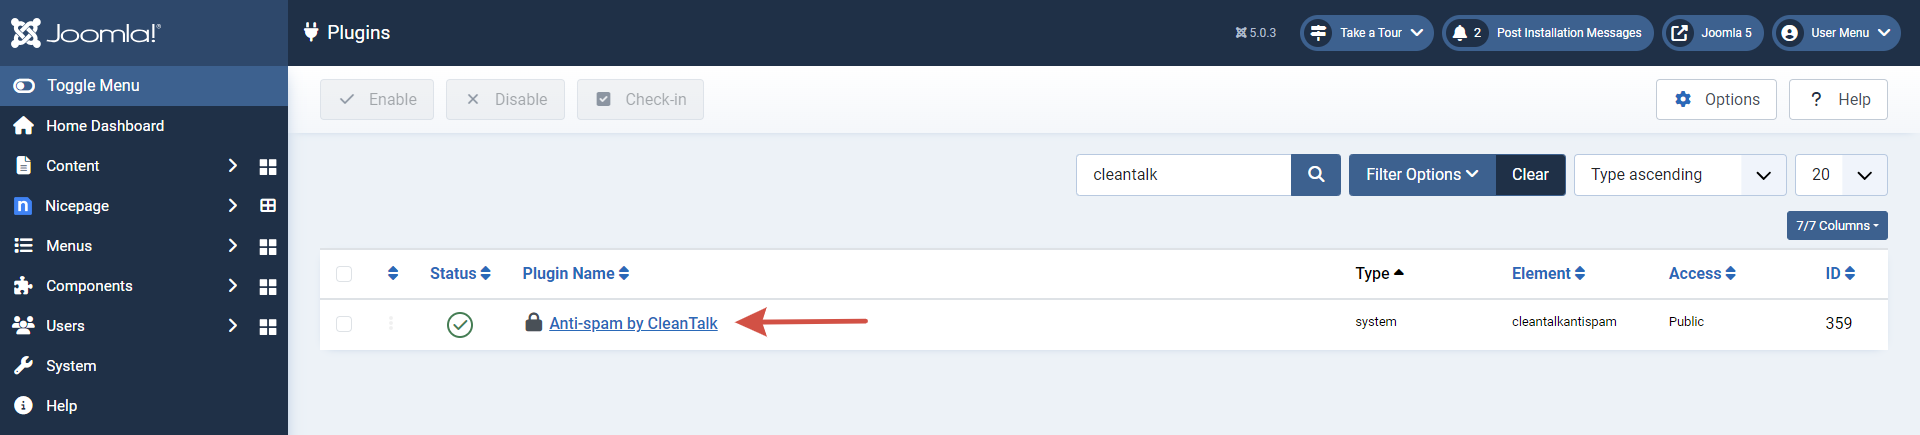
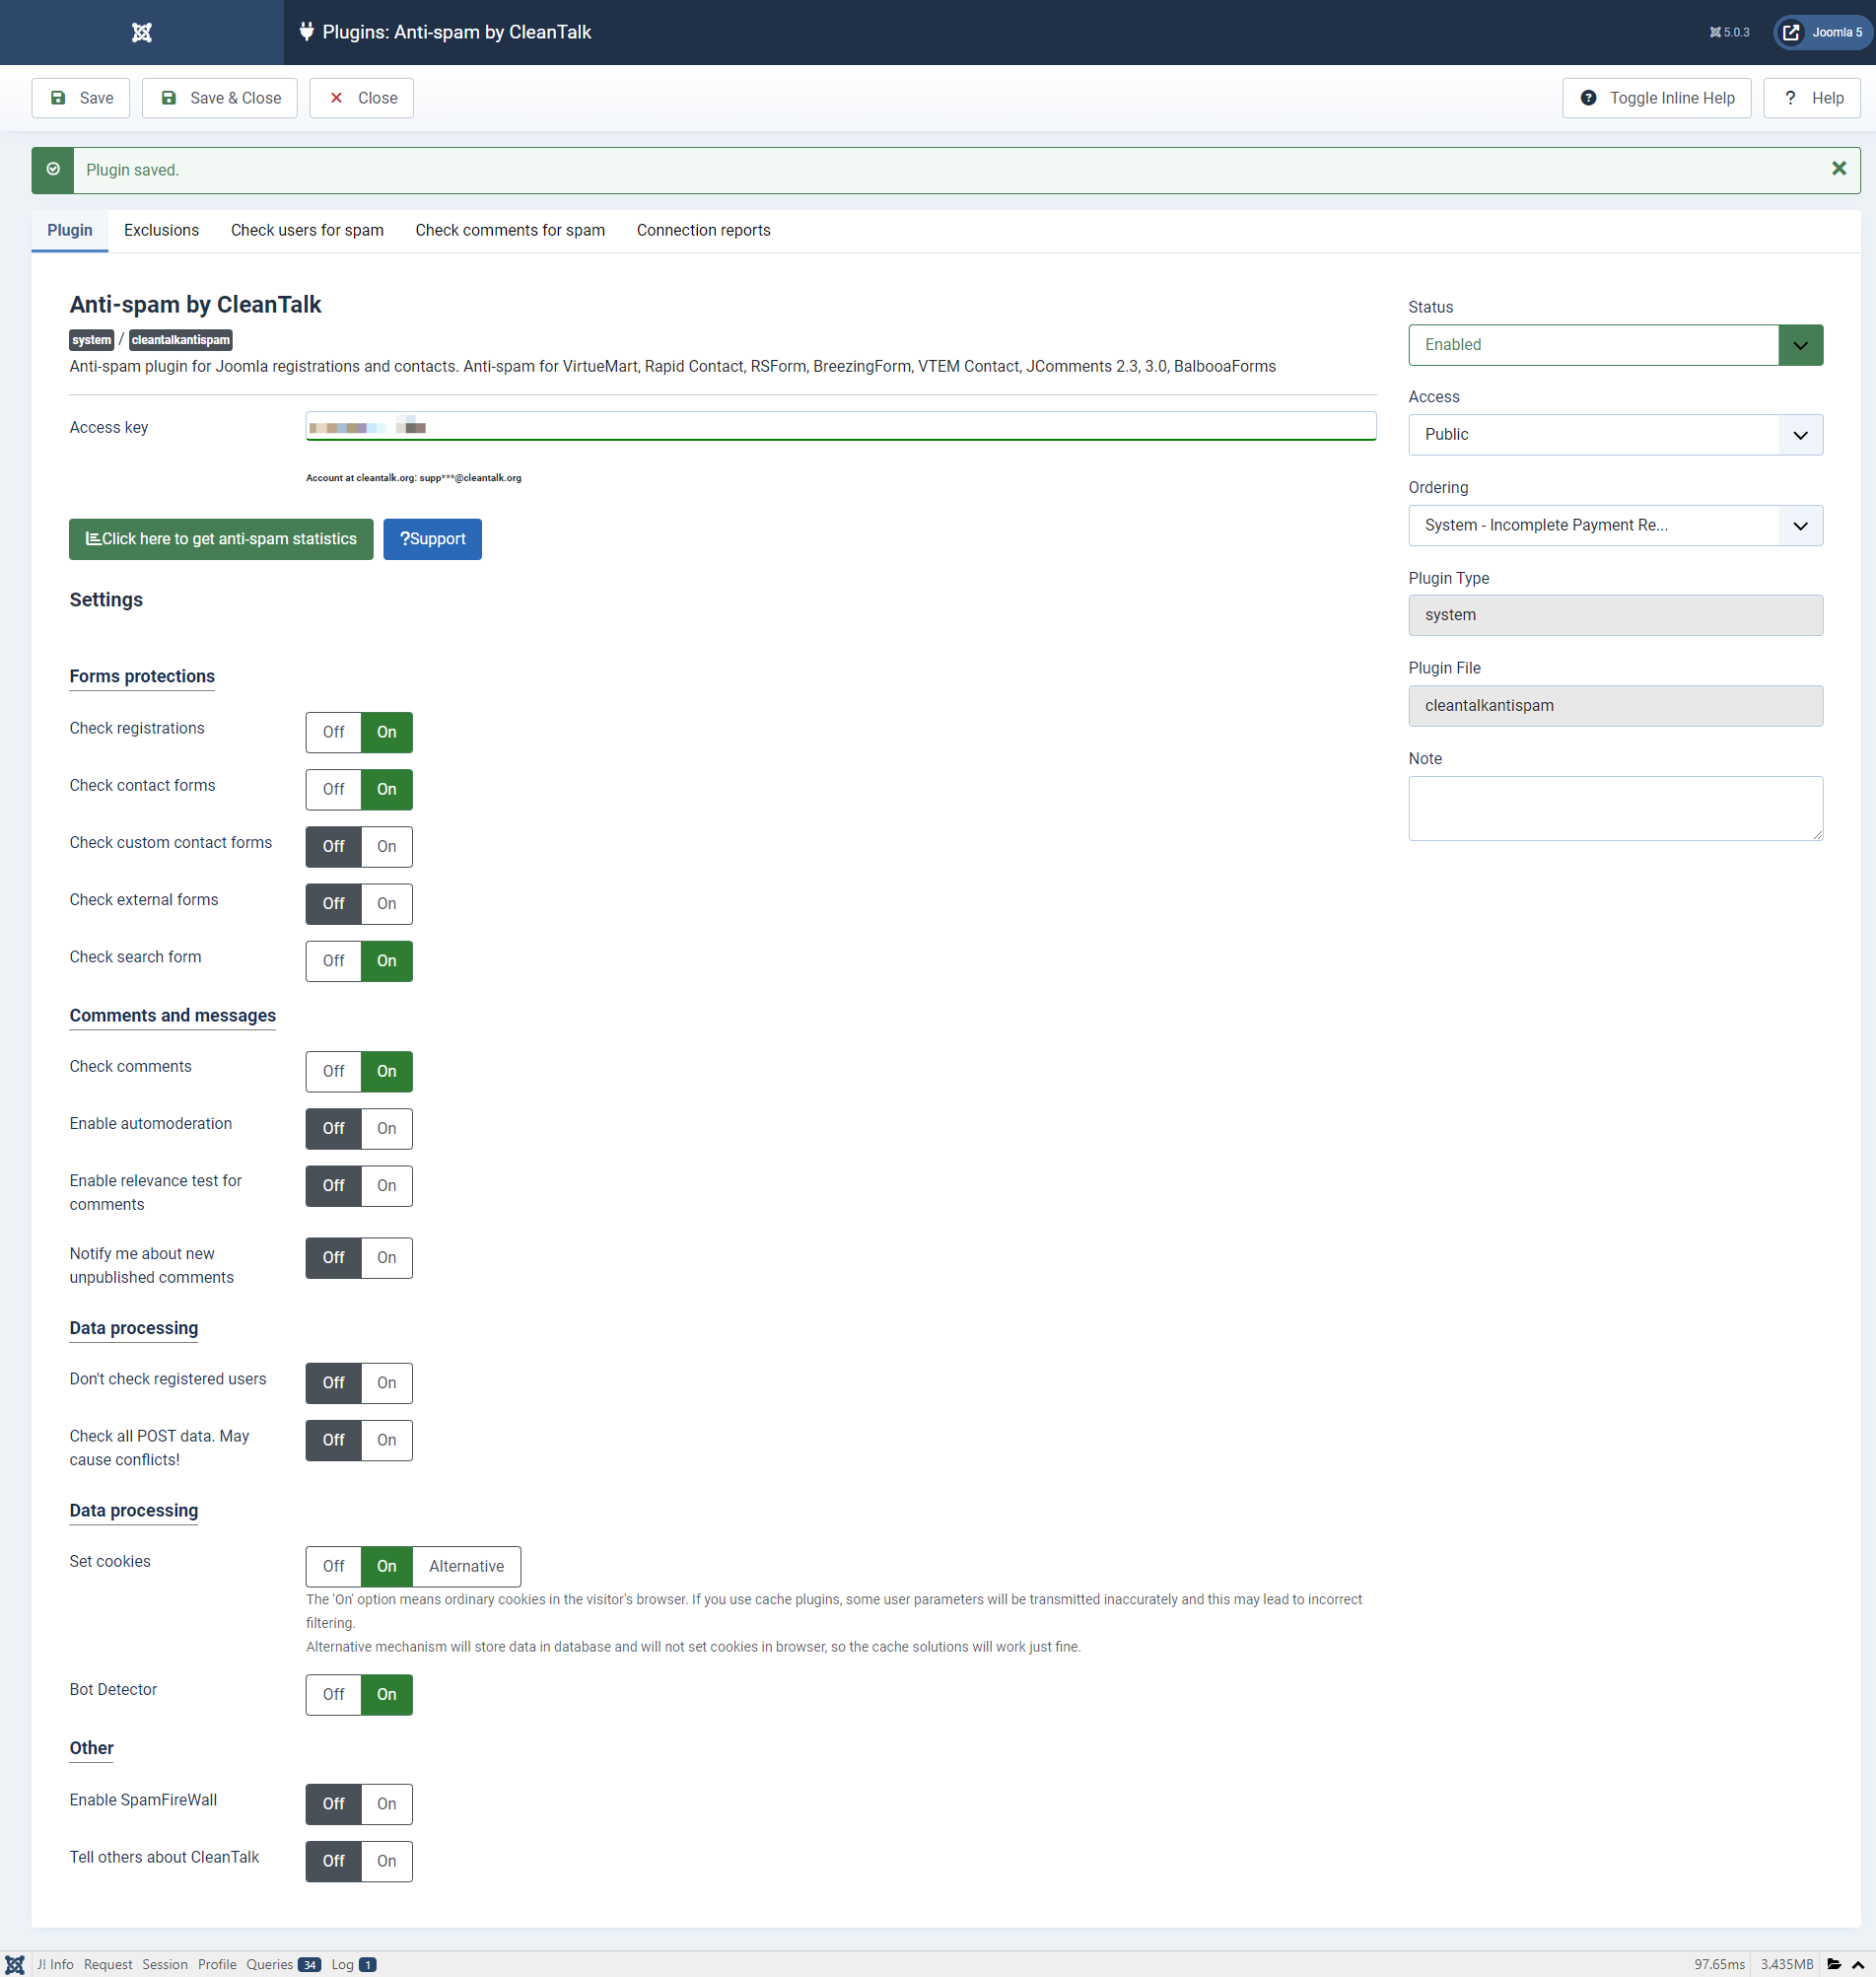
Step 6. Go to plugin settings: Extensions → Anti-Spam by CleanTalk, and enable the plugin.
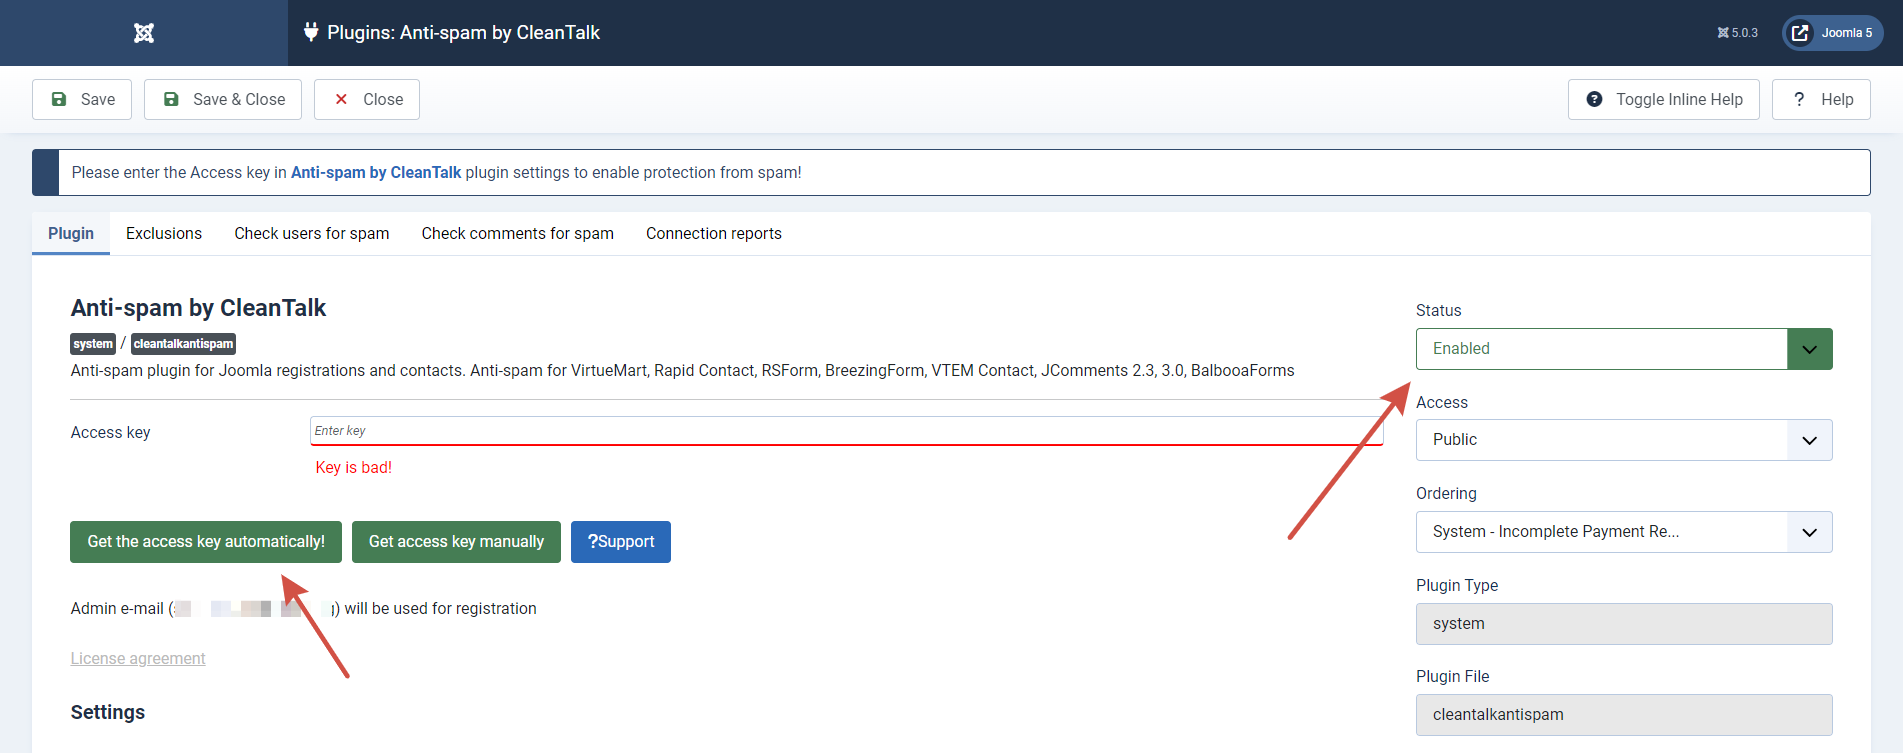
Step 7. In plugin settings press the Get access key automatically button. Admin email address will be used for registration.
If you want to use another address click the button Get access key manually. Fill in the easy registration form and you will receive your key.
Step 8. Enter your Access key in its field, choose protection options, and save settings.
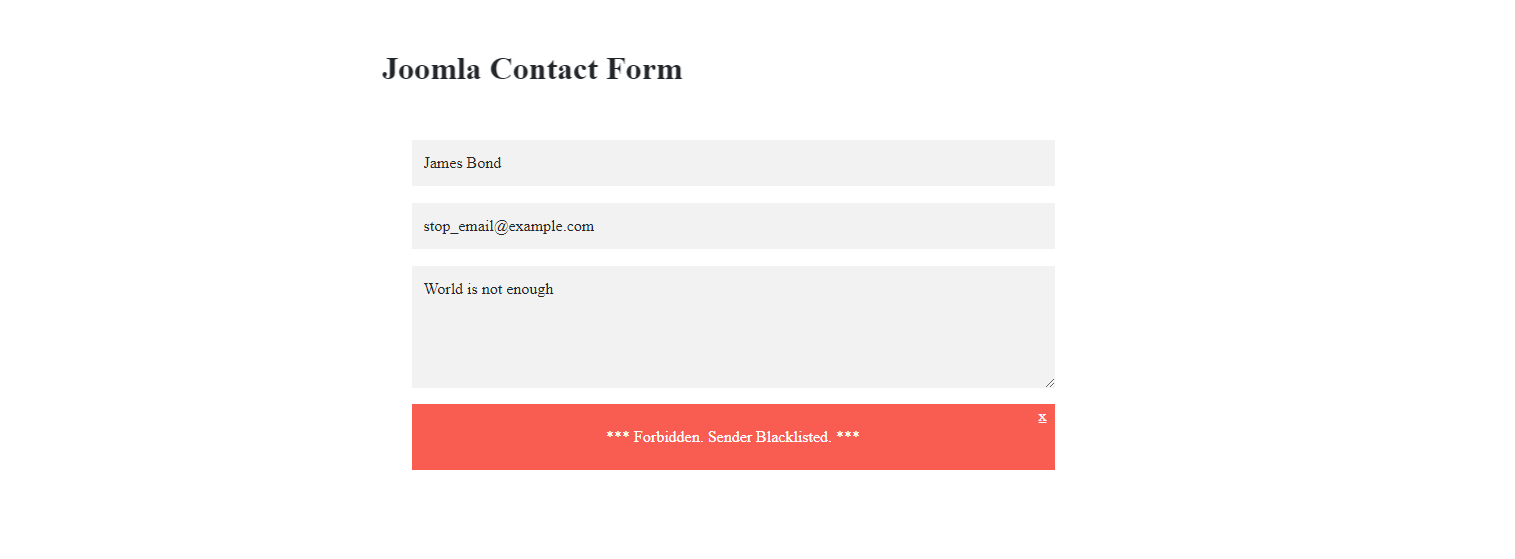
Test Your Registration Form
Test protection with this email address stop_email@example.com. Write a comment, registration, or contact message with this email. Here you should see the plugin respond, like in the screenshot.
You are amazing!
You have successfully installed Anti-Spam and now your registration forms (and all the other forms) are protected from spam. If something went wrong, please let us know in the comments below or create a private ticket.
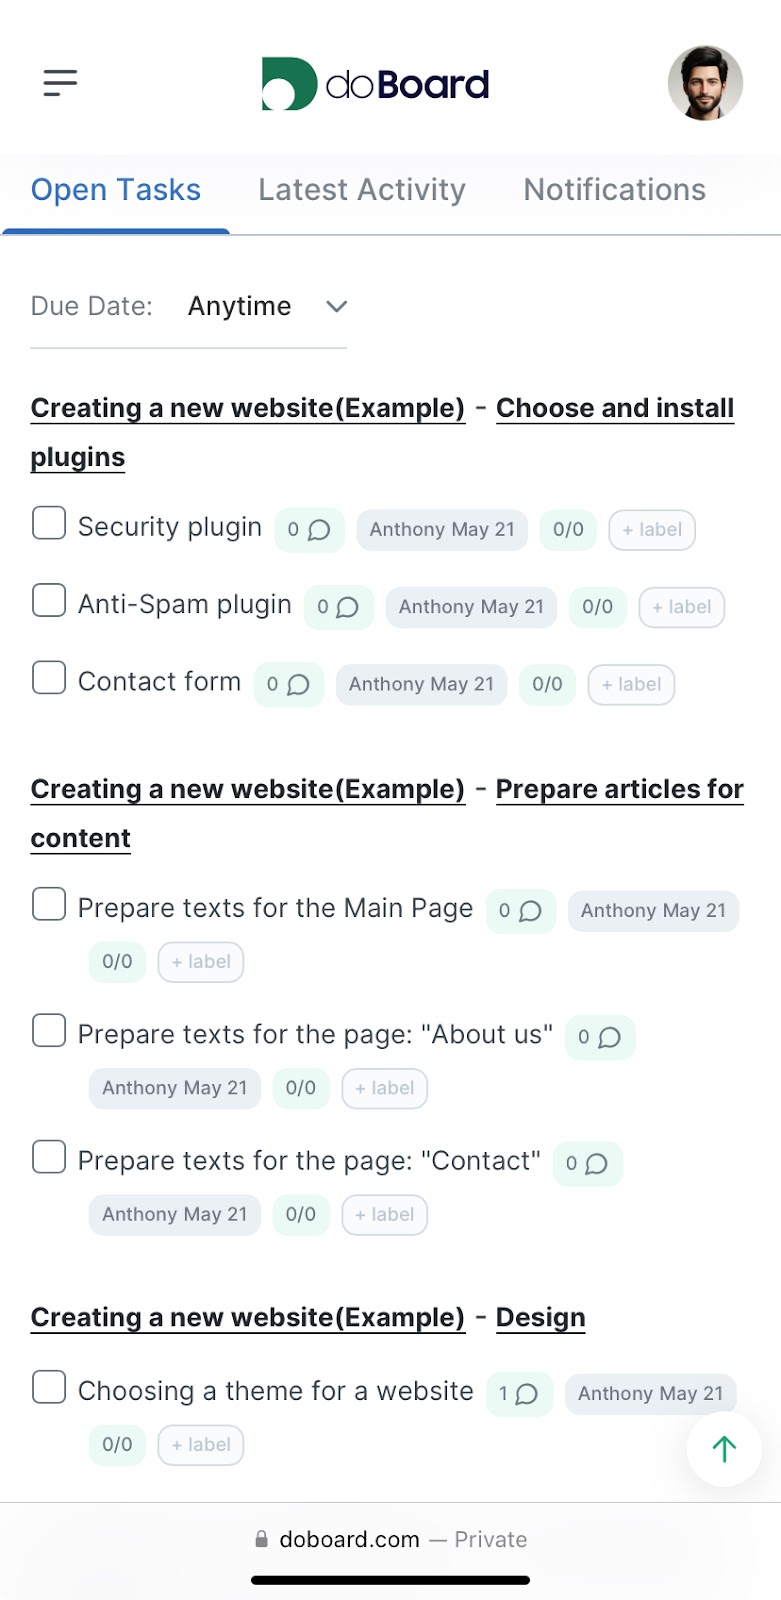
Choosing the right task management tool can significantly enhance productivity, streamline workflows, and improve team collaboration. Here are the top 7 features your task manager tool should have:
1. User-Friendly Interface
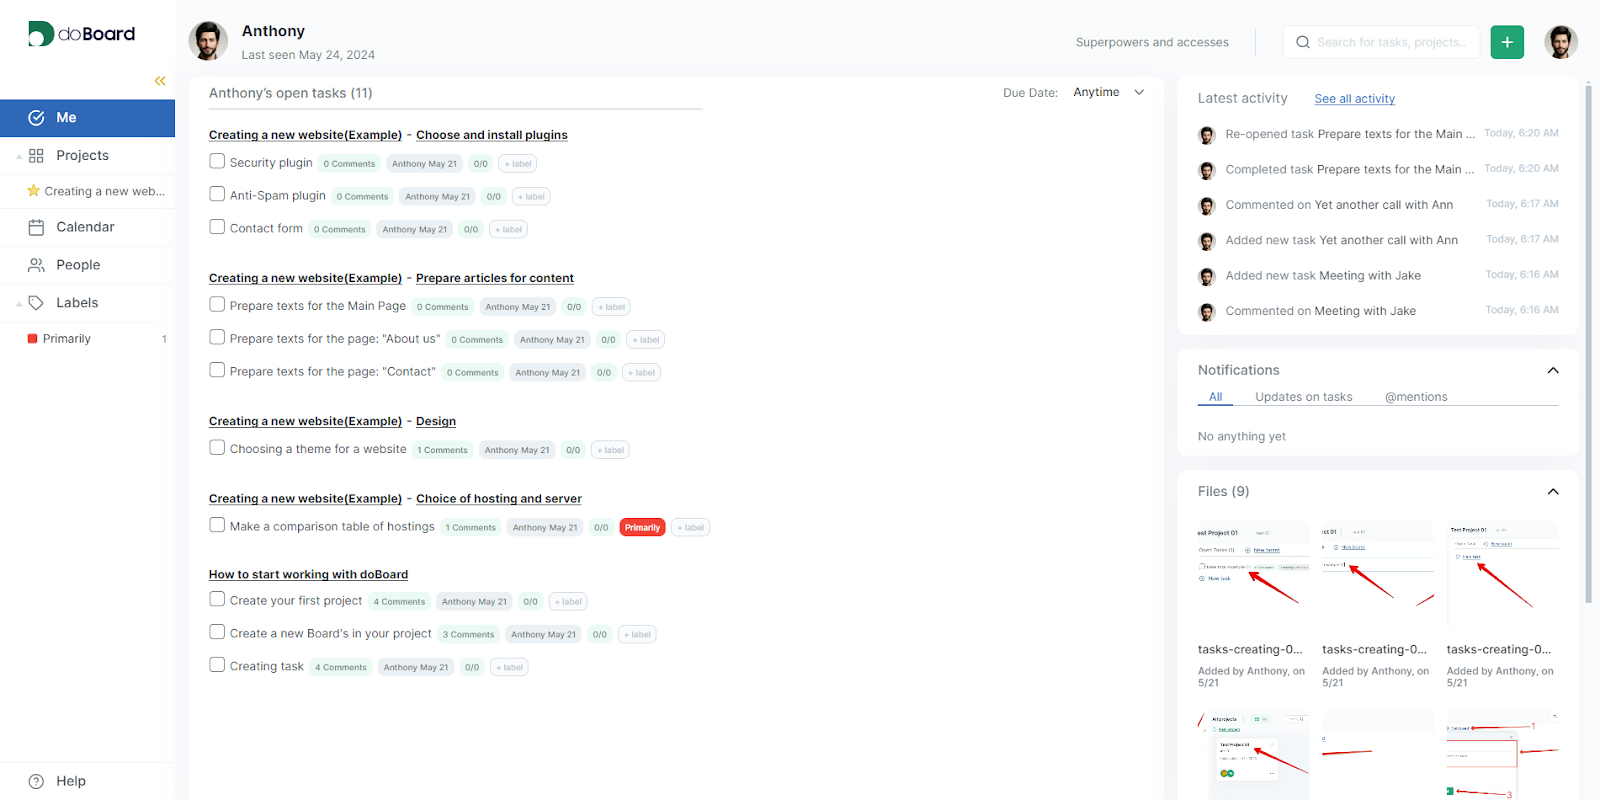
A task manager tool should offer an intuitive and user-friendly interface. This ensures that users can easily navigate through the service dashboard and manage their tasks without spending too much time learning how to use it. Drag-and-drop tasks between boards, minimize the sidebar or other panels to give yourself more space.
A user-friendly interface is essential for any task management tool because it ensures quick adoption, increases productivity, enhances user engagement, and supports effective collaboration. By reducing errors, boosting morale, and encouraging regular use, a user-friendly interface helps teams manage their tasks and projects more efficiently and effectively. Investing in a task management tool with a user-friendly interface ultimately leads to better project outcomes and a more productive and satisfied team.
Key points:
Reduces the learning curve for new users.
Enhances user experience and productivity.
Saves time on training and onboarding.
2. Collaboration and Communication
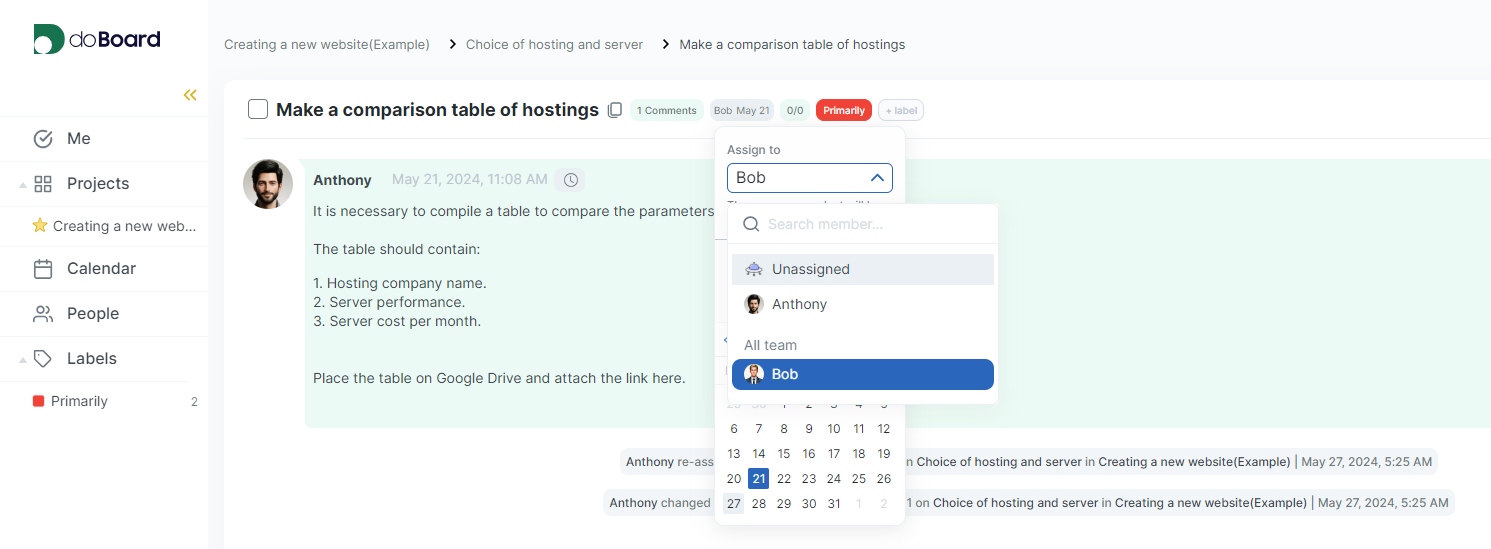
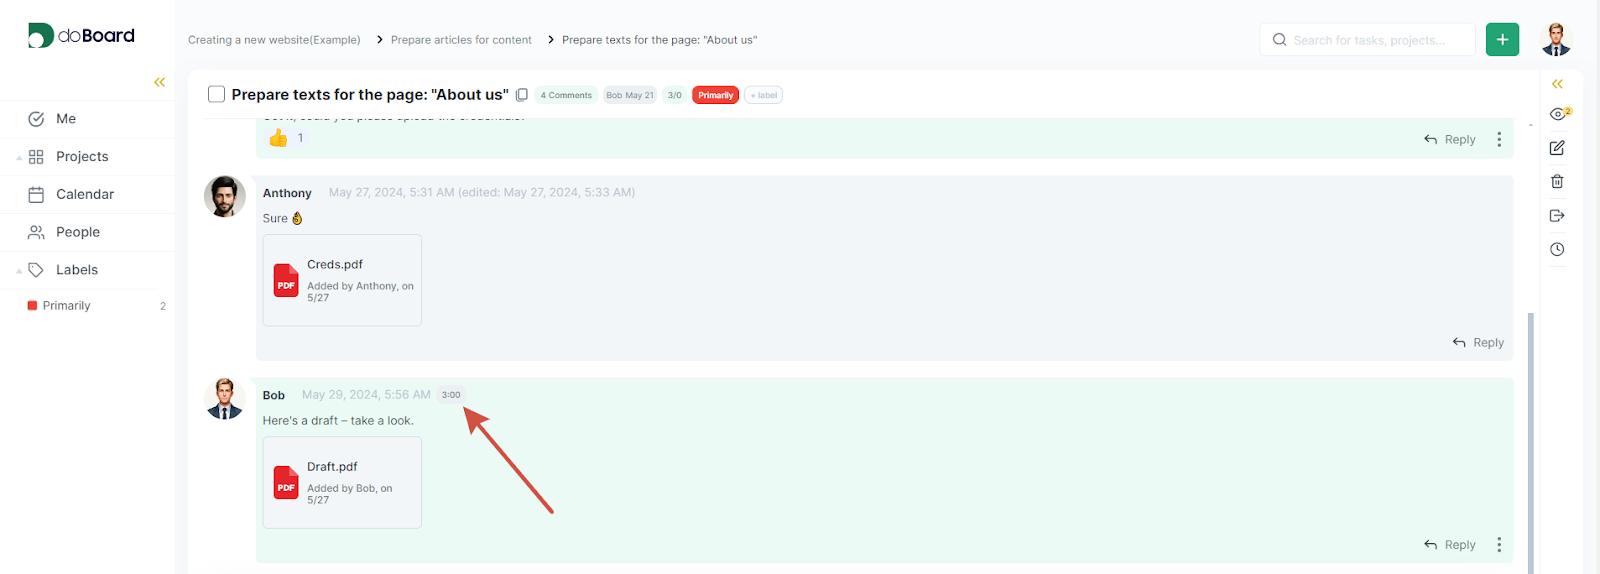
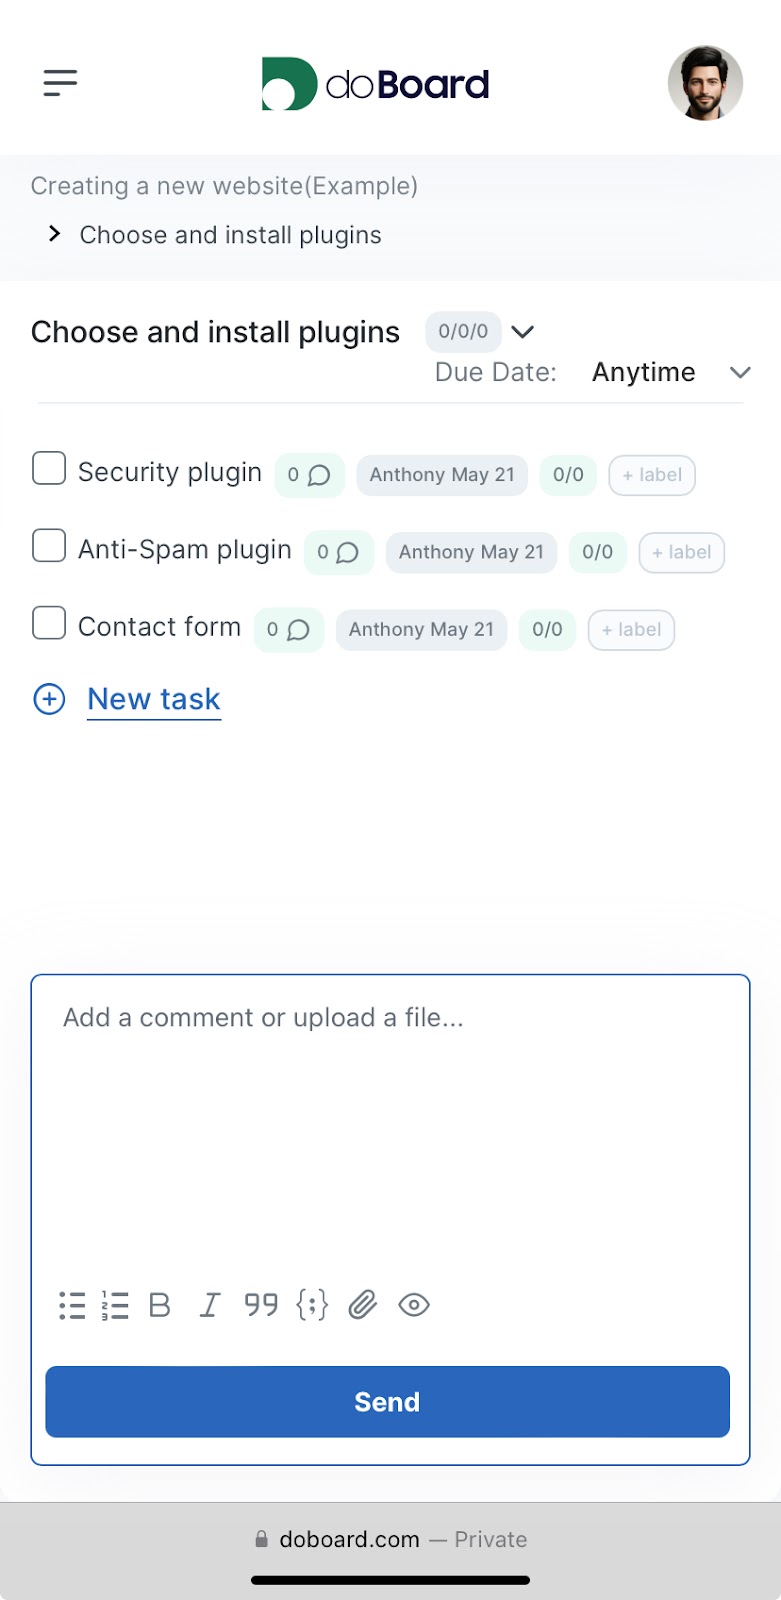
Effective collaboration is essential for successful project management. Your task manager tool should support seamless communication and collaboration among team members. Assign tasks, observe your team, view your colleague’s current tasks, share files, and feel free to comment and react on tasks and boards.
Among other things, transparency of tasks and centralized information are key features of a project management tool: all project-related information is stored in one place, making it easy for team members to find the information they need, and.everyone on the team can see the status of various tasks, which helps in understanding the overall progress of a project.
Key points:
Keeps everyone on the same page.
Facilitates quick decision-making.
Enhances team productivity and accountability.
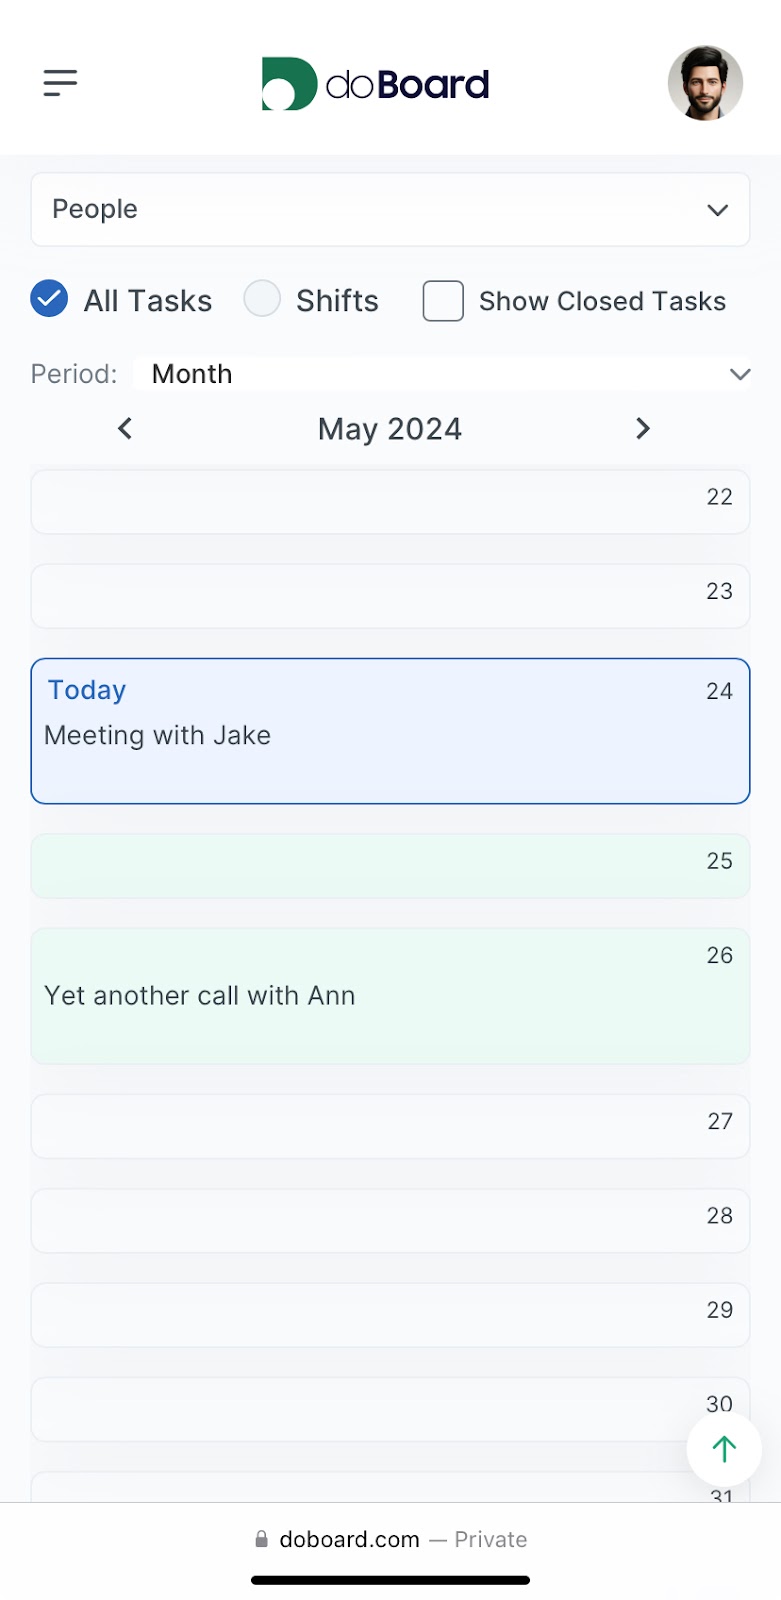
3. Task Prioritization and Scheduling
Managing tasks efficiently requires robust prioritization and scheduling capabilities. The tool should allow users to set priorities and deadlines for tasks. It is also important because it directly impacts how effectively and efficiently a team can manage its workload and achieve project goals.
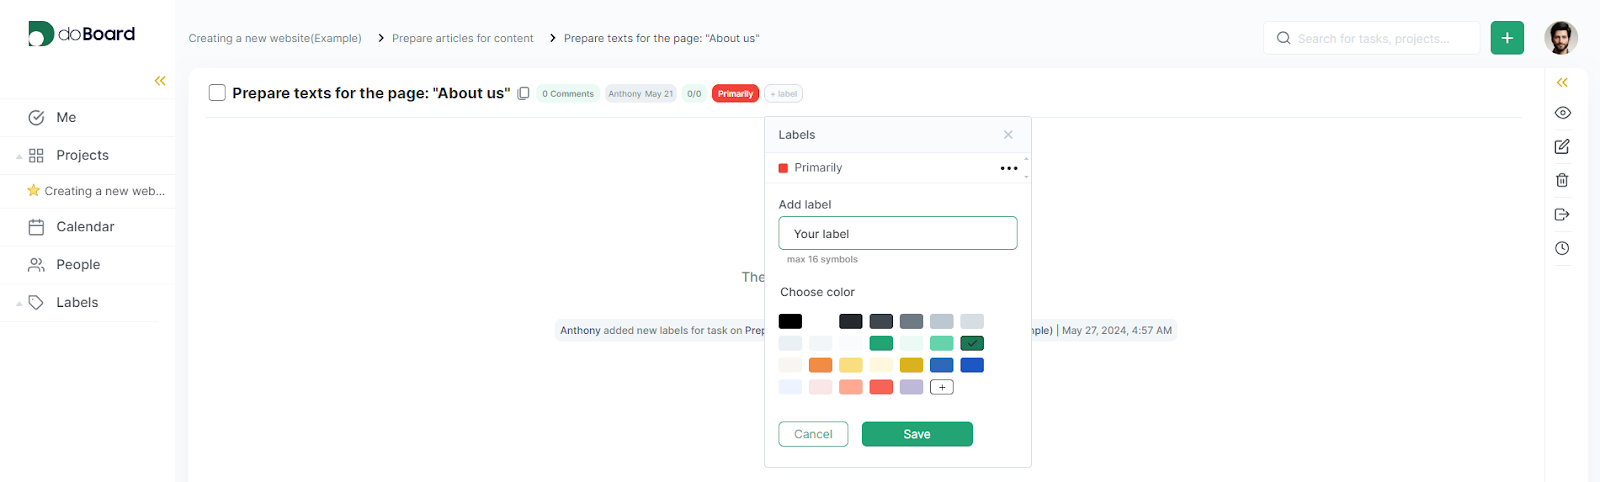
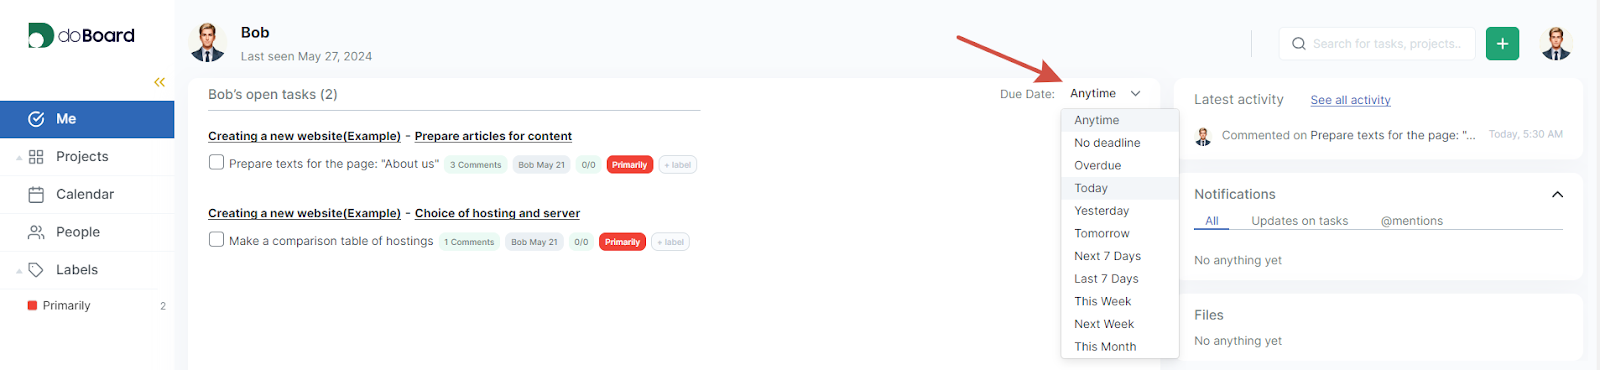
A proper task management tool should have customizable labels for setting task priorities, and a due date so you don’t miss any deadlines and can concentrate on the most important tasks at the current time.
Key points:
Helps manage deadlines and avoid procrastination.
Ensures important tasks receive the required attention.
Improves time management and efficiency.
4. Progress Tracking and Reporting
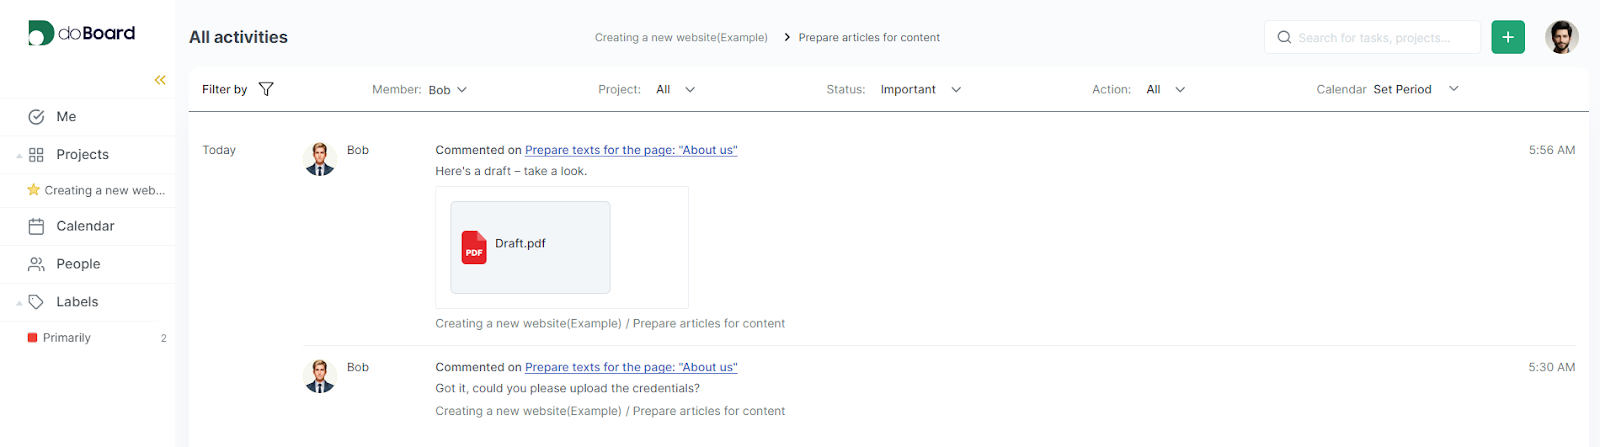
To ensure projects stay on track, the task manager tool should offer comprehensive progress tracking and reporting features. Plan time for boards and track estimated time for certain tasks. Observe your colleague’s activity to be aware of the current load.
Proper progress tracking and reporting tool helps you in early detection of potential risks and issues, allowing teams to mitigate them before they escalate. It is no less important for teams that practice agile methods.
Key points:
Provides visibility into project status and progress.
Identifies bottlenecks and areas for improvement.
Facilitates data-driven decision-making.
6. Mobile Accessibility
In today’s mobile-driven world, having access to your task manager tool on the go is crucial. The tool should offer a mobile view that allows users to manage tasks, collaborate with team members, and receive updates from anywhere.
Mobile accessibility is not just a convenient feature; it’s a necessity in today’s fast-paced, digital work environment. It empowers users with the flexibility to manage their tasks and collaborate with their teams effectively, no matter where they are. By ensuring real-time updates, enhancing collaboration, and supporting a balanced work-life integration, mobile accessibility significantly boosts productivity and efficiency in task management.
Key points:
Increases flexibility and productivity.
Ensures that tasks can be managed anytime, anywhere.
Keeps team members connected and informed, even when they’re on the move.
7. Flexible plans
A popular problem with modern task managers is that if you use the service with your team, you have to pay for each employee, which is usually quite expensive.
In order to avoid this difficulty, use services with an unlimited number of employees. Also, choose a plan for the number of projects that is relevant to you – so you will avoid unnecessary costs. And you can always expand the plan later.
Extended 45-day trial might be a good bonus for you, because it, at least, saves you 1,5 months of free use, while giving you enough time to make the right decision.
Key points:
Extended trial
Flexible plans
Unlimited users
Conclusion
Many services for task management are now available that contain many of the effective tools we have listed. And many of them are quite effective.
We see the main efficiency in finding a product that contains them all at once so that you don’t have to be torn between two services. That’s why we use doBoard in our projects for our team and can vouch for it.
During routine plugin testing, we discovered a critical security vulnerability in the Shortcodes Ultimate plugin for WordPress which has 600,000+ installations. This plugin, widely used for adding powerful shortcodes to enhance website functionality, is currently vulnerable to a severe security flaw that could potentially allow attackers to exploit and gain unauthorized access to your WordPress site.
The exploit allows contributors to embed malware JavaScript code into new posts via shortcode, subsequently facilitating admin account creation. By exploiting this flaw, attackers can gain unauthorized access and wreak havoc on websites.
Don’t rush to delete the plugin. To mitigate the risk you should just update your Shortcodes Ultimate plugin to the latest version. Additionally, implementing robust security measures, such as regular vulnerability assessments and user role restrictions, can fortify defenses against XSS attacks.
We’ve been wanting to make our own branded useful merch for our customers for a while now. For this purpose, we needed a marketplace on which we could place our goods, as well as deliver them to customers. No wonder we chose Amazon. In this article, we’d like to share our experience in launching our giftware sales and hopefully help those who are just thinking about how to start selling on Amazon.
Step 1: Finding the Right Products to Sell
One of the most important factors in determining your success on Amazon is finding the right products to sell. If you go to https://www.amazon.com/bestsellers you will see lots of products, that are sold way more often than others. Here you need to research products that sell well to find the ones, you like best or what you would be more comfortable branding.
We have chosen the water bottle category for us for several reasons:
It’s a product for everyday use.
It promotes the healthy habit of drinking enough water every day.
These bottles look great and it will be convenient to put a logo on one.
After choosing the right category and product you will need a product that you can buy as cheaply as possible, apply your logo, and sell at the average market price or higher. To find such a product we went to alibaba.com. It was difficult to find the same item as we wanted, but we were able to find the most similar one and contacted the seller to find out the details.
The good news was that for orders of 50 pieces or more, the seller would put the logo on the items for free. All we had to do was send the logo to the seller and a day later we received a photo of a bottle with the logo already applied.
To make sure of good quality goods and quality logo application we ordered delivery of 1 item.
Despite the $38 shipping cost on a $10 order, it was the right decision. Because after a week we received the product and after that, we were absolutely sure that the product would be a pleasure to use. So we ordered a full batch of 50 water bottles.
Step 2: Setting Up Your Amazon Seller Account
First, you need to choose a seller account type. There are two types of seller accounts:
Individual accounts are free but you are charged $0.99 per sale.
Professional accounts cost $39.99 per month, no matter how many items you sell.
We weren’t sure at what rate the items would sell, so we chose an individual account.
After that, you will access your Amazon Dashboard. Once you have connected your payment card and added your brand information, you are ready to add your product to Amazon.
Step 3: Adding a product and setting up a fulfillment plan
ASIN is an Amazon Standard Identification Number, which is the unique combination of 10 letters and/or numbers that is given to your product by Amazon. ISBN is an International Standard Book Numbers, which are unique identifiers for commercial books with a barcode. UPC or Universal Product Codes, is a unique 12-digit code assigned to retail packaging to help identify products in the US. EAN or European Article Numbers is simply a European version of UPC. It consists of 12- or 13-digit numbers for product identification.
If your product is unique like ours, select “I’m adding a product not sold on Amazon”. In this case, Amazon will assign an ASIN to your product, which will become your product’s primary identifier.
After that, you need to fill in all the information about the product in as much detail as possible. Here’s how it looked for us in the end.
And since Amazon’s interface doesn’t explain what and where it is, we’ve prepared a hint for you.
Title 200 characters max, capitalize the first letter of every word
Images 500 x 500 or 1,000 x 1,000 pixels to increase listing quality
Variations Such as different colors, scents, or sizes
Bullet points Short, descriptive sentences highlighting key features and benefits
Featured offer (“Buy Box”) The featured offer on a detail page. Customers can add to their cart or “Buy Now”
Other offers The same product sold by multiple sellers offering a different price, shipping options, etc.
Description Keywords improve the chances that people will find your listing
Once your item is added you need to decide how you will package and ship your items. Amazon has 2 solutions for this:
You can fulfill orders yourself, maintaining your own inventory and shipping products directly to customers. We call this merchant-fulfilled shipping (MFN).
You can send your inventory to Amazon and have us pick, pack, and deliver products through Fulfillment by Amazon (FBA). FBA also takes care of customer service and returns.
We chose the second option because we wanted to delegate this issue to experienced professionals to minimize the possibility of mistakes.
Fulfillment by Amazon (FBA)
We would like to talk about this option separately, as it has both pros and cons.
Pros
free shipping for your customers;
lower operating costs;
no need to contend with client inquiries;
Cons
laborious product preparation requirements;
potentially costly charges;
long-term storage fees;
complex sales tax;
Long story short, FBA is definitely not a cheap option and can make it difficult to justify the expense. But if you want to save your time it is really great.
Step 4: Driving traffic to the product
When you want to increase your sales in a marketplace you shouldn’t just rely on people finding your product on their own and choosing it because of its quality-to-cost ratio. Because there are indeed a lot of products on Amazon. This is especially true for products about a brand that, few people know about.
In this case, you need to take care of additional sources of traffic and a good option could be your website or online store, where people are familiar with your brand.
We have placed several banners on our blog and on our clients’ dashboards. This is roughly what it looked like.
Statistics on traffic sources and purchases are not available on the individual tariff, so we can’t say for sure what share of sales these banners brought, but we assume that not less than a half, taking into account the fact that the main products of our company and the brand itself for a fairly narrow audience.
Step 5: Keep track of your orders and adjust the price
In case you’ve enabled the FBA option, the only thing you’ll have to do is keep an eye on the status of your orders and how Amazon does everything itself.
Also, we recommend you collect sales statistics for a certain period and try to increase or decrease the cost of the product and track the impact of the cost on the number of sales as it can help you optimize your costs and increase your profits.
We wish you great sales!
It is difficult to fit all of our experiences into this article, but we have tried to mention the most important issues that we had to deal with ourselves.
We welcome questions in the comments and will be happy to share more specifics to help you save time and money.
Many online comments and reviews are helpful, but some might not be written by real users. A special verification badge could indicate if a comment/review is confirmed to be written by a real person. This might help you decide which reviews to trust more when reading/discussing online.