We continue with our clients’ stories and today’s story is from Anthony, he is a founder, creator, and owner of appwt.us website among others. They provide affordable business services including Web Application Design & Development, Responsive Web Design & Development, E-Commerce Development, SEO, PPC, Programming, Script Correction, Graphic Design, Logo Design, Print Design, QR Code Design, Animation, Social Media, Advertising, Production, Videos and much more.
And here’s the story from Anthony
There was an issue with websites we had done for organisations and they were a Children’s Performer. We were getting SPAM displaying on their website about articles related to Viagra and other child inappropriate not related content. It was all because somebody had injected coding through their contact form.
I found CleanTalk and decided to apply it to my client site to see if it would save us any manual preventive effort. After a couple passes we had ALL of our client websites cleaned up.
Unlike another services, CleanTalk let me select entire regions and countries to BLOCK with blacklist. Also it let me see where the hack/intrusion attempts were coming from. And also including what code they were trying to interject, their IP Address, and other items.
The cost of the site licenses has WAY MORE than PAID for itself in saving server bandwidth, site load speed. It works by blocking the intrusion before it floods the server slowing my site a.k.a. DDOS Attacks. And among others my time to remediate it manually which was difficult due to the hundreds of places it had put it’s malware.
I would recommend it for these reasons and on top of that, the SUPPORT is IMMEDIATELY responsive. My requests were filled and enhancements to the PRODUCT were coded to things specific to my installations. They are great! GET THE ANTISPAM running also. The uptime monitoring tool is useful too for making certain your website is always running, just make certain to Whitelist CleanTalk and their IP Addresses.
While using Contact Bank Contact Form, always be sure to use the most effective Anti-Spam plugin. Read the guide below and grant your Contact Bank Contact Form spam protection in about 5 minutes.
Once CleanTalk Anti-Spam plugin is installed it starts to protect all of the existing forms on your WordPress website. It may not only be Contact Bank Contact Forms but many others.
How to check your Contact Bank contact form are protected from spam
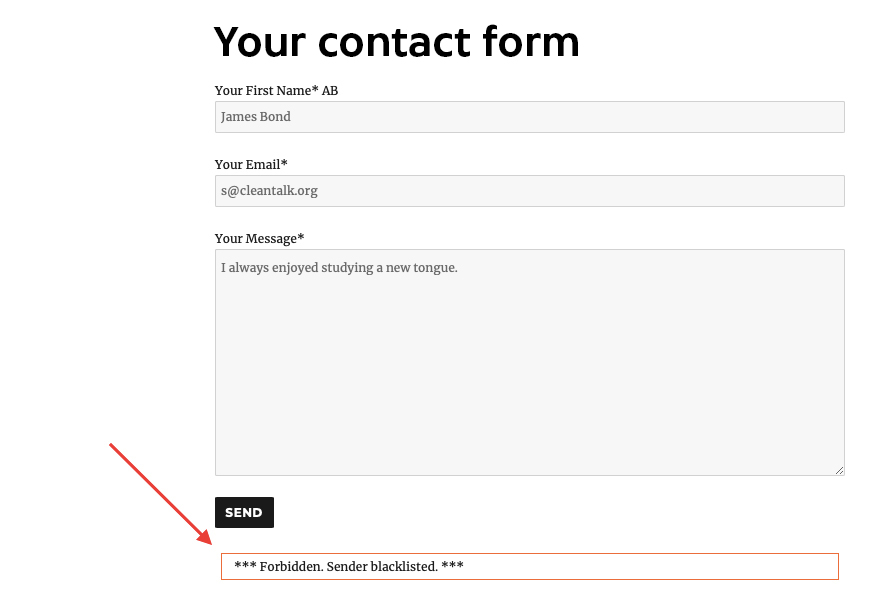
You can test the work of Anti-Spam protection for your Contact Bank Contact Forms by using a test email s @ cleantalk.org (without spaces). First, open the form in an Incognito browser tab.
Fill in all the required form fields and send a form. After submitting the form, you will see a block message about the block on the form submission.
If you have any questions, add a comment and we will be happy to help you.
Create your CleanTalk account – Register now and enjoy while CleanTalk protects your Contact Bank contact forms from spam.
Update
The protection works only for website visitors, not for website admins. Be sure to test the form protection using Incognito mode.
Additional features
CleanTalk protects all forms at once: comments, registrations, feedbacks, contacts, reviews.
Installation takes about 1-2 minutes.
Smart 99% protection against spambots.
Always online – 24/7 technical support.
Logs, SpamFireWall, personal lists, country filters, stop-words, and many others.
Discover the complete list of CleanTalk Anti-Spam plugin features here.
If you prefer to use Ultimate Form Builder Contact Form, always be sure to use the most effective Anti-Spam plugin. Read the guide below and learn how to Protect your Ultimate Form Builder Contact Form in about 5 minutes.
Once CleanTalk Anti-Spam plugin is installed it starts to protect all of the existing forms on your WordPress website. It may not only be Ultimate Form Builder Contact Forms but many others.
How to check your Ultimate Form Builder contact form are protected from spam
You can test the work of Anti-Spam protection for your Ultimate Form Builder Contact Forms by using a test email s @ cleantalk.org (without spaces). First, open the form in an Incognito browser tab.
Fill in all the required form fields and send a form. After submitting the form, you will see a block message about the block on the form submission.
If you have any questions, add a comment and we will be happy to help you.
Create your CleanTalk account – Register now and enjoy while CleanTalk protects your Ultimate Form Builder contact forms from spam.
Update
The protection works only for website visitors, not for website admins. Be sure to test the form protection using Incognito mode.
Additional features
CleanTalk protects all forms at once: comments, registrations, feedbacks, contacts, reviews.
Installation takes about 1-2 minutes.
Smart 99% protection against spambots.
Always online – 24/7 technical support.
Logs, personal lists, country filters, stop-words and many another.
A complete list of CleanTalk Anti-Spam plugin features can be viewed here.
If you prefer to use Smart Forms Contact Form, always be sure to use the most effective Anti-Spam plugin. Read the guide below and learn how CleanTalk protects your SmartForms contact forms from spam.
Once CleanTalk Anti-Spam plugin is installed it starts to protect all of the existing forms on your WordPress website. It may not only be Smart Forms Contact Forms but many others.
How to check your Smart Forms contact form are protected from spam
You can test the work of Anti-Spam protection for your Smart Forms Contact Forms by using a test email s @ cleantalk.org (without spaces). First, open the form in an Incognito browser tab.
Fill in all the required form fields and send a form. After submitting the form, you will see a block message about the block on the form submission.
If you have any questions, add a comment and we will be happy to help you.
Create your Cleantalk account – Register now and enjoy while CleanTalk protects your SmartForms contact forms from spam.
Update
The protection works only for website visitors, not for website admins. Be sure to test the form protection using Incognito mode.
Additional features
CleanTalk protects all forms at once: comments, registrations, feedbacks, contacts, reviews.
Installation takes about 1-2 minutes.
Smart 100% protection against spambots.
Always online – 24/7 technical support.
Logs, personal lists, country filters, stop-words and many another.
A complete list of CleanTalk Anti-Spam plugin features can be viewed here.
One of the most important things about protecting your website from hackers is understanding that one-time setting the security settings for your site is not enough. Taking care of your website protection is a permanent process like advertising or helping your clients with their issues.
Security tools for your website become stronger and more progressive every day but so do hacking technologies. The most simple way to find out if your site is in danger is to proceed through a complete WordPress security audit and figure out if your security measures are up-to-date.
If you do not go through a regular WordPress security audit every 3 months this may cause a breach in site security and your business can get a lot of damage.
But this risk can be avoided – just check if your security measures are up-to-date. In this instruction we will describe how to do a complete WordPress security audit to fully protect your website from hackers using standard security tools.
Sometimes the problem of security issues may be caused by missing security patch or update, some plugin vulnerability or a flaw in WordPress core that may result into a hack. Actually, only about 36% of users run up-to-date WordPress versions.
What is a WordPress Security Audit?
A WordPress security audit is a regular procedure that will inspect your website for different security vulnerabilities like weak admin passwords and outdated plugins. This audit also offers some steps for fixing these potential dangers.
Some website owners know how to perform a WordPress security audit but see it only as a one-time thing – it is a very popular mistake that may result in a threat to your site’s security. So it is highly recommended to perform the security audit of your WordPress site regularly to avoid hacker attacks and keep your website safe.
Without regular security audits performed your website becomes much more vulnerable to hacker attacks. You can use special WordPress plugins to automatically analyze and find security breaches for you. But vost security audits are performed manually by following 8 steps. Only several steps to find out how to perform WordPress security audit and fully protect your website from any attacks.
Why do you need a WordPress Security Audit?
Actually there is no magic about the main reasons to perform a WordPress security audit. In case you are a website owner and you don’t look after it’s security – no surprise it is vulnerable and can be hacked. It leads us to an easy conclusion that a security audit is necessary to find security breaches and vulnerabilities in your site until it becomes a problem. Without this procedure hackers may detect this vulnerabilities before your and so they can:
Hack your website;
Sell your and your client’s data via dark web;
Inject spam to your WordPress site pages so that will lead the website to search engine blacklist;
Steal your credit card info from your WordPress site that may result lawsuits and hefty fines against you;
Use your website to infect other users;
Many other bad things.
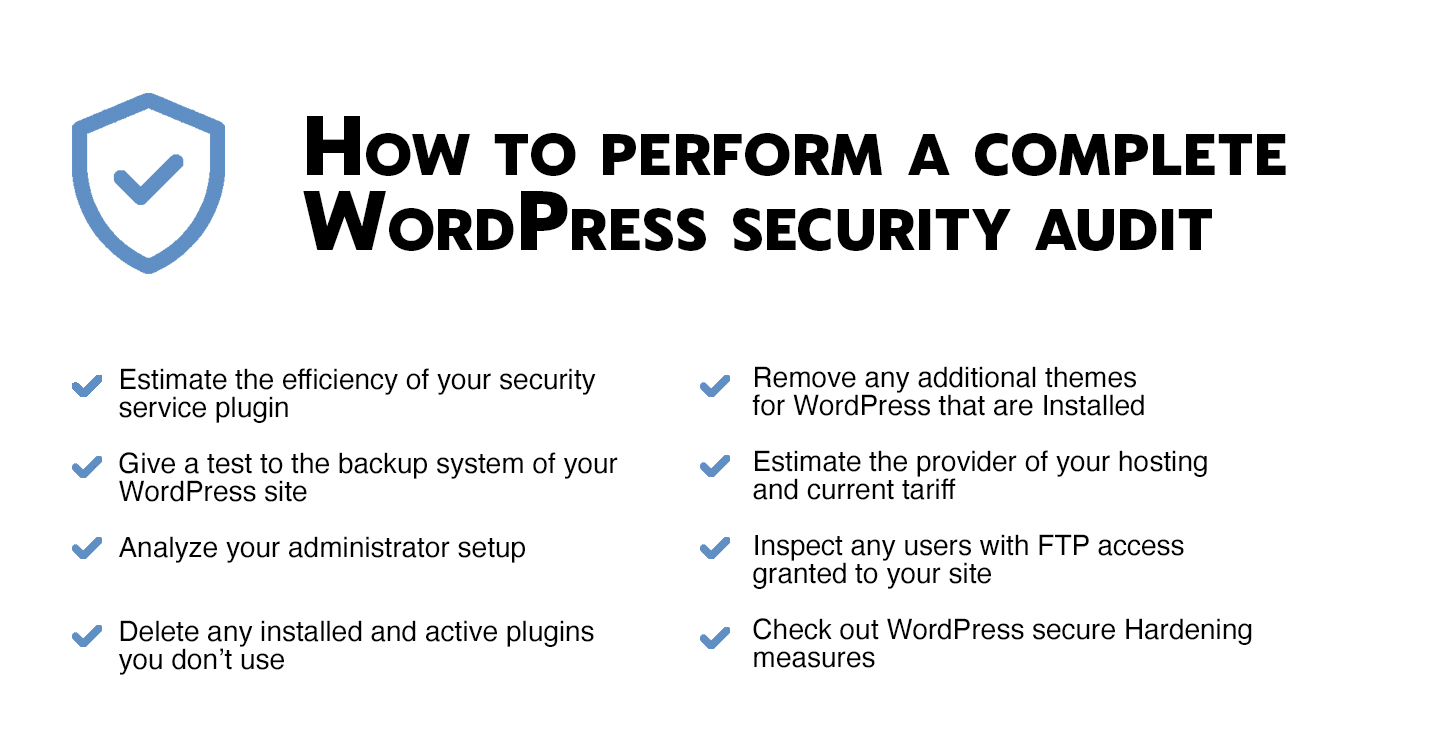
How to perform a complete WordPress security audit
1. Estimate the efficiency of your Security plugin
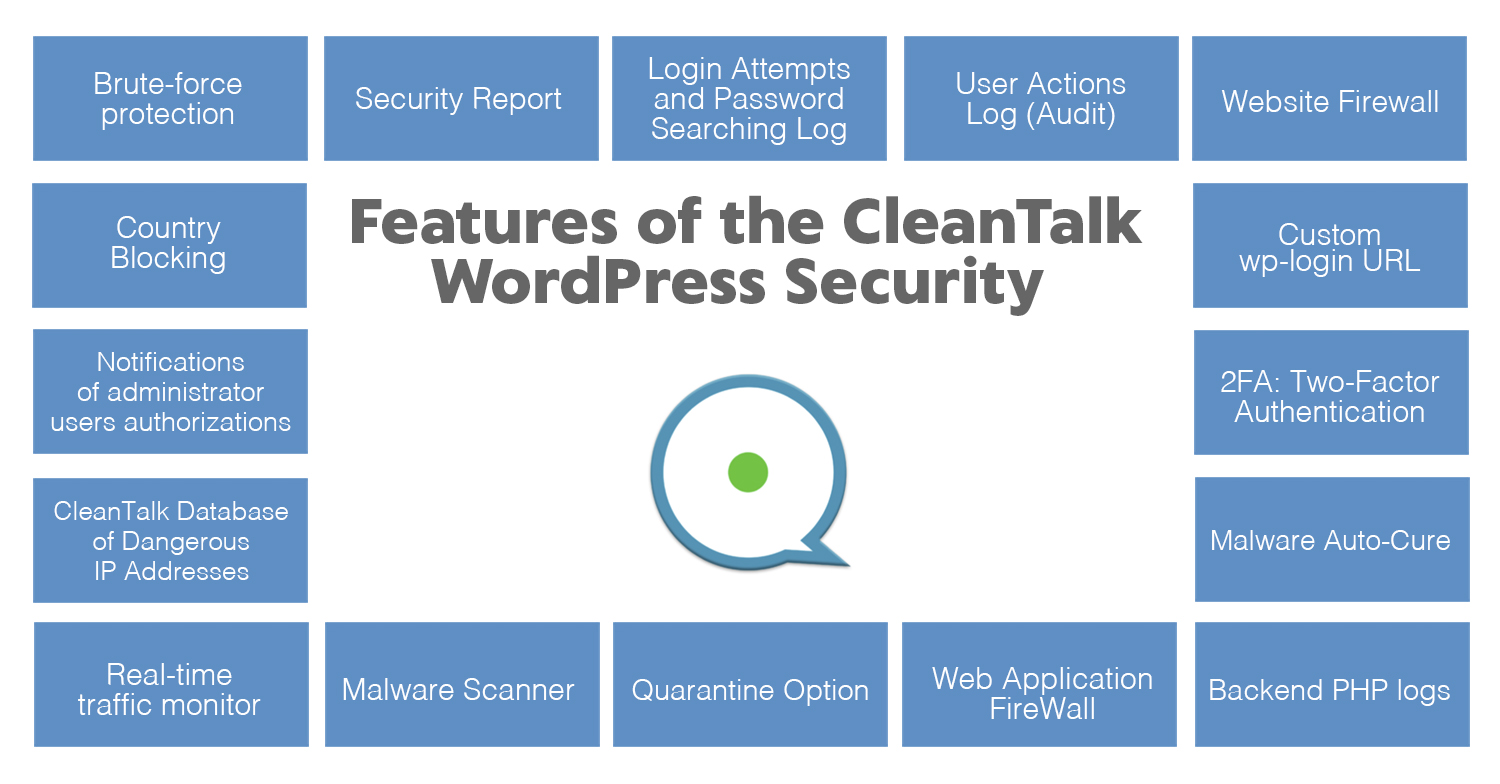
It all starts with your website’s security plugin. In case you still don’t use one, be sure to connect it and activate on your site as soon as possible. Security plugin protects all the WordPress sites from bots and hackers. Different security plugins offer various options to protect your site and not all of them guarantee a safe work for your website. When you choose a plugin during WordPress Security Audit, be sure it includes the following features:
Brute-force Protection Adds a delay of a few seconds for any failed attempt to login to the WordPress back-end. It makes your website security tougher and doesn’t waste the server’s resources on these IPs.
Daily Security Report Every day the plugin sends a Security report to your email. The report provides data on the number of incorrect password entries and the IP addresses from which they tried to sign in.
Login Attempts and Password Searching Log Security log keeps online a log of attempts to log in. Security log includes IP / Country / data / time, username and action result, was authorization successful or failed.
User actions log Keeps track of actions in the WP Dashboard to let you know what is happening on your site. With the Security Audit Log is very easy to see user activity in order to understand what changes have been done and who made them. Security Audit Log shows who logged in and when and how much time they spent on each page.
Security FireWall This option may significantly reduce the risk of hacking and reduces the load on your web server. Always use personal BlackList to block IP addresses with suspicious activity to enhance WordPress security. It also allows you to block access to your website by HTTP/HTTPS for individual IP addresses, IP networks, and e-mails.
Compatibility It should be compatible with the most popular VPN services and search engines like Google, Bing, Yahoo, Baidu, MSN, Yandex and etc.
Malware scan Scans WordPress files for hacked files or hacker code. Every day Malware Scanner will launch scanning automatically for files that have been changed from the last scanning or found new files. The scanner works in the background and doesn’t affect performance. All detailed results must be sent to your Security Dashboard so you are able to investigate them and see if those were legitimate changes or some bad code was injected. If any files were changed in your WordPress system you will be able to delete them or restore the original WordPress files.
We recommend using CleanTalk as it covers all these features. It has one of the best malware scanners that can detect any kind of malware. And more of that, you can clean up any malware infection in under a few minutes!
2. Give a test to the WordPress backup solution
In case something goes wrong with your website, having a backup may be very useful. You may get your site back to work with no problem. Any fail in a backup process may be critical and may cause a lot of trouble restoring your website.
That is the main reason you need to give a regular test for your site backup solution. Even if you use host backup it may not always include any test options.
So we recommend some actions to test your backup:
Go to your WordPress plugins page and install BlogVault backup plugin. This plugin automatically initializes a complete backup procedure for your site. If it is the first backup it may take a bit more time as it will copy the whole site to it’s servers. After that every backup will copy only files that were changed from the previous backup process.
After completing the backup, the option “Test Restore” will appear in the BlogVault dashboard.
After it is done the system will notify you about a successful restore.
3. Analyze your administrator setup
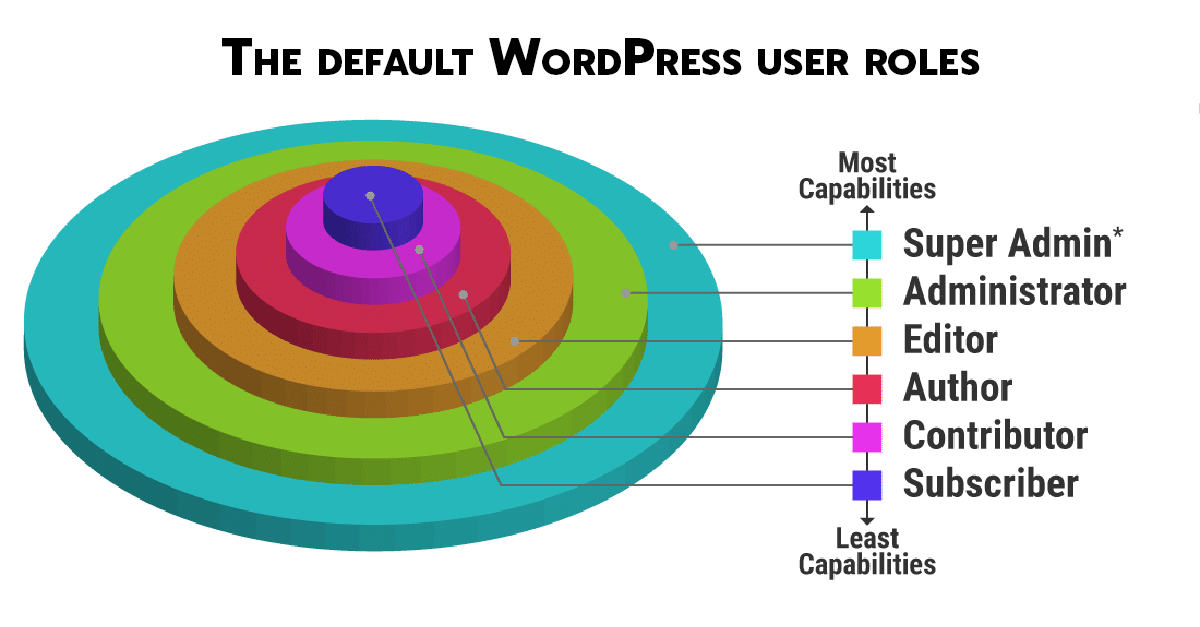
WordPress has a smart system of user access options to let them collaborate and work together to be more efficient themselves and WordPress maintenance and development. Though not all WordPress users need to have complete access to your website. For example, a person who writes news, articles, and other materials only needs access to writing and publishing content. They don’t need to have access to other website options like managing plugins and changing WordPress themes.
In order to avoid giving complete access to every website user WordPress has 6 different user roles that can be assigned to them:
Super Admin
Administrator
Editor
Author
Contributor
Subscriber
Each role has different levels of permissions for your website.
While providing your WordPress Security Audit one of the first things you should do is to check all of the users who are added to your WordPress.
Be sure to recognize all of the users on your dashboard. If you don’t recognize any of them – you should immediately delete this user because it may be created by hackers.
Check the number of users who have admin access to your site.
Decide how many of them really need that access level.
Change roles for users and lower permissions for those who doesn’t need that access level.
After that ensure that none of your website administrators uses the “admin” username. This is the most popular username for all of the administrators. Hackers know about this and may obviously try to use it to get access to your website.
If you decide to change the admin name you have to create another user account for that person. After that, you have to grant all the content access to this new user. And finally, just delete the old admin account.
Another important thing for you to protect your admin setup from hackers is hiding your admin’s username. If you leave settings unchanged it may cause some troubles.
All of the hackers know that the only thing that should be done to retrieve your most likely admin username is to add ?author=1 at the end of your URL. It is how easily hackers can brute force a website’s admin panel after they know the admin’s username.
The easiest way to avoid it is to hide all usernames with code in functions.php file:
add_action(‘template_redirect’, ‘bwp_template_redirect’);

function bwp_template_redirect()
{
  if (is_author())
  {
    wp_redirect( home_url() ); exit;
  }
}
If you use the CleanTalk Security plugin it already has a special field that automatically hides all of the usernames on your site.
This may seem a very easy step but it also makes a hacker’s work more difficult.
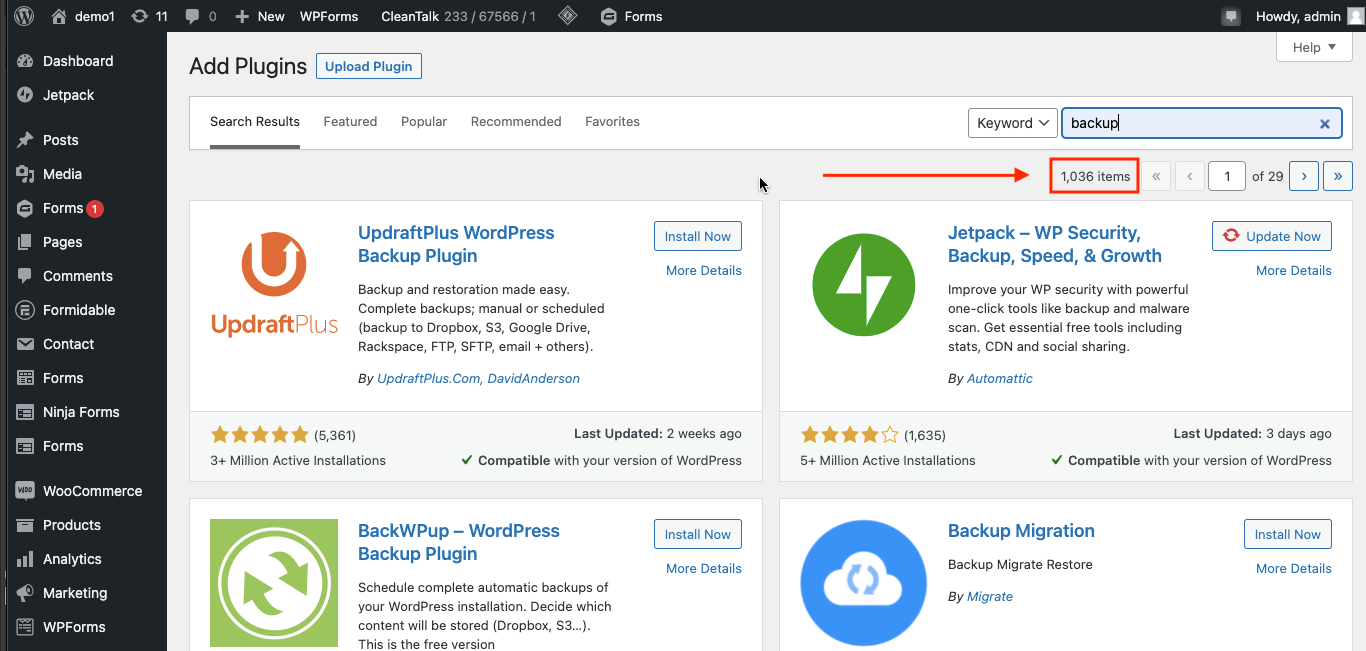
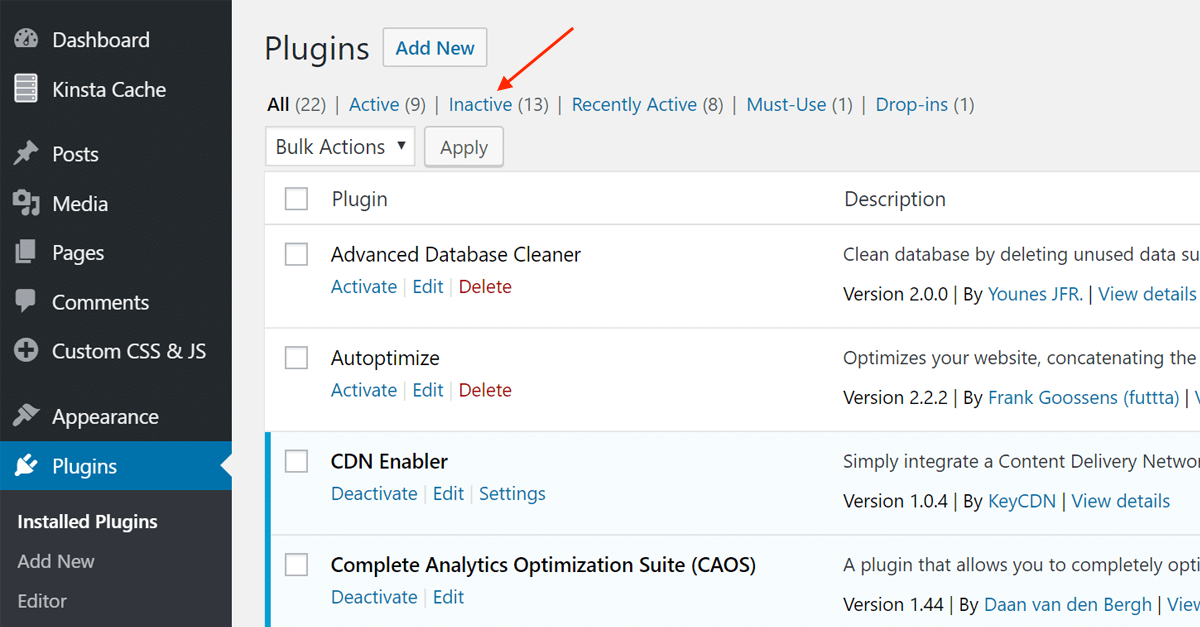
4. Remove unused plugins installed and active
Different WordPress plugins are one of the most vulnerable places on your website. It may be the main reason for you site to be hacked.
WordPress plugins are always created, maintained, and updated by their developers. But like any other software, these plugins may have vulnerabilities. So developers always fix these vulnerabilities and release updates. When you download this update it removes vulnerability from your website.
But in case you skip or delay downloading the newest update your site may remain vulnerable.
Do you still use these plugins? While performing a complete WordPress Security Audit check the list of plugins that are installed in your WordPress. In case you already don’t use them, they still have access to your website. So, at first, delete the plugins that you don’t use. It should reduce the chance of being hacked using one of them.
Do you recognize all of the plugins? In case you and your colleagues do not recognize some of your plugins it would be better to delete them. It is because when hackers break into your site they may install their own plugins that can cause even more damage as they contain backdoors which actually is a secret access to your website.
Do you have any nulled version or pirated plugins? If yes, then you should delete them at once. Hackers often use pirated software to spread their malware. Any quantity of such malware is contained in these plugins and it may infect your website at the moment you install the plugin.
From the moment you left only the plugins you use, be sure to update them right after developers release updates.
5. Remove any additional themes for WordPress that are Installed
A complete WordPress Security Audit is also about themes. It is no surprise that all the WordPress site owners install different themes in order to find the ones that they like. Favorite themes are used but others are often But most of these users don’t know that just like plugins, themes may contain different vulnerabilities.
Our recommendation is to delete all the themes except the one you already use. Also, be sure you use the most up-to-date version available of your active theme.
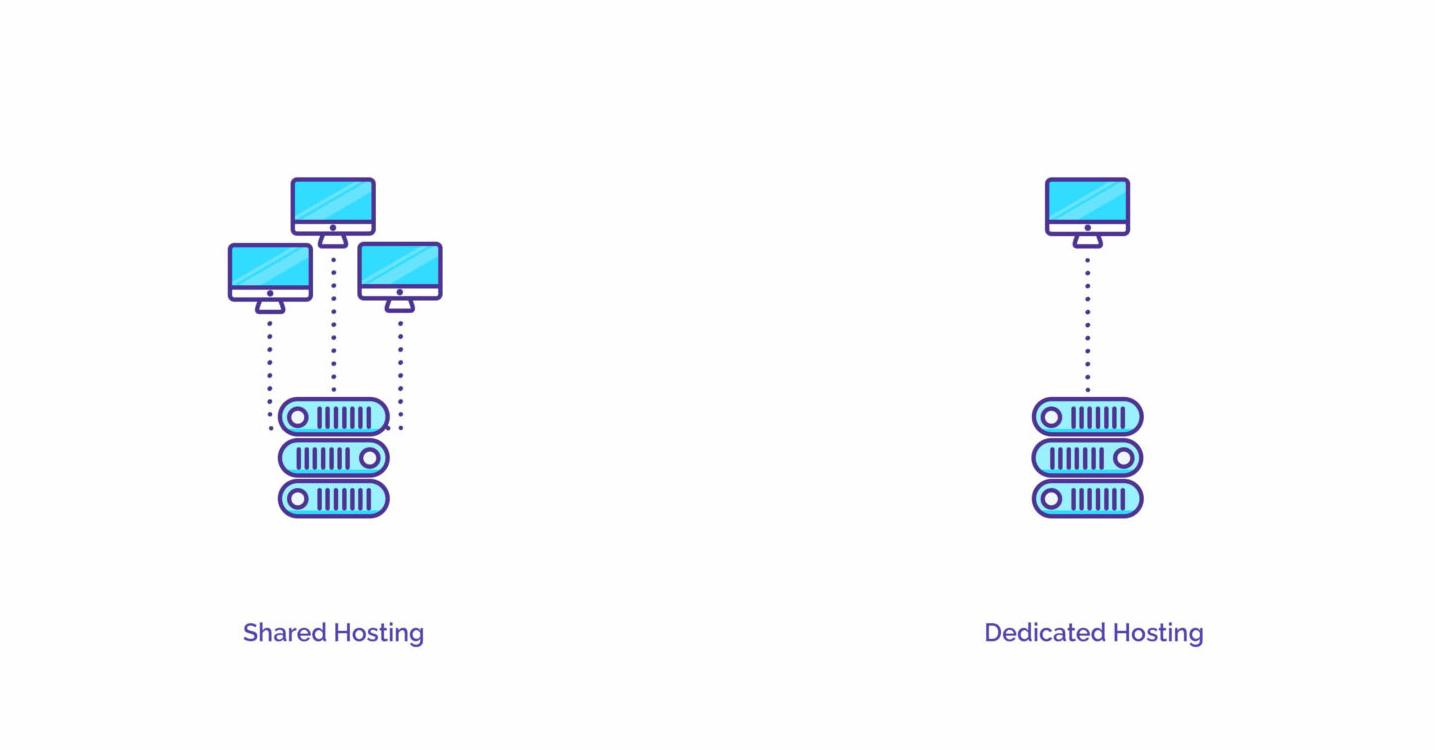
6. Estimate the provider of your hosting and current tariff
Nowadays you can create a website without serious money investment. Shared hosting allows you cheaper plans for small WordPress sites. Also hosting is an important part of a proper WordPress Security Audit.
But everything has its pros and cons. Shared hosting means that you share a server with other users and sites. It is out of your vision what happens with other websites on your hosting. If someone other’s website was hacked it may consume a large amount of server’s resources. It may obviously slow down your website and lower its performance.
That is also a slight chance of a malware infection will spread to different websites on the same hosting. So if you can afford to switch to a dedicated server – it will be our recommendation to do so – to evaluate your hosting plan. In case some hosting doesn’t fit you well, you may look through a better one, comparing some of them that cost your attention.
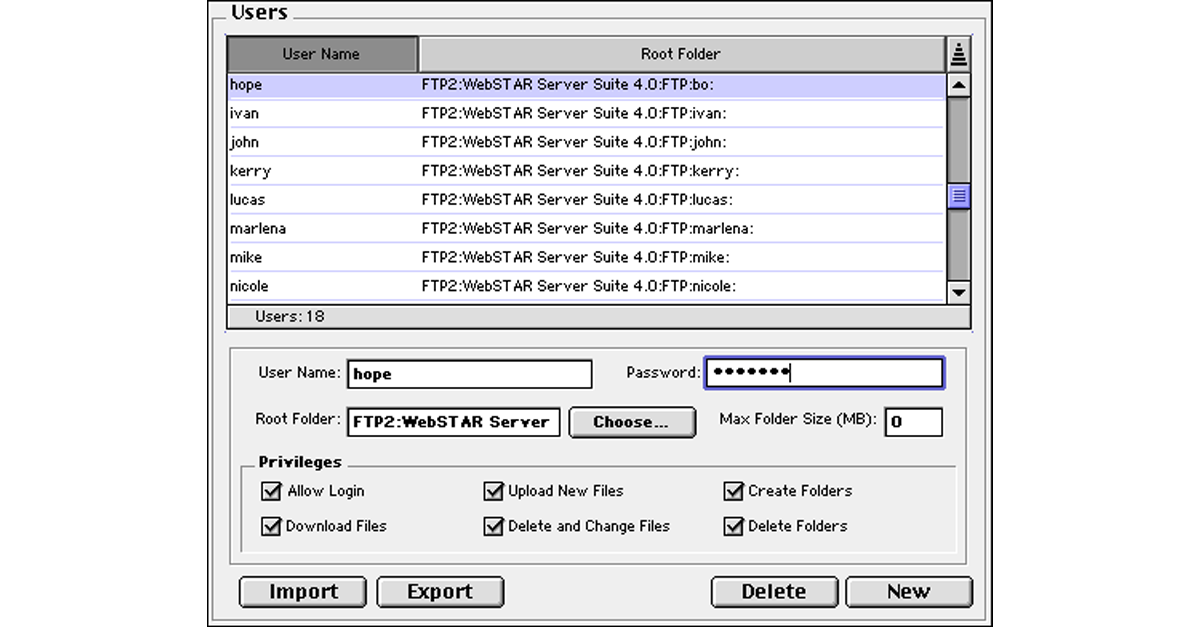
7. Inspect any users with FTP access granted to your site
As you already know FTP is a File Transfer Protocol. It provides your computer to your site on the server. Using FTP you may access all the website folders and files and change them.
As FTP has almost full control of your website you should be very careful and grand that kind of access to only users that you trust the most and only in case they really need that access.
In order to increase the protection of your website we strongly recommend you reset FTP passwords if necessary and check the list of your FTP users. You can make it if you go to your hosting account → cPanel → FTP accounts.
Check all the users in this list and just delete the ones you already do not need.
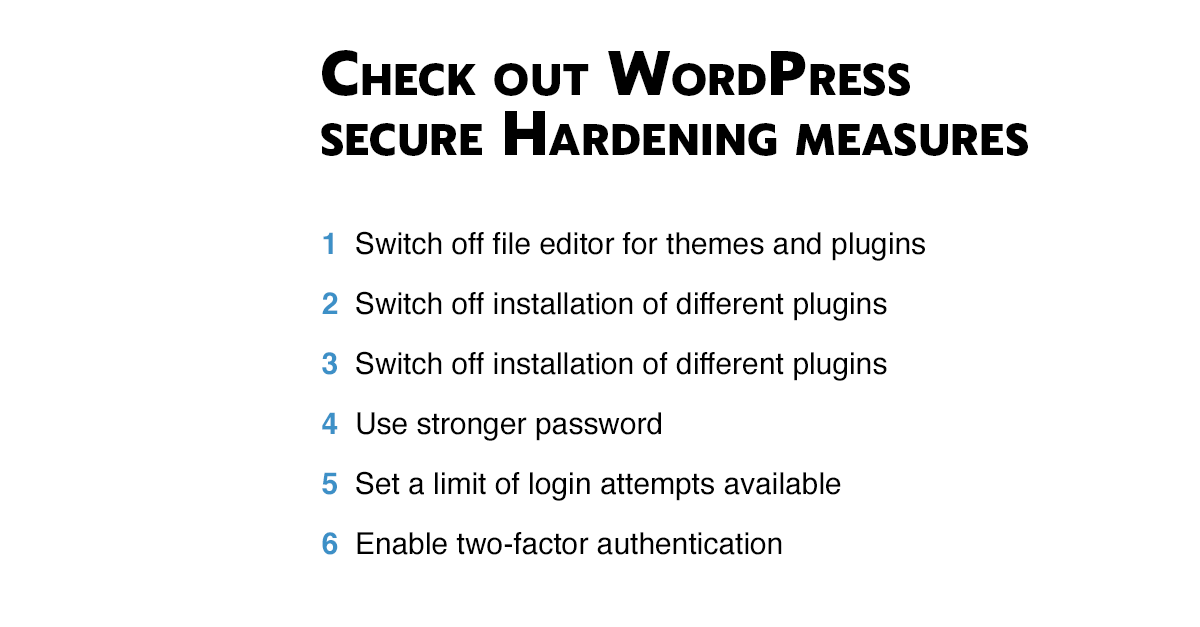
8. Check out WordPress secure Hardening measures
While providing a WordPress Security Audit there are several recommendations for your WordPress site to become more secure. What are these steps:
Switch off file editor for themes and plugins
Switch off installation of different plugins
Reset salts and keys on your WordPress website
Use stronger password
Set a limit of login attempts available
Enable two-factor authentication
Also we strongly recommend giving these steps a regular test. For example, if you use a two-step authentification or login attempts limit – be sure to use the actual up-to-date plugin. Or if it is not so, just switch to another solution that is updated more often.
Some of these hardening steps need some skill for the appliance. Or in case you use the CleanTalk Security plugin most of these features are enabled in a few seconds.
Conclusion
After reading this article you know how to perform a WordPress Security Audit by yourself. Just be sure to deal with all of these 8 steps and you will prevent most of the bad things that could happen with your website.
For example, if you will regularly check your site backup system and will be sure that it works well, you will avoid a lot of troubles in case of a security breach or something more serious happens to your website.
The process of Security audit involves a lot of steps and takes some skill and time. But some of the most important processes are just about keeping all the components of your website up-to-date, being sure that your login page is well-protected, and using very strong passwords.
So in the cost of a few hours spent for this WordPress Security Audit, you can avoid a lot of security issues and guarantee the best protection for your website.
In case you use both CleanTalk Anti-Spam and Follow.it Subscription Form simultaneously it becomes impossible to protect this form. It happens because the form itself is external and the data doesn’t go to the site itself, but is sent to an external resource and will not be possible to check it.
So in order to avoid conflicts between services, it is necessary to exclude the page from CleanTalk plugin protection. And that’s how you can do it:
How to exclude your URL from anti-spam check
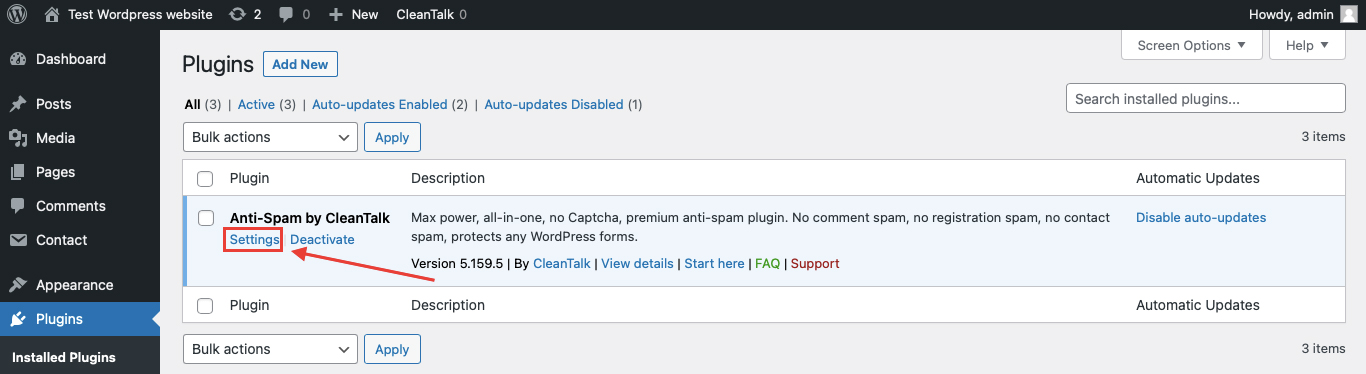
Step 1: Go to Plugins → Installed Plugins.
Then go to the Settings link next to CleanTalk Anti-Spam plugin.
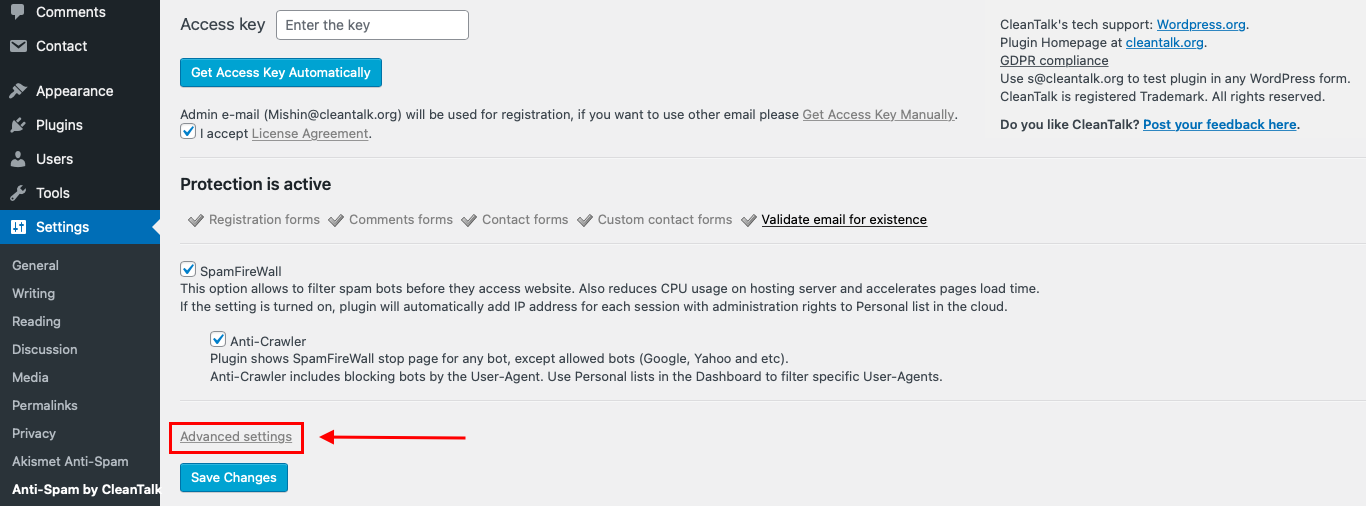
Step 2: Click on the «Advanced settings» button at the bottom of the screen. More settings will appear.
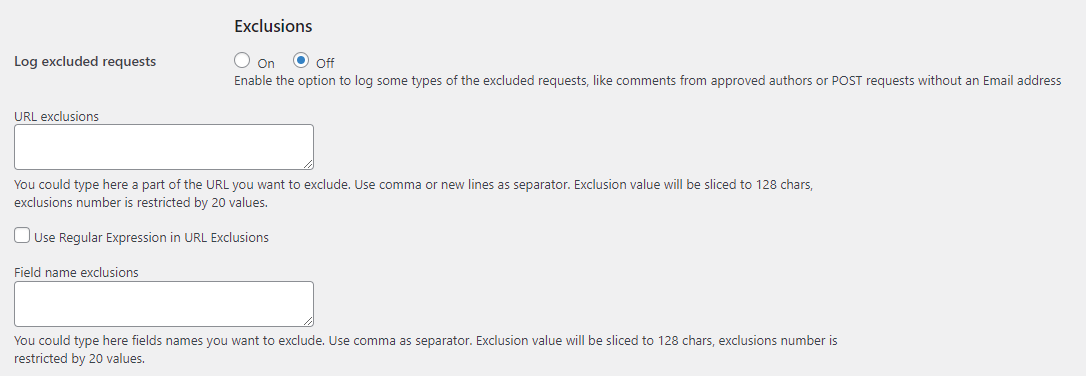
Step 3: Find the «URL exclusion» field in the Exclusions section and input your URL (or several URL’s) into it.
Step 3: Then just press the «Save changes» button.
Done! From that moment there should be no problems with checking your form.
If you have any questions, add a comment and we will be happy to help you.
Update
The protection works only for website visitors, not for website admins. Be sure to test the form protection using Incognito mode.
In case you use NEX Contact Form in your WordPress site be always sure to use proper anti-spam plugin to protect it. For example, CleanTalk Anti-Spam grants absolute spam protection for your NEX Contact Form.
Once CleanTalk Anti-Spam plugin is installed it starts to protect all of the existing forms on your WordPress website. It may not only be NEX Contact Forms but many others.
How to check spam protection for your NEX Contact Form
You can test the work of Anti-Spam protection for your NEX Contact Form using a test email s @ cleantalk.org (without spaces). First, open the form in an Incognito browser tab.
Fill in all the required form fields and send a form. After submitting the form, you will see a block message about the block on the form submission.
If you have any questions, add a comment and we will be happy to help you.
Create your Cleantalk account – Register now and enjoy your spam-free NEX Contact Form using.
If you prefer to use 10Web Contact Form, always be sure to use the most effective Anti-Spam plugin. Read the guide below and learn how to prevent getting spam via 10web Contact Form in 5 minutes
Once CleanTalk Anti-Spam plugin is installed it starts to protect all of the existing forms on your WordPress website. It may not only be 10Web Contact Forms but many others.
How to check your 10Web Contact Form spam protection in about 5 minutes
You can test the work of Anti-Spam protection for your 10Web Contact Forms by using a test email s @ cleantalk.org (without spaces). First, open the form in an Incognito browser tab. Fill in all the required form fields and send a form. After submitting the form, you will see a block message about the block on the form submission.
If you have any questions, add a comment and we will be happy to help you.
Create your Cleantalk account – Register now and enjoy while CleanTalk Anti-Spam plugin protects your 10Web Contact Forms from spam.
Update
The protection works only for website visitors, not for website admins. Be sure to test the form protection using Incognito mode.
Additional features
CleanTalk protects all forms at once: comments, registrations, feedbacks, contacts, reviews.
Installation takes about 1-2 minutes.
Smart 100% protection against spambots.
Always online – 24/7 technical support.
Logs, personal lists, country filters, stop-words and many another.
A complete list of CleanTalk Anti-Spam plugin features can be viewed here.
Contact Form by BestWebSoft is a good choice. But you must be sure to use the most effective Anti-Spam plugin to protect it. For example, CleanTalk Anti-Spam will guarantee your Contact Form by BestWebSoft spam protection.
Once CleanTalk Anti-Spam plugin is installed it starts to protect all of the existing forms on your WordPress website. It may not only be Contact Forms by BestWebSoft but many others. Read the post below and uncover How to protect your Contact Form by BestWebSoft from spam in 5 minutes.
How to check your Contact Form by BestWebSoft spam protection in about 5 minutes
You can test the work of Anti-Spam protection for your Contact Form by BestWebSoft using a test email s @ cleantalk.org (without spaces). First, open the form in an Incognito browser tab. Fill in all the required form fields and send a form. After submitting the form, you will see a block message about the block on the form submission. And that’s how to protect your Contact Form by BestWebSoft from spam in 5 minutes.
Update
The protection works only for website visitors, not for website admins. Be sure to test the form protection using Incognito mode.
If you have any questions, add a comment and we will be happy to help you.
Create your Cleantalk account – Register now and enjoy your spam-free Contact Form by BestWebSoft using.
Update
The protection works only for website visitors, not for website admins. Be sure to test the form protection using Incognito mode.
Landing Page Builder Contact Forms is a good choice when you need to use contact form for surveys, quizzes and many others. Always be sure to use the most effective Anti-Spam plugin. CleanTalk Anti-Spam ia an all-in-one plugin for your Landing Page Builder Contact Forms spam protection.
Once CleanTalk Anti-Spam plugin is installed it starts to protect all of the existing forms on your WordPress website. It may not only be Landing Page Builder Contact Forms but many others.
How to check your Landing Page Builder Contact Forms spam protection in about 5 minutes
You can test the work of Anti-Spam protection for your Landing Page Builder Contact Forms by using a test email s @ cleantalk.org (without spaces). First, open the form in an Incognito browser tab.
Fill in all the required form fields and send a form. After submitting the form, you will see a block message about the block on the form submission.
If you have any questions, add a comment and we will be happy to help you.
Create your Cleantalk account – Register now and enjoy while CleanTalk Anti-Spam plugin protects your Landing Page Builder Contact Forms from spam.
Update
The protection works only for website visitors, not for website admins. Be sure to test the form protection using Incognito mode.
Additional features
CleanTalk protects all forms at once: comments, registrations, feedbacks, contacts, reviews.
Installation takes about 1-2 minutes.
Smart 100% protection against spambots.
Always online – 24/7 technical support.
Logs, personal lists, country filters, stop-words and many another.
A complete list of CleanTalk Anti-Spam plugin features can be viewed here.