One of the unique features of CleanTalk Anti-Spam is the logging of all requests. Unlike other anti-spam solutions, where forbidden requests just disappear and you don’t even know about them, you have the opportunity to view and analyze data, both on forbidden and allowed queries. This allows you to save data, even if they were accidentally deleted from the mail or admin site.
What features provide Anti-Spam Log
First, it allows you to see all requests in one place for analysis and informativeness.
Secondly, it allows you to give feedback in the case of a false blocking of a request.
Anti-Spam Log page
You can use this link to go to your anti-spam log.
https://cleantalk.org/my/show_requests

Consider the possibilities in more detail on the points:
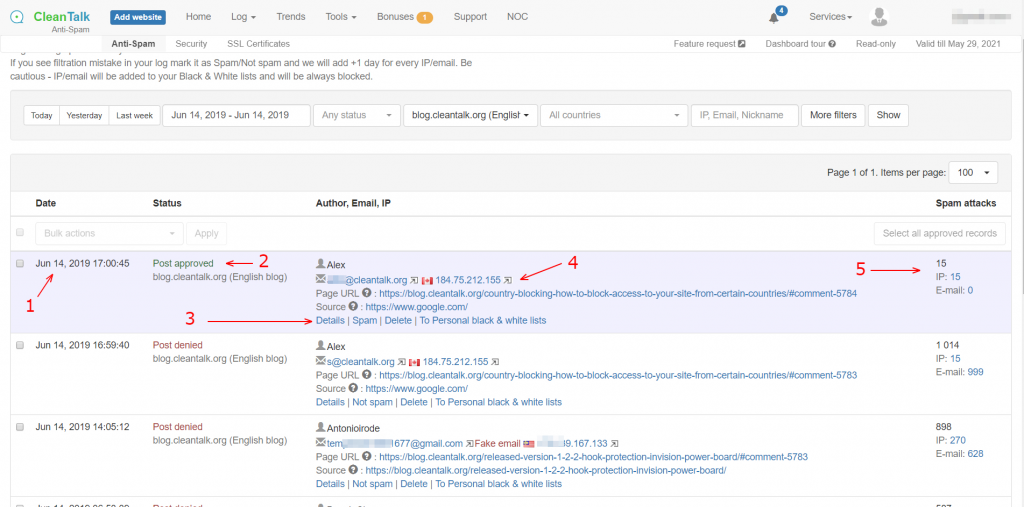
- Date and time of the request
- The status of the request indicates whether the request was blocked or approved by the service and the address of the site on which the event occurred.
- Additional menu request management includes:
3.1. View the request details. This item will be discussed in more detail below.
3.2. Feedback button. Allows you to inform the service that this request was processed incorrectly.
If the request was mistakenly blocked, you can mark it as Not Spam, in this case, the IP and Email address of the sender will be added to your personal whitelist.
If the request was incorrectly allowed, you can mark it as Spam, in this case, the IP and Email address of the sender will be added to your personal blacklist. How to use Personal Blacklist.
CleanTalk analyzes user feedback to improve the service. The reasons for erroneous requests can be:
– on the website page there are JS errors that may interfere with the normal execution of the code
– outdated version of the plugin
– the plugin receives incorrect data from the web form due to problems with integration
In any case, you can contact our technical support for advice. - IP and email address of the sender. Clicking on the links, you can see the data on the spam activity of these addresses according to the blacklist database.
“Page URL” is the address of the page of the site where the request was placed.
“Source” – the source from which the user navigated to your site. - This section shows spam activity statistics for the sender’s IP and email address. Without going to other pages, you can see data on the number of spam requests that were detected by CleanTalk on other websites
Now let’s take a closer look at the Details link.
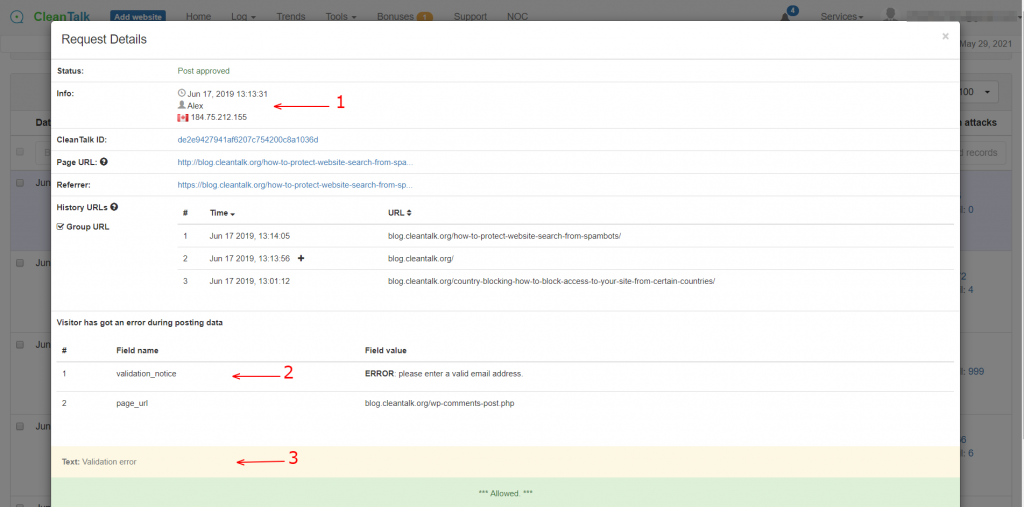
- The request status is Denied or Allowed. A request is when a visitor submits a completed form on a website, such as Comment/Registration/Contact form.
- Sender’s data: date/time, nickname, email and IP address.
- Request ID, this is service information.
- The URL of the page of the site on which the request was made.
- The previous page of the site from which the user went to the page on which the request was made (Comment / Registration / Contact form).
- The source from which the user came to your site, if it was a Google search, the source will be www.google.com If this is a direct entry to the site, it will be unknown – since in this case, it is impossible to determine exactly. Only for WordPress Plugin.
- URL grouping, this option only works for WordPress and with the Store visited URLs option enabled. If you enable this option in the CleanTalk Anti-Spam settings, the plugin will collect data on the last 10 pages that the user visited before sending the request. Pages are grouped by opening time. And you can always know which pages/information motivated the user to subscribe / register or other actions.
- The text of the comment/contact form.
- The result of the anti-spam check and the reason for blocking. In this case:
– Sender’s IP or email are blacklisted and have high spam activity (*@cl*******.org is a test email for testing)
– Private list deny is blocking by personal blacklists, in this case it was blocking by blacklist Stop Words, the word “test” is in the blacklist. - Feedback button, you can mark the request as Not Spam or Spam.
One of the features of CleanTalk Anti-Spam is the processing of a user’s request even if he filled out the form incorrectly, for example, he made a mistake in the email address. In this case, the form will give an error message that the form is filled in incorrectly. Some users do not pay attention to this and believe that the information they sent and leave the site, while the information is lost, because it does not fall into the backend of the site. CleanTalk allows you to view such a request and message text in the dashboard. CleanTalk transfers the completed form fields, which can be viewed in the Info field.
Look at the screenshot

- Since this is a comment form and there is no email address in the request, this means that this form was filled out incorrectly and the email address was specified with an error.
- Antispam plugin for WordPress, Drupal 7, Drupal 8, Bitrix is able to intercept errors that the form gives and these errors can be viewed in the request. Notice: this functionality is not supported for all forms since there is not always a technical possibility for this.
- The text that was sent by the user.
What to do if you do not want to transmit or store information.
- You can prohibit the storage of approved requests. Learn more.
The approved requests will be scanned for spam, but no information about them will be saved. - You can add site pages to exclusions for anti-spam checks. In this case, antispam protection will not work on these pages.
- You can add form fields to exceptions, these fields will not be processed by the antispam service.
- You can delete information at any time on any request in the dashboard of the site.
If you have any questions, you can ask them in the comments or create a personal ticket, we will always be happy to help you.

Leave a Reply