- Protection against brute-force attacks is essential to prevent unauthorized access to systems and accounts. Brute-force attack is a method where attackers sequentially try all possible combinations of account passwords and sometimes gain access to the system. The CleanTalk plugin has options such as:
1.1. Number of unsuccessful authorizations before blocking occurs.
1.2. Lockout time of the visitor which is the time period between login attempts.
1.3. Time period the IP will be blocked for when the limit of unsuccessful authorizations is reached. - User Actions Log is designed to track user actions in the WordPress Dashboard and ensure security. It allows you to record and display user actions in real time, to see which pages of the website backend and at what time they were visited. This tool is useful for detecting and preventing hacking attempts, unauthorized access, and other suspicious activities on the website.
- Security Firewall is designed to block access to the site under certain conditions:
3.1. CleanTalk Database of Dangerous IP Addresses is being used to block access to the site for those IP addresses that have already participated in hacking attempts into other sites.
3.2. Your Personal Lists of IP Addresses is being used to block access to the site.
You can add custom IP addresses, networks, and countries on your CleanTalk Dashboard.
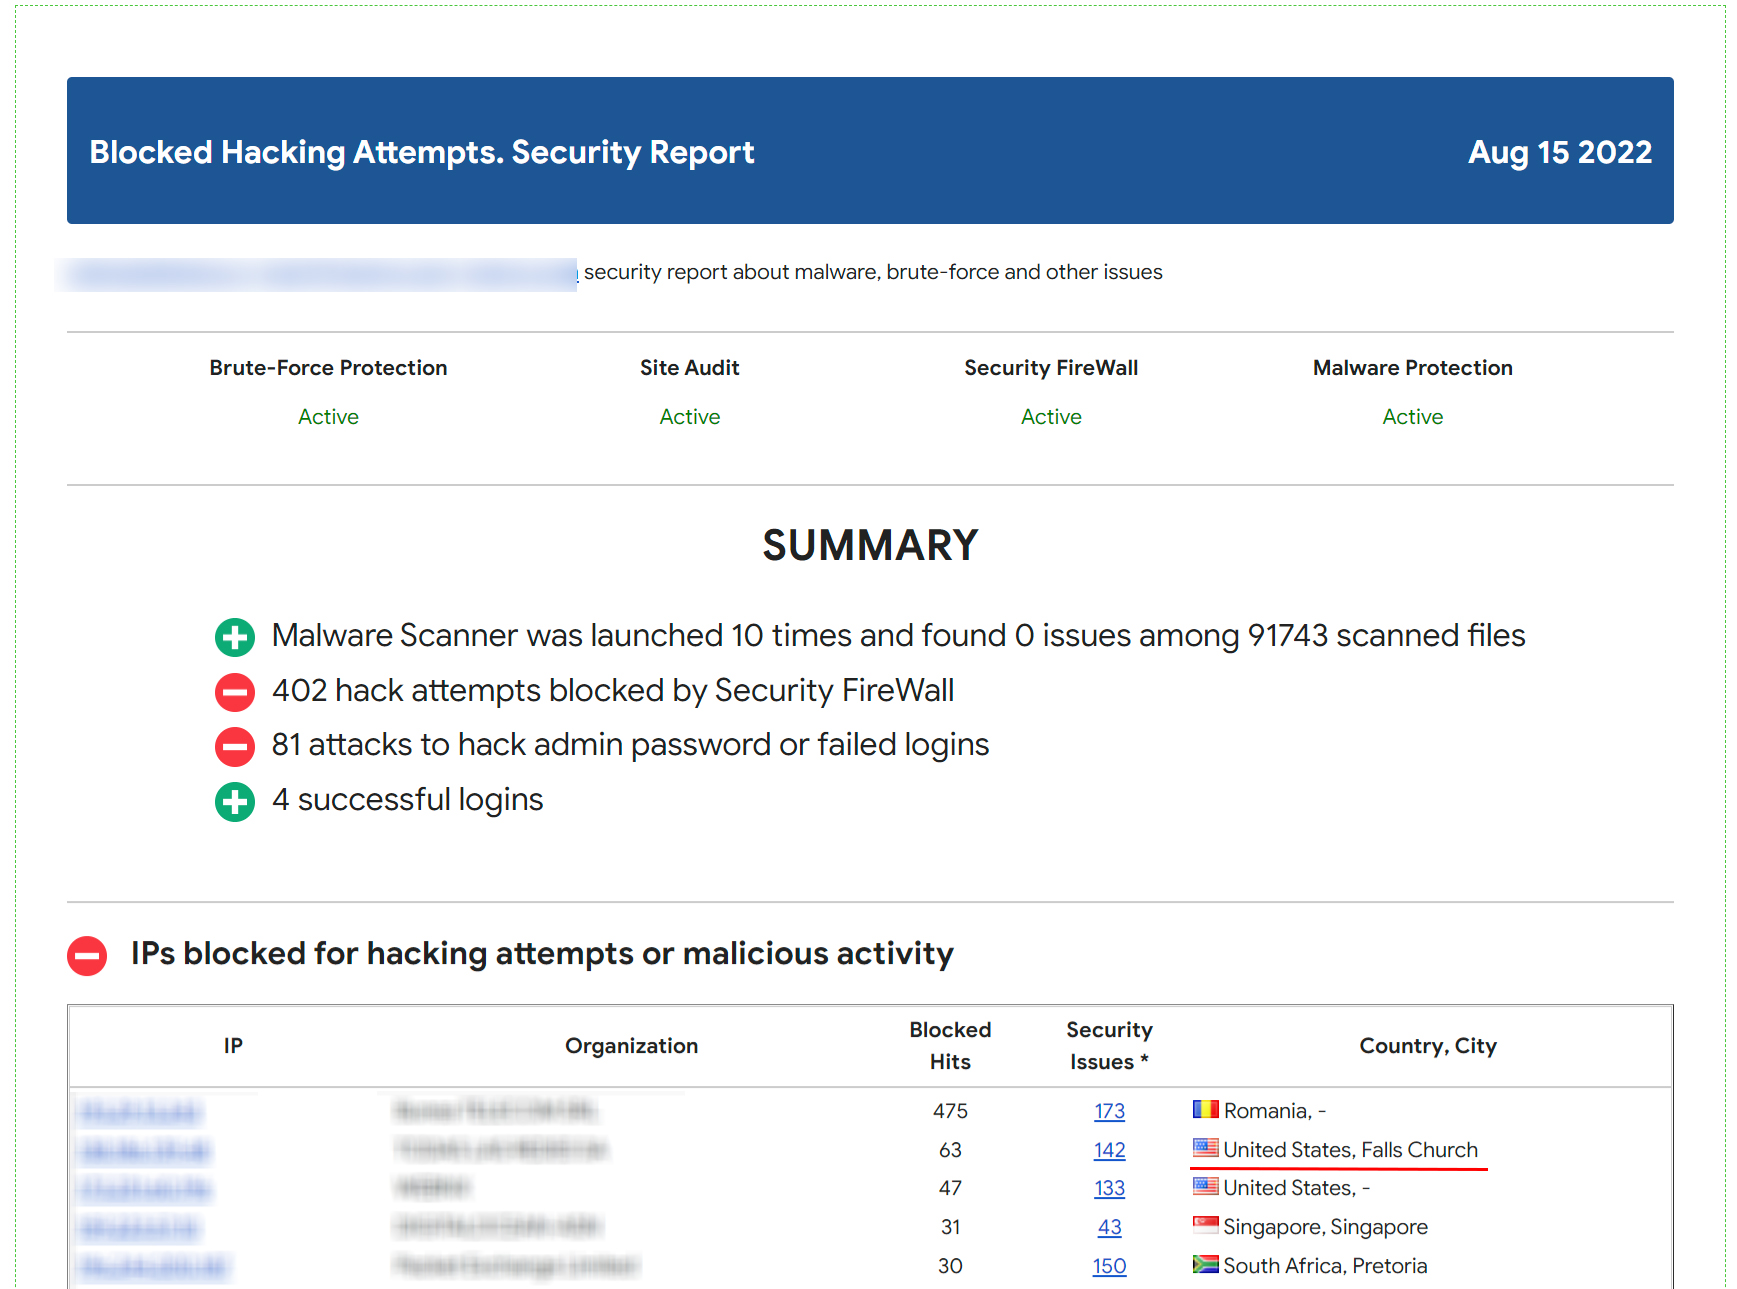
Visitors that were blocked by the Security FireWall will not be able to pass it and get to your site. - Security Report provides a summary of how the plugin works on your websites. The report is being sent once a week to your email address and provides the following statistics:
4.1. Blocked requests in Security FireWall
4.2. Number of brute-force attempts
4.3. Successful admin logins
4.4. Malware scanner statistics - The option “Notifications of administrator users authorizations” sends you a notification by email every time you successfully log in with an administrator account. This allows you to quickly receive information about unauthorized users.
- Real-Time Traffic Monitor feature provides you with real-time traffic information on your website. It helps you in tracking visitors activity and detect potentially malicious traffic — these can be password cracking attempts, SQL injections, DDOS attacks, and other threats.
The feature also allows you to see bots activity on your site. Bots can have different intentions, but it’s important to be able to distinguish real users from automated bots. You can view the list of bots and take action to block unwanted activity.
You can see data such as IP address, location, country, and other information that will help determine if a visitor is a suspicious or unwanted bot. It will also help you make the appropriate security settings.
The feature works In real time, meaning you can see the activity immediately without a delay. You can view the current users on the site, as well as which pages or sections of the site are currently being viewed. - Malware Scanner is one of the features of the CleanTalk Security Plugin for WordPress that is designed to detect and remove malicious code on your website.
Daily automatic site scanning. The plugin scans your site once a day and you will receive up-to-date information about your site cleanness. You can choose the time period for the automatic site scanning — every 12 hours, 24 hours, 3 days, 7 days, 14 days, or every 30 days.
The Malware Scanner feature analyzes all files on your site, including the WordPress core files, themes and plugins. It looks for vulnerabilities, malicious scripts, and other suspicious elements that may be related to malicious code.
When Malware Scanner detects malware or suspicious files, it alerts you instantly via email. You will receive a detailed report of the found threats, including the file names. This will help you quickly respond and take necessary actions to remove malware.
Automatic Malicious Code Removal: The CleanTalk Security Plugin for WordPress provides this feature to automatically remove malicious code. If there is a known signature for the detected malicious code, the file will be disinfected automatically. - The option “Collect and send PHP log” allows you to automate the process of checking your PHP logs for errors that occur while your site is running. Errors could appear for a short period of time and only when one specific function is running, they can’t be spotted in other circumstances so sometimes it’s hard to catch them. The CleanTalk Scanner will check your website backend once per hour. Statistics of errors are available in your CleanTalk Dashboard.
- 2FA: WordPress Two-Factor Authentication is a tool to provide an additional level of security for the website administrator account.
The main purpose of 2FA is to protect user accounts from unauthorized access, even if an attacker knows the user’s password.
When a user enters their password to log into their WordPress account, 2FA requires them to provide a second authentication code. The code is being sent to the WordPress account email address.
The CleanTalk Security plugin allows administrators to set up 2FA for various user roles. So they can grant 2FA to certain groups of users.
The option “Custom WP-Login URL” in the CleanTalk Security Plugin for WordPress allows you to change the default login URL of your WordPress Dashboard (wp-login.php). This is useful for several reasons:
• Protection against brute-force attacks: Changing the login URL of the admin panel makes it less predictable and harder for attackers to determine. Most brute-force scripts and bots look for the standard URL, so using a custom URL improves security.
• Hiding the fact that WordPress is being used: Many hackers and attackers specifically look for sites built on WordPress in order to gain access to them. Changing the login URL makes your site less vulnerable for attacks that are being made by the principle “Default WordPress Login URL Search” .
• If you use a custom login URL, this may be more memorable and convenient for you. You can choose an URL that is easy to remember or related to your brand.
• Prevent spam and DDoS attacks: Changing your login URL can help you prevent spam bots and DDoS attacks that often target a standard URL. This can significantly reduce the amount of unwanted activity and improve the performance of your site. - The option “Prevent collecting of authors’ logins” in the CleanTalk Security Plugin for WordPress is an additional tool to protect your site from malicious attacks and unauthorized access.
One of the most common ways of attacking websites is by attempting to hijack the accounts of the administrator or content authors. A hacker can use various methods to gain access to usernames and passwords and use them for malicious purposes such as injecting malicious code, modifying website content, and even stealing user data.
The option in the CleanTalk Security Plugin can greatly reduce the risk of such attacks. This feature allows you to hide the names of your authors (logins) from public view on the site, storing them in the database for administrative access only.
Firstly, it will prevent attackers from accessing authors’ data, which will significantly complicate the hacking process. Secondly, the site will look more secure and inaccessible to hackers. Thirdly, using this option reduces the likelihood of data leakage and privacy violations. - The option “Disable XML-RPC” in the CleanTalk Security Plugin is an important step to increase security and prevent potential attacks on your site.
XML-RPC is a protocol that allows you to remotely interact with your WordPress site. It was created to facilitate data transfer and information exchange with other platforms. However, due to several vulnerabilities, XML-RPC can become an entry point for hackers.
One of the main reasons for disabling XML-RPC is the possibility of an attack called brute-force. This attack involves attempts to forcefully input different random passwords for administrative accounts in a rapid succession. XML-RPC, by its very nature, allows attackers to carry out such attacks because it allows iterative validation of multiple passwords without restrictions. Disabling XML-RPC greatly reduces the risk of such attacks and prevents unauthorized access to your site.
In addition, XML-RPC can also be used to carry out DDoS (Distributed Denial of Service) attacks. Attackers can use XML-RPC to send a large number of requests to your site at the same time, which can lead to server overload and temporary site denial of service. Disabling XML-RPC protects your site from such attacks and helps keep it running for your visitors.
Disabling XML-RPC in WordPress is quite simple. You can do this with the CleanTalk Security Plugin and enable the option “Disable XML-RPC”. It is recommended to disable XML-RPC unless you are using it to communicate with other platforms or services. - The option “Disable REST API for non-authenticated users”. The REST API is a set of programming interfaces that allow you to interact with your WordPress site and access data and functionality. However, access to the REST API can become a vulnerability for attackers if the option “Disable REST API for non-authenticated users” is not enabled. Examples: getting a list of all posts, creating a new post or updating an existing one, deleting a post, getting/creating users and comments.
Disabling the REST API for unauthenticated users has several benefits. First, it reduces the risk of an attack on your site. If an attacker gains access to the REST API, they can use this opportunity to obtain sensitive data, change site content, or perform other unwanted actions. Disabling the REST API for unauthenticated users helps in preventing these potential attacks.
Second, disabling the REST API for unauthenticated users helps improve the performance of your site. The REST API can put a load on the server, especially when trying to process many requests from unauthenticated users. Disabling this feature for these users reduces the server load and speeds up your site response.
Enabling the option “Disable REST API for non-authenticated users” in the CleanTalk Security Plugin is very simple. Just activate this option in the plugin settings and save the changes. It is important to note that this option will not affect authenticated users, and they will be able to continue using the REST API without any issues. If you only use the WordPress Dashboard to work with the site and want to increase the security level of your resource, then it is recommended to disable the WP REST API. - The option “Forbid to show your website in <iframe> tags on third-party websites” in CleanTalk Security prevents your site from being embedded in an <iframe> on other websites. An <iframe> is an HTML element that allows you to embed one web page inside another. Technically speaking, <iframe> can be used to display your site on other third-party sites while still maintaining visual and functional content. However, this can also lead to security risks and undesirable consequences.
This has several advantages. First, it protects your site from potential fraudulent activities. Some attackers may create embedded iframe-copies of your website to fraudulently collect personal information from your visitors or malicious targets. Disabling <iframe> prevents this possibility and protects your users.
Second, opting out of showing your site in an <iframe> on third-party websites helps you control content and prevent copyright loss. If your site is embedded in another website’s <iframe> without your consent, this may result in improper display and control of your content. Disabling <iframe> allows you to retain full control over how and where your site is displayed.
Enabling the option “Forbid to show your website in <iframe> tags on third-party websites”in the CleanTalk Security Plugin is very simple. It is enough to activate this option in the plugin settings, and your site will be protected from embedding in <iframe> tags on third-party websites. - The option “Add these headers to the HTTP responses on the public pages: X-Content-Type-Options, X-XSS-Protection” in CleanTalk Security allows you to add the X-Content-Type-Options and X-XSS-Protection security headers to the HTTP responses on your site’s public pages. These headers tell browsers how to process the content of the page and prevent possible XSS-based attacks and malware downloads.
XSS (cross-site scripting) and drive-by download attacks are among the most common and dangerous threats in the online environment. XSS attacks can allow attackers to inject and execute malicious code on your site, while drive-by download attacks attempt to download and install malicious software without the admin’s knowledge.
The X-Content-Type-Options header tells the browser that page content should only be processed according to the specified MIME type (Multipurpose Internet Mail Extensions). This helps prevent possible attacks based on the content type and provides an additional layer of protection.
The X-XSS-Protection header is designed to protect against XSS (cross-site scripting) attacks. It includes built-in protection mechanisms in the browser that allow you to detect and block attempts to execute malicious scripts in a timely manner.
Enabling the option “Add these headers to the HTTP responses on the public pages: X-Content-Type-Options, X-XSS-Protection” in the CleanTalk Security Plugin is very simple. Just enable this option in the plugin settings and headers will be automatically added to the HTTP responses on public pages of your site.
In this article we have tried to tell you about the main and most useful options of the CleanTalk Security Plugin for WordPress. You can install the plugin from the official WordPress directory here: https://wordpress.org/plugins/security-malware-firewall
If you have any questions about the CleanTalk Security Plugin functions, feel free to ask them in the comments and we will be happy to assist you.
Category: Security
-

CleanTalk Security Plugin Tools for WordPress
-

CVE-2023-3601 – Simple Author Box < 2.52 - Contributor+ Arbitrary User Information Disclosure via IDOR (Thief of Creds)
We have discovered a severe security vulnerability in the Simple Author Box plugin (CVE-2023-3601), which puts your WordPress accounts at high risk of being compromised. This vulnerability allows attackers with Contributor-level access or higher to steal sensitive user information, including hashed passwords.
Main info:
CVE CVE-2023-3601 Plugin Simple Author Box Critical Very High Publicly Published July 24, 2023 Last Updated July 24, 2023 Researcher Dmtirii Ignatyev OWASP TOP-10 A01:2021-Broken Access Control PoC Yes Exploit Will be later Reference https://cve.mitre.org/cgi-bin/cvename.cgi?name=CVE-2023-3601
https://wpscan.com/vulnerability/c0cc513e-c306-4920-9afb-e33d95a7292fPlugin Security Certification by CleanTalk Timeline
July 5, 2023 Plugin testing and vulnerability detection in the Simple Author Box plugin have been completed July 6, 2023 I contacted the author of the plugin and provided a vulnerability PoC with a description and recommendations for fixing July 16, 2023 The author has eliminated the vulnerability and patched his plugin July 24, 2023 Registered CVE Discovery of the Vulnerability
During a thorough security assessment, I identified a critical security flaw in the Simple Author Box plugin for WordPress (CVE-2023-3601) , specifically affecting versions up to and including 2.51. This vulnerability arises from an Insecure Direct Object Reference (IDOR) issue within the plugin’s code. The plugin fails to properly validate user input when handling requests (action=sab_get_author) to fetch information about specific users, leading to the unauthorized disclosure of sensitive user details.
Understanding Insecure Direct Object Reference (IDOR)
Insecure Direct Object Reference is a type of security vulnerability where an application exposes direct references to internal objects, such as files, database records, or resources, without proper access controls. Attackers can manipulate these exposed references (often through changing parameters or input values) to access unauthorized data or functionalities.
Exploiting the IDOR Vulnerability
In the context of the Simple Author Box vulnerability, the plugin does not adequately check whether a user is authorized to access specific user information before displaying it. By altering the user ID parameter in a request, an authenticated attacker with Contributor-level permissions or higher can access personal information of other users, including potentially sensitive data such as hashed passwords (CVE-2023-3601).
POC:
1. Create a new Post as a Contributor user.
2. Add the “Simple Author Box” block.
3. Intercept the request to `/wp-admin/admin-ajax.php` upon addition of the block. Change the `author_ID` parameter to an ID of a user of your choosing.
4. Inspect the response to see all of the information about that user, including the hashed password.
POC request:
POST /wordpress/wp-admin/admin-ajax.php HTTP/1.1
Host: your_site_here
User-Agent: Mozilla/5.0 (X11; Linux aarch64; rv:102.0) Gecko/20100101 Firefox/102.0
Accept: /
Accept-Language: en-US,en;q=0.5
Accept-Encoding: gzip, deflate
Referer: http://your_site_here/wordpress/wp-admin/post-new.php
Content-Type: application/x-www-form-urlencoded; charset=UTF-8
X-Requested-With: XMLHttpRequest
Content-Length: 50
Origin: http://your_site_here
Connection: close
Cookie: thc_time=1693728697; wordpress_5bd7a9c61cda6e66fc921a05bc80ee93=forgen%7C1692348426%7CFaI19J1rkJx6EeKHpIVBTdyfmoDfF0Q1s0mnqWNHRUy%7C144c7182810741c5eae1d56f1a732319616b45d658a97cb2467966f1a9fa19de; wp-settings-1=libraryContent%3Dbrowse%26siteorigin_panels_setting_tab%3Dwelcome%26hidetb%3D0; wp-settings-time-1=1691260835; wordpress_test_cookie=WP%20Cookie%20check; wordpress_logged_in_5bd7a9c61cda6e66fc921a05bc80ee93=forgen%7C1692348426%7CFaI19J1rkJx6EeKHpIVBTdyfmoDfF0Q1s0mnqWNHRUy%7C65dd803dab6a195a6d2c2ff57c23361a622ab5130f1dd3da09ae9076153598ec
Sec-Fetch-Dest: empty
Sec-Fetch-Mode: cors
Sec-Fetch-Site: same-originaction=sab_get_author&author_ID={here_you_can_put_number_from_0_to_9999}&nonce=bc05e90fd7
Potential Risks and Real-World Impact
The IDOR vulnerability in the Simple Author Box plugin introduces severe risks to both website administrators and users. Some of the potential real-world impact includes:
- Unauthorized Data Exposure:
Attackers can view and collect sensitive user information, leading to privacy violations and potential misuse of user data. - Credential Compromise:
Disclosure of hashed passwords can enable attackers to launch offline attacks, attempting to crack passwords and potentially gain unauthorized access to user accounts. - Identity Impersonation:
The leaked information could facilitate identity theft or social engineering attacks, compromising the integrity of user accounts and potentially affecting the reputation of the website.
Recommendations for Improved Security
To mitigate the risks associated with this vulnerability and enhance overall security, the following measures are strongly advised:
- Immediate Plugin Update:
The developers of Simple Author Box should release a patched version that addresses the IDOR vulnerability. Website administrators should promptly update to the latest secure version to prevent exploitation. - Security Best Practices:
Plugin developers should adhere to secure coding practices, including input validation, proper access controls, and sanitization of user data. - Regular Security Audits:
Conduct regular security assessments and penetration tests on WordPress installations to identify and remediate potential vulnerabilities proactively. - User Privilege Restriction:
Implement strict access controls to ensure that users can only access information that they are authorized to view based on their roles and permissions. - User Awareness:
Educate website administrators and users about the risks of sharing sensitive information and the importance of strong, unique passwords.
By addressing the IDOR vulnerability in the Simple Author Box plugin and following these security recommendations, website owners can significantly reduce the likelihood of security breaches and protect the privacy and integrity of their users’ data.
Use CleanTalk solutions to improve the security of your website
Dmitrii ignatyevIf you think your website is infected and you need help, contact us for malware cleanup. Our specialists will provide you with professional assistance in cleaning your website from malware.
- Unauthorized Data Exposure:
-
Poll: Do you need the option of encrypting/hashing ip/email addresses when transferring to the cloud?
More and more users are concerned about the privacy of the data they send through forms on websites. Sometimes this can lead to forms not being submitted if there is no assurance that the data is completely private.
We are considering the possibility to hash all the data that is transferred into CleanTalk cloud. This will significantly increase the security of your data during transmission. For example:
Before hashing After hashing email@example.com 2a539d6520266b56c3b0c525b9e6128858baeccb5ee9b694a2906e123c8d6dd3 [poll id=”2″]
Attention! If you enable encryption, you will lose access to information about the real IP/Email of the visitor and will not be able to track these data in Anti-Spam reports and log.
-

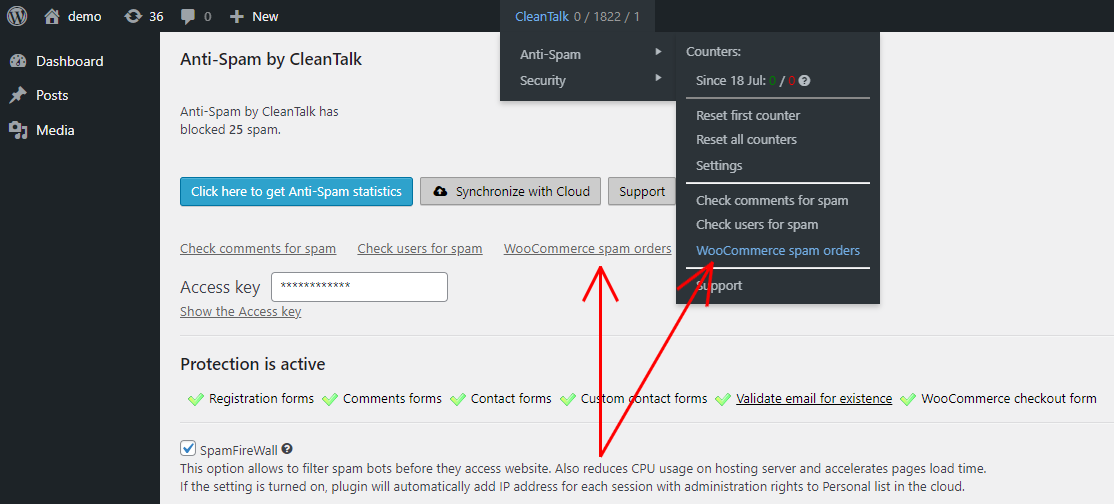
Manage your WooCommerce Spam Orders in one place
Good news,
EveryoneWooCommerce users!Now you can find all WooCommerce orders marked as spam in a separate folder. This is designed to ensure you don’t miss any orders and save you time accessing them.
How to access WooCommerce Spam Orders
- Make sure, your WooCommerce is properly connected to your website.
- Go to your WordPress dashboard → CleanTalk → Anti-Spam and click on the WooCommerce spam orders link.
The spam folder can also be accessed from your Anti-Spam plugin settings (Dashboard → Plugins → Installed plugins → Anti-Spam by CleanTalk).
-

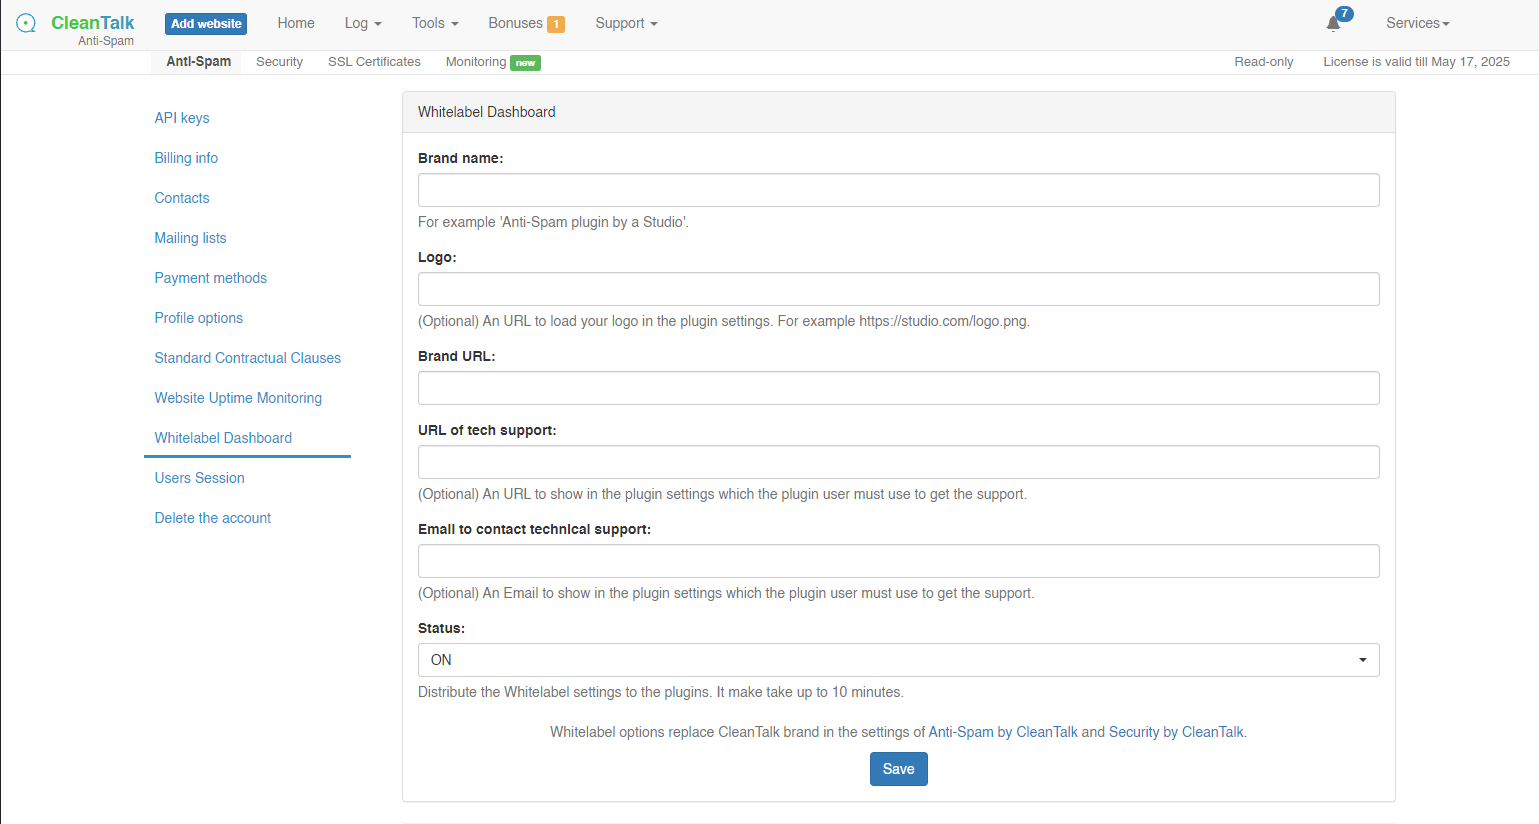
White Label Option for Anti-Spam and Security Plugins
We are proud to introduce the White Label option for our Anti-Spam and Security plugins. This option gives Unlimited plan users the ability to resell Anti-Spam or Security services to their customers under their own brand name. The Extra Package should be connected as well.
Here’s what you get
- Any CleanTalk and affiliate program mentions will be removed.
- Absolutely all links to CleanTalk.org will be replaced with your custom URL.
- The contact information of tech support will be replaced with yours.
- All Connection problems reports will be sent to your support email.
How to connect the White Label option for regular installation (not for Multisite)
- Ensure your Unlimited plan and the Extra Package for your Anti-Spam or Security services have been purchased.
- In the upper right corner of your Dashboard screen go to your Profile → Settings → Whitelabel Database.
- Switch the White label option to On and fill in the following fields and press the Save button.
Congratulations! You can now invite your customers to their new control panel.
How to connect the White Label option for Multisite/Multiuser/WPMS
In case you are using a Multisite/Multiuser/WPMS version of WordPress, check out these instructions.
-

GDPR compliance notification in comments is no longer supported
A while back, you might have seen a checkbox in the comments of a WordPress website saying that the site visitor had read the agreement and agreed to the site’s GDPR policy. Without the checkbox, you couldn’t submit a comment.
The feature wasn’t very popular and we decided to remove it. In the future. If you need to comply with GDPR requirements you can use other solutions to inform users.
-
WordPress DDoS Protection. How to Mitigate DDoS Attacks
How to Mitigate DDoS Attacks on WordPress
To mitigate DDoS attacks you can implement several methods.
The first method is to forbid access to your website by IP address on the level of your webserver by adding a rule in the file «.htaccess» manually.
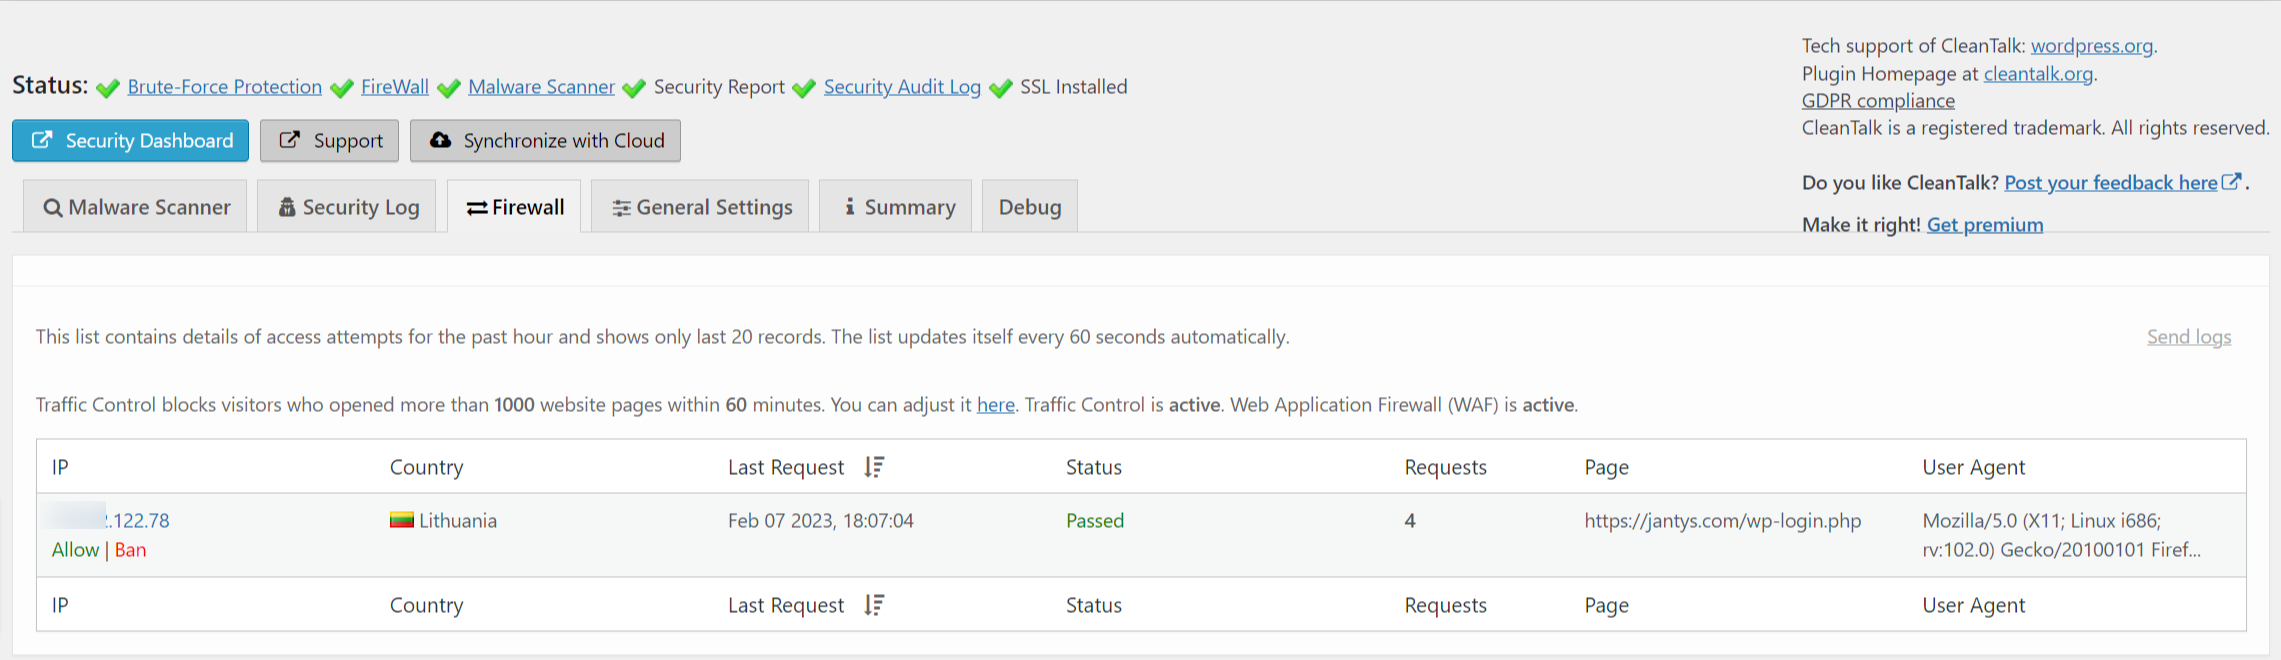
The second method is to install the CleanTalk Security plugin for WordPress, our feature Traffic Control that protects from DoS is enabled by default.
CleanTalk Traffic Control monitors each request from any IP address and if the number of requests exceeds the limit in a certain time period then this IP address will be temporarily blocked and it wouldn’t be able to access your website at all.
For instance, if an IP address sends requests to your website with a frequency of 1000 requests per 1 hour, such activity will definitely be blocked for 1 hour.
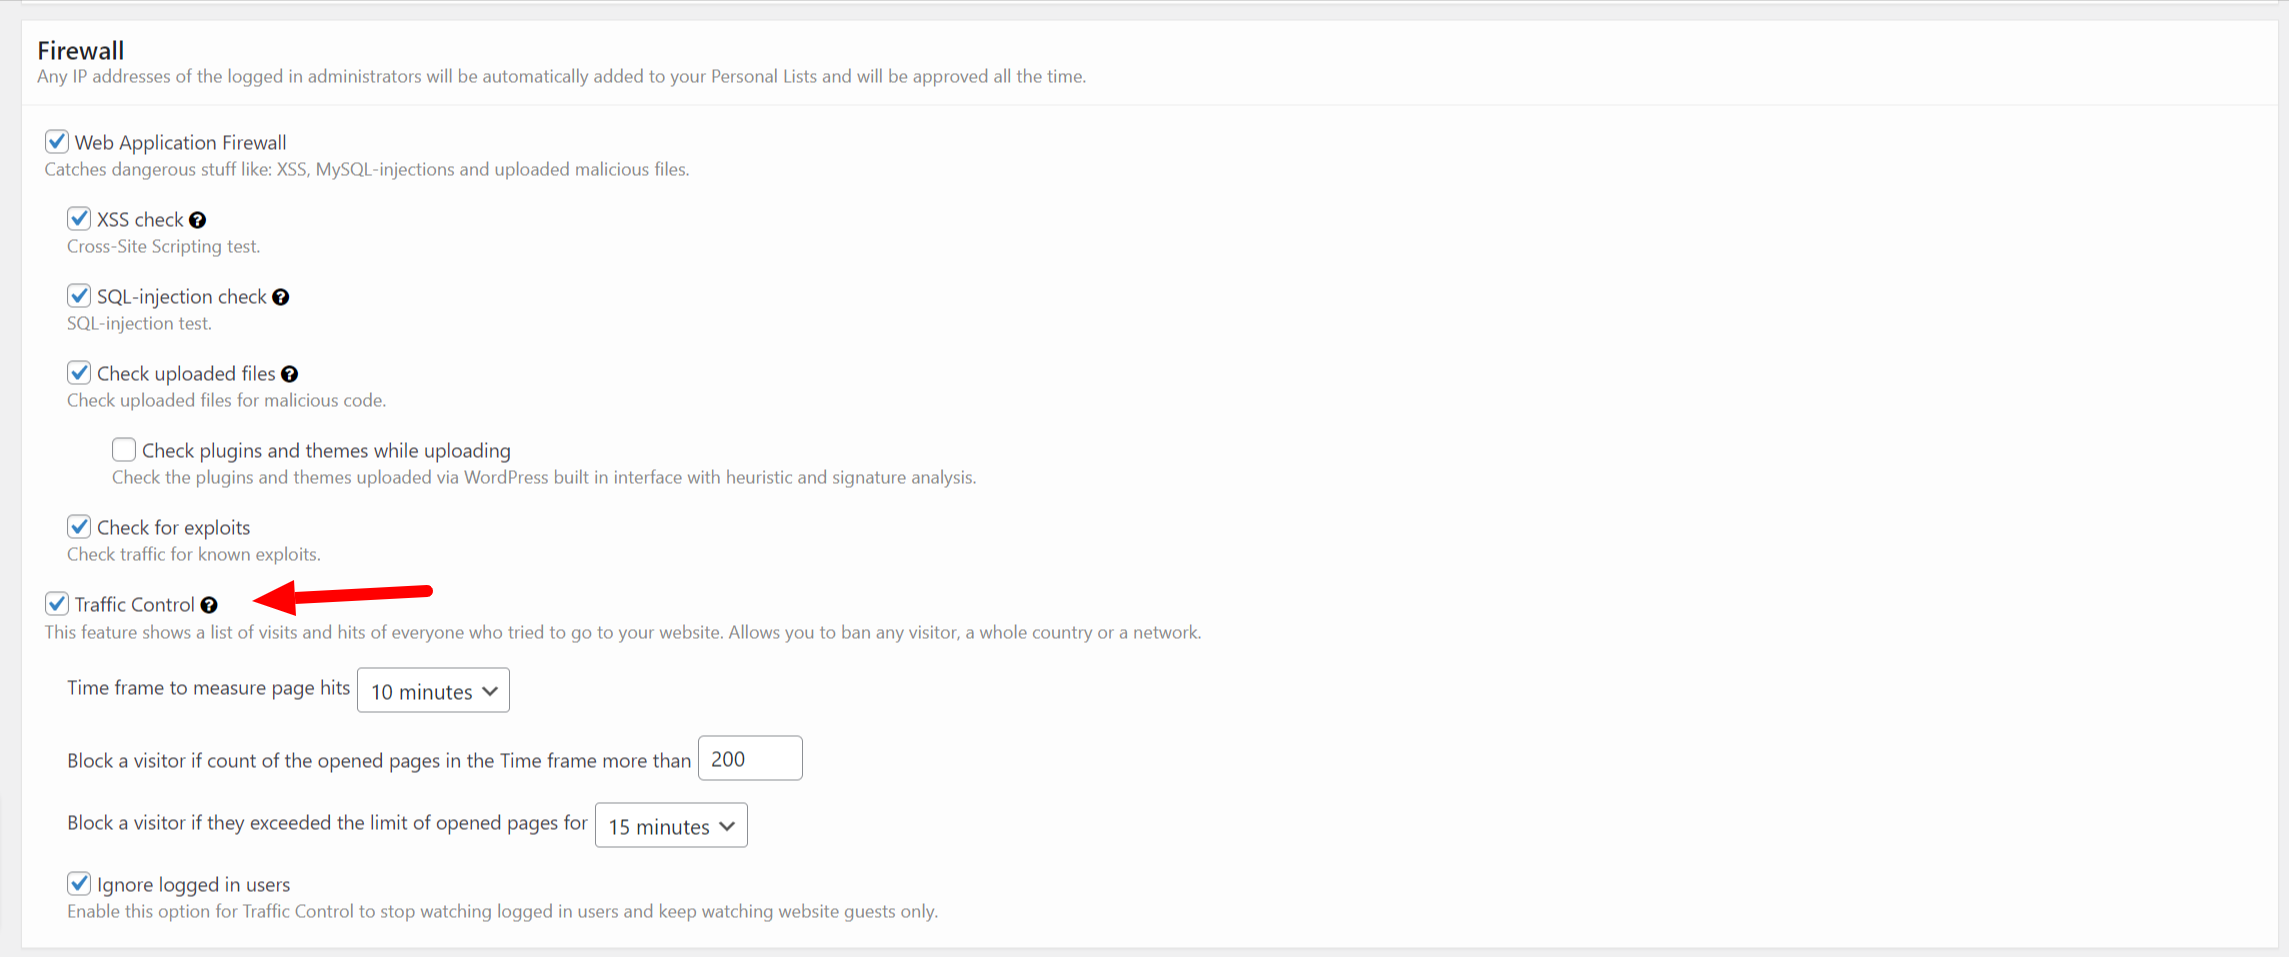
You can adjust the settings of Traffic Control as you want and as you find appropriate. To do that, go to your WP Dashboard → Settings → Security by CleanTalk → General Setting → Firewall.
Time frame to measure page hits – here you can set a time period which will be taken to calculate the number of requests of your visitors.
Block a visitor if the count of the opened pages in the time frame more than – here you can set your limit of requests after exceeding which any IP address will be blocked.
Block a visitor if they exceed the limit of opened pages for X minutes – this option is meant for setting a time period a blocked IP address will be put in.
Ignore logged-in users – tick this option to ignore all requests going from your logged-in users.
Also, on the tab Firewall, you can see all IP addresses that are visiting your website right now.
What are DDoS and DoS?These are types of attacks on a website when a lot of requests are being sent. If the number of requests is quite high then it will result in problems with the website functioning.
The difference between DDoS and DoS consists of that DDoS has a distributed attack, meaning it is executed from many IP addresses, while DoS has just one or a few IP addresses.
Why DDoS and DoS might be dangerous to a website
Such types of attacks is based on the fact that a webserver has to process each request, thus running all website page scripts, loading all pictures, and so on spending its resources. As a result, the website will function slower or start giving an error on attempts of visiting any page.
The second trouble is in a high volume of your website traffic, in some cases, it may lead to unexpected expenses or a warning from your hosting provider.It’s unwise to underestimate the dangers of such types of attacks and spend your time forbidding IP addresses manually, it’s more efficient to give this task to the automated tools.
You can install the plugin Security & Malware scan by CleanTalk from the WordPress catalog.
-

Vulnerability in Eval(‘$some=1;’); Code for WordPress Auto-Cure
A new virus has been detected by our Security Malware Scanner on one of our client’s websites. So, using this file we created a malicious code signature and added it to the Security Malware Scanner.
<?php
/**
 * Front to the WordPress application. This file doesn't do anything, but loads
 * wp-blog-header.php which does and tells WordPress to load the theme.
 *
 * @package WordPress
 */

/**
 * Tells WordPress to load the WordPress theme and output it.
 *
 * @var bool
 */
define( 'WP_USE_THEMES', true );

/** Loads the WordPress Environment and Template */
require __DIR__ . '/wp-blog-header.php';
eval('$some=1;');
Here it is in the last line.
So, from this moment this virus will be recognized and auto-cured on all the websites, protected by our Website Security plugin.
What is a signature
A Signature is a specific pattern that allows cybersecurity technologies to recognize malicious threats such as SQL injections, malware etc.
There are different types of signatures in our Security plugin, including parts of malicious php/js/html code, entire files, and WAF (Web Application Firewall) rules.How it works
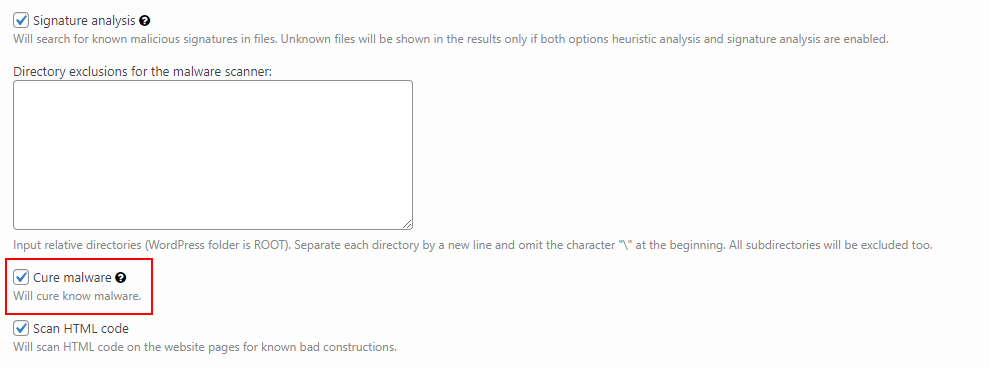
In other words, the Signature is a kind of mold of the file, the scanner will create a mold of each file from your website (we work only with MD5 cache of files) and compare it with the signature mold (MD5 cache as well). And if it finds a match – the file will be marked as Critical. If the Cure malware option is enabled then automatic treatment is performed.
In order to enable the Cure malware option you should go to your WordPress Dashboard → Plugins → Security by CleanTalk → General Settings. You will find the option in the Malware Scanner part.
If you have any questions, add a comment and we will be happy to help you.
-

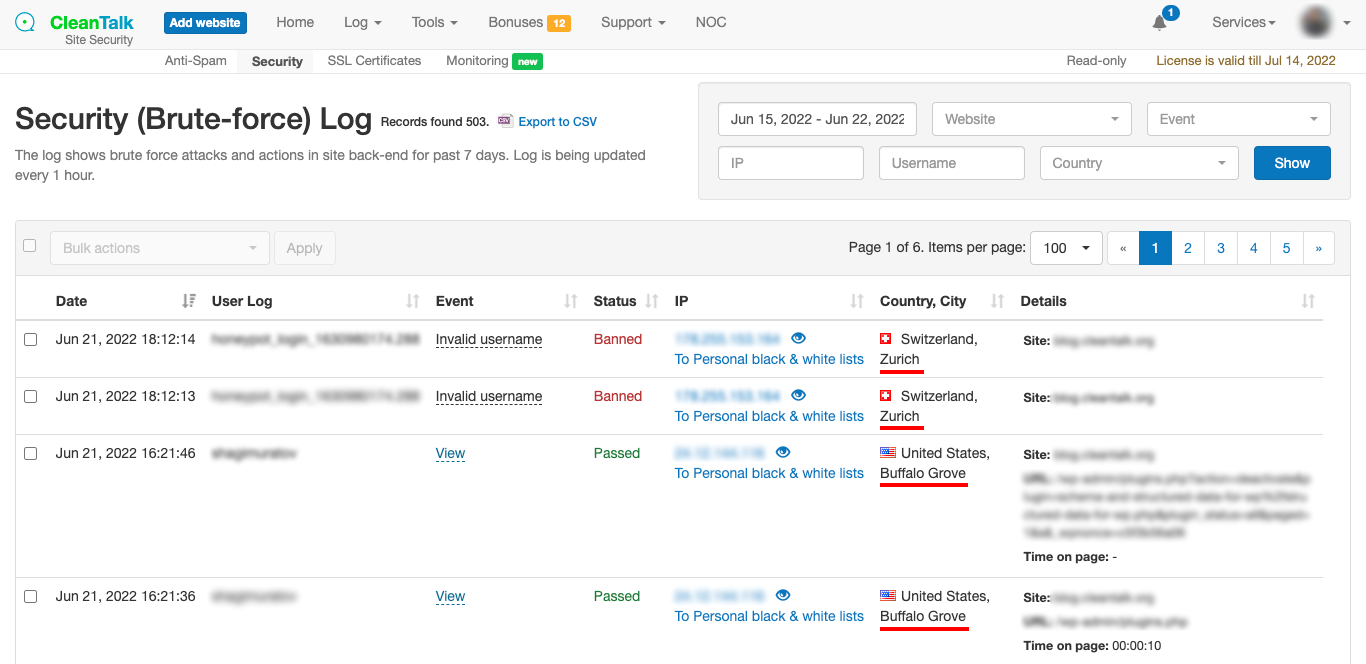
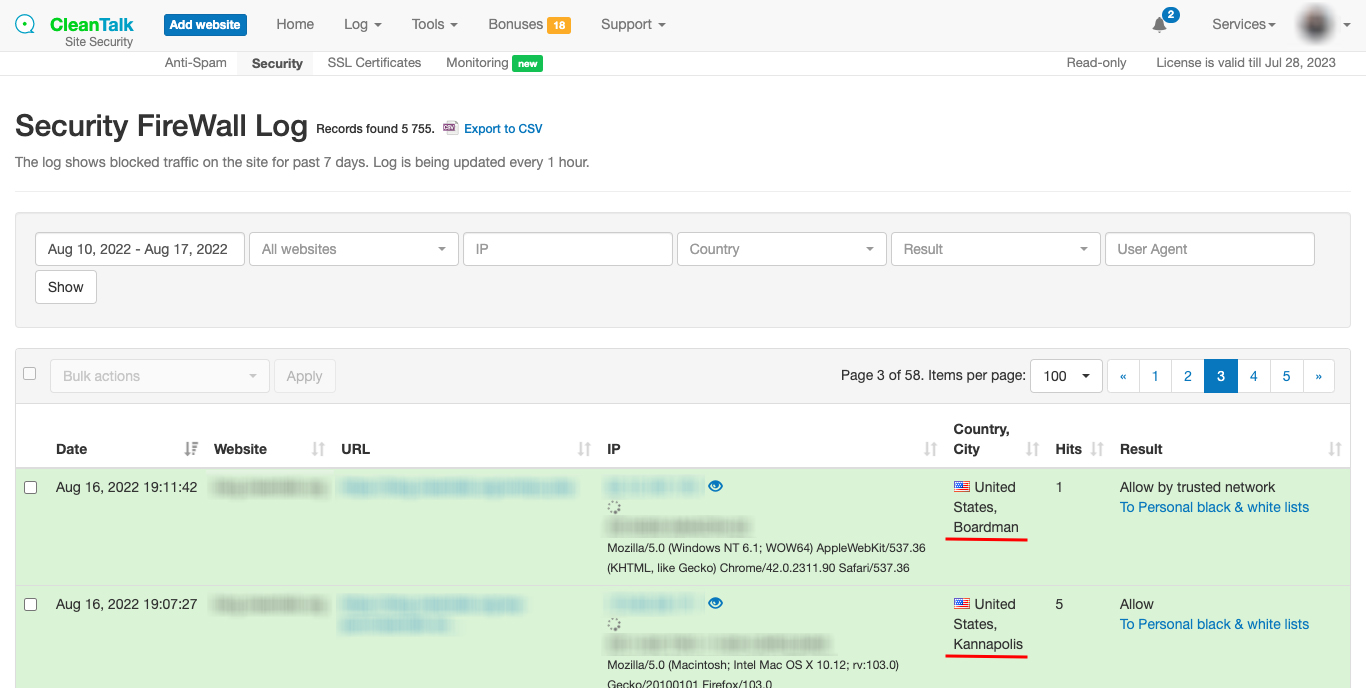
Geolocation (сity) in the Security Log and email reports
Sometimes knowing the attacker’s country is just not enough, so now we added certain geolocation by IP to help you. The new feature will be added automatically to all Website Security plugin users.
You can notice it:
- On the Security Log page.
- On the Security FireWall page.
- On the Blacklists Database Reports page.
- In your email with Successful Logins With an Administrator Role.
- In your email Weekly Security report.
Blacklists Database Reports page
-

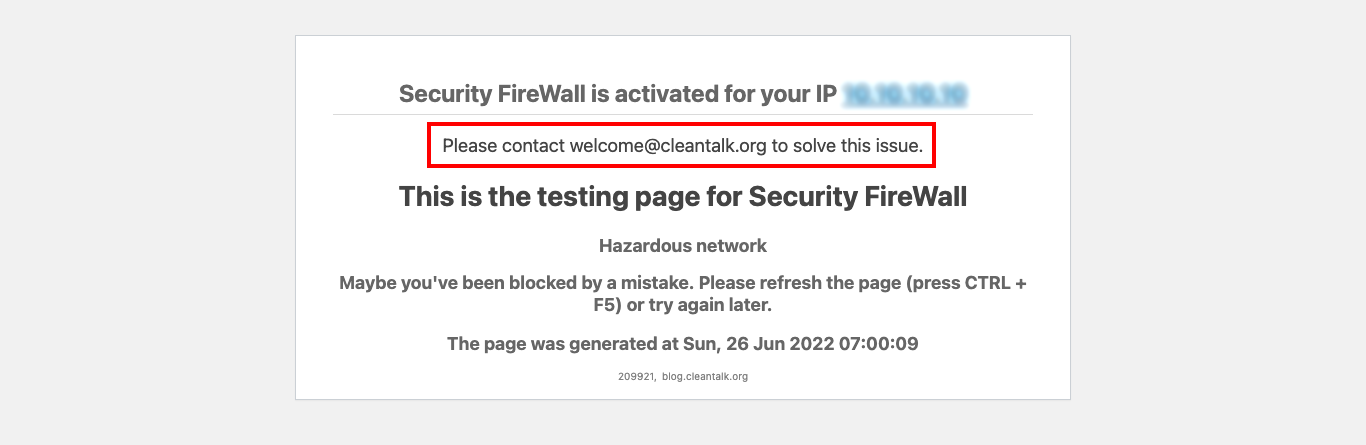
Custom text messages for Security FireWall Block Page
We’re glad to introduce the new feature of our Security Extra Package.
When you use Personal Black Lists (including blocking by country) users see a default message “This is the testing page for Security FireWall” but now you can change it. The message can include your email or phone number. In that case, you can collect data about the reasons for false positives.
How to create a custom message
Step 1: Go to your Dashboard => Security. Select your website and click on Settings.
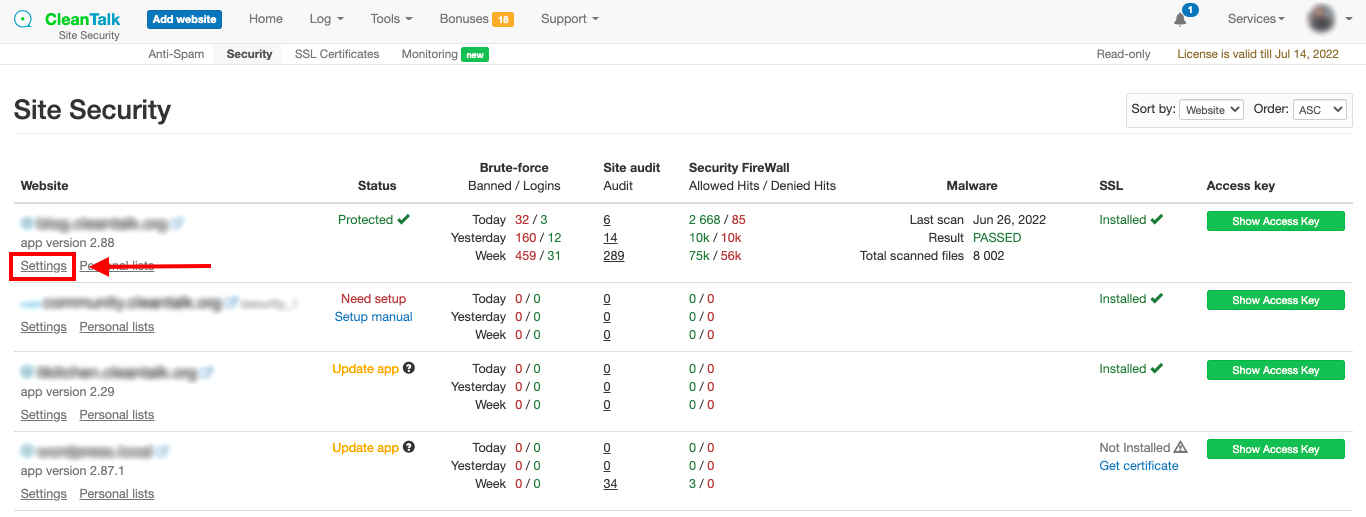
Step2: Scroll down to Message for forbidden visitors and check it. After that you can type any text you want including emails and phone numbers. When finished just press the Update button.
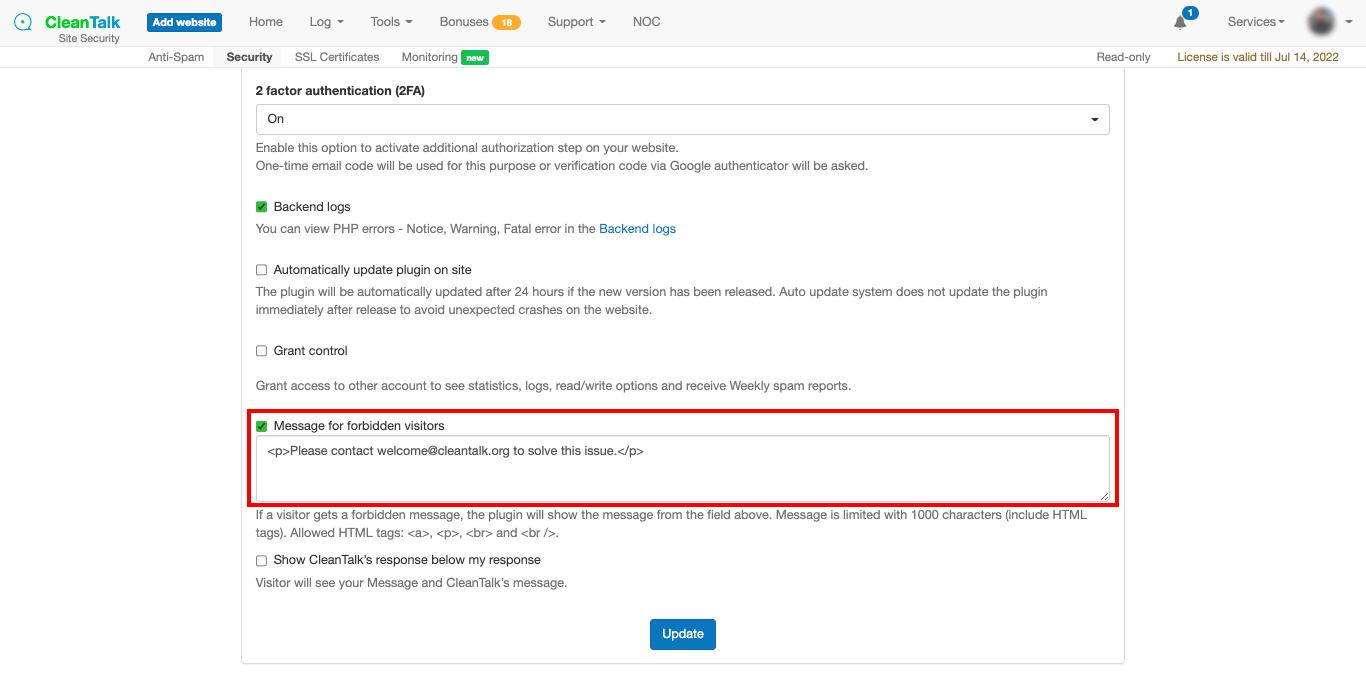
That’s it! Your custom message is enabled and updated. After about 10 minutes you can take a look at your Security FireWall block page.
How to preview your block page
Step 1: Go to Dashboard => Security => Your website Settings (exactly like it was described above). Then click on Testing Security FireWall.
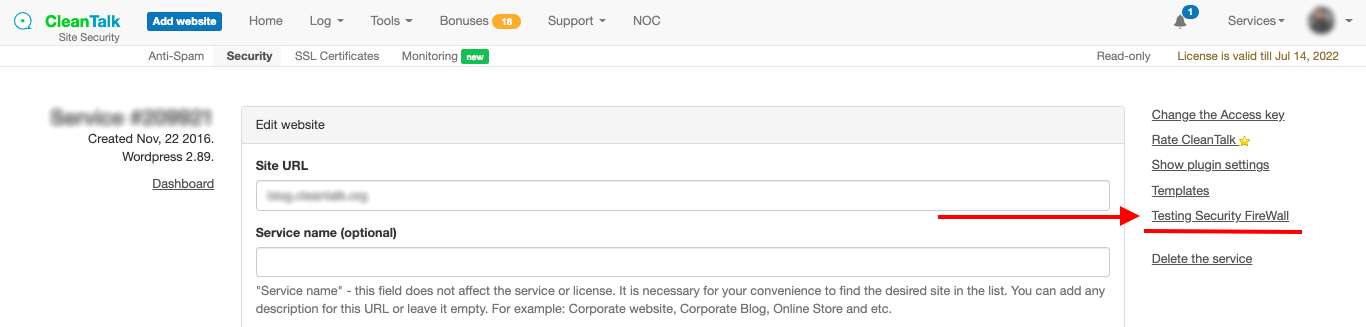
Step 2: After that, your Security FireWall testing page will appear. Here you can preview your custom message and edit it if needed.