Why it is important to protect a mobile app from spam bots
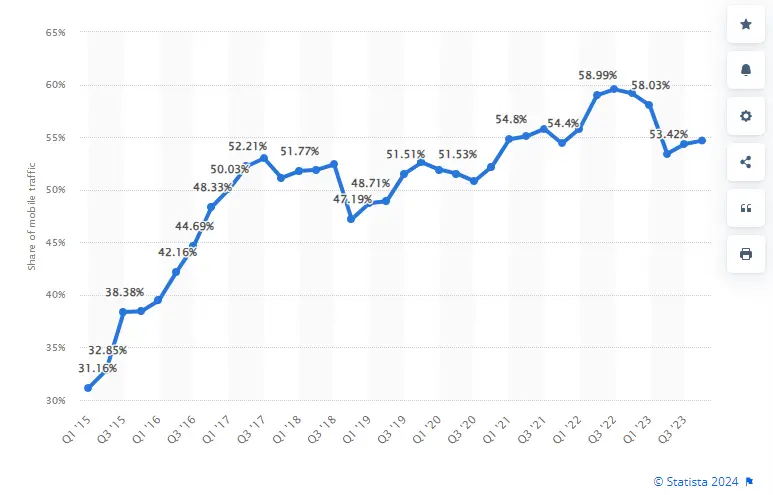
Spam bots are a serious threat to your website, but it affects your mobile app just the same. More than 54% of traffic goes from mobile devices and 76% of internet traffic comes from bad bots. This means that bad bots generate up to 41% of your mobile traffic However, we have listed 5 reasons to protect your mobile app from bots and to stop bad bots before harming your app.
Why it is important to protect your mobile app from spam bots
User experience Spam bots can flood your app with fake accounts, comments, and messages, which can eventually lead to degrading the user experience for legitimate users.
Security Spam bots can carry out malicious activities such as spreading malware, phishing attacks, and stealing sensitive information from users.
Resource consumption Spam bots can overwhelm your servers and consume valuable resources, leading to slower performance and increased costs.
Reputation If your app is known for being overrun by spam bots, it can damage your reputation and deter legitimate users from using your app.
Compliance Depending on the nature of your app, you may be required to comply with regulations related to data privacy and security. Allowing spam bots to operate unchecked can put you at risk of violating these regulations.
How it works
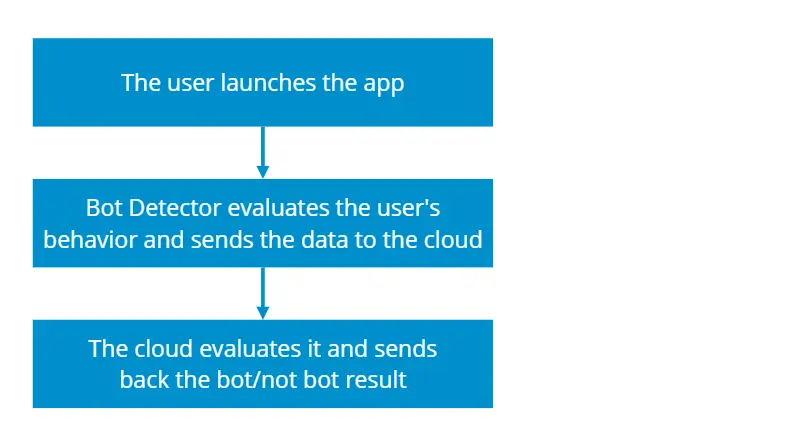
The Bot Detector works in the background and is not visible to the user. It does not require the user to confirm that he is not a bot.
How to install your mobile app spam protection
If you need to protect mobile apps from spam, you will definitely need a solution that uses API to check registrations for spam. The Bot Detector service uses the CleanTalk check_bot API method via a special library that you can download and integrate with just 1 line of code. You can check out our detailed instructions on GitHub below.
Good news for website owners on Magento 2.0 or newer. We have updated our UniForce extension, and now it works with Magento 2.X.
What exactly the extension does
UniForce is an extension that can be installed on any PHP site, CMS, or framework. We also call Uniforce a Universal security plugin for every CMS.
Malware scanning One-time and daily automatic tests for existing Malware and viruses among the site’s files.
Firewall Firewall – uses a database of IP addresses of those who attempt to hack sites, personal IP lists, networks, and countries. These lists forbid visiting the site, which means you can’t get to the site from these IPs.
XSS, SQL, and exploit-based attacks Protect a website from exploit attacks, XSS attacks, and SQL injections.
Brute-force protection Protect a website from password guessing (brute-force).
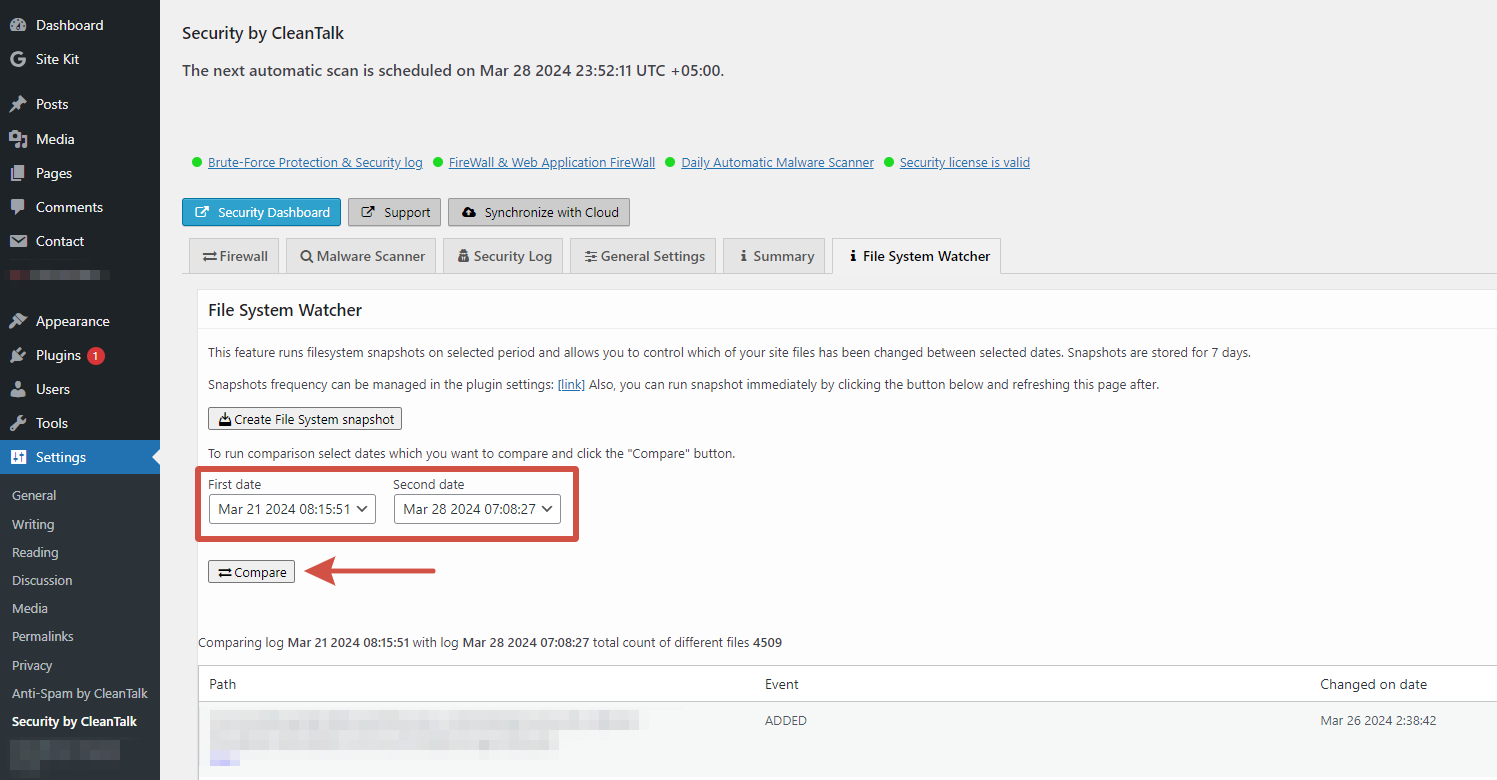
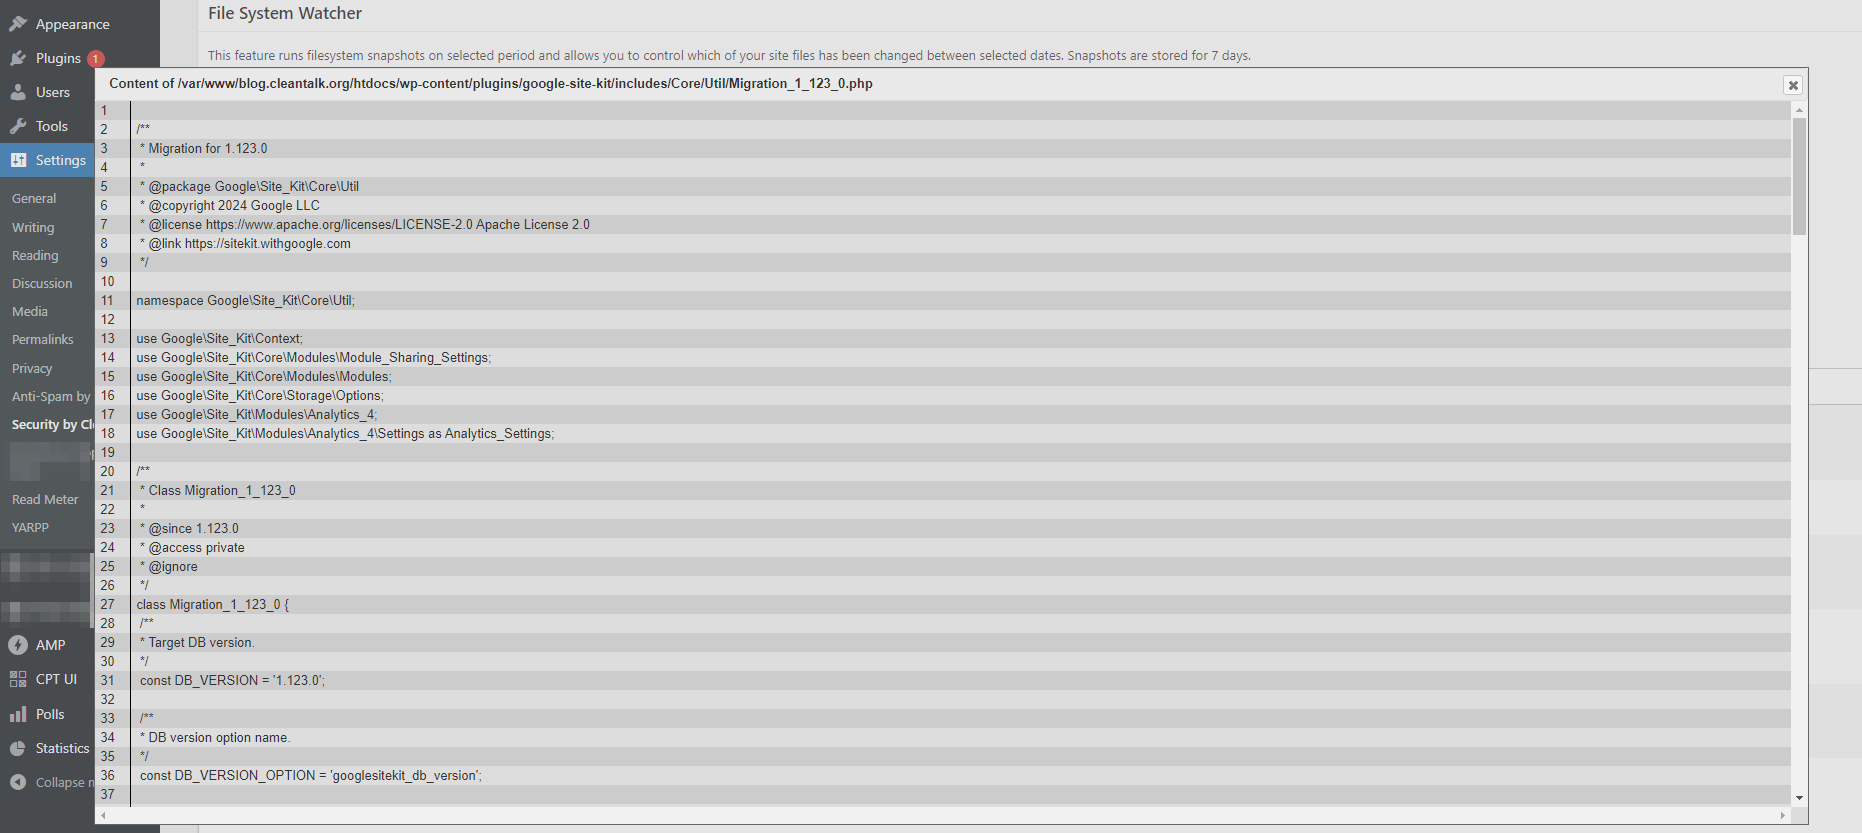
Introducing File System Watcher, a new feature of our Security protection. It helps to track changes in your site files to detect suspicious ones in time. File System Watcher has already been added to all plans and is enabled by default.
How the feature works
The feature takes a snapshot of the file system during a selected period and allows you to monitor which files on your site have been modified between selected dates. The snapshots are stored for 7 days.
You can control the frequency of snapshots in the plugin settings. Alternatively, you can run the snapshot immediately by clicking the Create File System snapshot button and refreshing the page.
How to use the feature and see results
1. Go to your WordPress site dashboard and go to Settings → Security by CleanTalk → File System Watcher.
2. Select the dates you want to compare and click the Compare button.
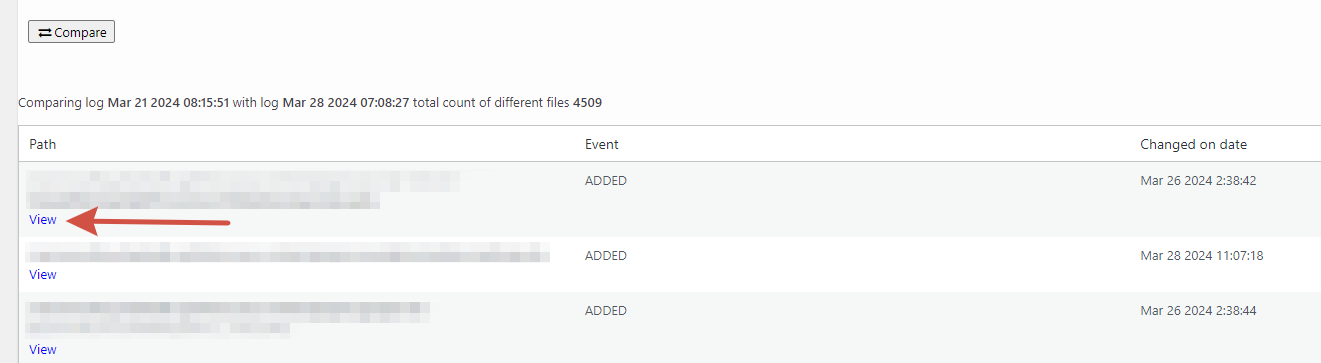
3. Click the View link and you will see the code for the modified version of the specified file.
To use this feature you have to have a Security & Malware scan plugin installed to your WordPress. Feel free to download it in WordPress catalog.
Hubspot users frequently encounter the issue of their email newsletters being classified as spam, despite having appropriate content in the emails. Even though the email content, headers, and text are all in compliance, you can still see the emails flagged as spam. Let’s investigate the possible reasons behind this occurrence.
Why email from Hubspot going to spam
Exclamation points or certain phrases in the “subject” line Avoid using exclamation points or specific phrases in the subject line that may trigger spam filters, such as “Make money,” “Free,” or “Not spam.” It is advisable to steer clear of these types of triggering phrases to prevent your emails from being classified as spam.
The Unsubscribe Button is missing It’s important to keep in mind that if an email is not pertinent to the recipient and lacks an Unsubscribe option, the only recourse for the recipient to cease receiving the email is to flag it as spam.
Irrelevant offer If multiple individuals label your email as spam, it could result in your future emails being automatically directed to recipients’ spam folders.
Blacklisted or unreal email in your email list We believe you can handle the changes above yourself, but this one requires some help to check email addresses. Since so many bots use subscription forms and use either fake addresses or stolen ones. If you have blacklisted and unreal emails in your email list, spam filters can recognize it and put your emails at risk of going into the spam folder.
Mailing to such addresses will not be useful, so we made a web service that clears your email list by checking it through a database of 6M email addresses for fake addresses and spam. Use the instructions below to clean your mailing list of “bad” addresses.
How to protect your HubSpot forms from spam bots
The Anti-Spam plugin for WordPress by CleanTalk has direct integration with HubSpot and blocks any spam bots even before they reach your website. Follow this guide to protect your HubSpot forms from spam.
How to clean email list of non-existent or spammers email addresses
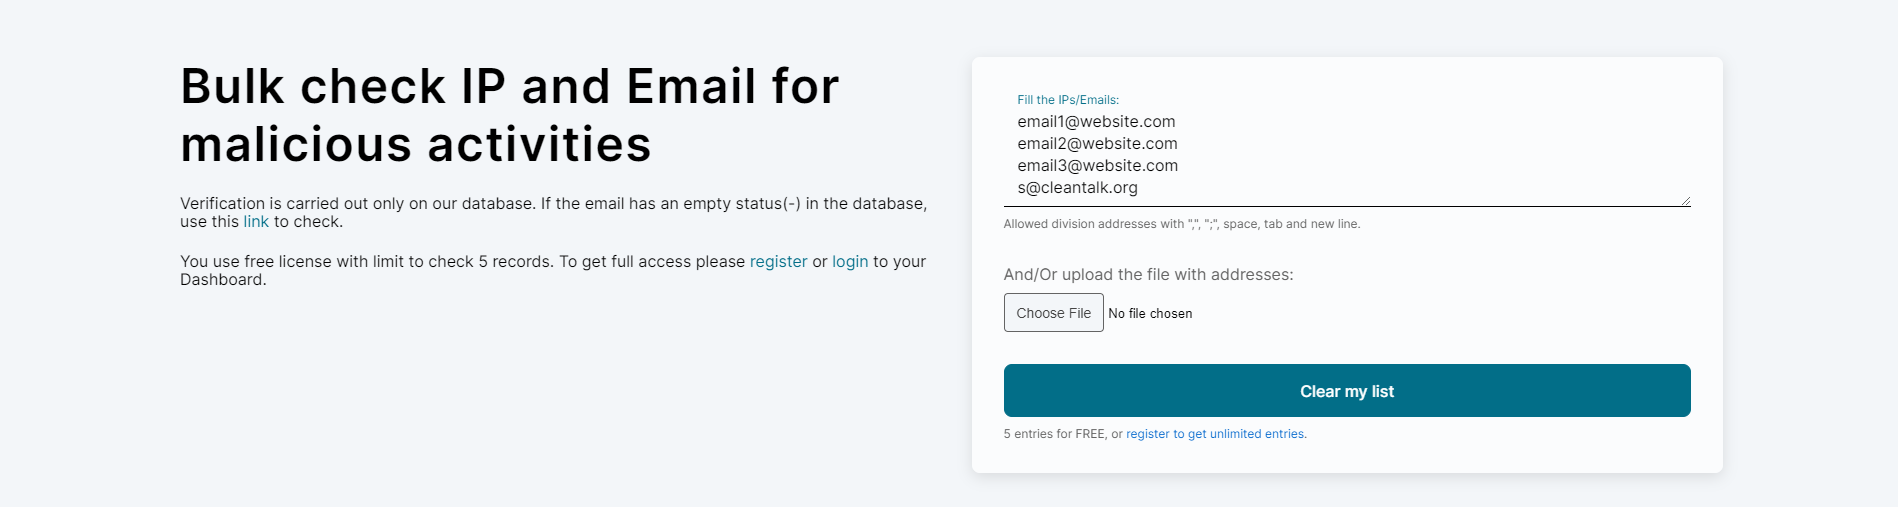
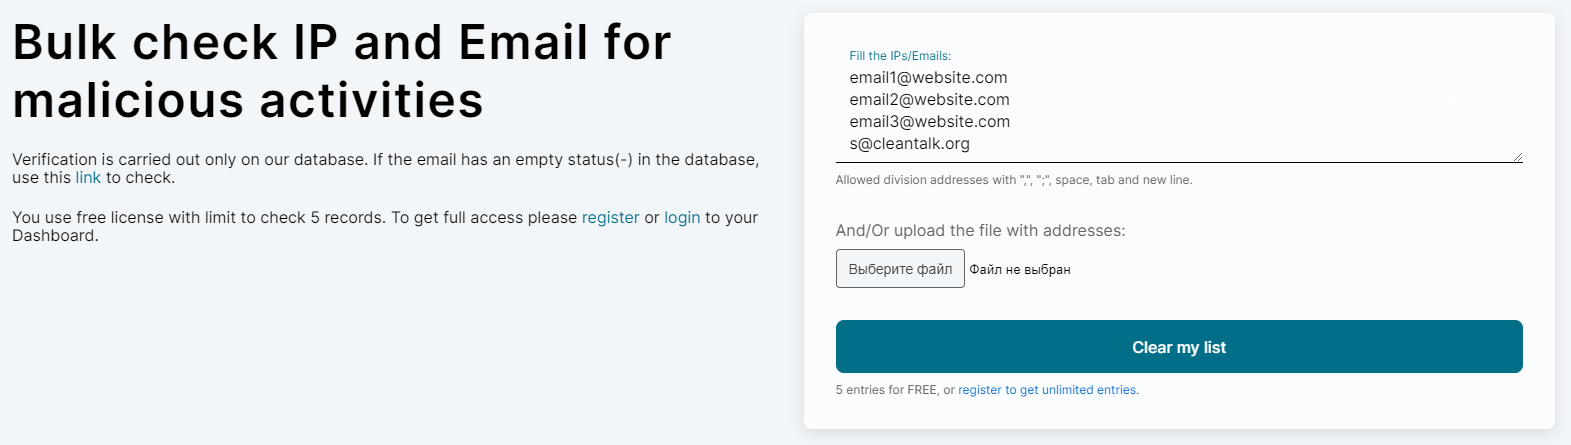
1. Visit the SpamBots Check page, where you can clean your email list by inputing your email list by either copying and pasting it into the designated field or uploading a file using the Browse button. Click the Clear my list button to initiate the process. That is the moment when all the non-existent or spammers email addresses are recognized and filtered. You need to register to check more than 5 emails, and it only takes approximately 30 seconds to complete.
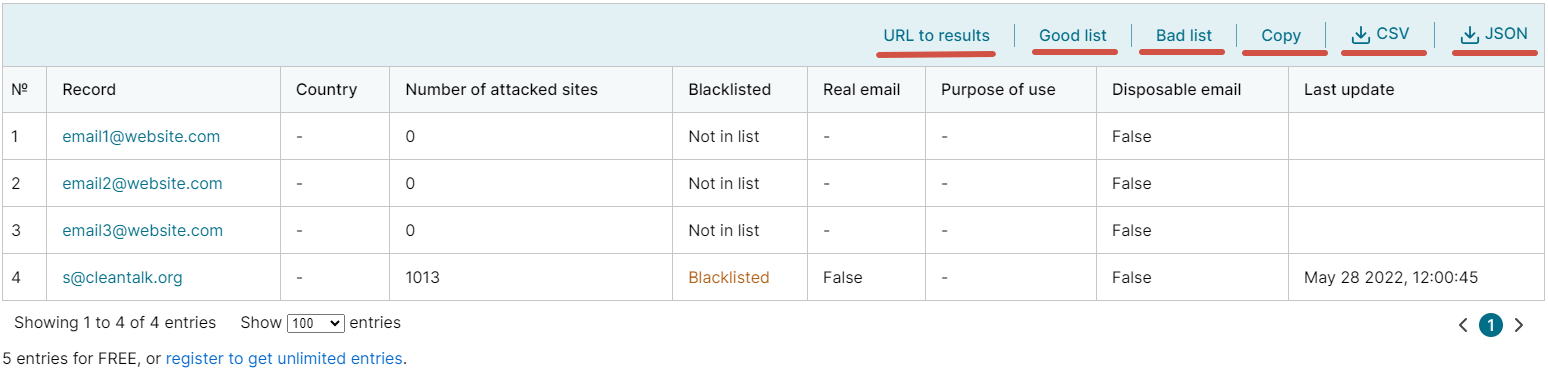
2. Once the email list has been processed, you will be presented with a summary of the checked emails along with their corresponding outcomes. You can easily download CSV and JSON files or share the check results by utilizing the provided links located in the upper right corner of the page.
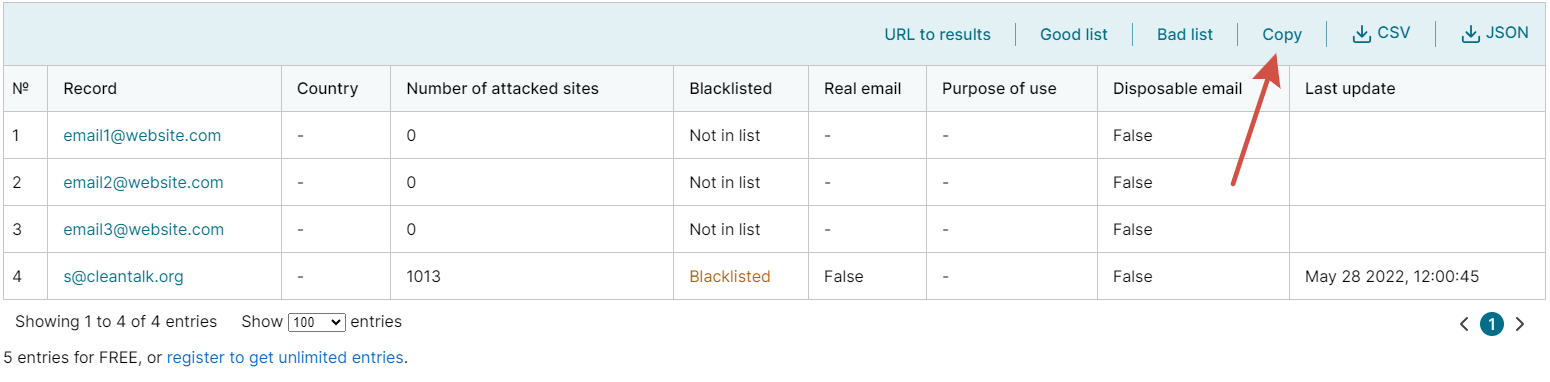
URL to results – share the check results or reset to the full list, including both good and bad lists. Good list – remove emails that are suspiciously active or invalid. Bad list – leave only emails that are suspiciously active or invalid. Copy – copy the entire list of emails. CSV – download results of the check in CSV-file. JSON – download results of the check in JSON file.
3. Access the CSV or JSON file and select the emails that are not on the blacklist for copying.
4. Access your HubSpot newsletter, paste the list into the designated area, and then click on the Continue to organize button.
5. Next, proceed with the regular process of creating your HubSpot newsletter.
By utilizing confirmed email addresses, you can prevent your HubSpot messages from being marked as spam, ensuring that more of your newsletter emails are successfully sent and read. Remember to validate all email lists to minimize the risk of your emails being flagged as spam. Email verification is essential for cleaning up email lists, enhancing email deliverability, and boosting engagement rates.
CleanTalk added spam protection for FluentBooking using direct form integration. Always be sure to use the most effective Anti-Spam plugin. For example CleanTalk Anti-Spam will guarantee your FluentBooking spam protection in about 5 minutes.
Once the CleanTalk Anti-Spam plugin is installed it starts to protect all of the existing forms on your WordPress website. It may not only be FluentBooking but many other forms.
How to check your FluentBooking spam protection in about 5 minutes
You can test the work of Anti-Spam protection for your FluentBooking forms by using a test email s @ cleantalk.org (without spaces). First, open the form in an Incognito browser tab. Fill in all the required form fields and send a form. After submitting the form, you will see a block message about the block on the form submission.
If you have any questions, add a comment and we will be happy to help you. Create your Cleantalk account – Register now and enjoy your spam-free FluentBooking.
MailChimp users often find that emails from their email newsletters end up in spam. The emails themselves, the headers and the text are fine, but still for some reason the emails end up in spam. Let’s try to figure out what the reason might be.
Why email from MailChimp going to spam
Exclamation points or certain phrases in the subject line E.g. “Make money”, “F r e e”, “Not spam” and many others. Try to avoid using triggering phrases like these ones.
The Unsubscribe Button is missed Always remember, that in case the email is not relevant to the mailing recipient and there is no Unsubscribe button, then the only way for the recipient to stop getting the email is to mark it as spam.
Irrelevant offer In case several people mark your email as spam, other emails can end up in the spam folder as well.
Blacklisted or unreal email in your email list Having blacklisted and unreal emails in your email list can be recognized by spam filters and put your emails at risk of going into the spam folder. In the instructions below, we will tell you how to clean your mailing list of “bad” addresses.
How to keep MailChimp from going to spam
1. Go to SpamBots Check page, copy and paste the email list into the left field or you may upload the file using the Browse button on the right, and press the Submit button. You will need to register in order to check more than 5 emails, which takes about 30 seconds.
2. After that, you will see a list of checked emails with their results. Feel free to download CSV and JSON files or share a link to that check using the links on the upper right.
URL to results – share the check results or reset to full list, including both good and bad lists. Good list – remove emails that are suspiciously active or invalid. Bad list – leave only email that are suspiciously active or invalid. Copy – copy the entire list of emails. CSV – download results of the check in CSV-file. JSON – download results of the check in JSON-file.
3. Go to CSV or JSON file and copy only emails, that are not blacklisted.
4, Go to your MailChimp newsletter, paste the list in there, and press the Continue to organize button.
5. After that, continue creating your MailChimp newsletter as usual.
Using only verified emails will help you avoid MailChimp going to spam and get more of your newsletter emails delivered and opened. And don’t forget to verify all your email lists to reduce the chances of your emails ending up in spam. Email verification not only allows assistance in cleaning email lists to increase email deliverability and engagement rates.
CleanTalk added spam protection for Divi Builder email opt-in subscription form using direct form integration. So in case, you prefer using Divi subscription form be sure to use the most effective Anti-Spam plugin. Read the guide below and learn 4 steps to protect your Divi subscription form from spam.
Once the CleanTalk Anti-Spam plugin is installed it starts to protect all of the existing forms on your WordPress website. It may not only be Newsletters subscription forms but also many others.
To install the Anti-Spam plugin, go to your WordPress admin panel → Plugins → Add New.
Then enter «СleanTalk» in the search box and click the Install button for «Spam protection, Anti-Spam, FireWall by CleanTalk».
After installing the plugin, click the «Activate» button.
After it is done go to the plugin settings and click the «Get Access Key Automatically» button. Then just click the «Save Settings» button.
That’s it! From now you How to completely protect your Divi Builder email opt-in subscription form from spam.
How to check spam protection for Divi Builder email opt-in
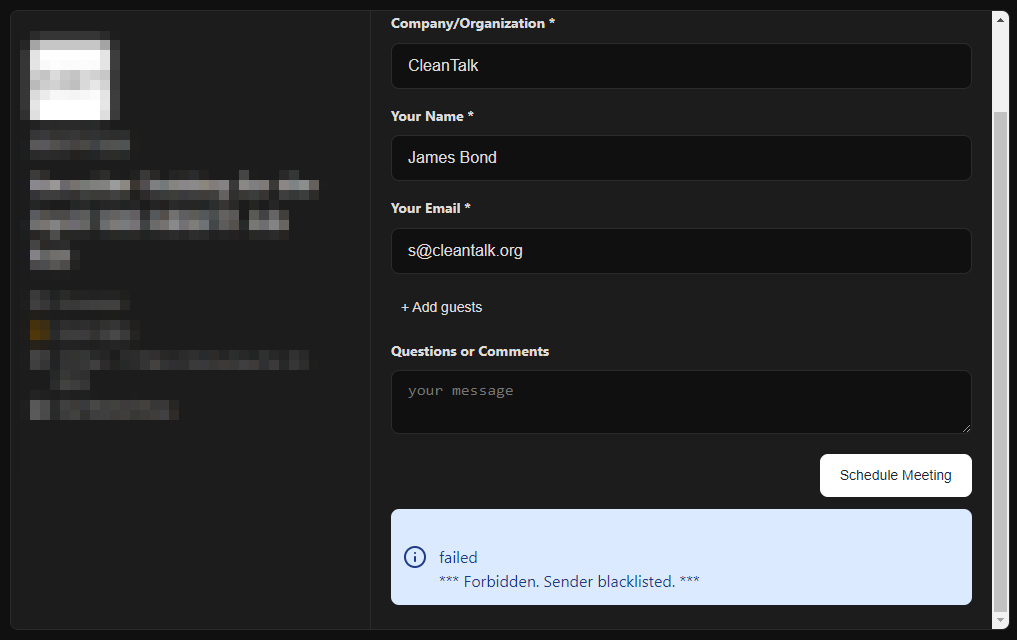
You can test the work of Anti-Spam protection for your СonvertKit Forms by using a test email s @ cleantalk.org (without spaces). First, open the form in an Incognito browser tab. Fill in all the required form fields and send a form. After submitting the form, you will see a block message about the block on the form submission.
If you have any questions, add a comment and we will be happy to help you.
Create your CleanTalk account – Register now and protect your Divi Builder email opt-in from spam in 5 minutes
Update
The protection works only for website visitors, not for website admins. Be sure to test the form protection using Incognito mode.
Additional features
CleanTalk protects all forms at once: comments, registrations, feedbacks, contacts, and reviews.
Installation takes about 1-2 minutes.
Smart 99% protection against spambots.
Always online – 24/7 technical support.
Logs, SpamFireWall, personal lists, country filters, stop-words, and many others.
Discover the complete list of CleanTalk Anti-Spam plugin features here.
CleanTalk added spam protection for Tribulant Newsletters using direct form integration. So in case, you prefer using Tribulant Newsletters be sure to use the most effective Anti-Spam plugin. Read the guide below and learn 4 steps to protect your Newsletters from spam.
Once the CleanTalk Anti-Spam plugin is installed it starts to protect all of the existing forms on your WordPress website. It may not only be Newsletters subscription forms but also many others.
To install the Anti-Spam plugin, go to your WordPress admin panel → Plugins → Add New.
Then enter «СleanTalk» in the search box and click the Install button for «Spam protection, Anti-Spam, FireWall by CleanTalk».
After installing the plugin, click the «Activate» button.
After it is done go to the plugin settings and click the «Get Access Key Automatically» button. Then just click the «Save Settings» button.
That’s it! From now you How to completely protect your Tribulant Newsletters from spam.
How to check spam protection for Tribulant Newsletters
You can test the work of Anti-Spam protection for your СonvertKit Forms by using a test email s @ cleantalk.org (without spaces). First, open the form in an Incognito browser tab. Fill in all the required form fields and send a form. After submitting the form, you will see a block message about the block on the form submission.
If you have any questions, add a comment and we will be happy to help you.
Create your CleanTalk account – Register now and protect your Tribulant Newsletters from spam in 5 minutes
Update
The protection works only for website visitors, not for website admins. Be sure to test the form protection using Incognito mode.
Additional features
CleanTalk protects all forms at once: comments, registrations, feedbacks, contacts, reviews.
Installation takes about 1-2 minutes.
Smart 99% protection against spambots.
Always online – 24/7 technical support.
Logs, SpamFireWall, personal lists, country filters, stop-words, and many others.
Discover the complete list of CleanTalk Anti-Spam plugin features here.
We continue sharing our clients’ reviews and today’s one is kindly brought to you by @n29bnb from n29bedandbreakfast.com on WordPress.
Perfect companion
CleanTalk has our back. After launching our new website, the inundation with spam messages started as well again. As we had previously sunk to the very bottom of websites with our old site, which effectively made us totally undetectable for spammers, we now were surprised by the level of interest from them. After installing CleanTalk, the number of spam e-mails dropped from 50 a week to nearly none. Seldom a very creative spammer gets through, but if, then they will quickly be eradicated too as I can forward those to CleanTalk and prompt action is taken.
Building a WordPress website can be a rewarding experience, allowing you to showcase your creativity, share your passion, or promote your business online. In this comprehensive guide, we will walk you through the step-by-step process of creating a WordPress website.
Step 1: Define Your Website’s Purpose and Goals
Before diving into the technical aspects of building a WordPress website, it’s essential to define your website’s purpose and goals. Consider what you aim to achieve with your website, whether it’s to sell products, share information, showcase your portfolio, or attract clients. Understanding your goals will help shape the design and content of your site.
Step 2: Choose a Domain Name and Web Hosting
The next step is to choose a domain name that reflects your brand or business and is easy to remember. You can register a domain name through domain registrars like GoDaddy, Namecheap, or Bluehost. Additionally, select a reliable web hosting provider that offers good uptime, speed, security, and customer support. Popular hosting providers include Bluehost, SiteGround, HostGator and Kinsta.
Step 3: Install WordPress
To install WordPress on your website, you can follow these steps:
Log in to Your Hosting Account. First, log in to your web hosting account. This is where you’ll manage your website files and settings.
Access the Control Panel (cPanel) Most hosting providers use cPanel as the control panel. Look for an option like “cPanel” or “My Account” in your hosting account dashboard.
Find the WordPress Installer In cPanel, look for an icon or section labeled “WordPress” or “Softaculous Apps Installer.” Click on it to access the WordPress installation tool.
Configure Your WordPress Installation Next, you need to configure your WordPress installation by entering details like the site name, description, admin username, password, and email address. You can also choose a language and select any plugins or themes you want to install.
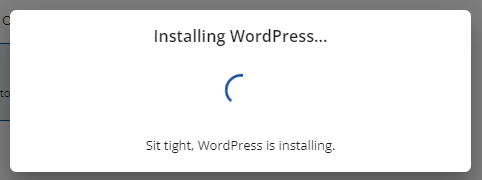
Start the Installation Process Inside the WordPress installer, click on the “Install Now” button. You will be prompted to choose the domain where you want to install WordPress.
Complete the Installation Once you’ve entered all the necessary information, click on the “Install” button. The installer will create the necessary database and install WordPress on your domain.
Access Your WordPress Dashboard After the installation is complete, you will receive a confirmation message with a link to access your WordPress dashboard. This is where you can customize your website, add content, and manage settings.
That’s it! You have successfully installed WordPress on your website. You can now start building your website by choosing a theme, adding pages and posts, installing plugins, and customizing the design. If you encounter any issues during the installation process, reach out to your hosting provider’s support team for assistance.
Step 4: Choose a Theme and Customize Your Website
WordPress offers thousands of free and premium themes that determine the design and layout of your website. Browse the WordPress theme directory or third-party marketplaces like ThemeForest to find a theme that aligns with your brand and goals. Once you’ve selected a theme, customize your website by adding your logo, changing colors and fonts, and creating custom menus.
Step 5: Create Essential Pages and Posts
Now it’s time to add content to your website. Create essential pages such as Home, About Us, Services, and Contact. Write engaging copy, add images or videos, and optimize your content for search engines using relevant keywords. Additionally, publish blog posts regularly to keep your audience engaged and drive traffic to your site.
Step 6: Set Up SEO
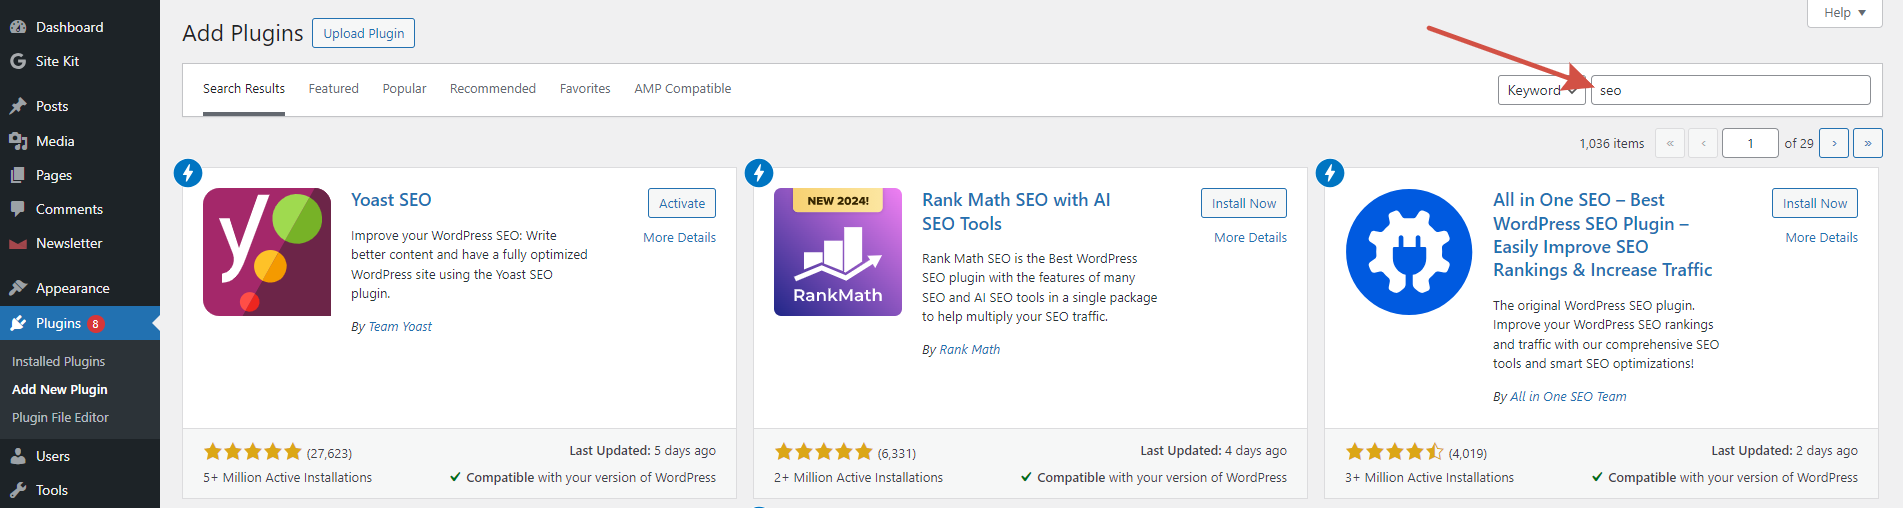
Search engine optimization (SEO) is crucial for improving your website’s visibility in search engine results. Install an SEO plugin like Yoast SEO or Rank Math to optimize your pages and posts for target keywords, meta descriptions, and structured data. Create an XML sitemap and submit it to search engines like Google for indexing.
Step 7: Install Essential Plugins
WordPress plugins extend the functionality of your website by adding different features. We recommend that you install the ones that will be useful for the first step and for the whole time you use WordPress:
SEO Plugins to improve website’s visibility in Search engine results: Yoast SEO / All in One SEO / Rank Math SEO – one of them will be enough. Additionaly, using Google Site Kit is our strong recommendation.
E-commerce Plugins in case you sell products or services: WooCommerce / Easy Digital Downloads / Shopify – research and choose one that fits you most.
Contact Form Plugins to allow your visitors contact you: Contact Form 7, WPForms, or Gravity Forms. Regardless of the form you choose make sure you protect it from spam and spambots with anti-spam protection like Anti-Spam.
Security Plugin to protect the site from threats like malware or hacking attempts: Security & Malware scan – it’s a 18-in-1 plugin that will be sufficient for you.
Performance Optimization Plugins: you might want to use WP Rocket, W3 Total Cache, and Smush Image Compression and Optimization to get started.
Step 8: Test Your Website and Launch
Before launching your website, test it on different devices and browsers to ensure it looks and functions correctly. Check for broken links, slow loading times, and mobile responsiveness. Once you are satisfied with the results, launch your website by promoting it on social media, email newsletters, and other marketing channels.
Step 9: Maintain and Update Your Website
After launching your website, it’s crucial to maintain it regularly by updating WordPress core, themes, and plugins. Monitor website performance using tools like Google Search Console and GTmetrix. Create fresh content, engage with your audience, and make necessary adjustments to improve user experience and achieve your goals.
Step 10: Monitor Analytics and Optimize
Monitor your website’s performance using tools like Google Analytics to track visitor behavior, traffic sources, and conversions. Analyze the data to identify areas for improvement and make informed decisions to optimize your website further. Continuously refine your content strategy
SEO efforts, and user experience based on analytics insights.
In conclusion, building a WordPress website involves planning, creativity, and technical know-how. By following this comprehensive guide and investing time in creating quality content, optimizing for search engines, and engaging with your audience, you can build a successful online presence with WordPress. Remember that building a website is an ongoing process that requires regular updates and improvements to stay relevant and effective in achieving your goals.