Author: Denis Shagimuratov

  • Our client’s review: GARNETCREATIVE.COM

    Our client’s review: GARNETCREATIVE.COM

    We continue sharing our clients’ reviews and today’s one is brought to you by @kpstraus from garnetcreative.com.

    Easy setup – Works like a charm!

    I can’t say enough good about CleanTalk. Reasonably priced. Easy to set up. Works immediately to cut down on unwanted traffic and form spam. I install it on every site I build. Clients who were previously bombarded with spam are totally pleased with the result.

  • Implementing SCRUM Techniques in Basecamp 2

    Everyone who has worked with Basecamp 2 knows that it is a convenient, reliable and very simple tool for organizing tasks in small teams. Basecamp 2 is so simple that it does not contain such popular functions as Gantt Chart, estimation hours per task as well as does not have integrations with various third party services like github.com and etc. On one hand this method facilitates working with the product, performing really important functions such as creating tasks, commenting and organizing the tasks list, but there is a need to “finish” the Basecamp 2 system to meet the specific requirements of the team. One of such requirements in the CleanTalk company is supporting “sprints” (this term is from the SCRUM methodology) in the task management system, below I will tell you how we added these sprints to Basecamp 2 for managing our tasks.

    Organizing Sprints in Basecamp 2

    The steps are below:

    1. We create a separate project, give it a name relevant to the application and the function that your team provides. In my case, let it be “Web development”.
    2. Add a list of tasks. This list of tasks will be our sprint. In the sprint title we indicate its number, its due date and its status (Open or Closed).
      1. Example of such title: Sprint 1. Due date July 20 2022. Open.
      2. Open – notifies the team that it is still possible to add tasks to the sprint, Closed – the sprint is closed for new tasks.
      3. I recommend putting information about the status of the sprint in its title, as in this case when other tasks from other projects are about to be transferred to the sprint, you will see if your sprints are open or not in the titles of the to-do lists.
    3. In the description of the to-do list we add information about the utilization of available working hours in the team, taking into account the sprint length. Utilization allows scheduling the number of tasks that the team is able to perform based on the available working hours.
      1. Example: Utilization of sprint 80/113, Tanya 14/32, Dmitrii 14/32, Mike 31/32, Vitalii 14/28.
    4. Next, we follow the SCRUM methodology – we assemble a team and plan Sprint # 1.
      1. We estimate the hours among the team that we are going to spend per each task from the Backlog.
      2. We select the estimated hours from the Fibonacci series.
      3. The estimated hours are put in the title of each task. Example: Update Bootstrap for Dashboard (19/21). Where,
        1. 19 – actual hours spent.
        2. 21 – estimated hours agreed by the team.
    5. At the end of the sprint planning, we update the Utilization, see point 3. If the Utilization is 100%, we set the sprint status as Closed in the to-do list title.

    Calculation of Sprint Convergence

    When the current sprint is completed and the next one is being planned, it’s time to calculate the convergence of the completed sprint. Convergence will be considered by two parameters – the ratio of scheduled tasks to actually solved tasks and the ratio of estimated hours to actually spent hours. Example for Sprint #1:

    • Convergence by hours 124/113 = 110%.
      • If the convergence by hours is more than 100% it means that the team spent more hours on the tasks than was initially planned. In such cases it is necessary to understand what prevented the proper scheduling of the estimated time. If the convergence is less than 100% it means that something prevented some of the planned tasks from being completed.
    • Convergence by tasks 18/21 = 86%.
      • If the convergence by tasks is more than 100% it is an excellent result indicating that the team has planned the sprint qualitatively. If the convergence is less than 100% it means that the team should review what prevented the previously scheduled tasks from being completed. Determine the cause of the losses and take action to eliminate them.

    Conclusion

    By simple manipulations we managed to organize our work on tasks in Basecamp 2 according to the SCRUM recommendations. In addition, look at our experience how to use Daily reports to save time among team members.

  • Custom text messages for Security FireWall Block Page

    Custom text messages for Security FireWall Block Page

    We’re glad to introduce the new feature of our Security Extra Package.

    When you use Personal Black Lists (including blocking by country) users see a default message “This is the testing page for Security FireWall” but now you can change it. The message can include your email or phone number. In that case, you can collect data about the reasons for false positives.

    How to create a custom message

    Step 1: Go to your Dashboard => Security. Select your website and click on Settings.

    Step2: Scroll down to Message for forbidden visitors and check it. After that you can type any text you want including emails and phone numbers. When finished just press the Update button.

    That’s it! Your custom message is enabled and updated. After about 10 minutes you can take a look at your Security FireWall block page.

    How to preview your block page

    Step 1: Go to Dashboard => Security => Your website Settings (exactly like it was described above). Then click on Testing Security FireWall.

    Step 2: After that, your Security FireWall testing page will appear. Here you can preview your custom message and edit it if needed.

    Get your Website Security now


  • Our client’s review: MORGENSTUDIO.DE

    Our client’s review: MORGENSTUDIO.DE

    We continue sharing our clients’ reviews and today’s one is brought to you by @doriank from morgenstudio.de.

    Good solution for spam

    Using this on two sites for a while and works extremely good. Recommended!

  • Our client’s story: EKART.CZ

    Our client’s story: EKART.CZ

    We continue sharing our clients’ stories and today’s one is brought to you by Jindrich Ekart from ekart.cz.

    Great satisfaction with the Spam protection CleanTalk product

    A large number of spam user registrations have appeared on several Joomla content management sites, and despite the use of ReCaptcha by Google, there have also been problems with forms spam on the BreezingForms component, which is also protected by ReCaptcha.

    We were helped by a plugin for Joomal from CleanTalk, which captures a large number of spam attempts to register or submit forms.

  • How to stop spam on Drupal – Webform Forms

    How to stop spam on Drupal – Webform Forms

    CleanTalk added Webform Forms spam protection using direct form integration. So if you prefer to use Webform Forms, be sure to use the most effective Anti-Spam plugin. Read the guide below and learn 7 steps to protect your Webform Forms from spam.

    Once the CleanTalk Anti-Spam plugin is installed it starts to protect all of the existing forms on your Drupal website. It may not only be Webform Forms forms but also contact forms and many others.

    Download CleanTalk Anti-Spam plugin | Download Webform Forms 

    How to install CleanTalk Anti-Spam plugin

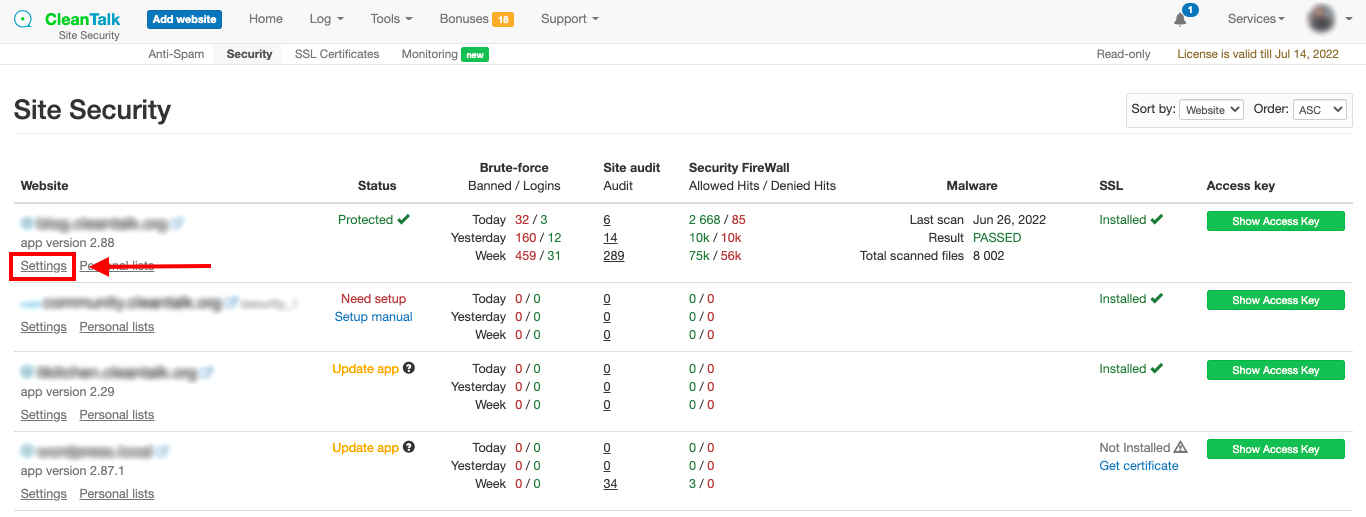
    Go to your Anti-Spam Dashboard

    1. Download the archive on the top of the page.

    2. Go to “Manage →Extend” section, find and press button “+Install new module“.

    Drupal 9 modules install

    3. Choose the downloaded archive from CleanTalk, press the button “Install“.

    Drupal 9 install anti-spam plugin

    4. After the process of installation press the line “Enable newly added modules“.

    Drupal 9 enable anti-spam module

    5. In the “CLEANTALK” category find the Anti-Spam by CleanTalk module, tick the checkbox near the name and press the button “Install“.

    Drupal 9 enable anti-spam module

    6. When you enable the module, go to Configuration → Content Authoring. Click it.

    Drupal 9 configure anti-spam module

    Then open the Settings:

    Drupal 9 configure anti-spam module

    7. Copy the Access key from your CleanTalk Dashboard and paste it in the “Access key” field, turn on the options of the module and press the button “Save configuration“.

    Drupal 9 anti-spam plugin options

    Drupal 9 anti-spam plugin options

    How to check spam protection for Webform Forms

    Do a test registration using this blacklisted email address: stop_email@example.com

    Drupal 9 spam registration block

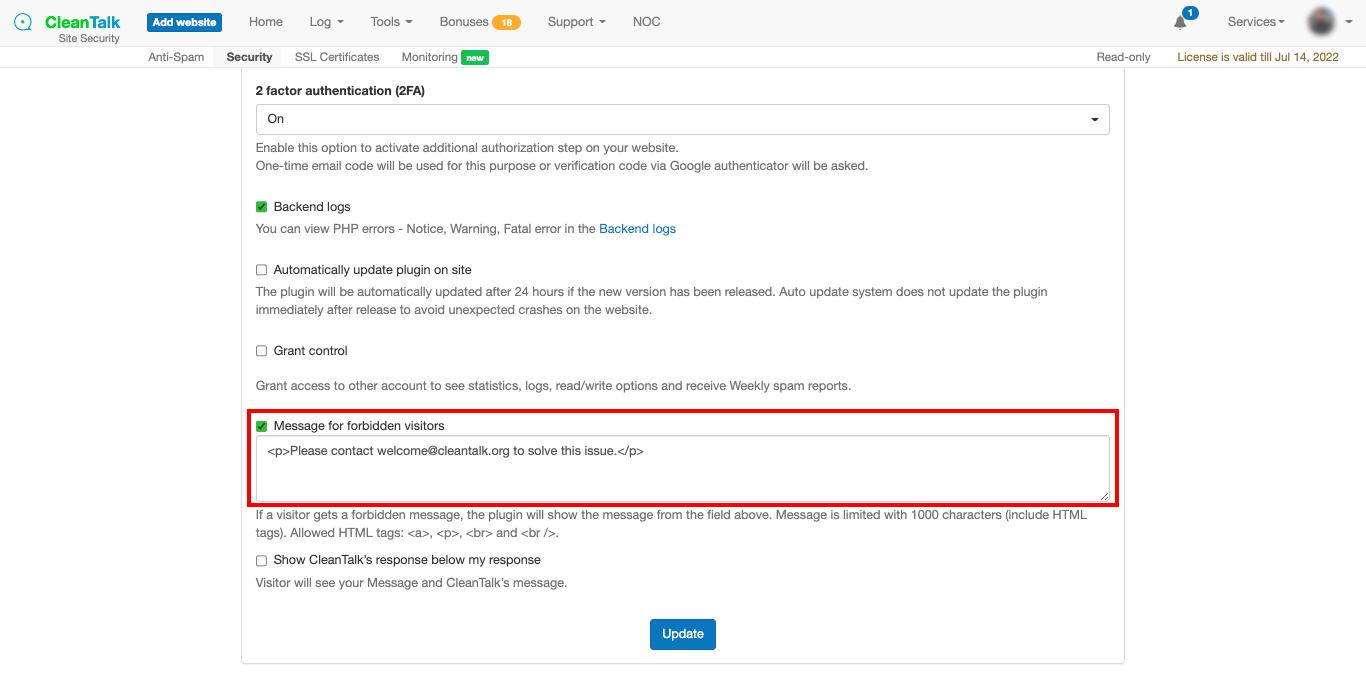
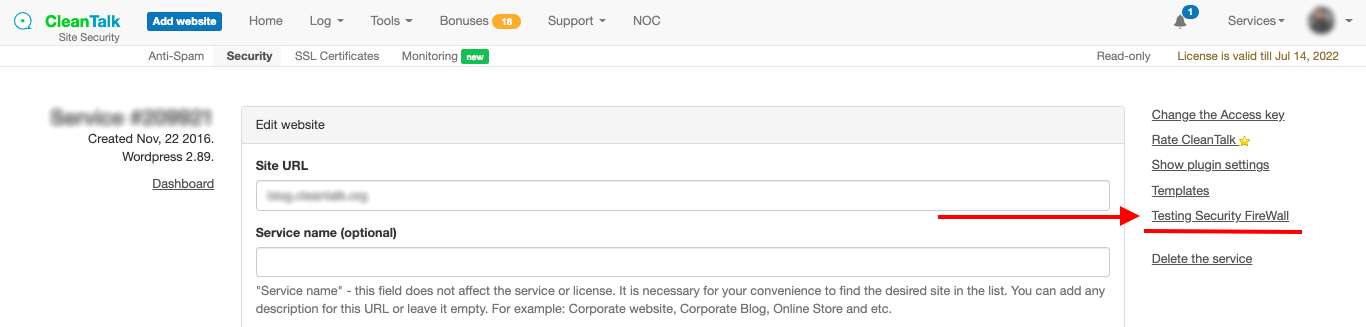
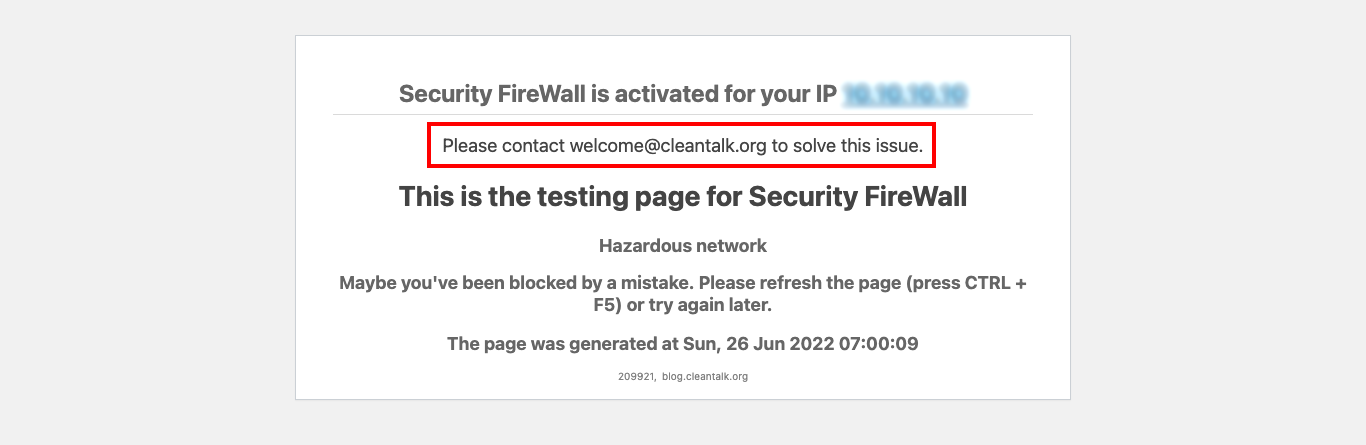
    To test if SpamFireWall is working just add /?sfw_test_ip=10.10.10.10 to your site name. Example www.yoursitename.domain/?sfw_test_ip=10.10.10.10 (you must see blocking screen)

    Attention! You should test SFW with incognito mode switched on. To enable incognito mode press Ctrl+Shift+N for Chrome, Opera and Safari browsers; press Ctrl+Shift+P for Firefox, Internet Explorer and Microsoft Edge.

    How to Add a Website to Your CleanTalk Anti-Spam Dashboard
     

    Please, use this guide to add a website to your CleanTalk Anti-Spam Dashboard: https://cleantalk.org/help/add-website

    Please go to the Dashboard to see the Anti-Spam status, add new websites, or manage existing ones!

    Please check your inbox to get your account password.

    Attention!

    If you use the EU Cookie Compliance (GDPR Compliance) plugin and some settings are applied, this plugin will not allow the use of cookies for the CleanTalk Anti-Spam plugin. As a result, there may be false positive spam protection triggering.

    Drupal 8 Update Manager install

    In order to solve the situation, please add all of the cookies listed below used by the Anti-Spam plugin to the exceptions:

    ct_check_js
    ct_timezone
    ct_pointer_data
    ct_fkp_timestamp
    ct_ps_timestamp
    apbct_timestamp
    apbct_cookies_test

    Drupal 8 Update Manager install

    All CleanTalk cookies don’t contain personal data or data by which a visitor can be identified and are strictly necessary cookies as they directly affect your website security and your guests/visitors/registered users.

    That’s it! From now you know how to completely protect your Webform Forms from spam.

    If you have any questions, add a comment and we will be happy to help you.

    Create your CleanTalk account – Register now and protect your Webform Forms from spam in 5 minutes.

    Update

    The protection works only for website visitors, not for website admins. Be sure to test the form protection using Incognito mode.

    Additional features

    • CleanTalk protects all forms at once: comments, registrations, feedbacks, contacts, reviews.
    • Installation takes about 1-2 minutes.
    • Smart 99% protection against spambots.
    • Always online – 24/7 technical support.
    • Logs, SpamFireWall, personal lists, country filters, stop-words, and many others.

    Discover the complete list of CleanTalk Anti-Spam plugin features here.

  • ChronoForms – Spam Protection for Joomla

    ChronoForms – Spam Protection for Joomla

    CleanTalk added ChronoForms spam protection using direct form integration. So if you prefer to use ChronoForms, be sure to use the most effective Anti-Spam plugin. Read the guide below and learn 8 steps to protect your ChronoForms from spam.

    Once the CleanTalk Anti-Spam plugin is installed it starts to protect all of the existing forms on your Joomla website. It may not only be comment forms but also contact forms and many others.

    Download CleanTalk Anti-Spam plugin | Download ChronoForms 

    How to install CleanTalk Anti-Spam plugin

    1. Make a backup of the site files and database.

    2. Download the Anti-Spam extension archive via link above.

    3. In the main Joomla menu open Extensions → Manage → Install.

    4. Click the «Browse for file» button to upload the archive.

    Joomla install

    5. After installation you will see a success message:

    Joomla success

    6. Go to plugin settings: Extensions → Plugins → Anti-Spam by CleanTalk. Enable the plugin and save settings.

    7. In plugin settings press «Get access key automatically» button. Admin email address will be used for registration. If you want to use another address click the button «Get access key manually». Fill in the easy registration form and you will receive your key.

    Joomla Anti-Spam settings

    8. Enter your Access key in its field, choose protection options and save settings.

    Anti-Spam settings

    That’s it! From now you know how to completely protect your ChronoForms from spam.

    How to check spam protection for ChronoForms

    You can test the work of Anti-Spam protection for your ChronoForms by using a test email s @ cleantalk.org (without spaces). First, open the form in an Incognito browser tab. Fill in all the required form fields and send a form. After submitting the form, you will see a block message about the block on the form submission.

    If you have any questions, add a comment and we will be happy to help you.

    Create your CleanTalk account – Register now and protect your ChronoForms from spam in 5 minutes.

    Update

    The protection works only for website visitors, not for website admins. Be sure to test the form protection using Incognito mode.

    Additional features

    • CleanTalk protects all forms at once: comments, registrations, feedbacks, contacts, reviews.
    • Installation takes about 1-2 minutes.
    • Smart 99% protection against spambots.
    • Always online – 24/7 technical support.
    • Logs, SpamFireWall, personal lists, country filters, stop-words, and many others.

    Discover the complete list of CleanTalk Anti-Spam plugin features here.

  • CleanTalk Update: Contacts Encoder protects public email addresses by making them invisible to bot.

    CleanTalk Update: Contacts Encoder protects public email addresses by making them invisible to bot.

    Since Anti-Spam version 5.177, a new feature is available: automatic email address encoding.
    Now, all email characters on your public pages are hidden in the source code and protected from crawlers.
    Visitors can still decode them with a click.
    This helps reduce direct spam to your inbox.
    You can enable this in the Data Processing section here:

    WordPress Dashboard → Settings → Anti-Spam by Cleantalk → Advanced settings

    The plugin will encode all email addresses on your pages. 

    Original view:

    Encoded view:

    After clicking the address will be decoded:

    That’s exactly how it works. Try it out and keep your email addresses safe from bots.


    How to Make Sure Email Encoding Is Working

    1. Open your webpage in Guest (Incognito) mode
    Go to a public page with an email address. If encoding is active, the email won’t appear in raw HTML — it will be encrypted.

    2. Hover over and click the email
    A hint will appear: “This contact was encoded by CleanTalk. Click to decode.”
    Click to reveal the full address.

    Note: if you’re logged in, encoding may not be applied — always test in Incognito mode.

    To decrypt it, just click on it. If you hover the mouse pointer over the email, you’ll see the message:
    “This contact was encoded by CleanTalk Contacts Encoder. Click to decode.”
    This hint helps your website visitors understand how the protection works.

    Make sure to test the encryption and decryption in Guest (Incognito) mode, because if you’re logged in, Contacts Encoder may be bypassed.

    Encrypted view (Incognito mode) Decrypted view (or authorized)

    Since version 5.184 of the Anti-Spam plugin, each email encoding is logged in your Anti-Spam Log with the status “Decoding approved”.

    Feel free to ask your questions in the comments below or email us at we*****@*******lk.org 🙂
    If you can see the full email address right away, you’re probably not viewing the page in Incognito mode, and Contacts Encoder didn’t activate.

  • How to stop spam on Joomla – Balbooa Forms

    How to stop spam on Joomla – Balbooa Forms

    CleanTalk added Balbooa Forms spam protection using direct form integration. So if you prefer to use Balbooa Forms, be sure to use the most effective Anti-Spam plugin. Read the guide below and learn 8 steps to protect your Balbooa Forms from spam.

    Once the CleanTalk Anti-Spam plugin is installed it starts to protect all of the existing forms on your Joomla website. It may not only be comment forms but also contact forms and many others.

    Download CleanTalk Anti-Spam plugin | Download Balbooa Forms 

    How to install CleanTalk Anti-Spam plugin

    1. Make a backup of the site files and database.

    2. Download the Anti-Spam extension archive via link above.

    3. In the main Joomla menu open Extensions → Manage → Install.

    4. Click the «Browse for file» button to upload the archive.

    Joomla install

    5. After installation you will see a success message:

    Joomla success

    6. Go to plugin settings: Extensions → Plugins → Anti-Spam by CleanTalk. Enable the plugin and save settings.

    7. In plugin settings press «Get access key automatically» button. Admin email address will be used for registration. If you want to use another address click the button «Get access key manually». Fill in the easy registration form and you will receive your key.

    Joomla Anti-Spam settings

    8. Enter your Access key in its field, choose protection options and save settings.

    Anti-Spam settings

    That’s it! From now you know how to completely protect your Balbooa Forms from spam.

    How to check spam protection for Balbooa Forms

    You can test the work of Anti-Spam protection for your Balbooa Forms by using a test email s @ cleantalk.org (without spaces). First, open the form in an Incognito browser tab. Fill in all the required form fields and send a form. Even though you may still see a message that the form was sent successfully, the spam message will still be blocked – check your email to make sure.

    If you have any questions, add a comment and we will be happy to help you.

    Create your CleanTalk account – Register now and protect your Balbooa Forms from spam in 5 minutes.

    Update

    The protection works only for website visitors, not for website admins. Be sure to test the form protection using Incognito mode.

    Additional features

    • CleanTalk protects all forms at once: comments, registrations, feedbacks, contacts, reviews.
    • Installation takes about 1-2 minutes.
    • Smart 99% protection against spambots.
    • Always online – 24/7 technical support.
    • Logs, SpamFireWall, personal lists, country filters, stop-words, and many others.

    Discover the complete list of CleanTalk Anti-Spam plugin features here.

  • Our client’s review: HIZERO.COM.HK

    Our client’s review: HIZERO.COM.HK

    We continue sharing our clients’ reviews and today’s one is brought to you by @hizerohk from hizero.com.hk.

    nice plugin!

    its really useful!