While using WPForms, always be sure to use the most effective Anti-Spam plugin. This guide is about how to set up Anti-Spam protection for WPForms in four steps.
The protection delivered by CleanTalk, which is a cloud Anti-Spam service and has a WordPress plugin which is also developed in-house by CleanTalk team.
The plugin filters spam existing forms on your WordPress website, including WPForms Contact Form and many others.
How to install the CleanTalk Anti-Spam plugin to stop WPForms spam
To install the Anti-Spam plugin, go to your WordPress admin panel → Plugins → Add New.
Then enter «СleanTalk» in the search box and click the Install button for «Spam protection, Anti-Spam, FireWall by CleanTalk».
After installing the plugin, click the «Activate» button.
After it is done go to the plugin settings and click the «Get Access Key Automatically» button. Then just click the «Save Settings» button.
That’s it! From now you How to completely protect your WPForms Contact Forms from spam.
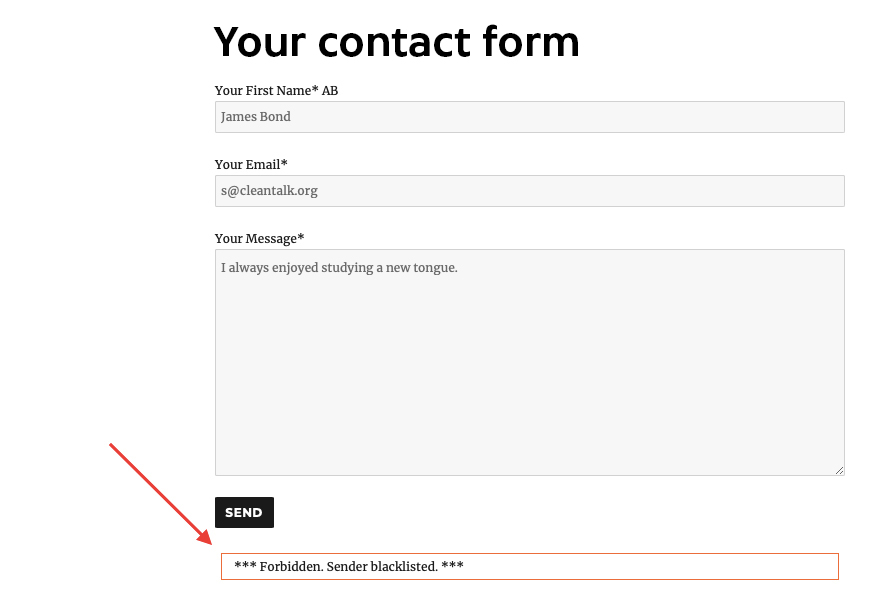
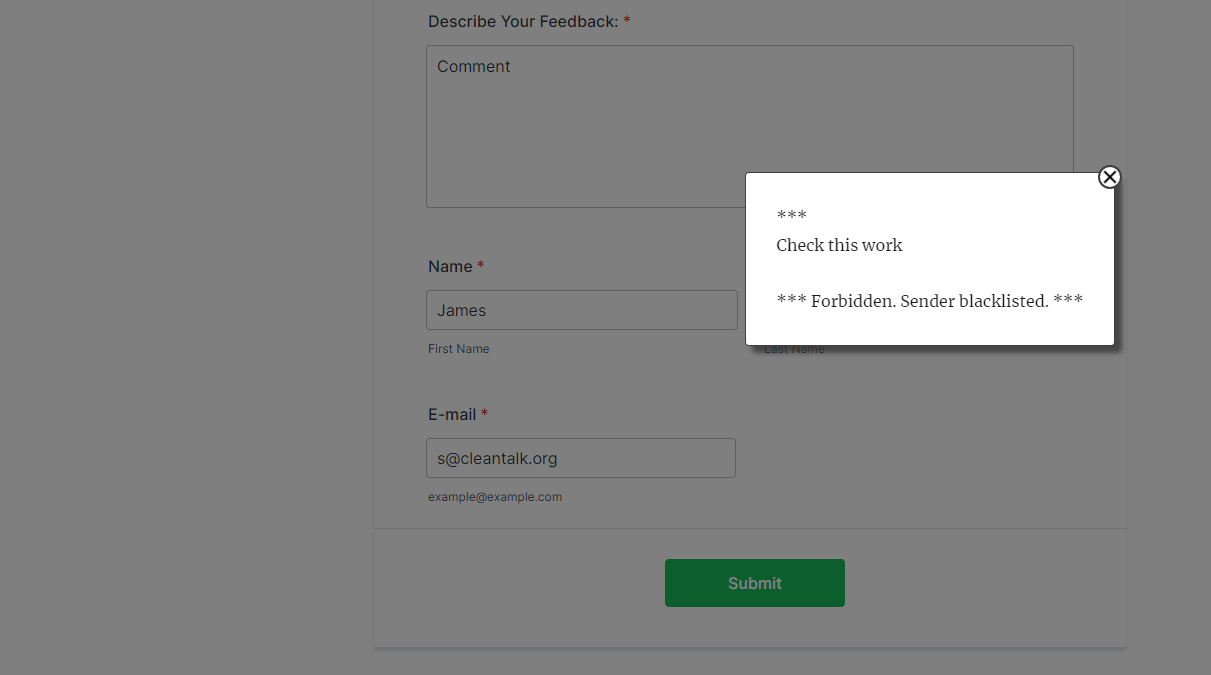
You can spam protection by using a test email s@cleantalk.org. First, open a page with the form in an Incognito browser tab. Fill in all the required form fields and send a form. After submitting the form, you will see a block message about the block on the form submission.
If you use PRO version of WPForms, you find this test submission in Entries,
WordPress console -> WPForms -> Entries
As well as any submissions are logged under Anti-Spam log in the Dashboard.
Create your CleanTalk account – Register now and protect your WPForms Contact Form from spam in 5 minutes
Update
The protection works only for website visitors, not for website admins. Be sure to test the form protection using Incognito mode.
We respect user privacy and offer options for anonymous spam protection. This includes excluding or encrypting personal data before transmission to the cloud. Additionally, users can choose to store their data in regional data centers located in the US, Europe, or globally. Here is guide to change data center location https://cleantalk.org/help/storage-location
CleanTalk does not challenge website visitors to prove they are not bots. Instead, we perform background checks silently while visitors browse your site or submit forms. The plugin sends collected data to the cloud and receives a real-time response: SPAM or NOT_SPAM.
We prioritize both site and plugin performance. Every release undergoes automated testing to ensure the plugin does not affect your website’s loading speed. We follow performance standards set by tools like GTmetrix and Google PageSpeed Insights for every release. It means no negative SEO impact on your site by our solutions. Here is some data https://blog.cleantalk.org/cleantalk-anti-spam-as-a-no-jquery-wordpress-plugin-for-optimal-performance/
As soon as you create your contact form using contact Forms you may get spam through the contact form. You can always use reCAPTCHA to separate bots from real visitors but it will take some time for your visitors to pass this test. Otherwise, you can use the CleanTalk Anti-Spam plugin instead so it will protect all of your Ninja forms and save your visitors’ time.
Once the CleanTalk Anti-Spam plugin is installed it starts to protect all of the existing forms on your WordPress website. It may not only be Ninja contact forms but many others.
How to install CleanTalk Anti-Spam plugin to stop Ninja Forms spam
To install the Anti-Spam plugin, go to your WordPress admin panel → Plugins → Add New.
Then enter «СleanTalk» in the search box and click the Install button for «Spam protection, Anti-Spam, FireWall by CleanTalk».
After installing the plugin, click the «Activate» button.
After it is done go to the plugin settings, click the «Get Access Key Automatically» button. Then click the «Save Settings» button.
That’s it! From now your WordPress website and Ninja forms are protected from spam.
How to check that your Ninja Forms are protected properly
You can test the work of Anti-Spam protection for your Ninja contact form by using a test email s @ cleantalk.org (without spaces). First, open the form in an Incognito browser tab.
Fill in all the required form fields and send a form. After submitting the form, you will see a block message about the block on the form submission.
If you have any questions, add a comment and we will be happy to help you.
Create your Cleantalk account – Register now and enjoy while CleanTalk Anti-Spam plugin protects all of your Ninja forms from spam.
While using Forminator Contact Forms, always be sure to use the most effective Anti-Spam plugin. Read the guide below and learn 4 steps for complete Forminator spam protection.
Once the CleanTalk Anti-Spam plugin is installed it starts to protect all of the existing forms on your WordPress website. It may not only be the Forminator Contact Form but many others.
How to install the CleanTalk Anti-Spam plugin to stop Forminator spam
To install the Anti-Spam plugin, go to your WordPress admin panel → Plugins → Add New.
Then enter «СleanTalk» in the search box and click the Install button for «Spam protection, Anti-Spam, FireWall by CleanTalk».
After installing the plugin, click the «Activate» button.
After it is done go to the plugin settings and click the «Get Access Key Automatically» button. Then just click the «Save Settings» button.
That’s it! From now you How to completely protect your Forminator Contact Form from spam.
Check if your Forminator spam protection works
You can test the work of your spam protection by using a test email s @ cleantalk.org (without spaces). First, open the form in an Incognito browser tab. Fill in all the required form fields and send a form. After submitting the form, you will see a block message about the block on the form submission.
If you have any questions, comment; we will be happy to help you.
Create your CleanTalk account – Register now and protect your Forminator Contact Form from spam in 5 minutes
Here is a guide to protecting Forminator with additional anti-spam tools such as captchas, a honeypot, and Akismet.
Update
The protection works only for website visitors, not for website admins. Be sure to test the form protection using Incognito mode.
Additional features
CleanTalk protects all forms at once: comments, registrations, feedback, contacts, and reviews.
Installation takes about 1-2 minutes.
Smart 99% protection against spambots.
Always online – 24/7 technical support.
Logs, SpamFireWall, personal lists, country filters, stop-words, etc.
Discover the complete list of CleanTalk Anti-Spam plugin features here.
If your website was developed using one of the popular CMS like WordPress or others, there are various security plugins for them, which provide permanent protection from malware. But what to do if your site is unprotected and you suspect that it has been infected? Let’s find out together.
6 signs that your website may be infected
First of all, let’s break down when it’s really time for you to think about cleaning your site of malware.
Unusual activity in Server logs Server logs contain access logs that display the users who have recently accessed your website.
Your website is slow Hackers deploy DoS attacks to overload your server resources, thus impacting your website speed and performance.
Emails ending in the Spam folder This happens when your web server is infected with malware. As a result, email servers categorize your emails as “spam”.
Pop-up and Spam Ads Usually happens when you have installed an insecure plugin or theme. Hackers earn money when visitor clicks on them.
Modified website files To insert backdoors and other malicious code in your site, hackers often modify your website core files.
Website being redirected Hackers often deploy cross-site scripting (or XSS) attacks to send your website traffic to unsolicited websites.
What is a manual malware removal
During a manual malware removal, a dedicated cybersecurity specialist is assigned to your site to work on your site from start to complete site cleanup.
Step 1: Clean up the bad stuff Using SSH and admin access, the specialist reaches your website hosting and gets rid of all viruses, malware, malicious code, and bad links on your website.
Step 2: Restore the site from backup In case you have a backup he restores the site from backup. Otherwise, he works with the site’s current version.
Step 3: Protect it from future infections The specialist installs a permanent Security protection plugin to avoid infecting in the future.
Reasons to use manual malware removal instead of automatic
Sometimes automatic solutions can be enough to find the most known viruses and malware and often are low cost or free.
Automatic free malware removal tools can be effective at identifying and removing known malware from a website, but there are several reasons why they may not completely cure a website of all security threats.
Over-insurance and possible data loss The problem is that they often over-insure and accept your files as bad ones, causing large file and data losses during automatic site cures. A specialist can always distinguish your files from malicious ones even if it’s a custom code.
Evolving Malware Malware is constantly evolving, with new variants and techniques being developed by cybercriminals. Automatic tools may not always be able to keep up with the latest malware threats.
Hidden Malware Some malware is designed to be stealthy and can hide in obscure locations within a website’s code or files. Automatic tools may not always detect these hidden threats.
False Positives Automatic tools may sometimes flag legitimate code or files as malware, leading to false positives. This can result in the removal of essential components of the website, causing functionality issues.
Complex Infections In some cases, websites may be infected with complex malware that requires manual intervention to fully eradicate. Automatic tools may not have the capability to address these intricate infections effectively.
Vulnerability Patching While malware removal tools can remove existing infections, they may not address the underlying vulnerabilities that allowed the malware to compromise the website in the first place. It’s essential to also address security vulnerabilities and implement robust security measures to prevent future infections.
Human Expertise Manual inspection and intervention by cybersecurity experts are often necessary to thoroughly assess the extent of an infection, identify potential backdoors, and ensure that the website is fully secure.
In conclusion, while automatic malware removal tools are valuable for initial detection and removal of known threats, they may not be sufficient to completely cure a website of all security issues. Manual inspection, ongoing security measures, and expert intervention are often necessary to ensure comprehensive protection against malware and other security threats.
Why it is profitable for you to use CleanTalk malware removal
100% refund in case of unsuccessful We will manually clean your site from viruses and malware or refund your money.
10+ years fighting malware of fighting malware and spam all over the Internet. We are aware of all the dangers that can threaten your website and how to deal with them.
30-day support Free 30-day help with reinfection. As a guarantee of our work we continue to be with you and will get back to work if needed.
50+ CVE reports published And we continue to share found vulnerabilities in our blog.
10 000+ active users A lot of loyal users that trust our experience and use our Security protection.
1 year of free Security Plugin Order your Malware Removal now and get 1 year of free Security plugin.
Clean your site from malware today
And get CleanTalk Security Plugin for 1 year for FREE
We continue sharing our clients’ reviews and today’s one is kindly brought to you by Liz from amweb.com.au on Trustpilot.
I highly recommend the CleanTalk
I highly recommend the CleanTalk plugin, it is simple to install, easy to use and very reliable cutting spam emails from your website and preventing them from landing on your in box. This saves you considerable time each day by not having to manually sift through spam emails coming via your website. Usually sent by hundreds of Robots that are scanning the web looking for vulnerable forms and email addresses. Anyone running or managing a website would be really silly not to use the CleanTalk plugin, I recommend it to everyone
Nobody likes spam. It makes your website look untrustworthy and unprofessional in case the site is filled with spam comments. Search engines like Google penalize sites that have spammy content, which can result in lower search rankings and decreased visibility. Moreover, some spam may contain malicious links or code, posing security risks to website visitors. Definitely not good.
Why not just keep reCAPTCHA?
Most WordPress forms already have anti-spam protection like Google ReCAPTCHA, so why not just leave it?
If you’re reading this article, you probably already know that the user experience of using Google reCAPTCHA can be frustrating: hard-to-read CAPTCHAs and lots of challenges are required to prove that the user is not a bot. This wastes your visitors’ time and even can cause them to leave.
Another issue is accessibility: some users with disabilities, such as visual impairments, may have difficulty completing reCAPTCHA tasks, leading to accessibility issues.
How to choose a WordPress anti spam plugin
So, site owners who respect their visitors most often choose WP plugins with invisible yet reliable spam protection. Except, all plugins are different and mostly act in various ways. They are compatible with different numbers of forms, have different sets of tools, and of course cost differently.
To help you out we’ve compared the 5 most popular anti spam WordPress plugins in one table below, but first, we’ll tell you a little about each one.
1. CleanTalk
Anti-Spam is a cloud-based platform that offers advanced spam protection and website security services. It allows you to protect all forms on your WordPress site at once and grants protections for 55 forms plugins, no matter whether it is a comment, contact, registration form, or any other.
It also provides detailed statistics and logs of spam activity, allowing website owners to monitor and analyze spam trends. Anti-Spam offers a 14-day free trial period and different pricing plans based on the number of websites and the desired features.
Features
Protects all types of forms at once.
Has personalized lists filtered by language/ip/email/country/stop words.
Spam FireWall allows blocking spam bots even before they reach a site.
Maximum detailed logs are stored for up to 45 days.
Akismet is a popular spam filtering service for websites and blogs, developed by Automattic. It is designed to automatically detect and filter out spam comments and form submissions, helping to keep websites and online communities free from unwanted and potentially harmful content. Akismet uses advanced algorithms and data from lots of sites to identify and block spam, providing website owners with an effective tool to maintain the quality and security of their online platforms.
Has a free plan, but for non-commercial use only, which means: no ads are displayed, no products/services are sold, and no business is promoted on your website.
Features:
Is already pre-installed on your WordPress website.
Removes the most harmful spam to prevent possible risks.
Reveals any concealed or deceptive URLs within comments.
Free plan for non-commercial use.
Allows moderators to mark blocked comments as spam or legitimate.
Antispam Bee is a popular WordPress plugin designed to combat spam on WordPress websites. It helps website owners to filter out spam comments, trackbacks, and other unwanted content that can be submitted by bots or spammers. The plugin uses a variety of methods to detect and block spam, including comment filters, IP address checks, and the use of various blacklists.
Additionally, the plugin automatically removes any spam that has been filtered out. You can specify in the settings when you want the spam to be deleted. You also have the option to designate certain types of spam to be directly sent to the trash without needing any additional action.
Features
Spam statistics are available.
Allow comments from specific languages.
Restrict comments from specific countries.
Exclude trackbacks and pingbacks in spam detection.
Zero Spam is a WordPress plugin designed to help website owners combat spam in their comments section. It uses a combination of techniques to block spam, including JavaScript-based checks, time-based checks, and honeypot fields. The plugin aims to be user-friendly and effective at blocking spam while minimizing false positives and not inconveniencing legitimate users. Zero Spam also includes features such as automatic spam removal and the ability to customize settings to suit the specific needs of a website.
In addition to identifying and preventing spam, Zero Spam also allows you to identify the geographical origin of these spam messages. This feature enables you to prevent future comments and registrations from specific countries and regions based on the information provided.
Features
No need for admin moderation.
Ability to block IP addresses either manually or automatically.
Can be integrated with widely used plugins.
Identifies the geographical location of IP addresses.
Provides protection for WooCommerce registration forms.
Titan Anti-Spam is a WordPress plugin designed to protect websites from spam and malicious activity. It offers features such as IP address blocking, integration with popular plugins, and protection for WooCommerce registration forms. The plugin aims to prevent spam submissions, comments, and registrations, ultimately enhancing the security and integrity of WordPress websites.
Additionally, Titan Anti-Spam can identify the geographical location of IP addresses, enabling website administrators to take appropriate action to mitigate potential threats.
CleanTalk added spam protection for Brevo Forms using direct form integration. So in case, you prefer using Brevo Forms be sure to use the most effective Anti-Spam plugin. Read the guide below and learn 4 steps to protect your Brevo Forms from spam.
Once the CleanTalk Anti-Spam plugin is installed it starts to protect all of the existing forms on your WordPress website. It may not only be Brevo Forms but also many others.
To install the Anti-Spam plugin, go to your WordPress admin panel → Plugins → Add New.
Then enter «СleanTalk» in the search box and click the Install button for «Spam protection, Anti-Spam, FireWall by CleanTalk».
After installing the plugin, click the «Activate» button.
After it is done go to the plugin settings and click the «Get Access Key Automatically» button. Then just click the «Save Settings» button.
That’s it! From now you How to completely protect your Brevo Forms from spam.
How to check spam protection for Brevo Forms
You can test the work of Anti-Spam protection for your СonvertKit Forms by using a test email s @ cleantalk.org (without spaces). First, open the form in an Incognito browser tab. Fill in all the required form fields and send a form. After submitting the form, you will see a block message about the block on the form submission.
If you have any questions, add a comment and we will be happy to help you.
Create your CleanTalk account – Register now and protect your СonvertKit Forms from spam in 5 minutes
Update
The protection works only for website visitors, not for website admins. Be sure to test the form protection using Incognito mode.
Additional features
CleanTalk protects all forms at once: comments, registrations, feedbacks, contacts, reviews.
Installation takes about 1-2 minutes.
Smart 99% protection against spambots.
Always online – 24/7 technical support.
Logs, SpamFireWall, personal lists, country filters, stop-words, and many others.
Discover the complete list of CleanTalk Anti-Spam plugin features here.
While using Elementor Contact Form, always be sure to use the most effective Anti-Spam plugin. Read the guide below and learn how to protect your Elementor Contact Form from spam in 5 minutes.
Once CleanTalk Anti-Spam plugin is installed it starts to protect all of the existing forms on your WordPress website. It may not only be Elementor Contact Form but many others.
To install the Anti-Spam plugin, go to your WordPress admin panel → Plugins → Add New.
Then enter «СleanTalk» in the search box and click the Install button for «Spam protection, Anti-Spam, FireWall by CleanTalk».
After installing the plugin, click the «Activate» button.
After it is done go to the plugin settings and click the «Get Access Key Automatically» button. Then just click the «Save Settings» button.
That’s it! From now you How to completely protect your Elementor Contact Form from spam.
Check the result to save your Elementor Contact Form from spam
You can test the work of Anti-Spam protection for your Elementor Contact Form by using a test email s @ cleantalk.org (without spaces). First, open the form in an Incognito browser tab.
Fill in all the required form fields and send a form. After submitting the form, you will see a block message about the block on the form submission.
If you have any questions, add a comment and we will be happy to help you.
Create your CleanTalk account – Register now and protect your Elementor Contact Form from spam in 5 minutes
Update
The protection works only for website visitors, not for website admins. Be sure to test the form protection using Incognito mode.
Additional features
CleanTalk protects all forms at once: comments, registrations, feedbacks, contacts, reviews.
Installation takes about 1-2 minutes.
Smart 99% protection against spambots.
Always online – 24/7 technical support.
Logs, SpamFireWall, personal lists, country filters, stop-words, and many others.
Receiving only valid email addresses on the contact form is very important for effective communication with customers. Incorrect or invalid addresses can result in lost leads and skewed marketing campaign performance statistics. CleanTalk Anti-Spam has the ability to check email addresses for their existence, which helps avoid sending emails to invalid addresses and ensures accurate and reliable contact information. This saves time and resources when processing data, and improves the overall effectiveness of your marketing efforts.
Discover the complete list of CleanTalk Anti-Spam plugin features here.
CleanTalk added spam protection for Aweber Forms using direct form integration. So in case, if you prefer using Aweber Forms be sure to use the most effective Anti-Spam plugin. Read the guide below and learn 4 steps to protect your Aweber Forms from spam.
Once the CleanTalk Anti-Spam plugin is installed it starts to protect all of the existing forms on your WordPress website. It may not only be Aweber Forms but also many others.
To install the Anti-Spam plugin, go to your WordPress admin panel → Plugins → Add New.
Then enter «CleanTalk» in the search box and click the Install button for «Spam protection, Anti-Spam, FireWall by CleanTalk».
After installing the plugin, click the «Activate» button.
After it is done go to the plugin settings and click the «Get Access Key Automatically» button. Then just click the «Save Settings» button.
That’s it! From now you How to completely protect your Aweber forms from spam.
How to check spam protection for Aweber Forms
You can test the work of Anti-Spam protection for your Aweber Forms by using a test email s @ cleantalk.org (without spaces). First, open the form in an Incognito browser tab. Fill in all the required form fields and send a form. After submitting the form, you will see a block message about the block on the form submission.
If you have any questions, add a comment and we will be happy to help you.
Create your CleanTalk account – Register now and protect your Aweber Forms from spam in 5 minutes
Update
The protection works only for website visitors, not for website admins. Be sure to test the form protection using Incognito mode.
Additional features
CleanTalk protects all forms at once: comments, registrations, feedback, contacts, and reviews.
Installation takes about 1-2 minutes.
Smart 99% protection against spambots.
Always online – 24/7 technical support.
Logs, SpamFireWall, personal lists, country filters, stop-words, and many others.
Discover the complete list of CleanTalk Anti-Spam plugin features here.
CleanTalk added spam protection for Back In Stock Notifier using direct form integration. So in order to stop Back In Stock Notifier for WooCommerce spam, be sure to use the most effective Anti-Spam plugin. Read the guide below and learn 4 steps to protect your Back In Stock Notifier from spam.
Once the CleanTalk Anti-Spam plugin is installed it starts to protect all of the existing forms on your WordPress website. It may not only be Back In Stock Notifier but also many others.
Note: the protection only works with alternative cookies on and only for website visitors, not for website admins. Be sure to test the form protection using Incognito mode.
To install the Anti-Spam plugin, go to your WordPress admin panel → Plugins → Add New.
Then enter «CleanTalk» in the search box and click the Install button for «Spam protection, Anti-Spam, FireWall by CleanTalk».
After installing the plugin, click the «Activate» button.
After it is done go to the plugin settings and click the «Get Access Key Automatically» button. Then just click the «Save Settings» button.
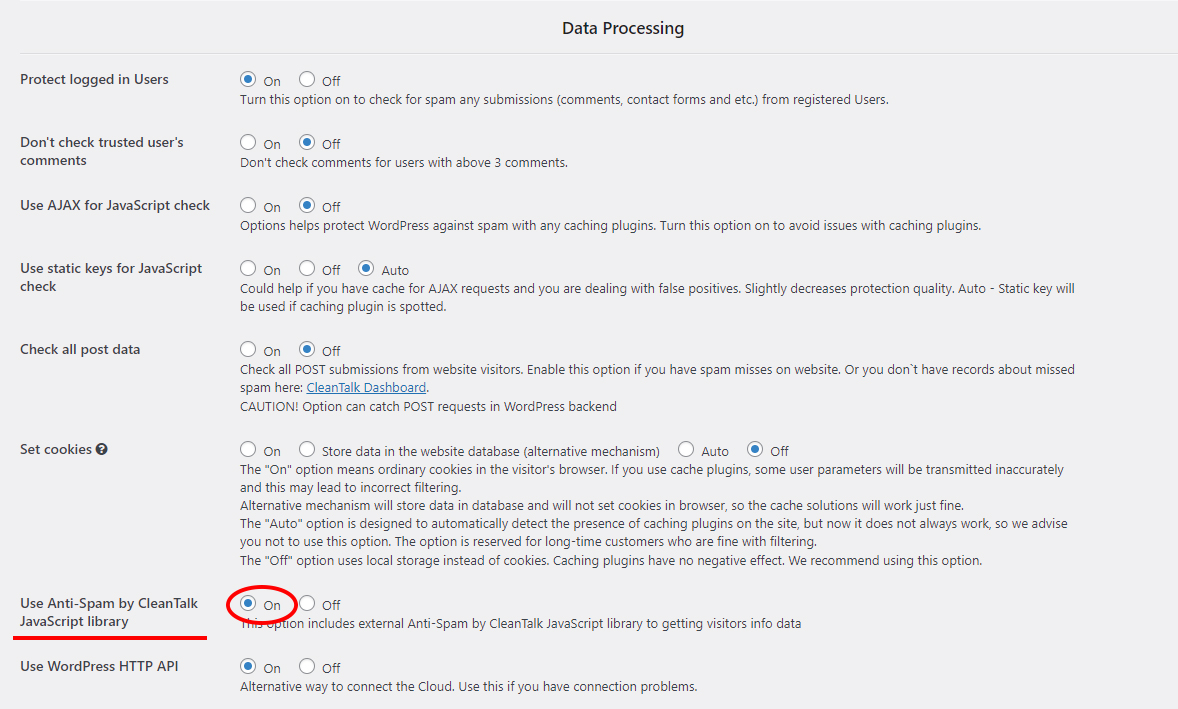
Then go to Advanced settings and scroll down to the Data Processing section. Find the Use Anti-Spam by CleanTalk JavaScript library option and switch it on. Press the Save Changes button.
That’s it! From now you know how to stop Back In Stock Notifier for WooCommerce spam. If you have any questions, add a comment and we will be happy to help you.
Create your CleanTalk account – Register now and protect your Back In Stock Notifier from spam in 5 minutes
Additional features
CleanTalk protects all forms at once: comments, registrations, feedbacks, contacts, reviews.
Installation takes about 1-2 minutes.
Smart 99% protection against spambots.
Always online – 24/7 technical support.
Logs, SpamFireWall, personal lists, country filters, stop-words, and many others.
Discover the complete list of CleanTalk Anti-Spam plugin features here.