While monitoring exposed password databases we found a leaked database that contained 178 compromised credentials of CleanTalk users among other data. These emails/passwords were compromised some time ago and after that were used to create a CleanTalk account by their owners. As soon as we found this potential vulnerability – we immediately reset passwords for all CleanTalk users related to these email addresses.
Please remember to be careful when clicking on third-party links or using unverified services or WordPress plugins. And be sure to check the list of your compromised passwords in your browser. If you use Google Chrome you can find it here: chrome://password-manager/checkup/compromised.
ZeroBounce is an email validation plugin for WordPress, that works with most popular WordPress forms including registration forms, comments sections, eCommerce shops, and more. There were issues with using both ZeroBounce and CleanTalk plugins at the same time, but we’ve fixed it and now everything’s working perfectly.
To install the Anti-Spam plugin, go to your WordPress admin panel → Plugins → Add New.
Then enter «CleanTalk» in the search box and click the Install button for «Spam protection, Anti-Spam, FireWall by CleanTalk».
After installing the plugin, click the «Activate» button.
After it is done go to the plugin settings and click the «Get Access Key Automatically» button. Then just click the «Save Settings» button.
That’s it!
If you have any questions, add a comment and we will be happy to help you.
Create your CleanTalk account – Register now and protect all your Forms from spam in 5 minutes
Update
The protection works only for website visitors, not for website admins. Be sure to test the form protection using Incognito mode.
Need help with settings or missed spam?
If you have any issues with the plugin settings, test submissions or missed spam signups, feel free to ask for help in the comments section down below.
Additional features
CleanTalk protects all forms at once: comments, registrations, feedbacks, contacts, reviews.
Installation takes about 1-2 minutes.
Smart 99% protection against spambots.
Always online – 24/7 technical support.
Logs, SpamFireWall, personal lists, country filters, stop-words, and many others.
Discover the complete list of CleanTalk Anti-Spam plugin features here.
CleanTalk Anti spam is amazing and would not feel comfortable about the security of my website without it. It stops spam comments and CleanTalk stops brute force attacks on my site. I would recommend it to any bloggers or website owners who don’t want their website attacked.
In case Security Malware Scanner detects a suspicious file, the file is sent for analysis and, earlier this analysis was done manually by our team.
For 3 months now the files have been processed by our AI and the average analysis time has decreased from 36 hours to 10 minutes. However, we continue to double-check the results manually in order to guarantee perfect quality. This allowed us to raise the accuracy of the analysis and increase its speed tremendously.
And this is just the beginning. The AI-driven machine analysis data will be used to train the algorithm further and improve the scanner’s performance.
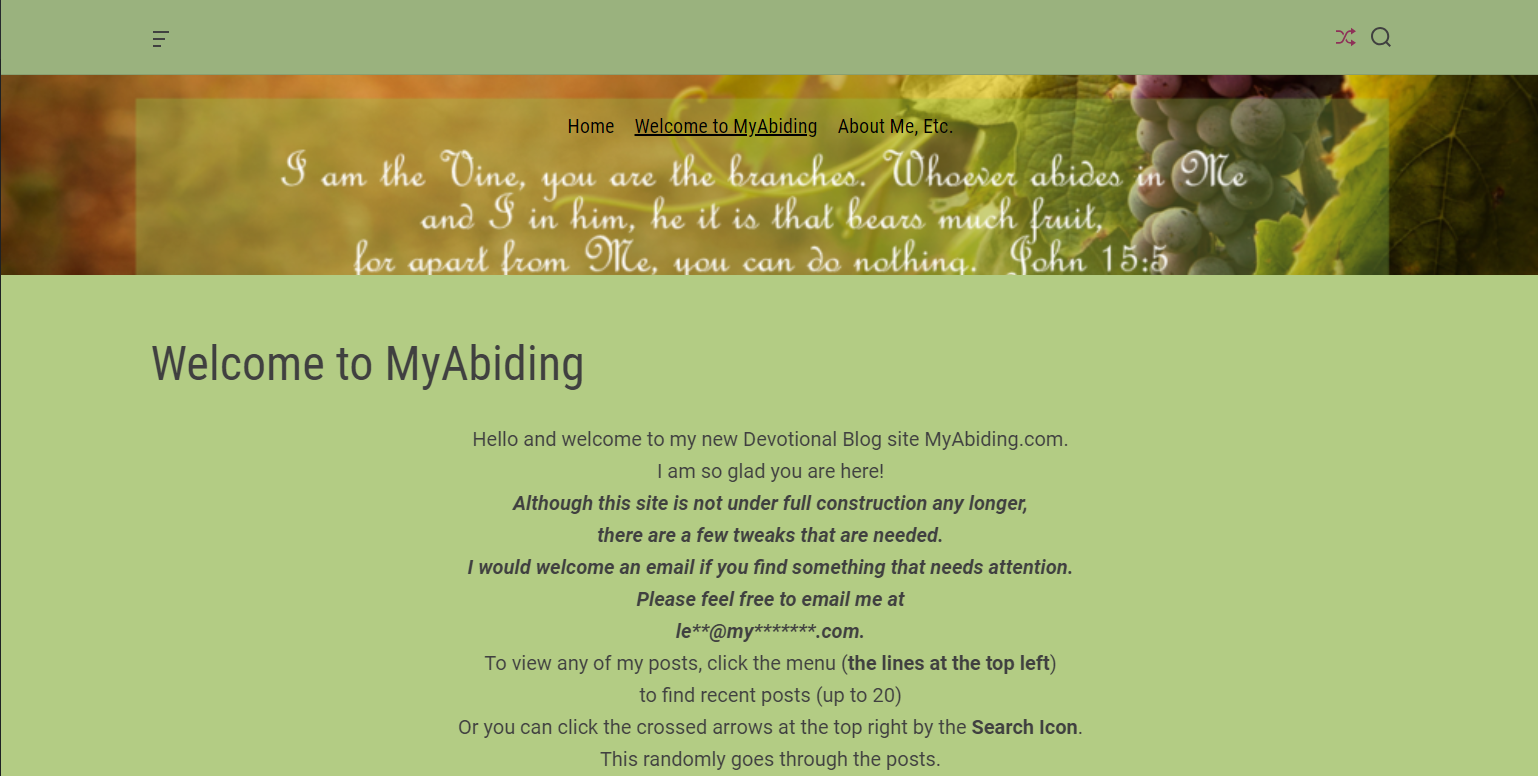
We continue sharing our clients’ reviews and today’s one is kindly brought to you by @leahladams from myabiding.com.
EXCELLENT PRODUCT!
Clean Talk has protected me before. When i started my new website, there was no question as to who i wanted to help with the Spam Attacks! Clean Talk will always be my Spam killer! Thanks Clean Talk for being so good and very easy to work with.
More and more users are concerned about the privacy of the data they send through forms on websites. Sometimes this can lead to forms not being submitted if there is no assurance that the data is completely private.
We are considering the possibility to hash all the data that is transferred into CleanTalk cloud. This will significantly increase the security of your data during transmission. For example:
Attention! If you enable encryption, you will lose access to information about the real IP/Email of the visitor and will not be able to track these data in Anti-Spam reports and log.
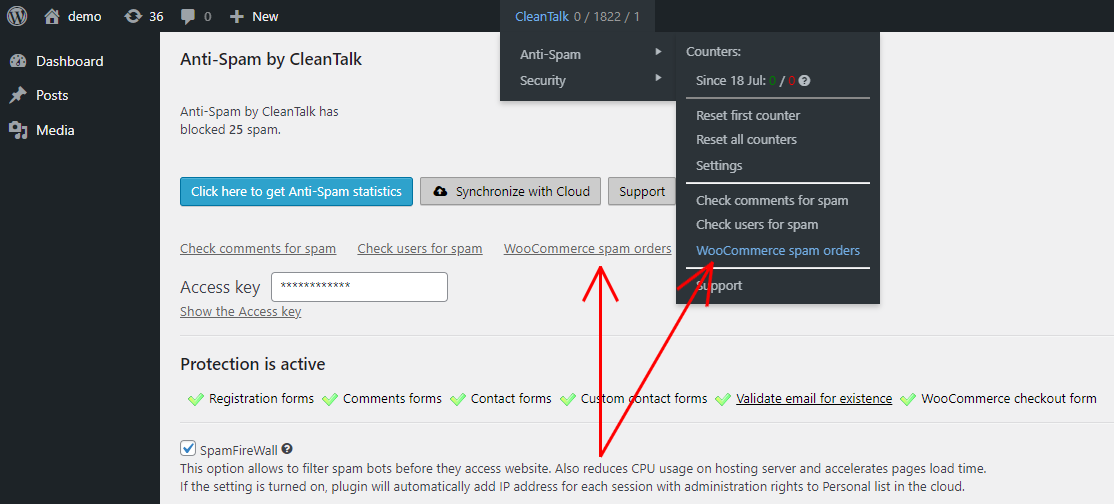
Now you can find all WooCommerce orders marked as spam in a separate folder. This is designed to ensure you don’t miss any orders and save you time accessing them.
How to access WooCommerce Spam Orders
Make sure, your WooCommerce is properly connected to your website.
Go to your WordPress dashboard → CleanTalk → Anti-Spam and click on the WooCommerce spam orders link.
The spam folder can also be accessed from your Anti-Spam plugin settings (Dashboard → Plugins → Installed plugins → Anti-Spam by CleanTalk).
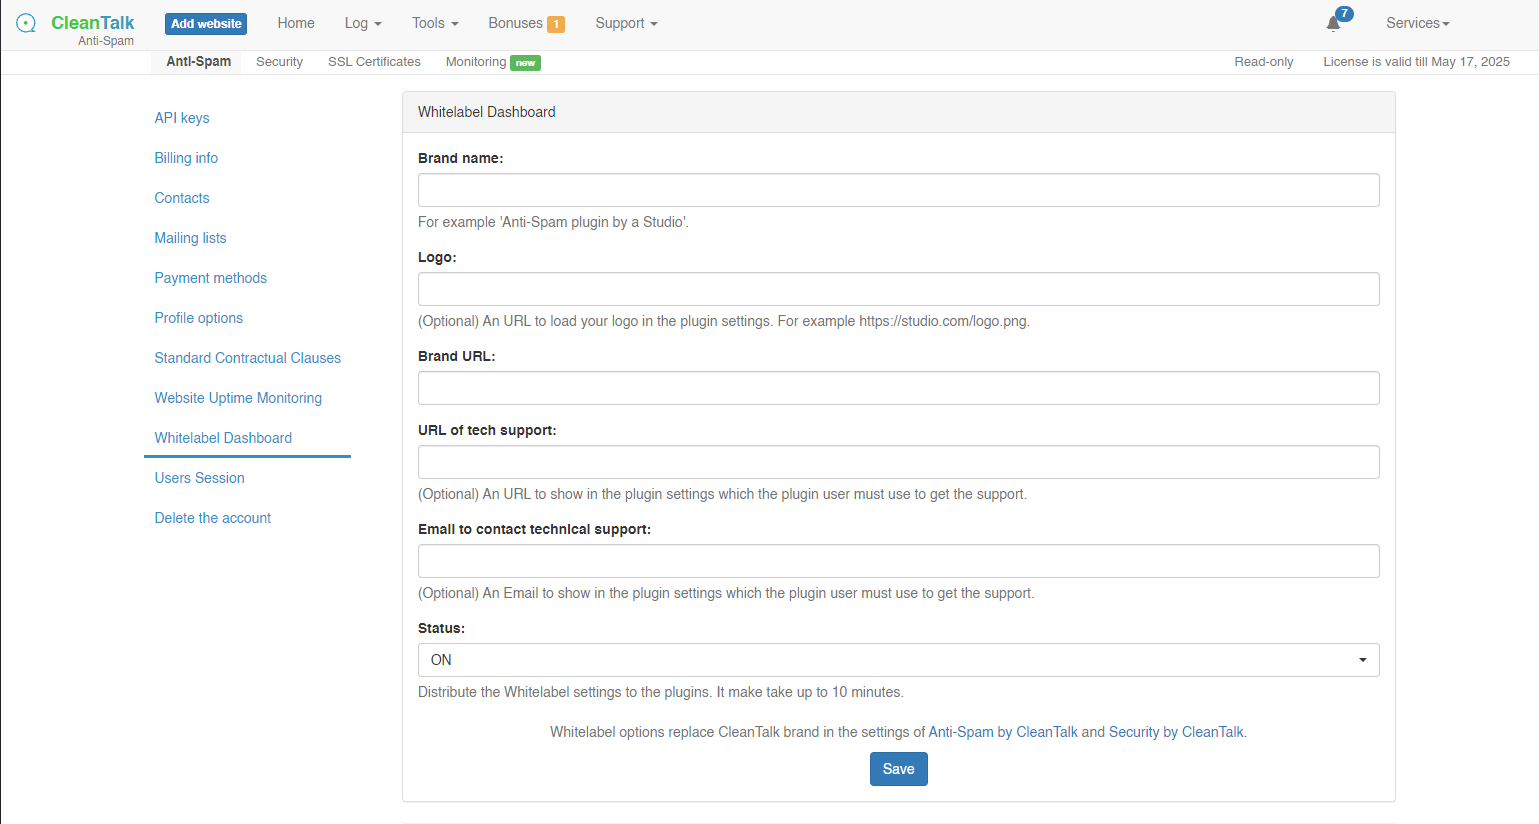
We are proud to introduce the White Label option for our Anti-Spam and Security plugins. This option gives Unlimited plan users the ability to resell Anti-Spam or Security services to their customers under their own brand name. The Extra Package should be connected as well.
Here’s what you get
Any CleanTalk and affiliate program mentions will be removed.
Absolutely all links to CleanTalk.org will be replaced with your custom URL.
The contact information of tech support will be replaced with yours.
All Connection problems reports will be sent to your support email.
How to connect the White Label option for regular installation (not for Multisite)
Ensure your Unlimited plan and the Extra Package for your Anti-Spam or Security services have been purchased.
In the upper right corner of your Dashboard screen go to your Profile → Settings → Whitelabel Database.
Switch the White label option to On and fill in the following fields and press the Save button.
Congratulations! You can now invite your customers to their new control panel.
How to connect the White Label option for Multisite/Multiuser/WPMS
In case you are using a Multisite/Multiuser/WPMS version of WordPress, check out these instructions.
We have fixed a security vulnerability in Anti-Spam by CleanTalk for WordPress. The vulnerability in the plugin can still be exploited in versions till 6.11. You can see the changelog here.
You can check the current version of the plugin in the list of your installed plugins.
WordPress Console -> Plugins
In case you use one of these previous versions, please be sure to update the plugin to the latest stable version as soon as you read this post using our special guide.
AMP (Accelerated Mobile Pages) is a free technology, that makes your website pages optimized for mobile web browsing and helps webpages load faster.
There is a way to make your WordPress website AMP-compatible while keeping it protected with CleanTalk Anti-Spam plugin. And there is how you do it:
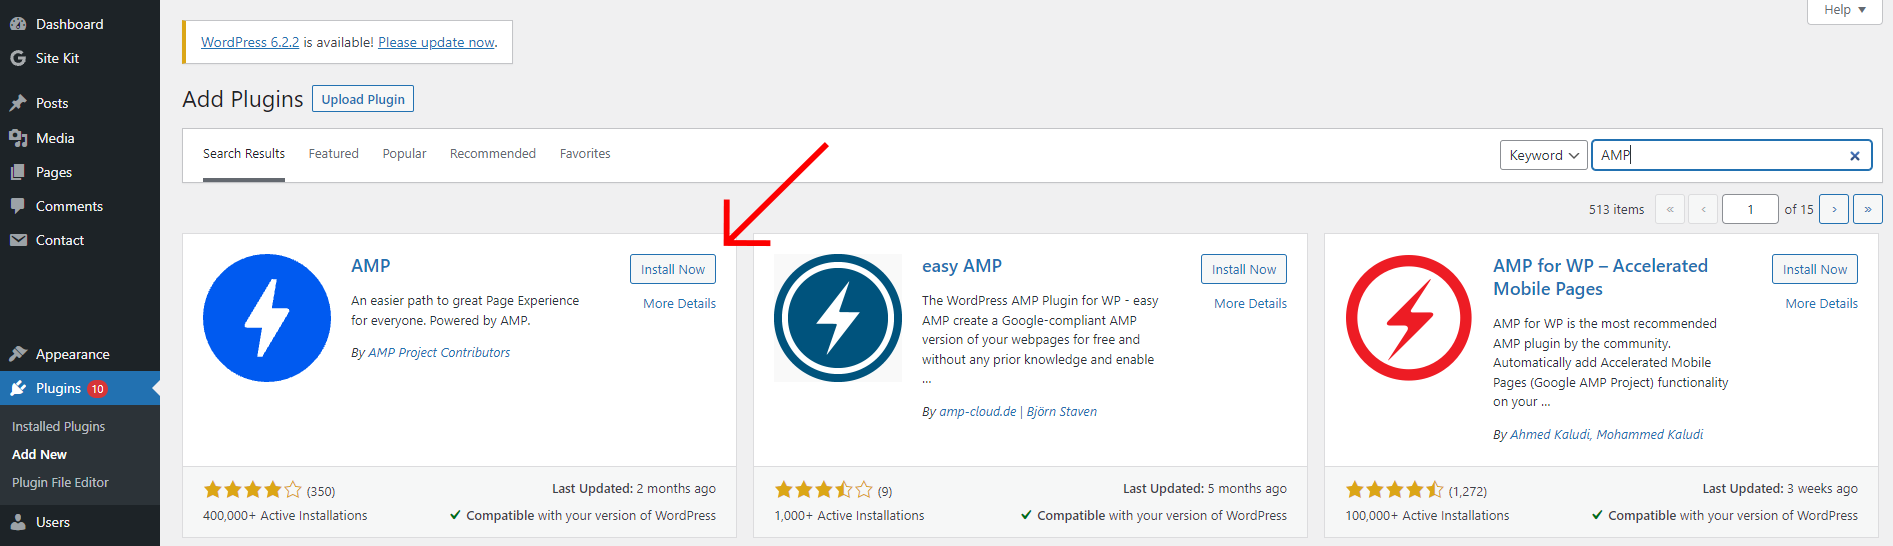
In your WordPress dashboard go to Plugins → Add New and type “AMP” in the search form.
After that, press the Install Now button near the plugin and the Activate button once the plugin is installed.
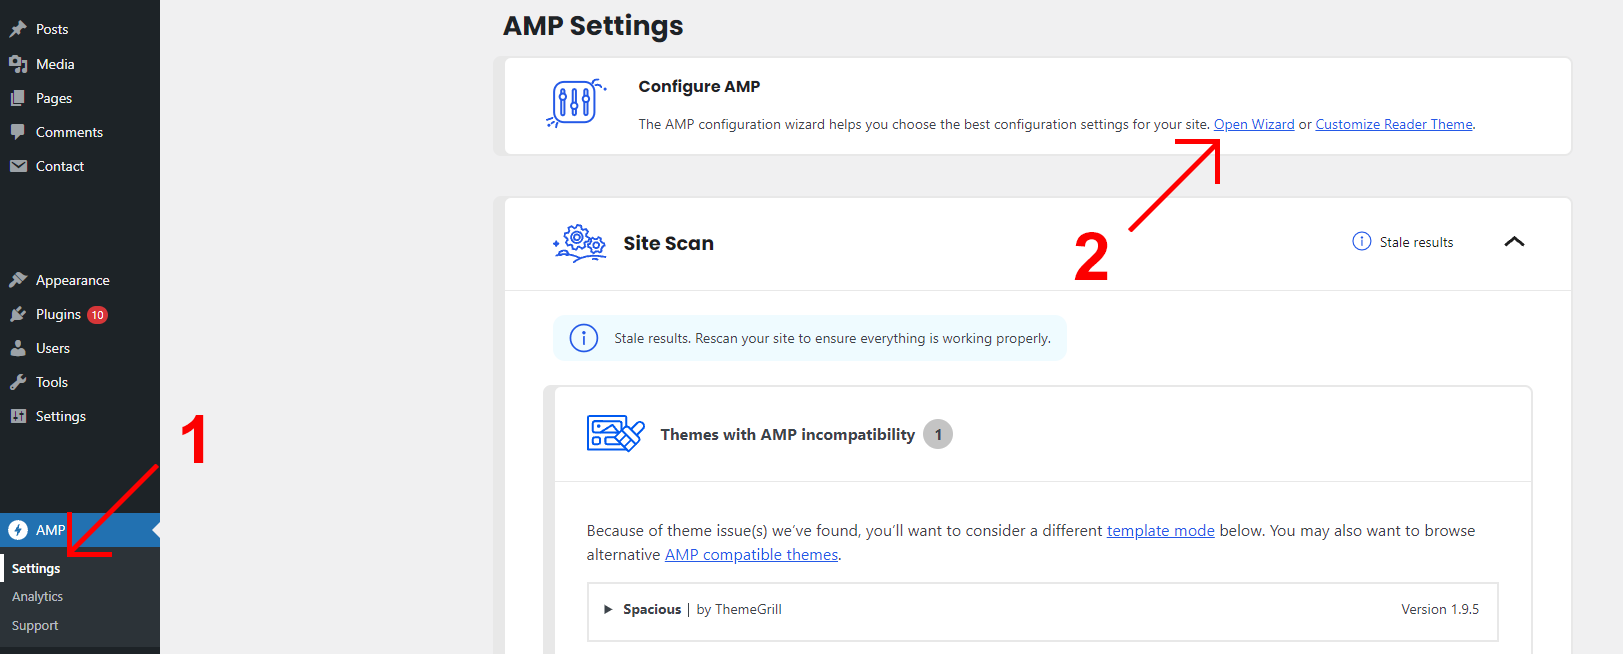
After that go to AMP → Settings and click on the Open Wizard button.
The final step is just to follow the instruction on the page and scan the website. After the scan there is nothing else that should be done – the plugin works automatically and if you open your website page, you will see, that all the AMP-incompatible code is already gone.
Congratulations! Now your WordPress website is 100% AMP-compatible.